


 TL;DR:
To effectively reduce a MOV file's size, you must lower its resolution, bitrate, or frame rate, or switch to a more efficient codec like HEVC, because the file extension alone does not dictate storage requirements.
● QuickTime Player is best for Mac users needing to keep the .mov container while selecting HEVC for smaller sizes or H.264 for broader compatibility, whereas Clipchamp suits Windows users who accept MP4 as the mandatory export format.
● Converting to MP4 resolves cross-device compatibility issues but does not automatically shrink the video, as actual size reduction requires actively lowering the encoding demands during the export process.
● Because high-quality formats like Apple ProRes can be up to 30 times larger than HEVC files, always perform compression tests directly from the original source file to avoid compounding generation loss from lossy encoding.
Ask AI for a summary
 ChatGPT
 Perplexity
 Gemini
 Claude
 Grok
Grok
Large MOV files can quickly consume storage and become difficult to upload or share. However, the MOV extension alone does not determine file size. Resolution, bitrate, codec, frame rate, and video length all affect how much space a video uses. Adjusting these settings can make the file smaller, while some compression tools keep the MOV format and others export to MP4.
The right approach depends on your device, desired quality, and compatibility needs. This guide covers 4 practical ways to compress MOV videos on Mac, Windows, web browsers, and iPhone. You’ll also learn which compression settings matter most and how the Dr.Fone App can help manage large videos directly on iPhone.
In this article
Part 1. 4 Ways to Compress a MOV File
The right way to shrink a MOV file depends on your device, preferred output format, and compression needs. The following 4 methods cover practical options for Mac, web browsers, Windows, and iPhone, helping you choose the most suitable approach for your workflow:
Method 1. Compress MOV on Mac with QuickTime Player
QuickTime Player provides a simple way to shrink MOV size on a Mac while keeping the video in the MOV container. Depending on the source video, you can export at 4K, 1080p, 720p, or 480p. QuickTime saves the exported video as a QuickTime movie (.mov), making it useful when you want a smaller file without switching to MP4. Here is how to adjust the export settings for a smaller MOV file:
Step 1. Open the MOV video in QuickTime Player, then select “File > Export As.” Choose 4K, 1080p, 720p, or 480p.
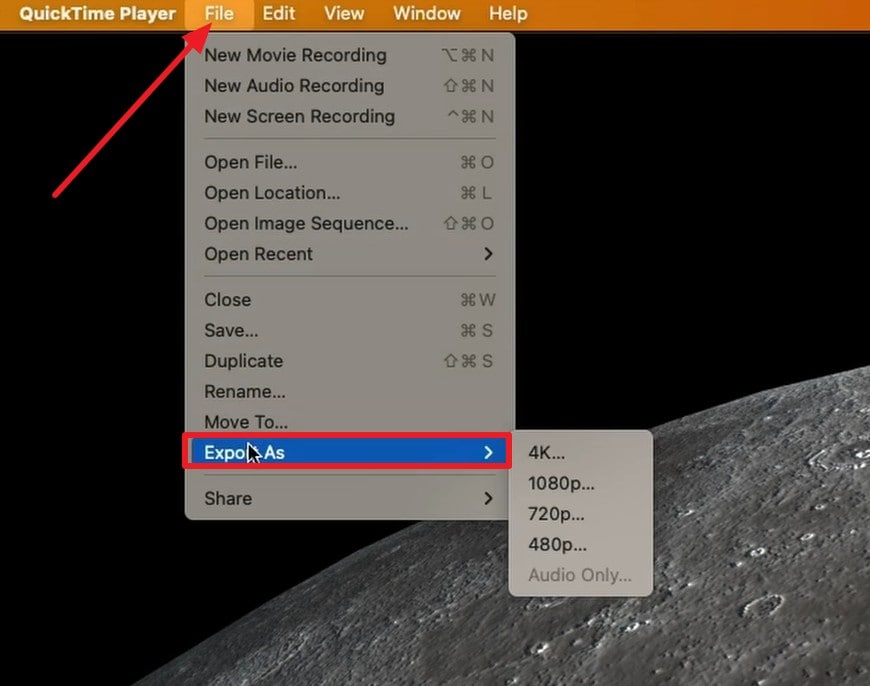
Note: To reduce MOV file size, select a lower resolution than the original when appropriate.
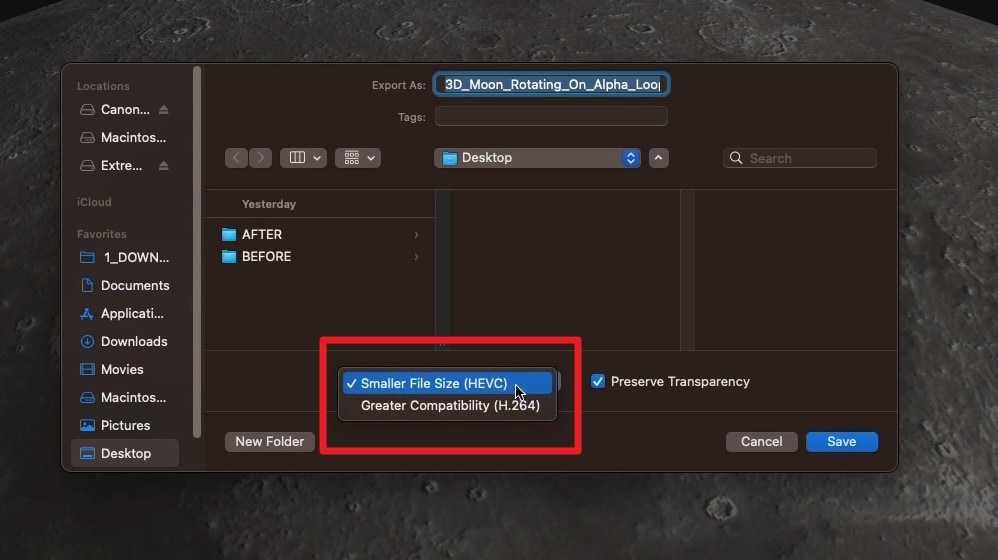
Step 2. If you select 4K or 1080p, open the “Format” menu. There, choose “Smaller File Size” for HEVC or “Greater Compatibility” for H.264.
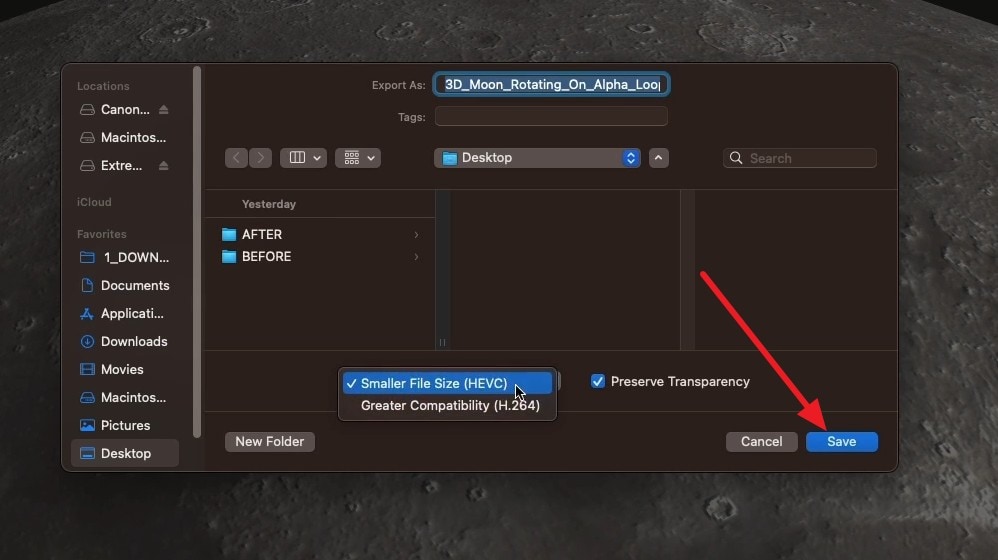
Step 3. Enter a new filename, choose where to save the export, and click “Save.” Play the exported copy and check its size and quality before removing the original.
Method 2. Compress MOV Online with Media.io
For browser-based compression, Media.io can reduce the size of a MOV file without requiring software installation on your computer or phone. It provides controls for resolution, bitrate, and target file size to customize the output. Batch compression also lets you process multiple videos together, while support extends to MOV, MP4, AVI, WMV, and other popular formats. Here is how to compress a MOV file using Media.io:
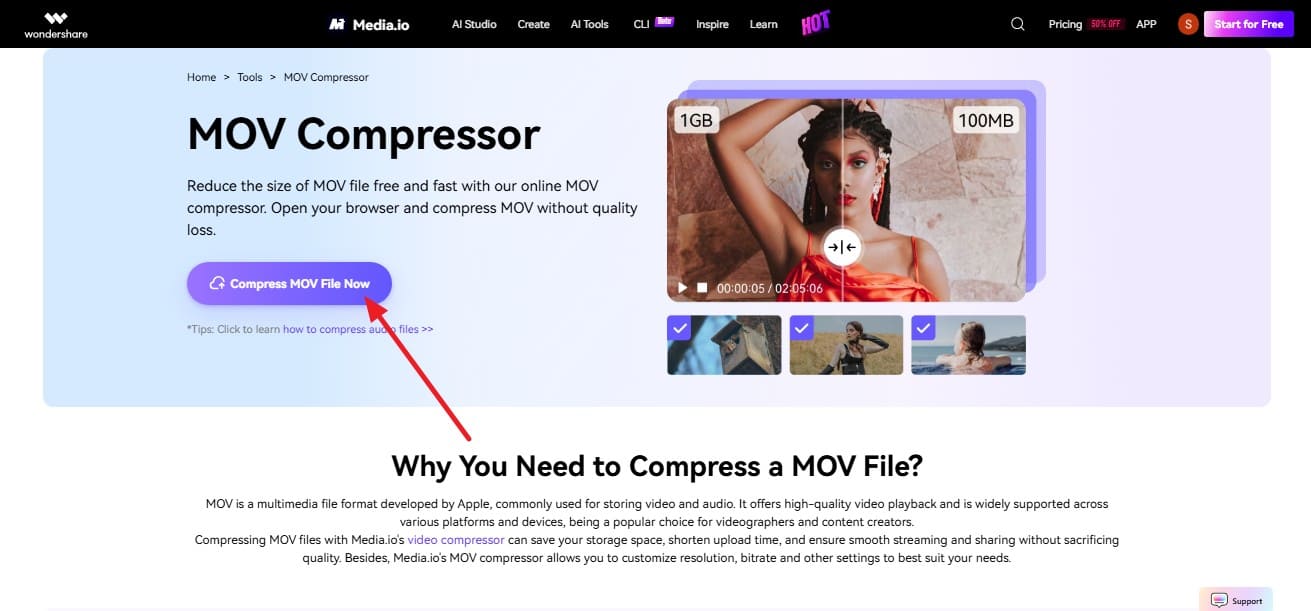
Step 1. Once you access this MOV Compressor, tap on “Compress MOV File Now” and continue.
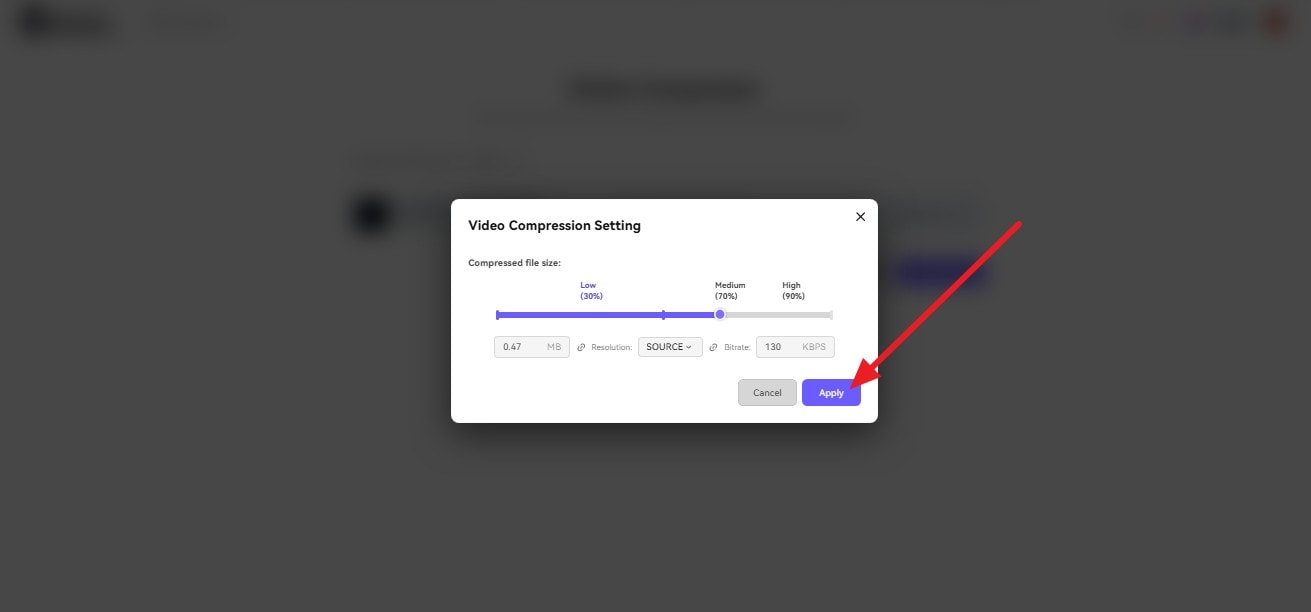
Step 2. Import the MOV file, then tap the “Settings” icon. Choose the compression settings with the slider and select “Apply.”
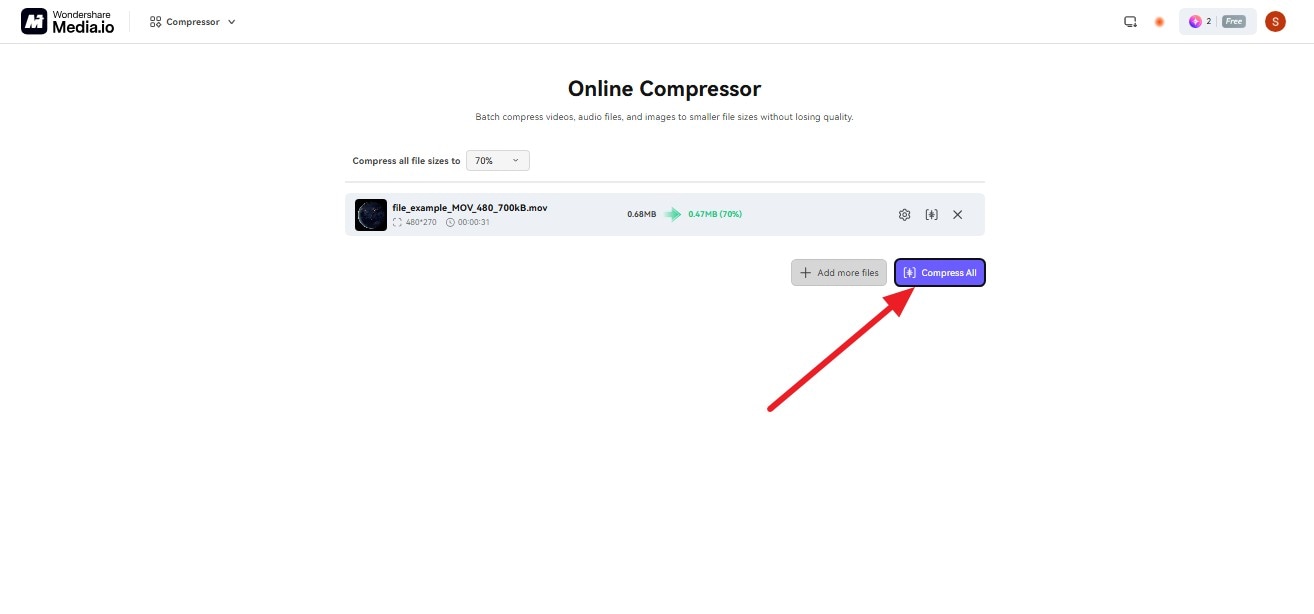
Step 3. After that, tap the “Compress All” button to start processing. Once compression finishes, review the result and download the smaller file. Check its playback quality and final size before deleting the original.
Method 3. Reduce MOV File Size on Windows with Clipchamp
For Windows users, Clipchamp offers a practical way to decrease MOV file size when keeping the MOV format is unnecessary. The editor accepts MOV files as input, but exports completed videos as MP4. You can choose from 480p, 720p, and 1080p output resolutions, while 4K is available with eligible plans. Selecting a lower resolution can also help reduce the exported file size. Here is how to compress a MOV video with Clipchamp:
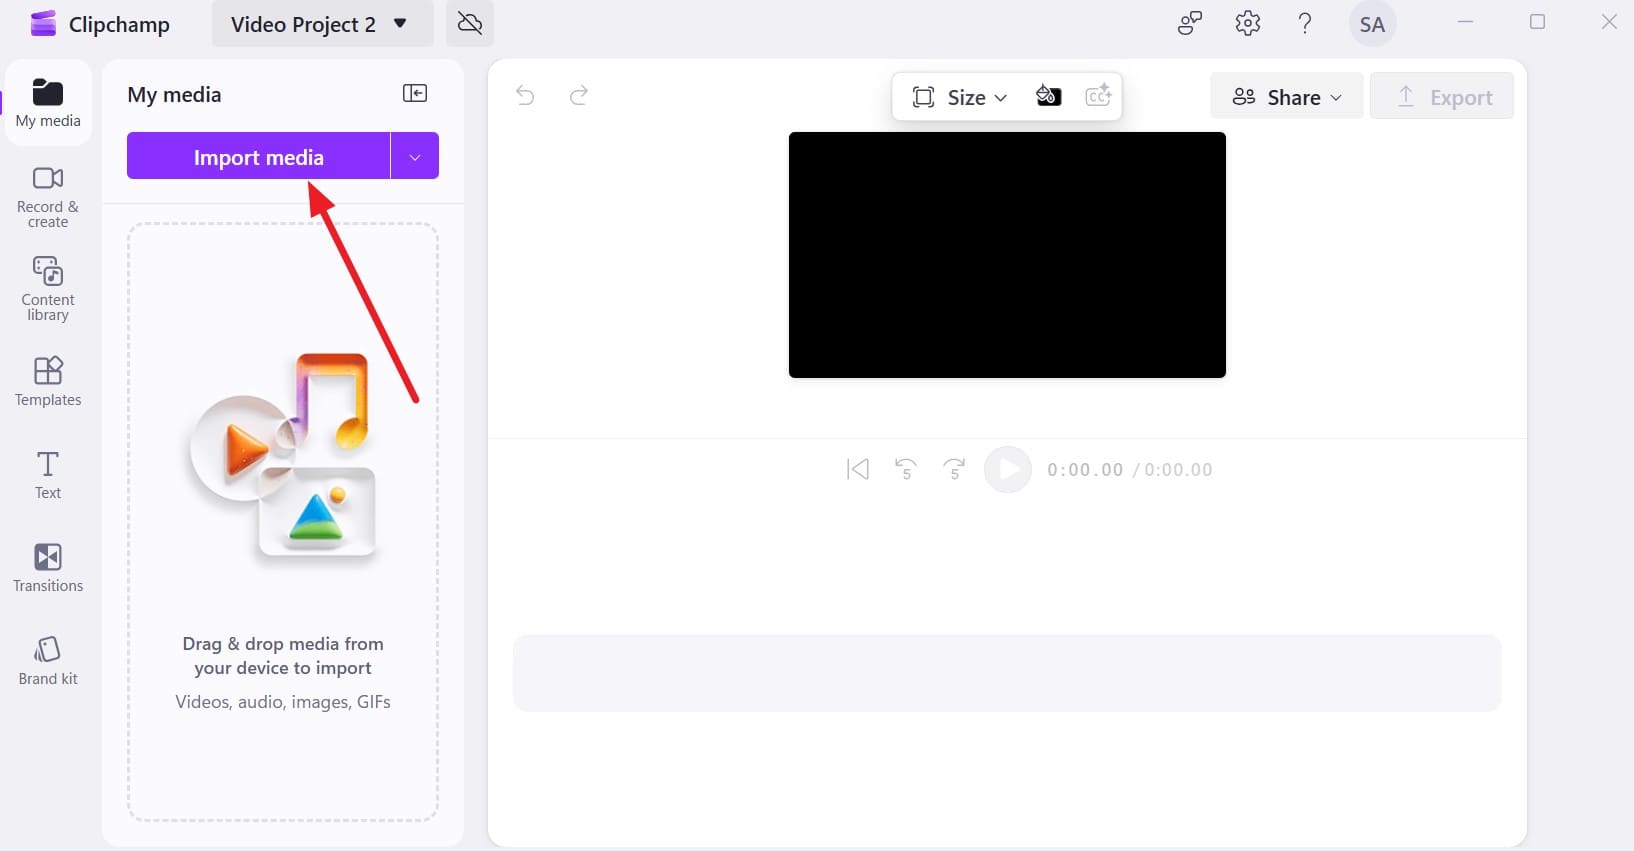
Step 1. On Clipchamp, select the “Create a New Video” and “Import Media” options to add the MOV file.
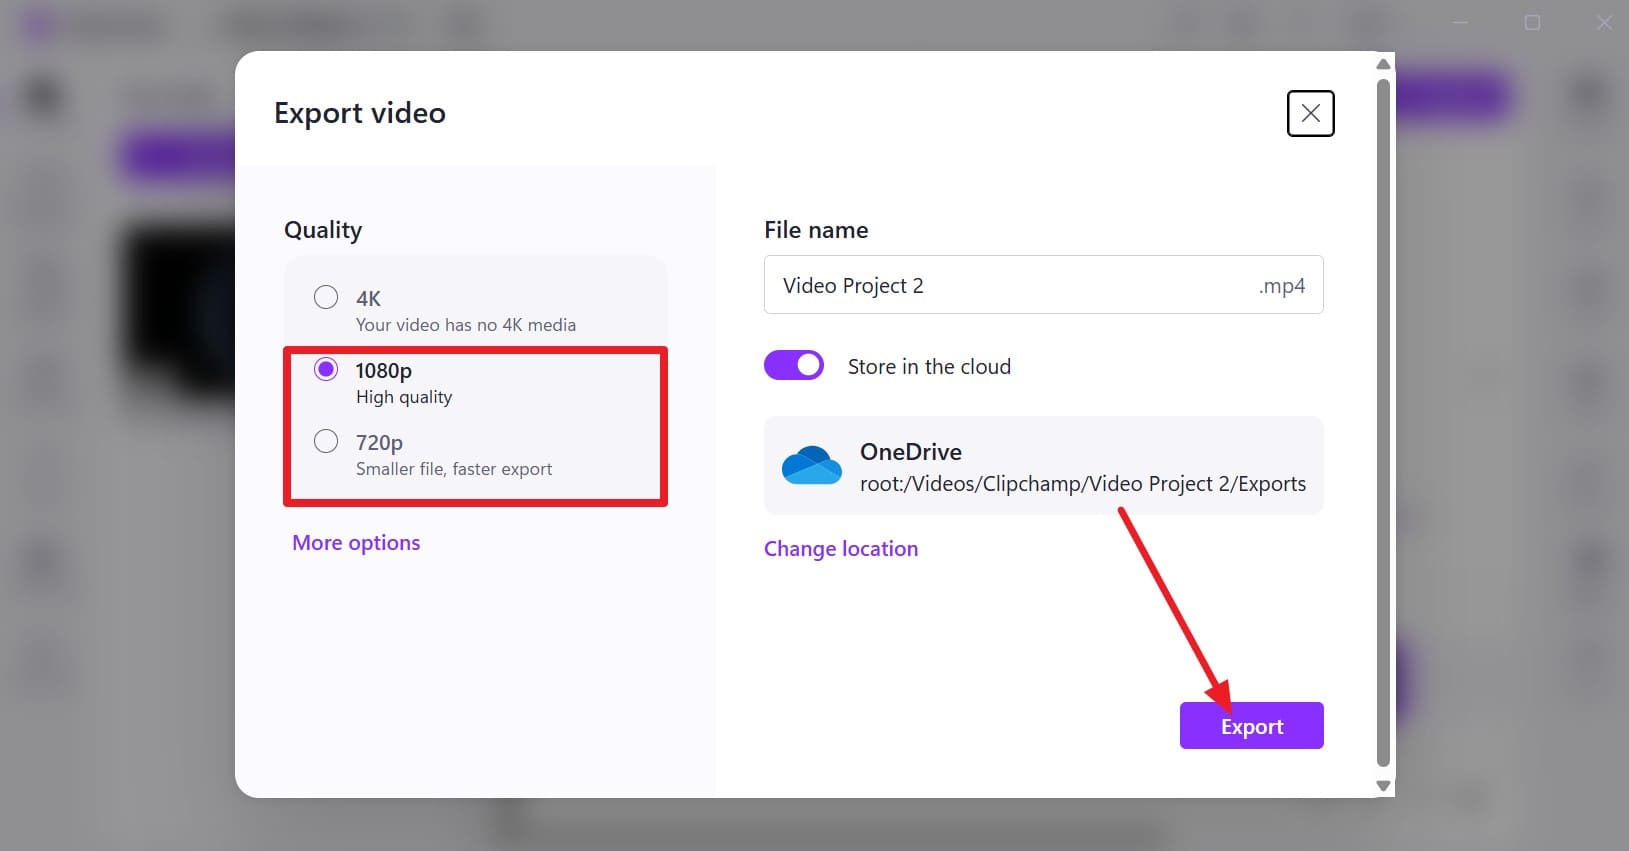
Step 2. Drag the video to the timeline, select “Export” in the upper-right corner, and choose an output resolution.

Step 3. If the original is 4K or 1080p, select “1080p” or “720p” to reduce the resulting MOV file size. Once you select the resolution, tap “Export,” and Clipchamp will start processing the video and export it as an MP4 file.
Method 4. Compress a MOV File on iPhone with Dr.Fone App
Large MOV videos can quickly consume iPhone storage and become difficult to upload or share. The Dr.Fone App provides a convenient way to compress a MOV file directly on your phone without transferring it to a computer. Its media compression feature handles photos and videos, making it useful for managing storage-heavy files directly from your device.
The app also supports batch processing, allowing you to compress multiple videos or images together. Its storage tools help identify large media files, making it easier to decide what needs compression. After processing, you can review the compressed videos and check their resulting sizes before keeping them. This provides a practical way to reduce large MOV files while managing available iPhone storage.
Dr.Fone App Guide to Compress a MOV File on iPhone
To reduce the size of a MOV file directly on your iPhone with the Dr.Fone App, complete these 3 steps:
Dr.Fone App - Photo & Video Compressor for iPhone
Compress Photos & Videos to Free Up iPhone Storage
- Compress Large Photos to Reduce File Size
- Compress Large Videos Instead of Deleting Them
- Free Up More Storage Space for New Photos, Videos, and Apps
- Manage Space-Consuming Photos and Videos More Efficiently



-
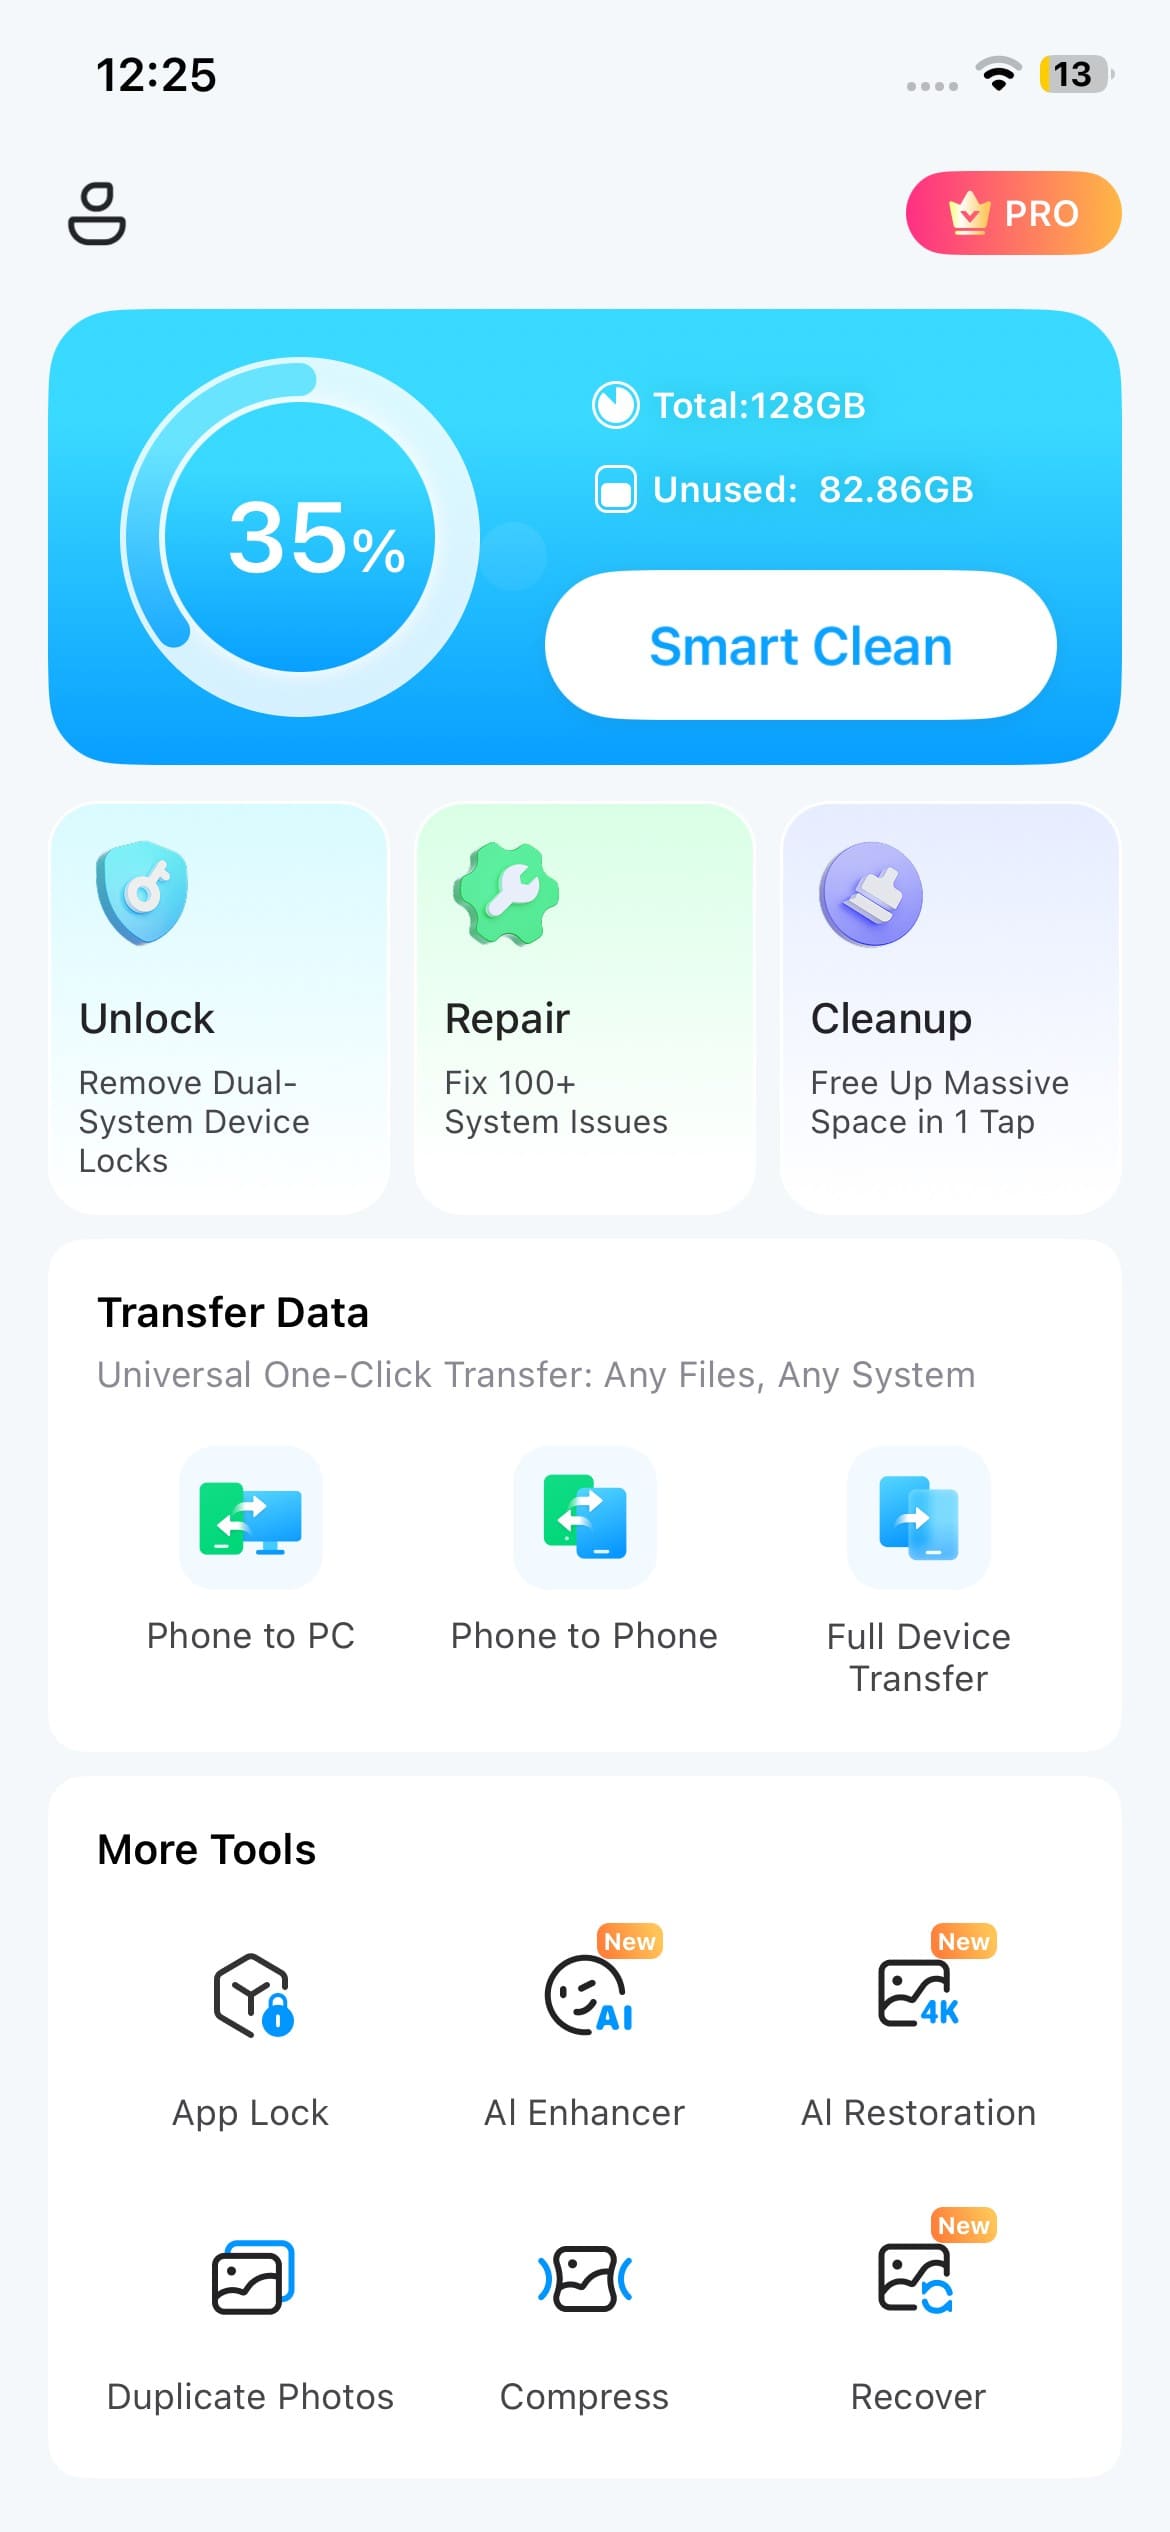
Step 1. Open Compressor from More Tools
Launch the Dr.Fone App, access the “More Tools” section, and select “Compressor” to access the media compression feature.
-
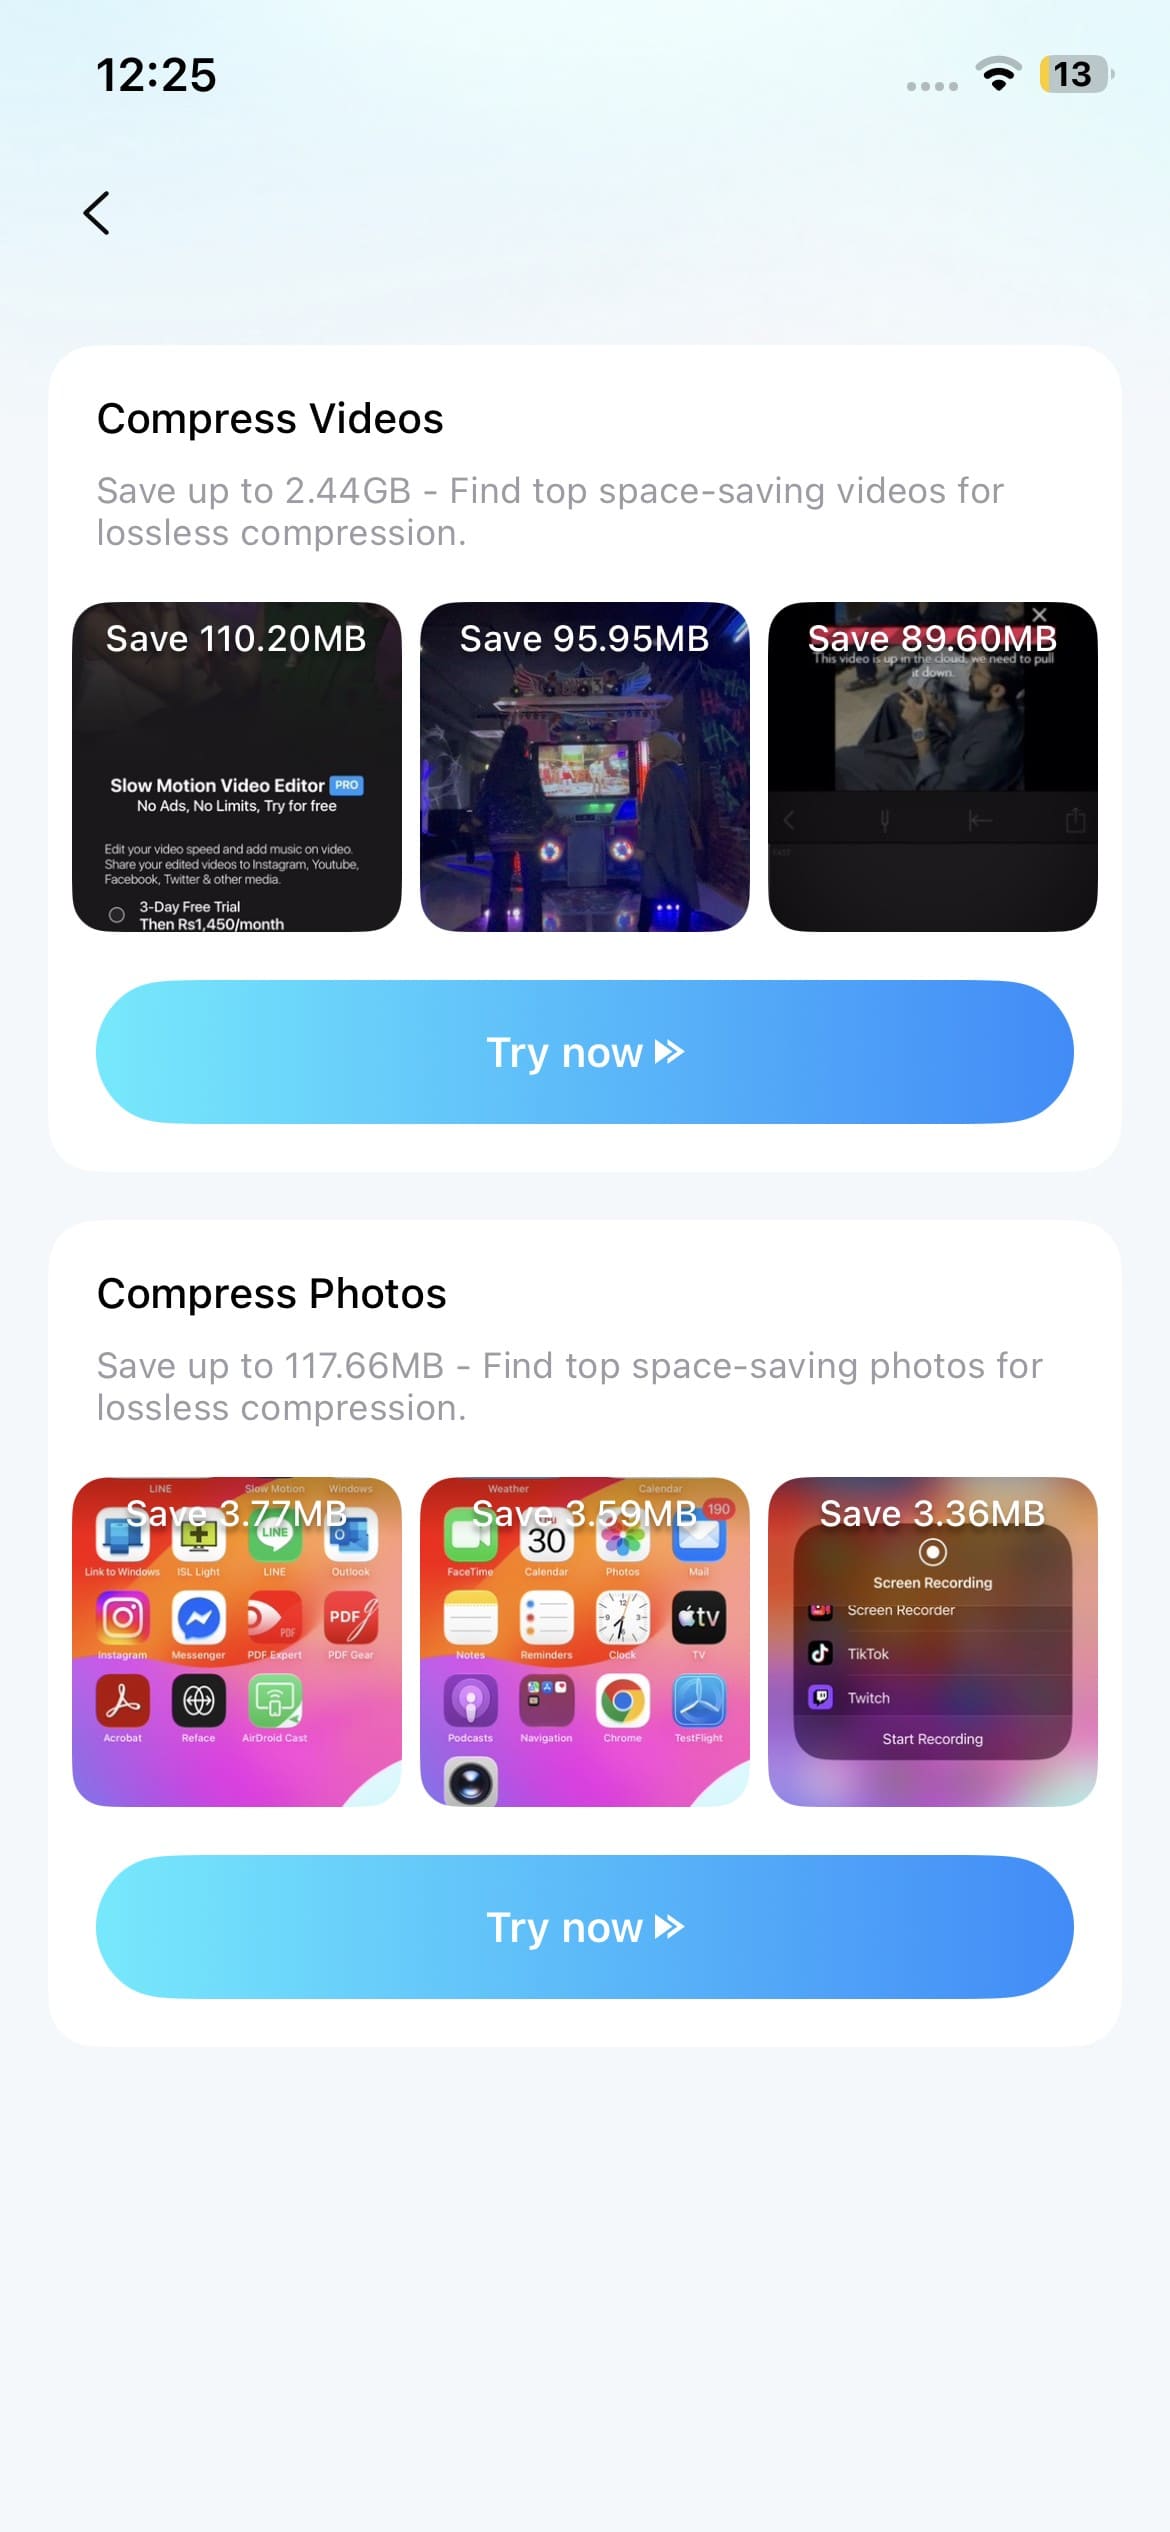
Step 2. Select the MOV Videos to Compress
Under “Compress Videos,” tap “Try Now.” Then, select one or multiple MOV videos from your iPhone that you want to compress.
-
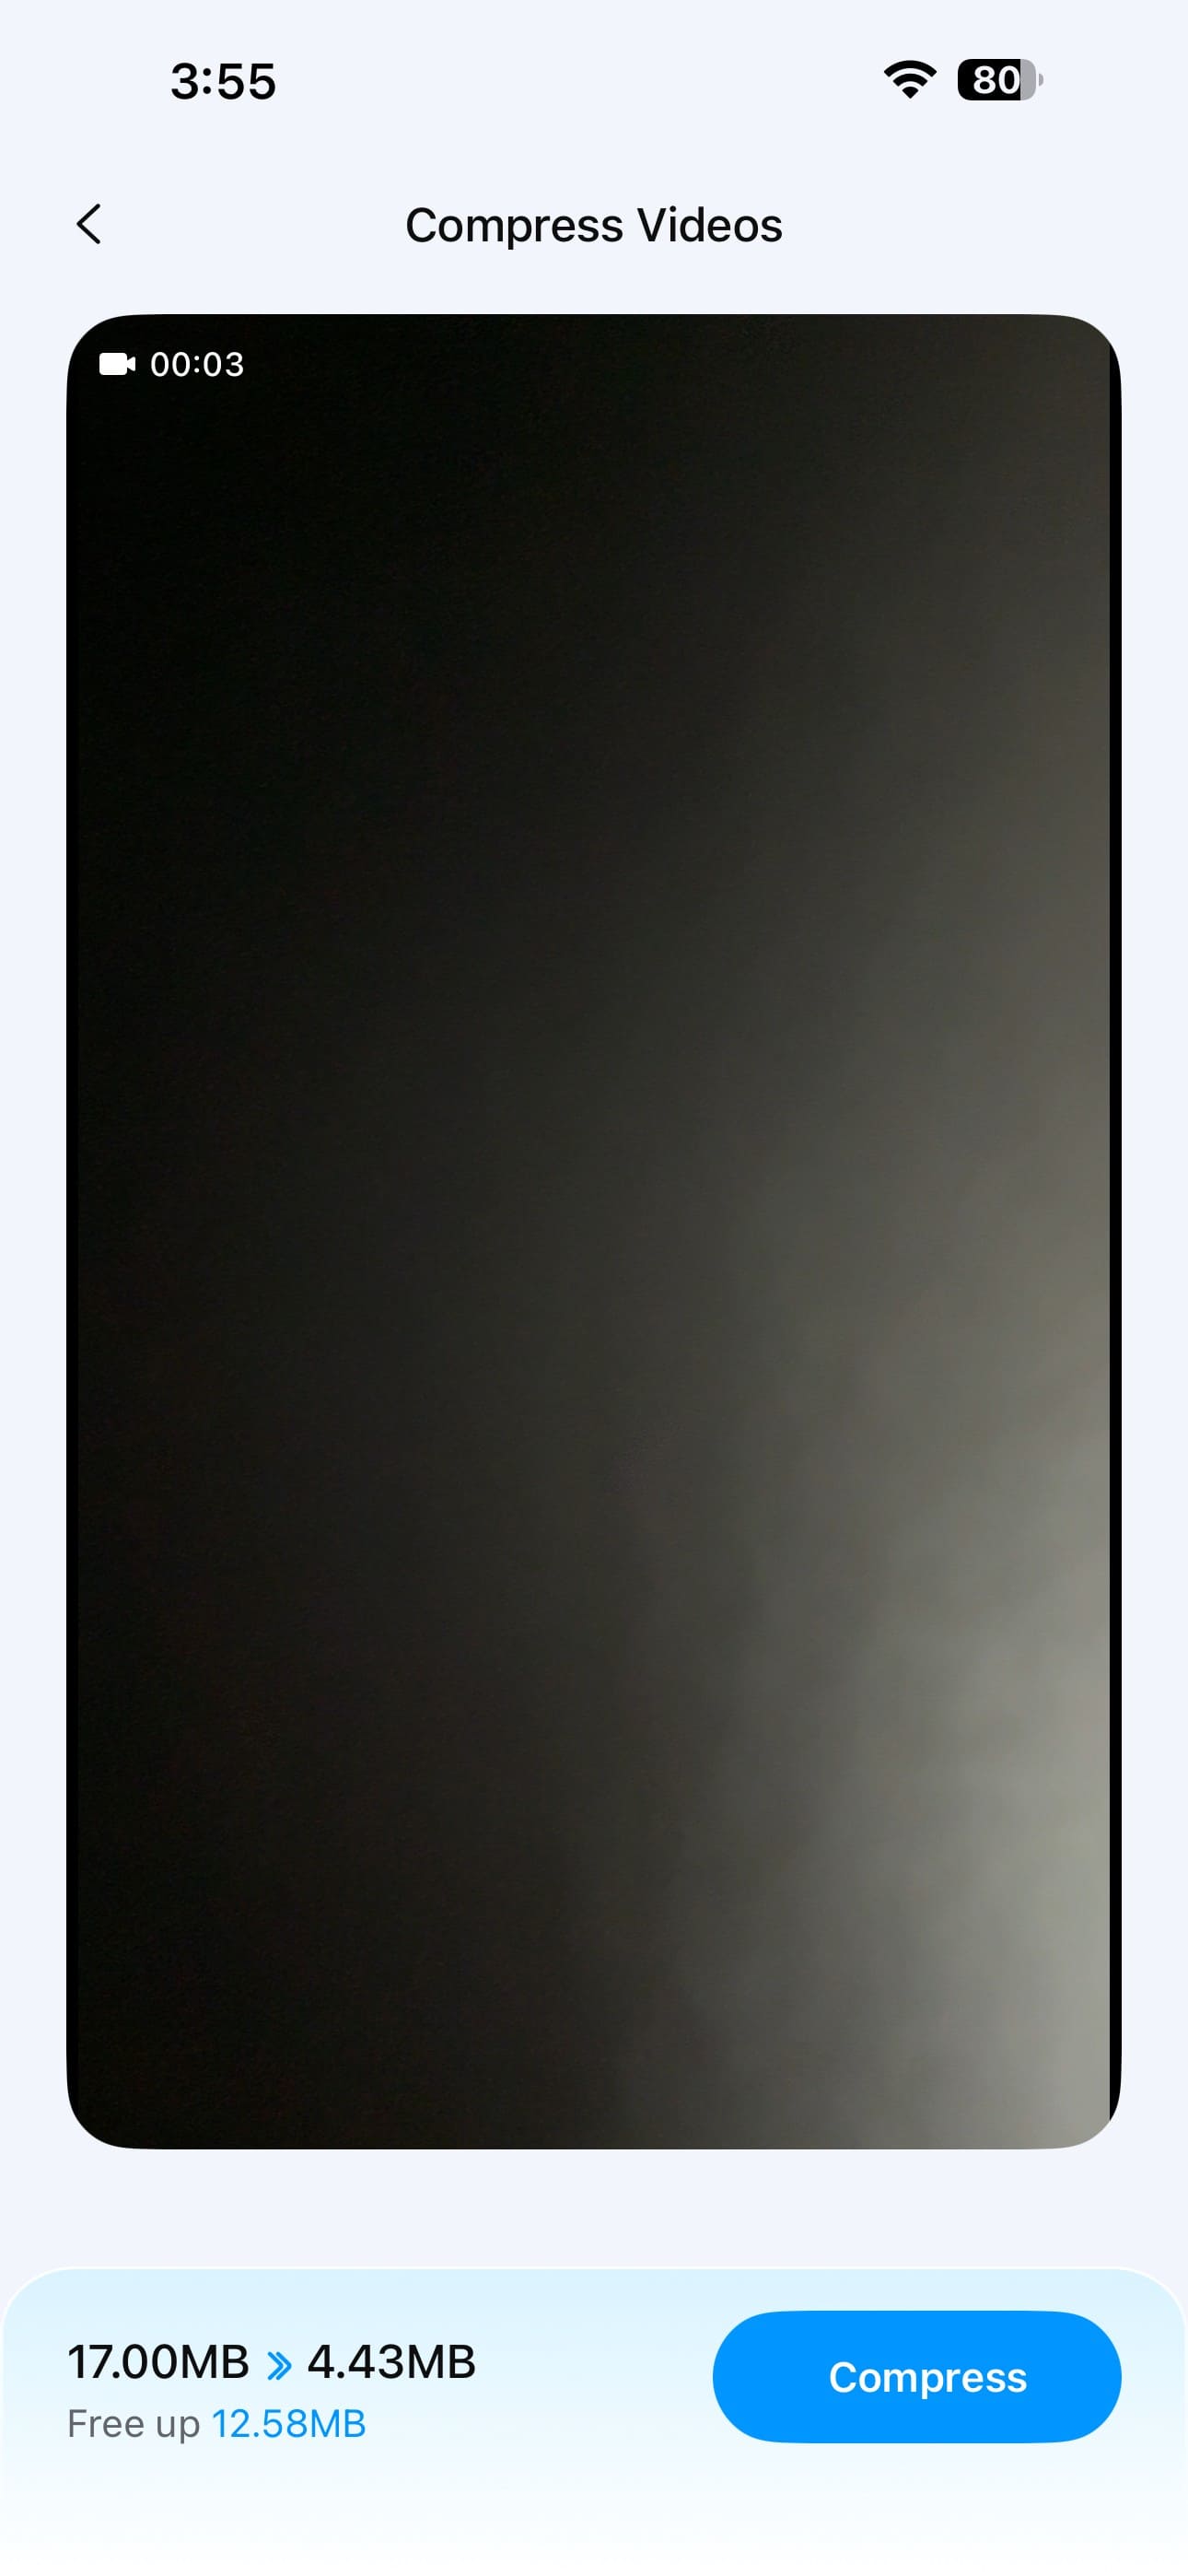
Step 3. Compress and Save the Smaller Videos
Review the “Free Up” details and tap “Compress” to process the selected MOV videos. Once completed, check the compressed files before deciding whether to remove the originals.
Part 2. What Actually Makes a MOV File Smaller?
To decrease MOV file size, focus on the settings that control how much video data is stored rather than the .mov extension itself. The table below explains how each setting affects file size and the potential quality trade-off:
| Setting | What Happens When Reduced/Changed | File Size Impact | Main Quality Trade-Off |
|---|---|---|---|
| Resolution | Fewer pixels per frame | Large | Less detail on larger screens |
| Bitrate | Less data encoded per second | Large | Detail loss in complex scenes |
| Frame Rate | Fewer frames displayed per second | Moderate | Motion may appear less smooth |
| Codec | More efficient encoding is used | Large | Reduced playback compatibility |
| Duration | Less footage remains in the video | Direct | None for remaining footage |
| Audio Bitrate | Less data allocated to audio | Small | Reduced audio quality, especially music |
Cutting unneeded footage first reduces file size without affecting the quality of the remaining video. Lowering the resolution can provide a significant size reduction, while adjusting the bitrate gives you finer control when the resolution needs to remain unchanged.
Another option is changing the codec. Apple confirms that HEVC provides better compression than H.264 while preserving the same visual quality. H.264, however, offers broader compatibility across devices and operating systems. This makes HEVC useful when you want to shrink MOV size without automatically lowering the video's resolution.
Part 3. Why Is the MOV File Still Large After Compression?
A MOV file may remain large after compression because certain settings or characteristics still keep its data requirements high. High resolution, bitrate, inefficient codecs, long duration, or unchanged encoding settings can all limit the reduction. To reduce the size of a MOV file more effectively, check these 5 common causes:
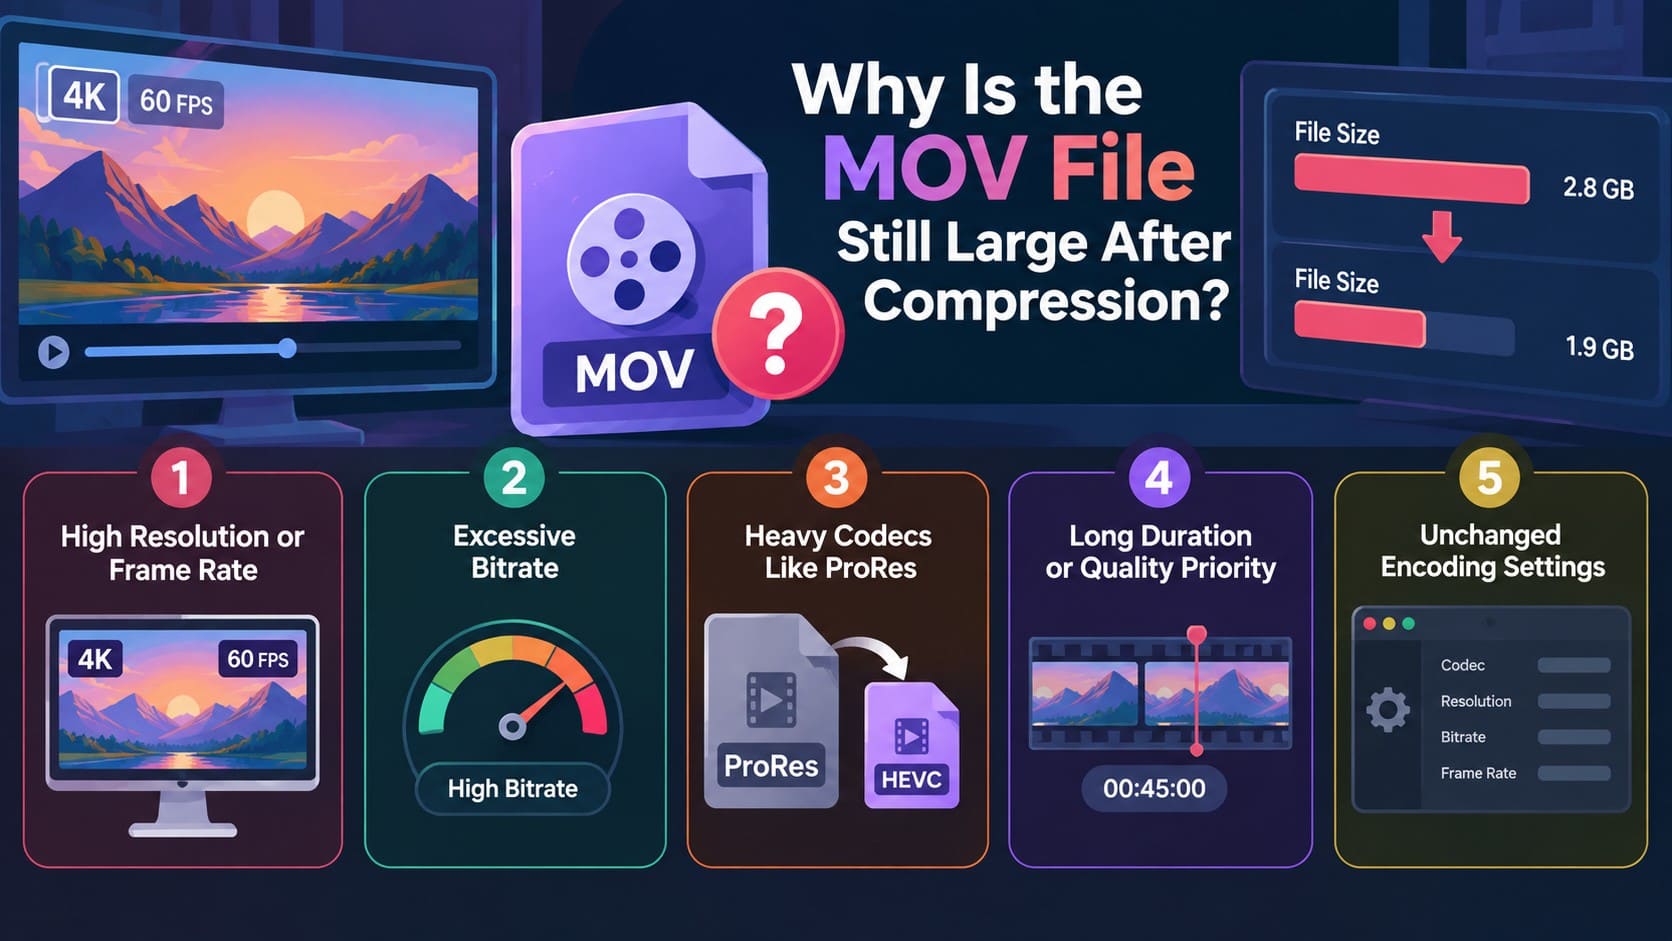
- High Resolution or Frame Rate: Keeping a 4K resolution or high frame rate means more video data must be stored. Lowering the resolution can noticeably reduce file size, while reducing frame rate can provide additional savings when smoother motion is unnecessary.
- Excessive Bitrate: A high bitrate stores more data for every second of video. If compression barely changes the file size, reduce the bitrate or choose a stronger compression preset when the tool provides these controls.
- Storage-Heavy Codecs Like ProRes: The codec can significantly affect how much storage a video requires. Apple states that ProRes videos recorded on iPhone can be up to 30 times larger than HEVC files, explaining why some high-quality recordings remain exceptionally large.
- Long Video Duration: Longer videos naturally require more storage because they contain more frames and audio data. Trimming unnecessary footage before compression directly reduces file size without lowering the visual quality of the footage you keep.
- Unchanged Encoding Settings: Exporting a video as another MOV does not automatically make it smaller. Encoding choices matter more than the container alone. For example, QuickTime offers HEVC for a smaller file size and H.264 for greater compatibility.
Part 4. How to Shrink a MOV File Without Making It Look Bad?
To shrink a MOV file without noticeably reducing its quality, avoid aggressive compression and evaluate the final result carefully. The following 5 practices can help you maintain a better balance between file size and video quality:
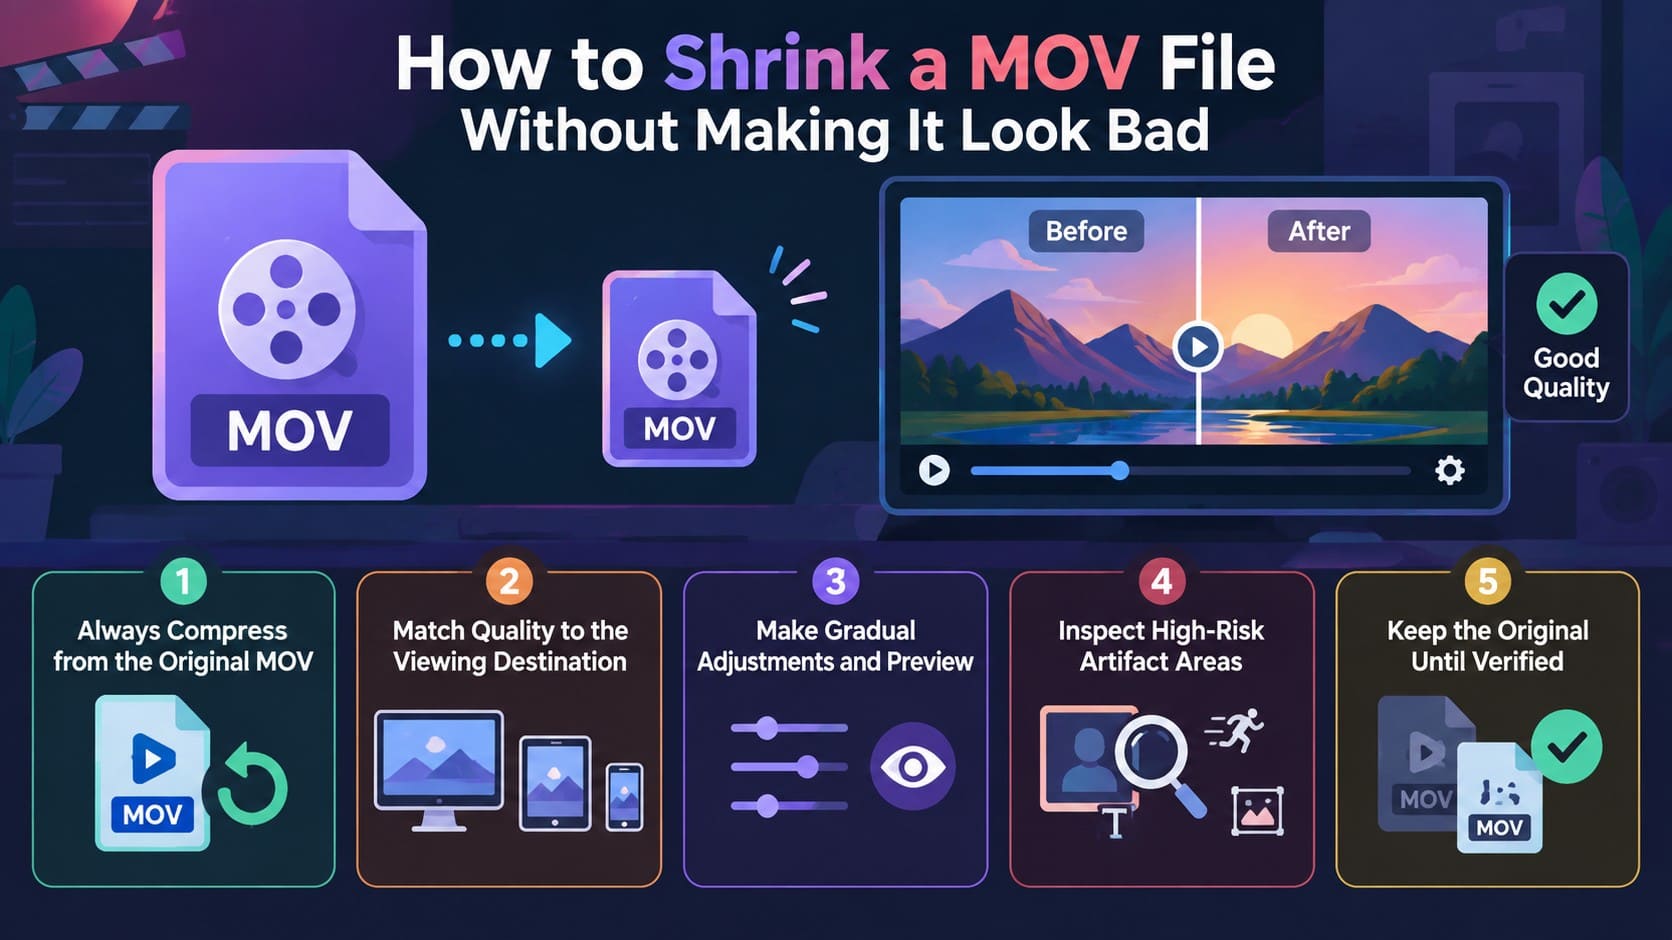
- Compress from the Original MOV: Avoid repeatedly compressing an already compressed copy. Lossy encoding can introduce additional quality loss with each generation, so return to the original MOV whenever you want to test different compression settings.
- Match Quality to the Viewing Destination: Maximum resolution is unnecessary for every use case. Choose an output resolution appropriate for the target screen or platform instead of retaining extra resolution that provides little visible benefit.
- Make Gradual Adjustments and Preview: Avoid applying aggressive compression immediately. Make moderate changes, preview the resulting video, and adjust further only when necessary to maintain a suitable balance between visual quality and file size.
- Inspect Areas Prone to Compression Artifacts: Do not evaluate quality from a single still frame. Review fast motion, faces, fine text, detailed textures, and smooth gradients because compression artifacts can become more noticeable in these areas.
- Compare the Compressed Video with the Original: View both versions at the intended playback size and check for noticeable differences in sharpness, motion, colors, and fine details. Avoid further compression once quality loss becomes clearly visible.
Part 5. When Should You Convert MOV to MP4 Instead of Compressing It?
Choosing between MOV and MP4 depends on what you need from the final video. Compatibility, the existing editing workflow, file size, and codec efficiency can each point toward a different approach. The table below shows when to compress a MOV file, keep MOV, convert to MP4, or consider HEVC:
| Situation | Best Choice | Reason |
|---|---|---|
| Destination Has Trouble With MOV | Convert to MP4 | MP4 with H.264 offers broad compatibility across devices and platforms. |
| Apple or Editing Workflow Requires MOV | Keep MOV | Changing the container provides little benefit when the existing workflow supports MOV. |
| MOV File Is Too Large | Compress MOV | Converting to MP4 alone does not reduce resolution, bitrate, duration, or other encoding demands. |
| Smaller File Needed at Same Resolution | Consider HEVC | HEVC can provide better compression than H.264, but compatibility should be checked first. |
Conclusion
Choosing the right way to compress MOV files depends on where you are working and how you plan to use the final video. QuickTime keeps the MOV format, Clipchamp exports to MP4, while the Dr.Fone App handles compression directly on iPhone. Whichever method you choose, make gradual adjustments, check the compressed video's quality, and keep the original file until you are satisfied with the final result.
Frequently Asked Questions
-
1.Why is my MOV file so large?
MOV file size depends on factors such as resolution, bitrate, frame rate, duration, and codec. High-resolution footage or less storage-efficient codecs can significantly increase the file size. The MOV container itself does not determine how large the video will be. -
2. Can I compress a MOV file and keep it as MOV?
Yes. QuickTime Player can export videos as MOV using H.264 or HEVC, allowing you to compress an MOV file without converting it to MP4. On iPhone, the Dr.Fone App can also compress selected videos directly on the device. -
3. Does converting MOV to MP4 always reduce file size?
No. Converting MOV to MP4 does not automatically make the video smaller. File size depends more on the codec, bitrate, resolution, and other encoding settings used during export. To decrease MOV file size, adjust these compression settings instead of simply changing the container format. -
4. What is the best way to shrink a MOV file without making it blurry?
Start with the original MOV and make gradual compression adjustments rather than applying aggressive settings immediately. Reduce the resolution only when necessary and preview the output for visible quality loss. On iPhone, the Dr.Fone App can compress selected videos directly and lets you review the results afterward.


James Davis
staff Editor
Generally rated4.5(105participated)