


 TL;DR:
For optimal video uploads, create separate platform-specific exports rather than a single generic file, prioritizing high-resolution bitrate retention for 16:9 YouTube videos and accurate 9:16 vertical framing for Instagram Reels.
● Match your compression method to your hardware by using the Dr.Fone App on iPhone for batch processing, Media.io in web browsers, Microsoft Clipchamp on Windows for 9:16 MP4 presets, or QuickTime Player on Mac for native .mov HEVC or H.264 exports.
● Configure precise upload settings by exporting YouTube files as H.264 MP4 containers with AAC-LC audio, and preparing Instagram files at a practical 1080x1920 resolution at 30 FPS while enabling the in-app "Upload at highest quality" feature.
● Prevent blurry playback by trimming unnecessary footage to reduce file size before applying compression, avoiding the re-encoding of already heavily compressed source files, and allowing time for YouTube's temporary lower-quality background processing to finish.
Ask AI for a summary
 ChatGPT
 Perplexity
 Gemini
 Claude
 Grok
Grok
YouTube and Instagram process videos differently, so the same export settings may affect quality, framing, or file size. YouTube supports large, high-resolution uploads, while Instagram favors mobile-friendly videos and vertical framing for Reels.
To compress video for YouTube/Instagram, you can adjust bitrate or resolution, trim unwanted footage, or create platform-specific copies. Tools like Dr.Fone App also make it easier to compress large videos directly on your phone. This guide covers 4 practical methods and the best settings for maintaining quality on both platforms.
In this article
Part 1. YouTube vs Instagram: What Should Your Video Look Like Before Upload?
Before you compress videos for YouTube or Instagram, check how your video matches each platform’s preferred format. The table below compares the key settings to consider before compression:
| Platform Use | Preferred Aspect Ratio | Practical Resolution | Frame Rate Approach | Main Compression Priority |
|---|---|---|---|---|
| Standard YouTube Video | 16:9 | 1920 × 1080 or 3840 × 2160 | Match the source frame rate | Maintain sufficient bitrate for quality |
| YouTube Shorts | 9:16 | 1080 × 1920 | Match the source frame rate | Optimize size while preserving vertical quality |
| Instagram Reels | 9:16 for full-screen viewing | 1080 × 1920 | 30 FPS or higher | Fix framing before reducing file size |
What Format Should You Use for YouTube?
For YouTube, focus on preserving quality before reducing file size. When you compress video for YouTube, keep the original resolution and frame rate where practical. YouTube recommends MP4 with H.264 among its upload settings, making it a reliable choice for balancing quality and file size.
What Format Should You Use for Instagram?
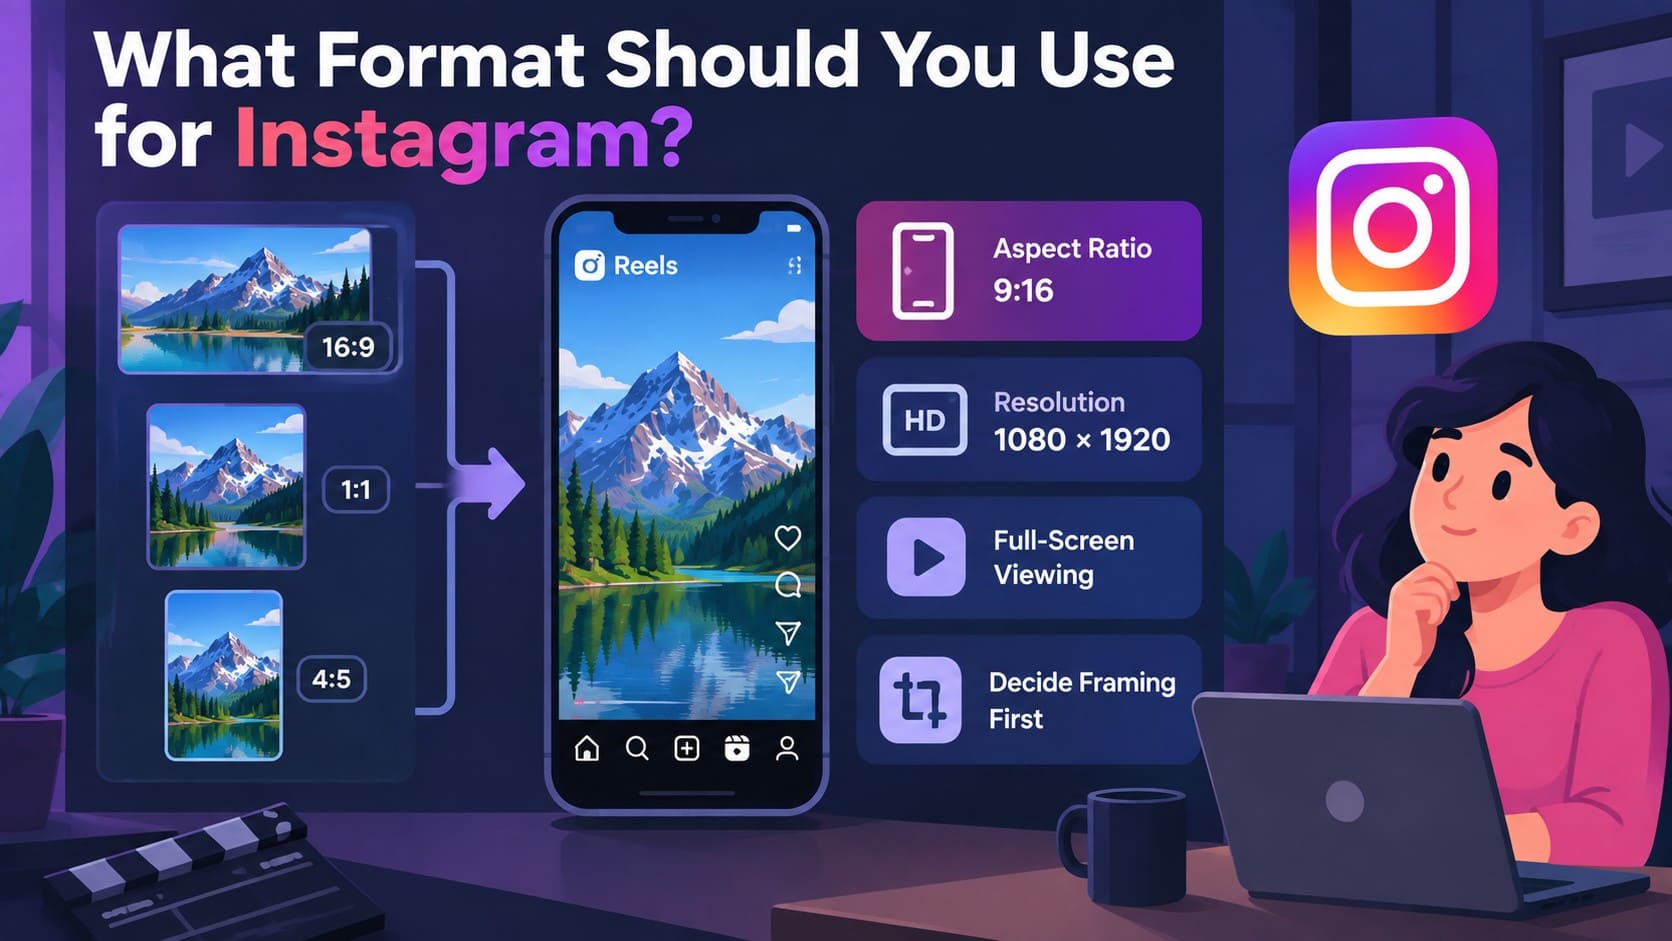
Instagram needs a different approach because framing matters more for full-screen Reels. Start by fitting the video into a 9:16 vertical layout instead of compressing it immediately. Once the framing looks right, use an Instagram video compressor to reduce file size while keeping the platform-ready dimensions.
Part 2. Should You Compress a Video Before Uploading It?
Compression is not always necessary for every upload. Before you compress videos for Instagram or YouTube, consider what is actually causing the problem. The table below shows when compression makes sense and when trimming, resizing, or keeping the original quality is the better choice.
| Situation | Should You Compress? | What to Do |
|---|---|---|
| YouTube File Already Meets Upload Limits | Usually no | Keep the original quality and use a suitable bitrate for the resolution. |
| YouTube File Is Unnecessarily Large | Yes | Reduce an excessive bitrate or resolution while keeping the source frame rate where practical. |
| YouTube Upload Is Very Slow | Consider it | Trim unnecessary footage first, then lower the bitrate or resolution if needed. |
| Instagram Video Has the Wrong Dimensions | Not yet | Crop or resize the video for the intended Instagram format before compression. |
| Instagram File Is Larger Than Necessary | Yes | Create a properly sized platform copy instead of heavily compressing the original. |
| Video Contains Unwanted Footage | Not initially | Trim unnecessary sections first to reduce file size without lowering the remaining video quality. |
| Source Is Already Heavily Compressed | Avoid it | Return to the original high-quality file rather than compressing an already compressed copy again. |
Note: According to YouTube’s official guidelines, the maximum upload size is 256 GB or 12 hours, whichever is less. For videos larger than 256 GB, YouTube recommends using H.264 compression to reduce file size while maintaining video quality.
Part 3. 4 Ways to Compress Video for YouTube and Instagram
You do not need the same compression method for every video. The best option for video compression for Instagram or YouTube depends on where your file is stored, which settings you need to adjust, and the device you are using. The following 4 methods cover practical ways to reduce video file size on iPhone, in a web browser, on Windows, and on Mac:
Method 1. Compress Social Media Videos on iPhone With Dr.Fone App
If the video is already on your phone, Dr.Fone App provides a convenient way to reduce its size without transferring it to a computer first. Its Compressor tool handles photos and videos separately, making it useful when you need to compress video for Instagram or prepare a smaller video for YouTube. You can also sort videos from largest to latest, making larger files easier to find before compression.
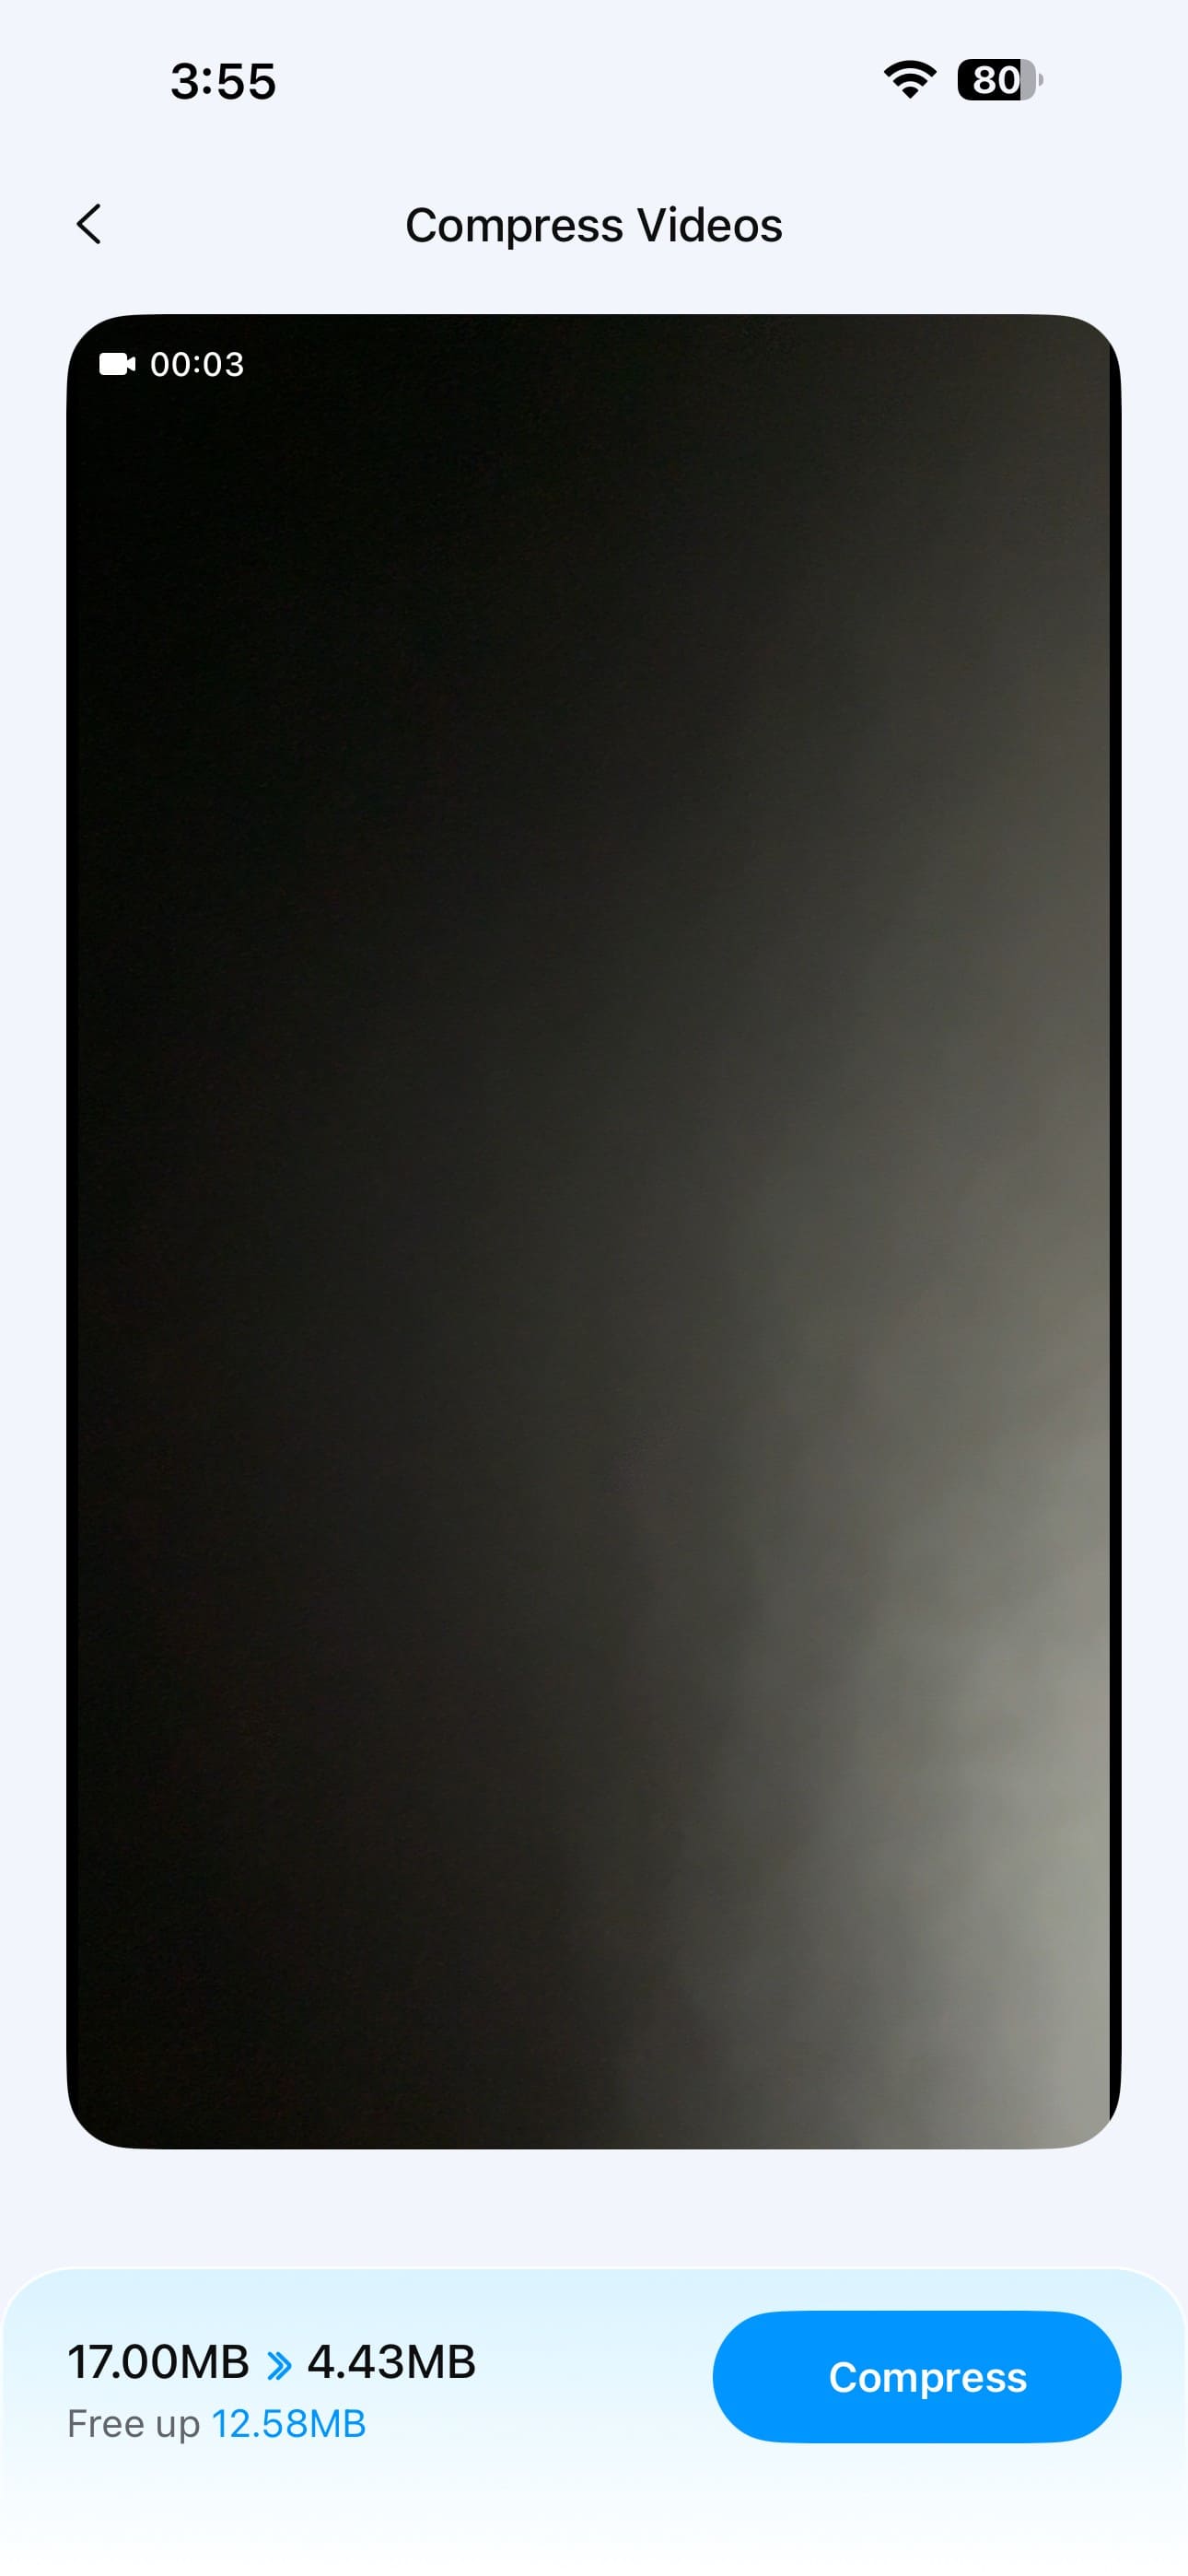
Dr.Fone App supports batch compression, allowing you to reduce the size of multiple videos together. Before processing, it shows the estimated space you can free up, helping you understand the expected reduction. Once compression is complete, you can preview the result and check its final size and quality. This makes it easier to prepare smaller videos for Instagram or YouTube while keeping the visual quality suitable for uploading.
Guide to Compress YouTube or Instagram Video Directly from iPhone
Follow the detailed guide below for video compression for Instagram or YouTube directly from your phone:
Dr.Fone App - Photo & Video Compressor for iPhone
Compress Photos & Videos to Free Up iPhone Storage
- Compress Large Photos to Reduce File Size
- Compress Large Videos Instead of Deleting Them
- Free Up More Storage Space for New Photos, Videos, and Apps
- Manage Space-Consuming Photos and Videos More Efficiently



-
Step 1. Choose the Video Compression Tool
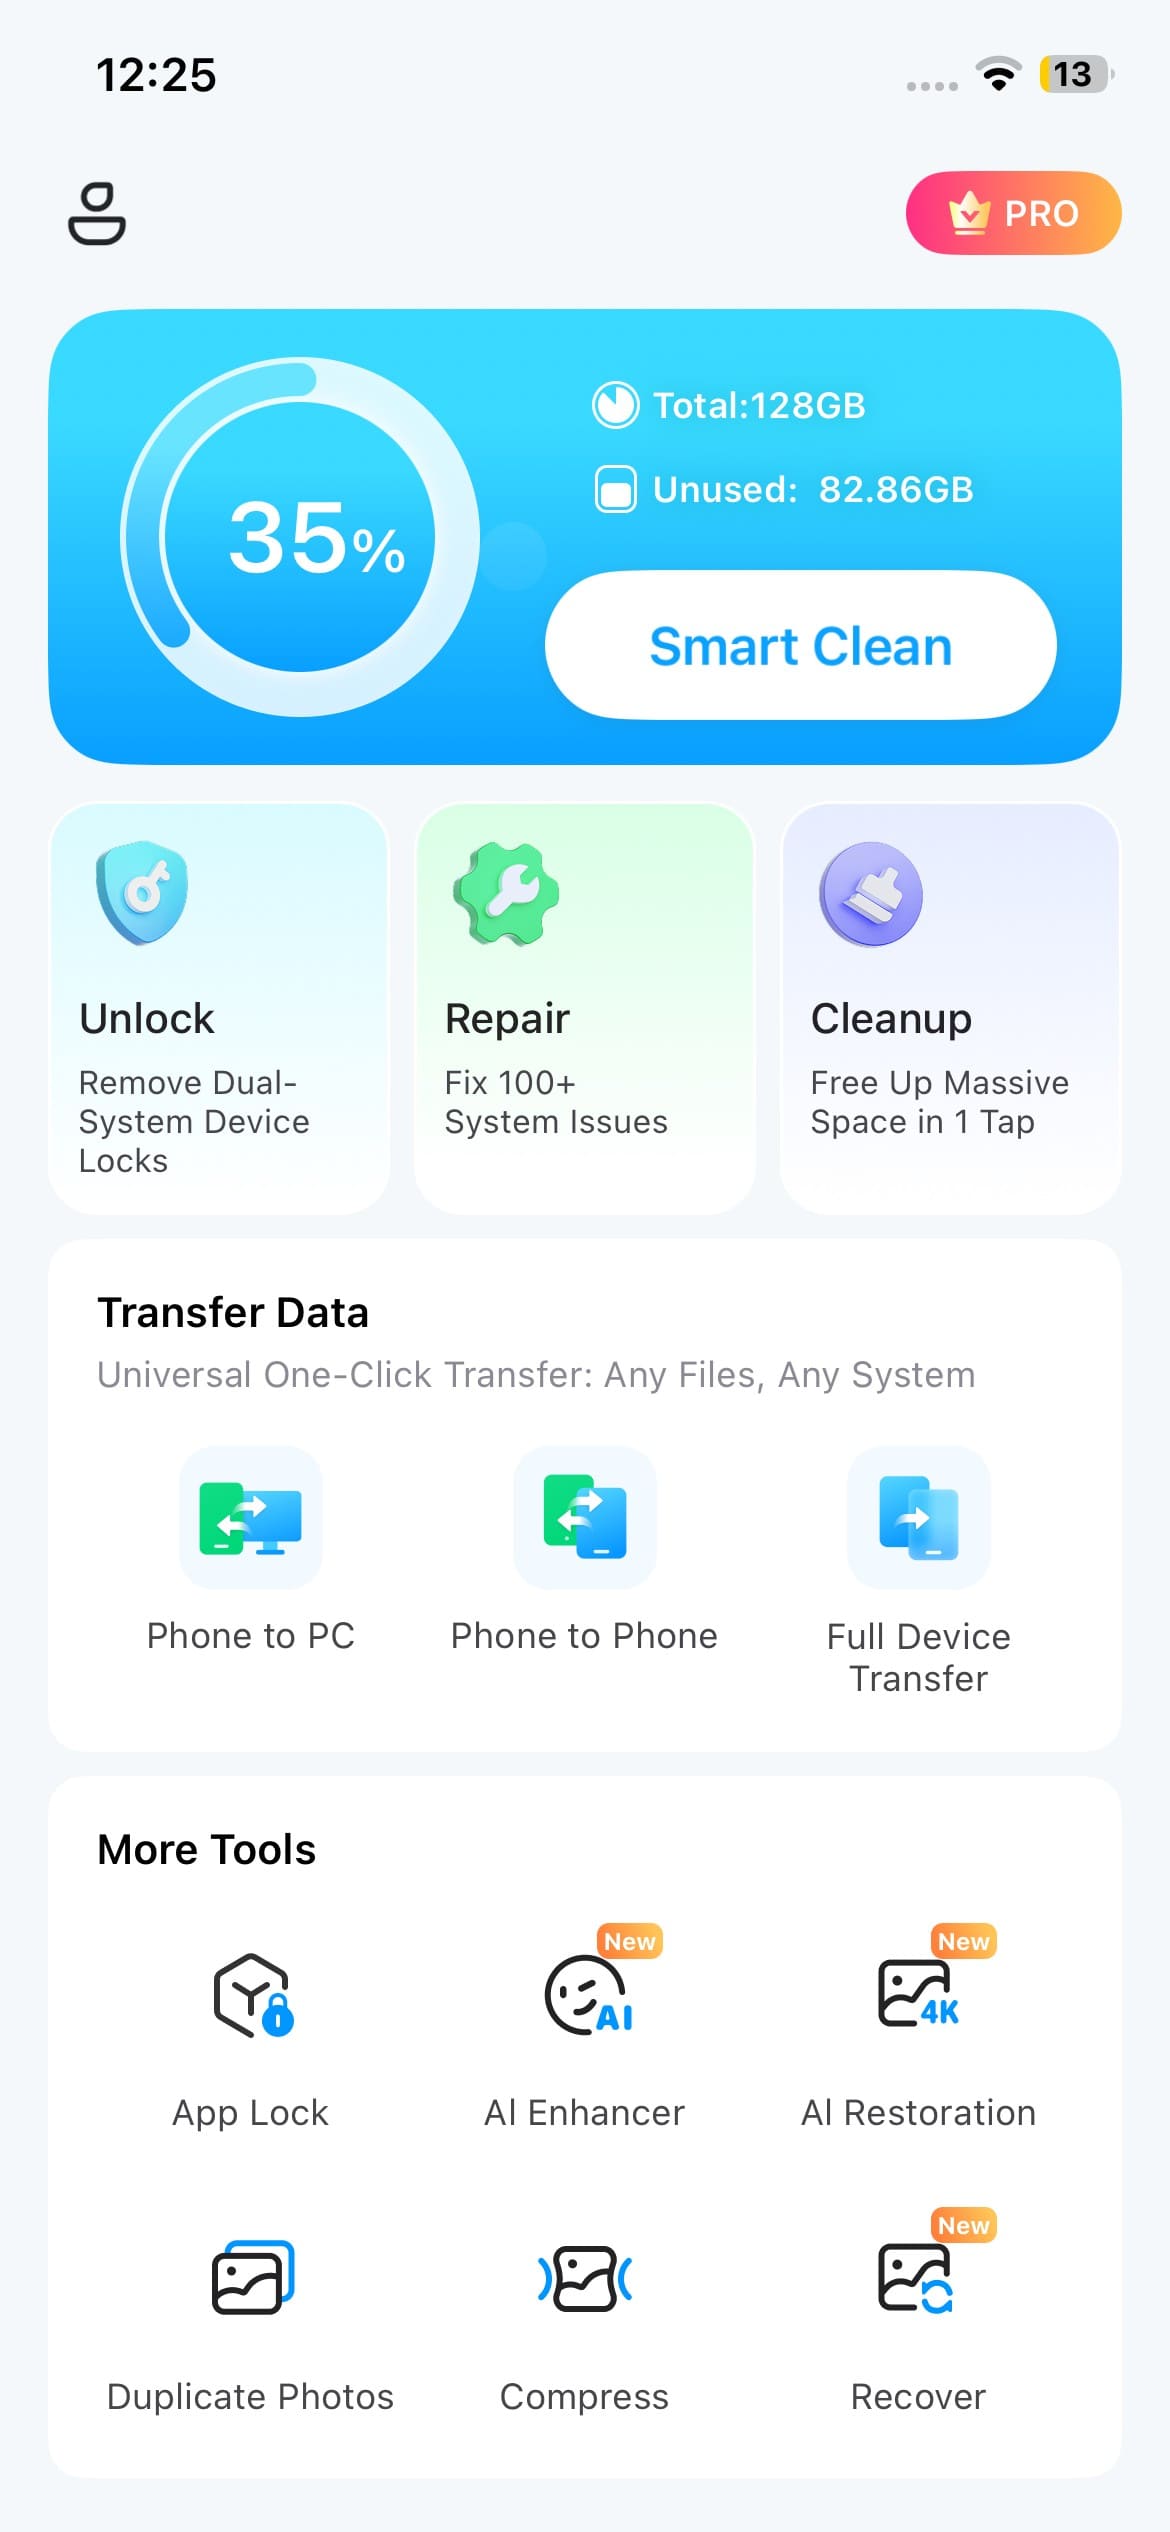
Launch the Dr.Fone App and navigate to the "More Tools" section. Find "Compressor" and tap it to begin the compression process for your Instagram or YouTube video.
-
Step 2. Choose the Video and Try Now Button
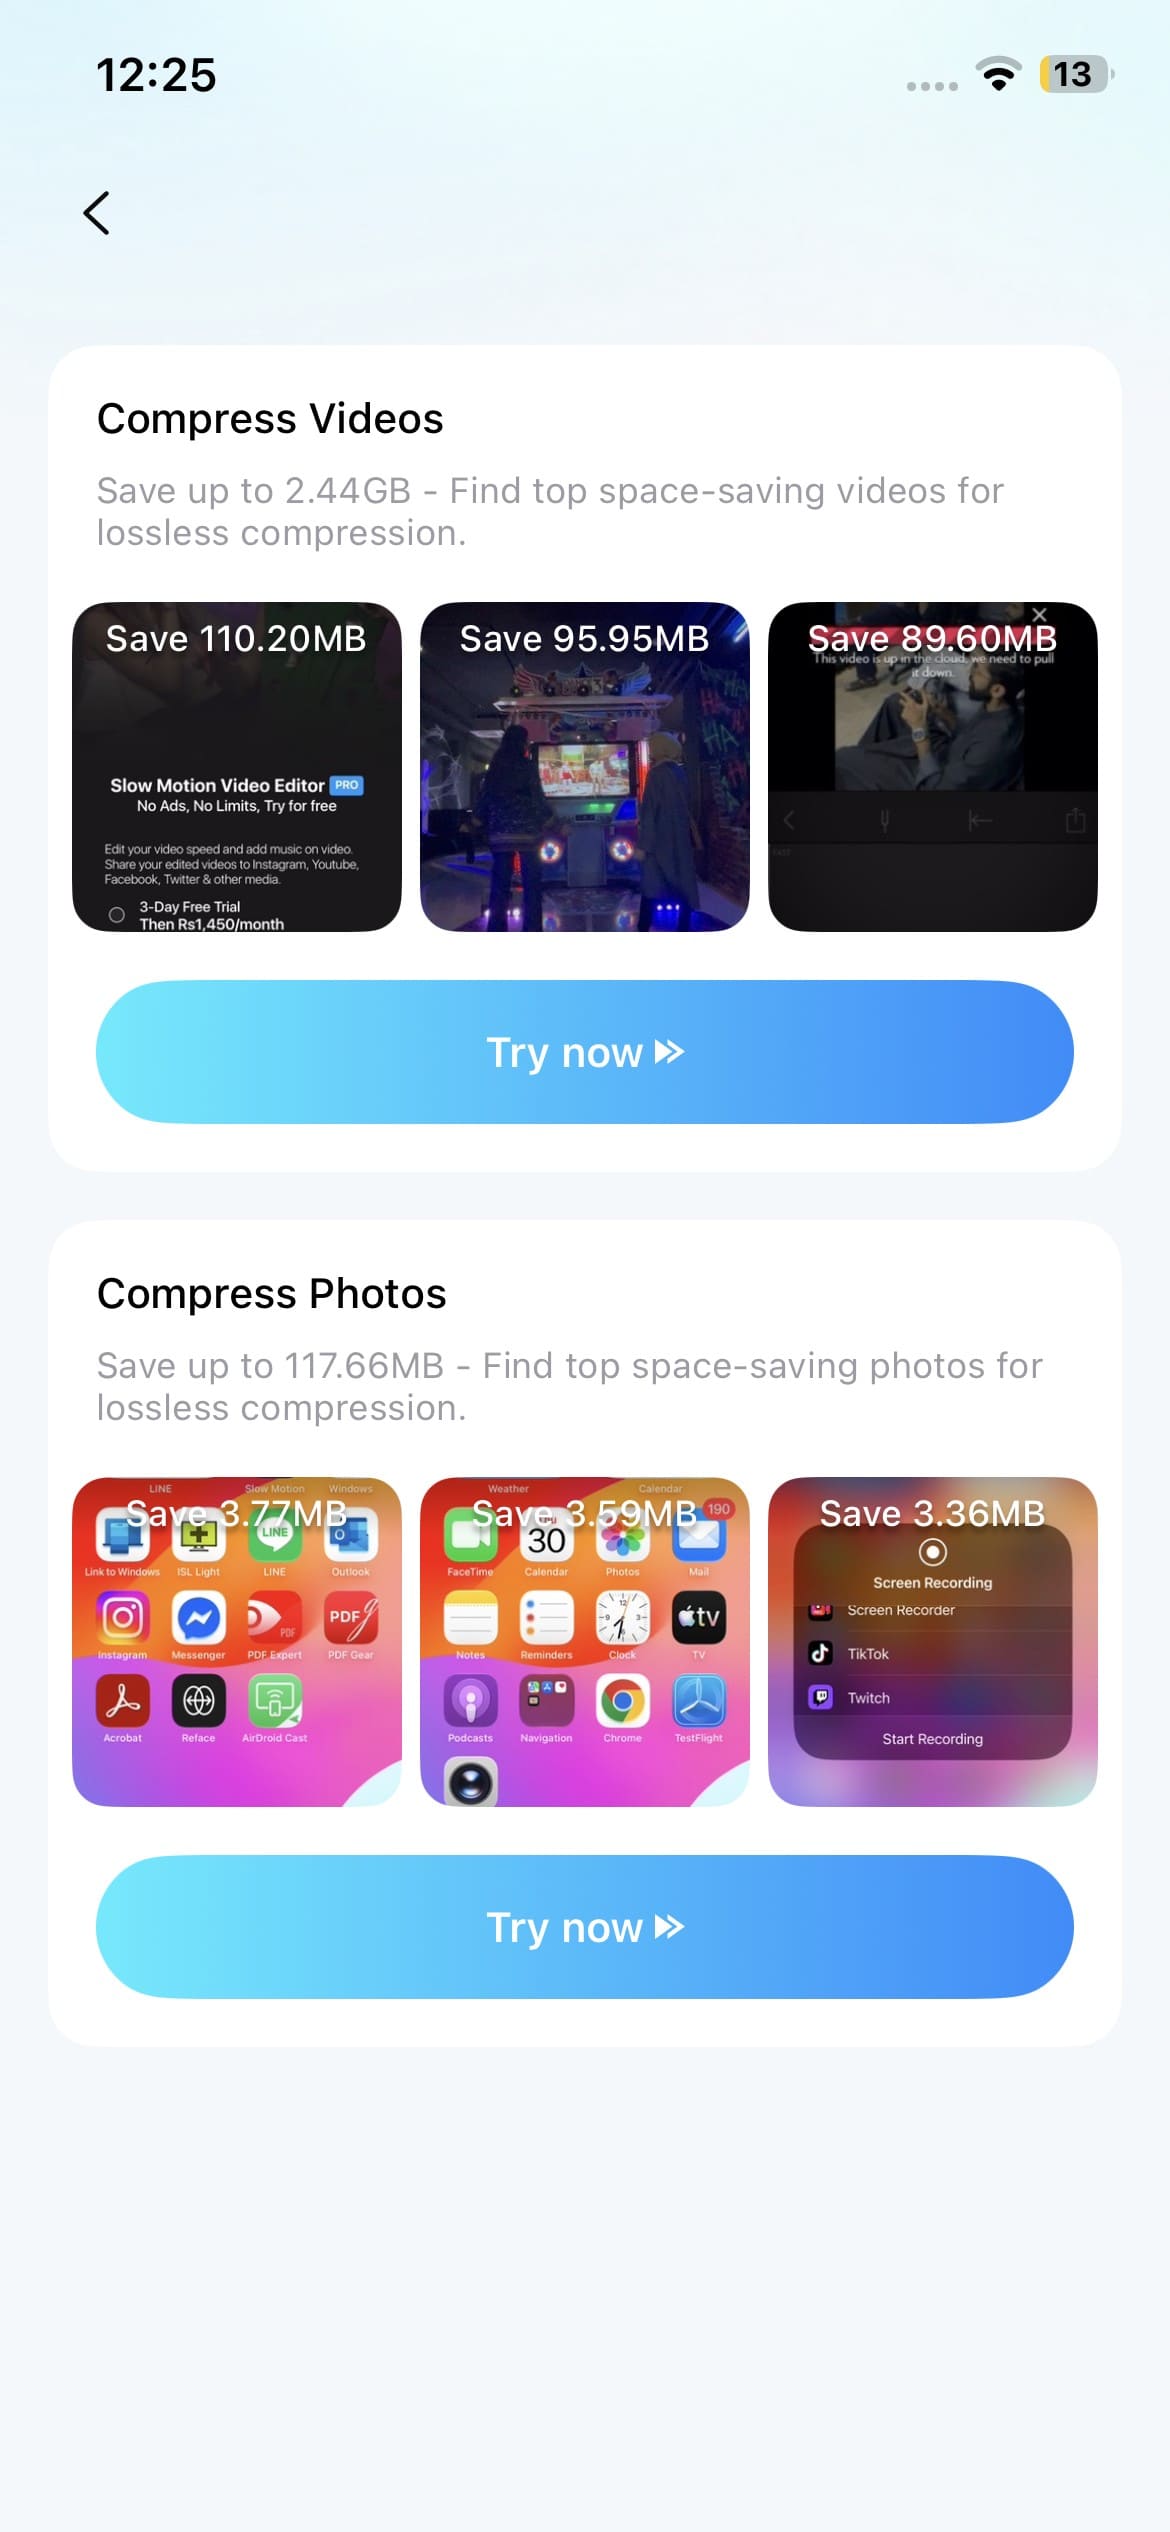
Under “Compress Videos,” tap “Try Now” to view your available videos. Sort the files from “Latest” to “Largest,” then select the Instagram or YouTube videos you want to compress.
-
Step 3. Compress and Review the Video
Tap “Compress” to reduce the selected video’s file size. Once processing is complete, preview the compressed version and check its final size and quality before uploading it to Instagram or YouTube.
Method 2. Compress Video Online with Media.io
This browser-based tool lets you compress videos on Windows, Mac, iOS, or Android without installing additional software. Media.io supports popular formats such as MP4, MOV, AVI, MKV, WebM, and WMV. Depending on the available settings, you can reduce the target file size, change the output format, or select a resolution from 480p up to 4K. To compress a video for Instagram or prepare a smaller YouTube upload, follow these steps:
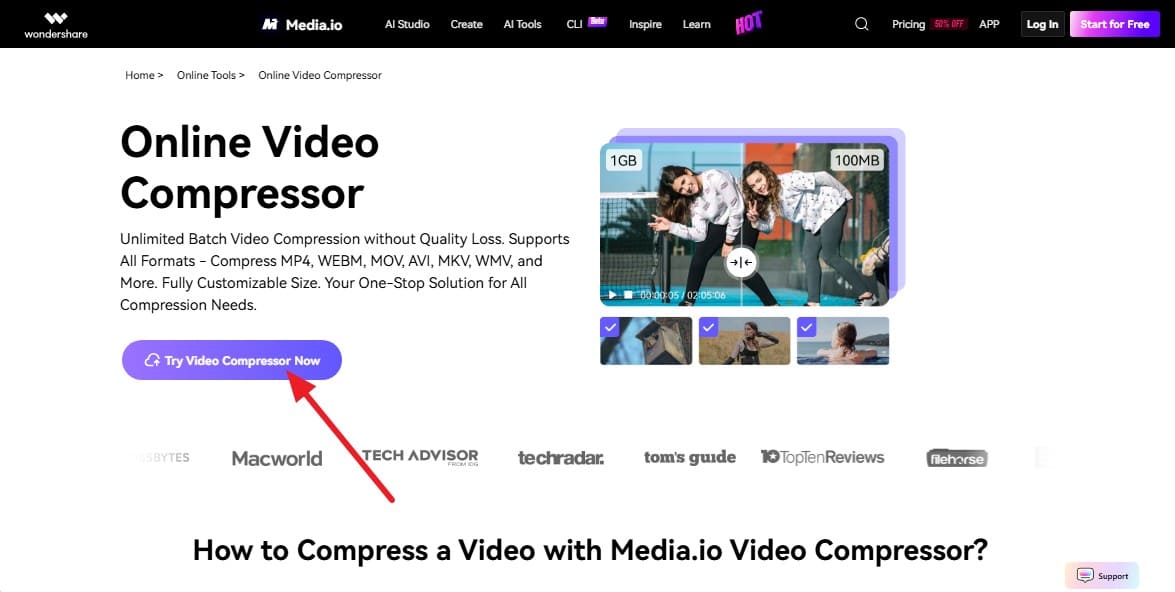
Step 1. Tap on the “Try Video Compressor Now” button and import the video.
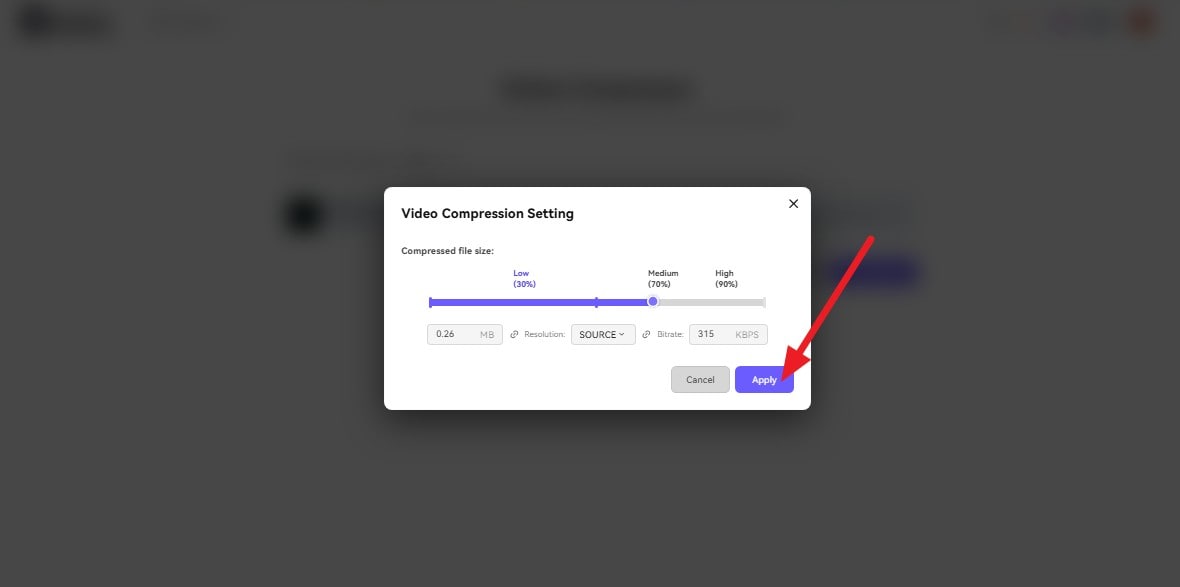
Step 2. After that, press the “Settings” icon, choose the compression level, and select the “Apply” button.
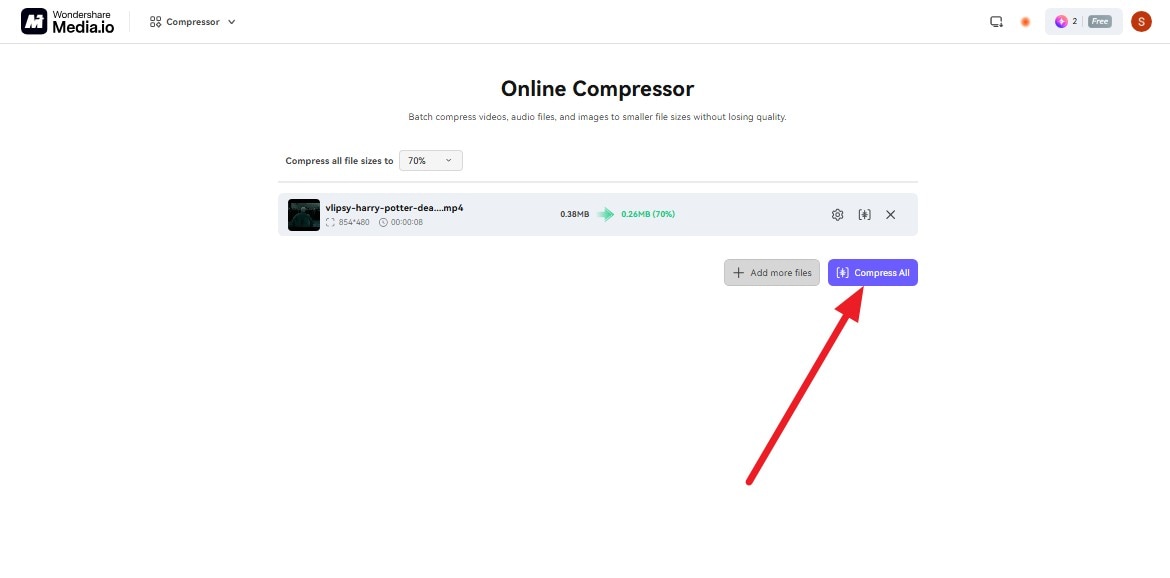
Step 3. Click the “Compress All” button and wait for Media.io to process the file. Once it finishes, download the compressed video and play it once to check the quality before uploading it to Instagram or YouTube.
Method 3. Reduce Video Size on Windows with Clipchamp
Microsoft Clipchamp provides a straightforward way to reduce video file size by selecting a lower export resolution. Microsoft offers 480p, 720p, 1080p, and 4K export options, with completed video projects exported as MP4 files. Microsoft describes 720p as suitable for social media and 1080p for video streaming platforms.
To compress video for Instagram, adjust the aspect ratio before exporting. Clipchamp includes a 9:16 preset suitable for Instagram Reels and Stories, while 16:9 is commonly used for standard YouTube videos. Follow these steps to prepare and export your video:
Step 1. Choose the “Create a New Video” and “Import Media” options to add the video.
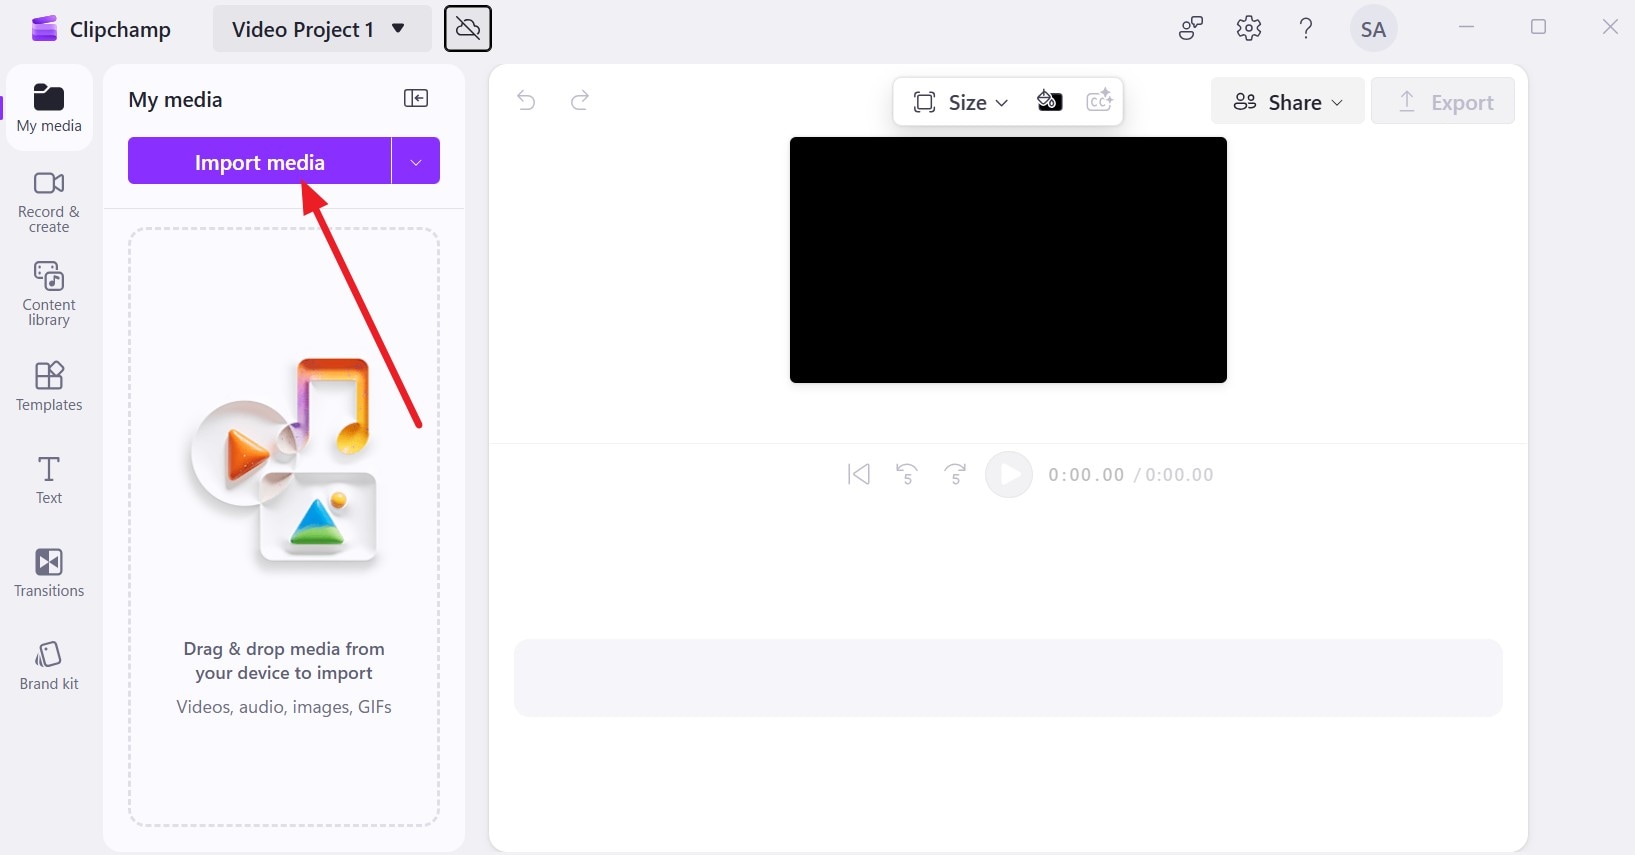
Step 2. Drag the video to the timeline and expand the “Size” menu to select “Vertical” or another option, then tap “Export.”
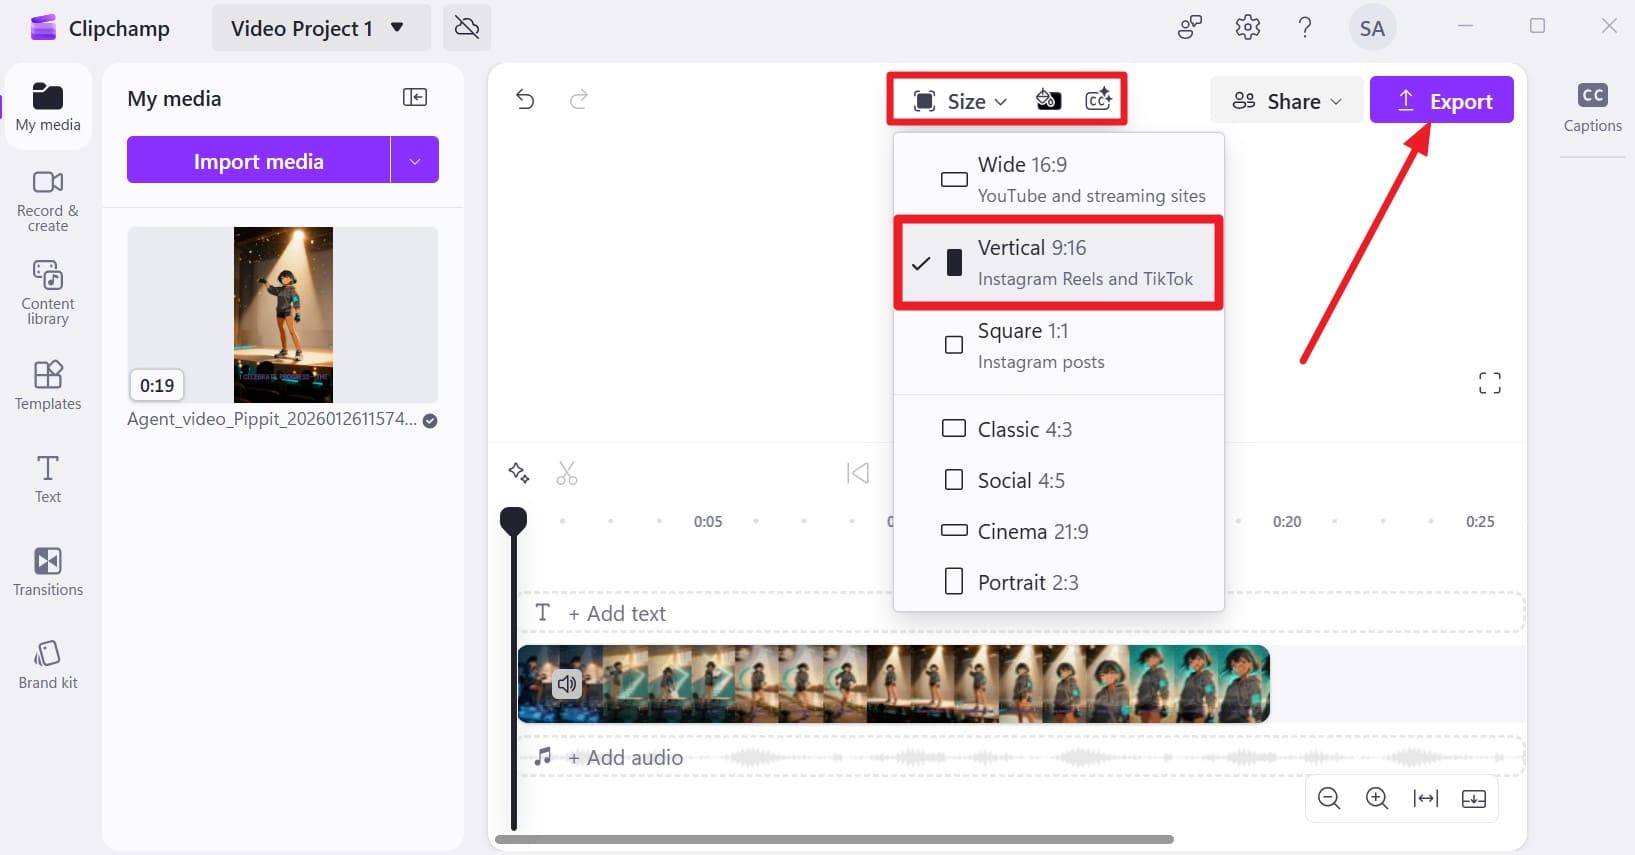
Tip: If you're preparing a standard YouTube video, keep the appropriate horizontal layout.
Step 3. In the Export Video window, select the “Quality,” Video Name,” and other settings, then click “Export.” The finished project exports as an MP4. Play the exported file and check its framing and quality before uploading it to YouTube or Instagram.
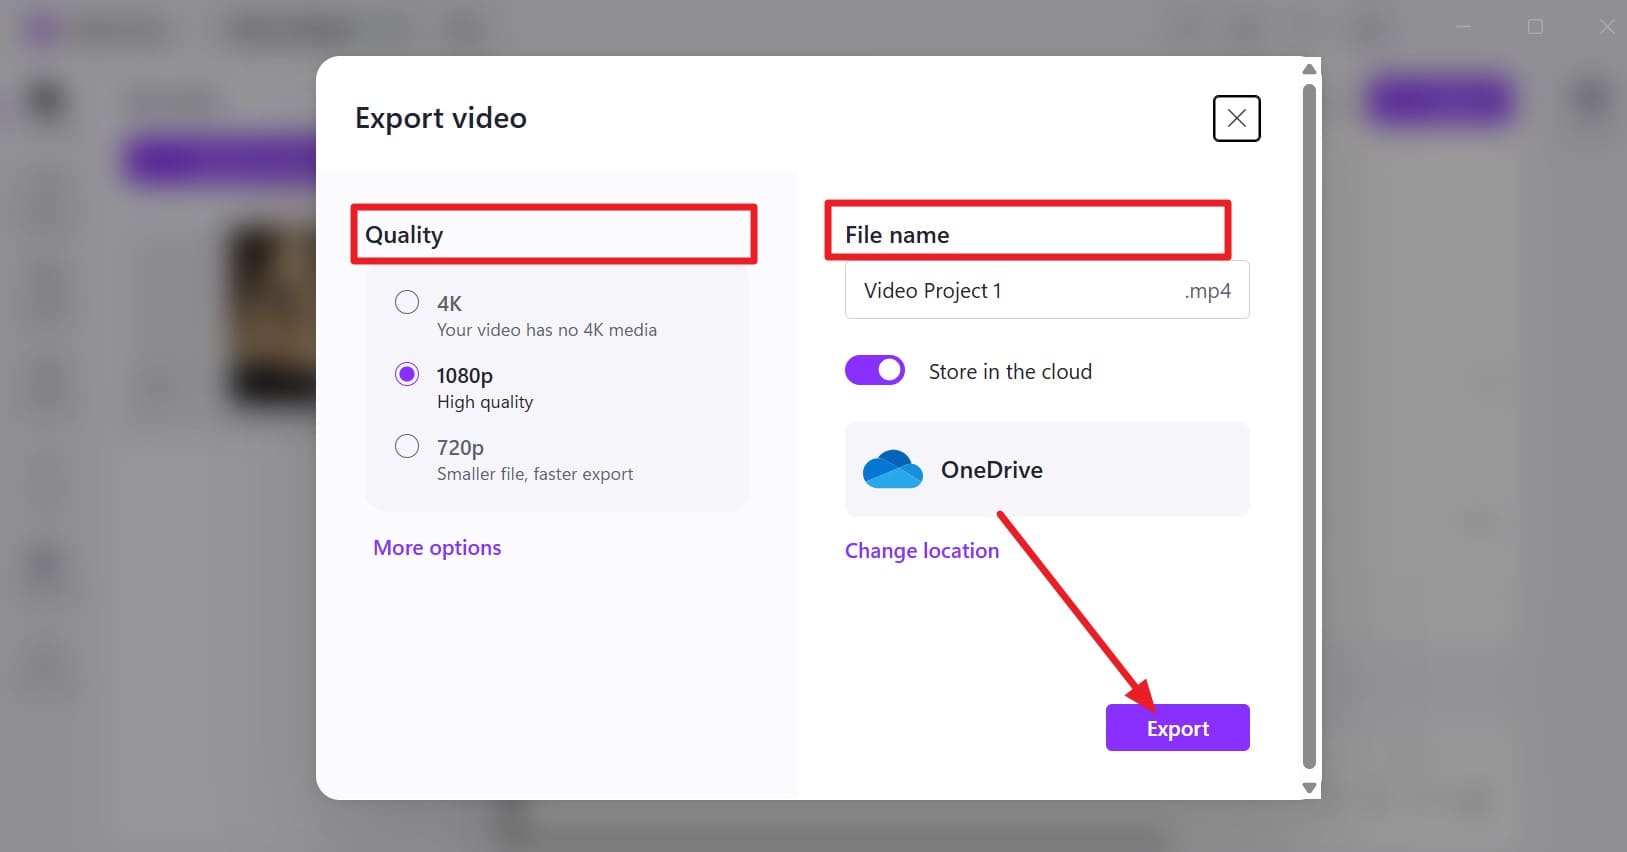
Tip: Select 1080p for higher quality, or choose 720p when file size reduction matters most.
Method 4. Reduce Video Size on Mac with QuickTime Player
QuickTime Player gives Mac users a built-in way to reduce video file size without installing extra software. Depending on the source video, it provides export options such as 4K, 1080p, 720p, and 480p, making it easy to choose a smaller resolution.
This can be useful when you need to compress video for YouTube or prepare a lighter copy for online sharing. Apple notes that the 480p option is suitable for online sharing, including YouTube. Follow these steps to export your video:
Step 1. Open your video in QuickTime Player by right-clicking the file and choosing “Open With > QuickTime Player.”
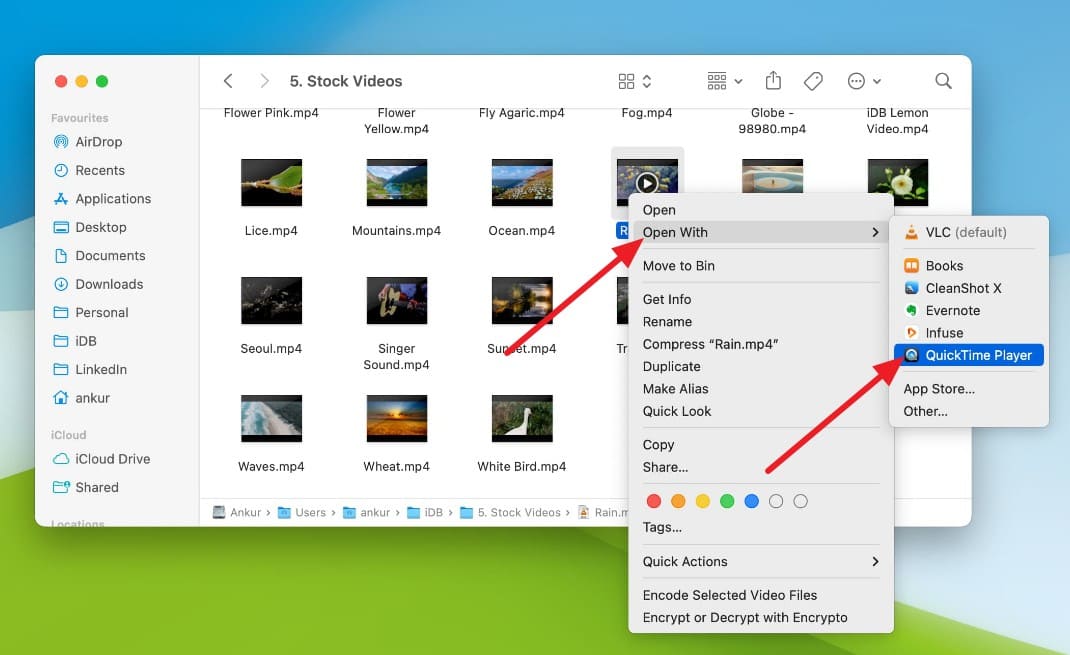
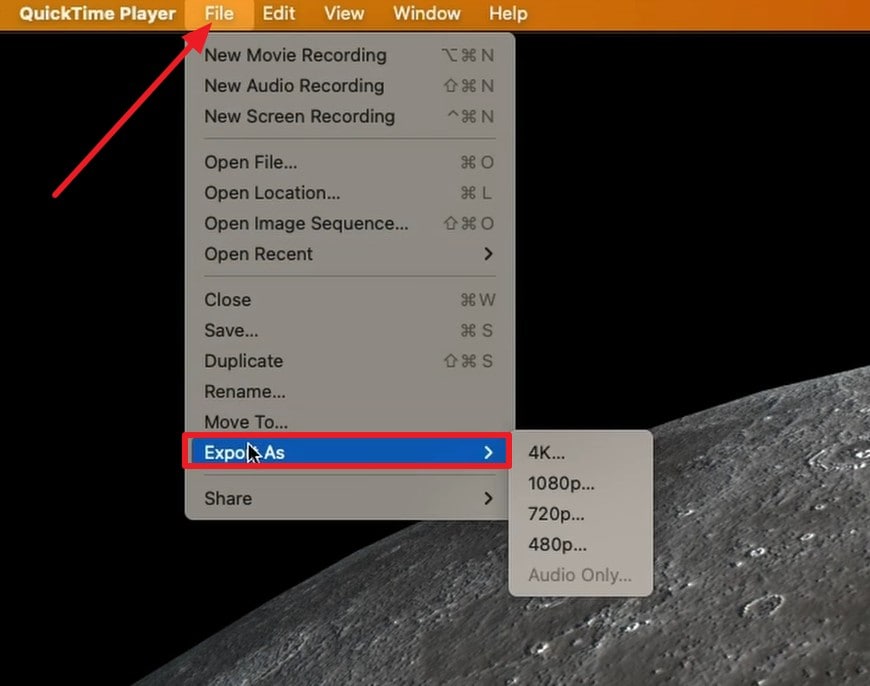
Step 2. Select “File > Export as” to see a list of lower resolution options. Choose an available resolution such as 1080p, 720p, or 480p.
Step 3. For 4K or 1080p exports, open the “Format” menu and choose “Smaller File Size” for HEVC or “Greater Compatibility” for H.264. Select “Save,” then review the exported video before uploading.
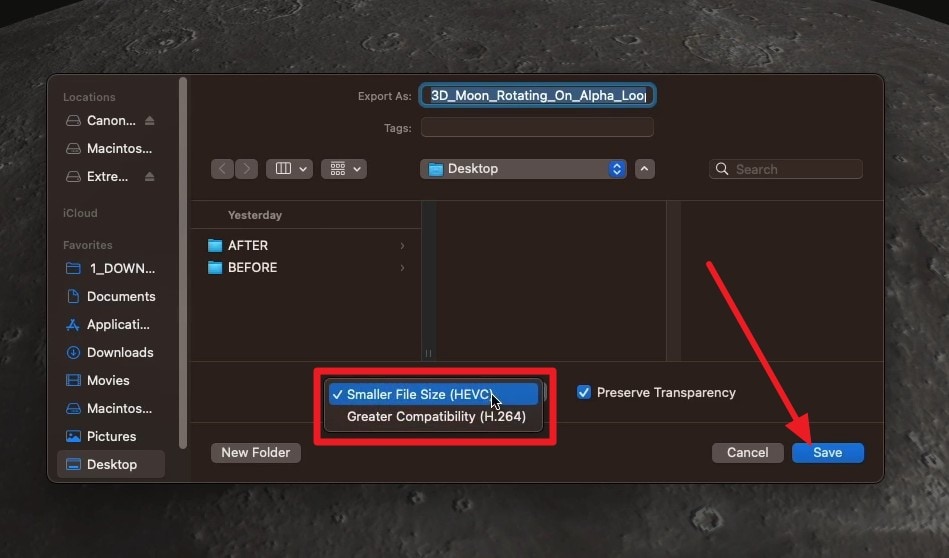
Note: QuickTime exports the finished video as a QuickTime movie (.mov) rather than MP4. Since YouTube supports MOV files for uploading, you do not need to convert the video to MP4 first.
Part 4. Best Video Compression Settings for YouTube
To compress video for YouTube without sacrificing resolution, bitrate is one of the most important settings to consider. The table below shows YouTube’s recommended SDR upload bitrates for different resolutions and frame rates. These figures are recommendations rather than strict limits, as YouTube’s official guidelines state that no bitrate limit is required.
| YouTube Resolution | SDR Bitrate, 24–30 FPS | SDR Bitrate, 48–60 FPS | Best Use |
|---|---|---|---|
| 4K (2160p) | 35–45 Mbps | 53–68 Mbps | High detail 4K uploads |
| 1440p | 16 Mbps | 24 Mbps | High-quality uploads below 4K |
| 1080p | 8 Mbps | 12 Mbps | Standard HD YouTube uploads |
| 720p | 5 Mbps | 7.5 Mbps | Smaller HD video files |
| 480p | 2.5 Mbps | 4 Mbps | SD uploads with smaller files |
What Codec and Format Should You Use for YouTube?
For YouTube uploads, video and audio settings both matter for maintaining quality. YouTube recommends an MP4 container with H.264 video, while supported audio recommendations include AAC-LC, Opus, and Eclipsa Audio at a 48 kHz sample rate. Check YouTube’s recommended upload settings for the complete specifications.
What About HDR Video?
For HDR videos, YouTube recommends different upload bitrates based on the resolution and frame rate. The table below shows the recommended settings for 24–30 FPS and 48–60 FPS HDR uploads.
| HDR Resolution | 24–30 FPS | 48–60 FPS |
|---|---|---|
| 4K (2160p) | 44–56 Mbps | 66–85 Mbps |
| 1440p | 20 Mbps | 30 Mbps |
| 1080p | 10 Mbps | 15 Mbps |
| 720p | 6.5 Mbps | 9.5 Mbps |
Part 5. Best Video Compression Settings for Instagram
When you compress video for Instagram, start with the right dimensions and frame rate before reducing file size. Since Instagram processes uploaded videos again, excessive compression can affect the final quality. The table below shows the recommended Instagram compression settings to consider:
| Setting | Recommended Target | Why It Matters |
|---|---|---|
| Aspect Ratio | 9:16 | Fills the screen for vertical Reels |
| Resolution | 1080 × 1920 when practical | Maintains clear full-screen video quality |
| Minimum Resolution | 720p | Meets Instagram’s minimum resolution requirement |
| Frame Rate | 30 FPS or higher | Meets Instagram’s minimum frame rate requirement |
| Bitrate | Avoid excessive compression | Helps preserve quality after Instagram processing |
| Upload Quality | Turn on “Upload at highest quality” | Prioritizes the highest-quality version during upload |
Part 6. Can You Use the Same Compressed Video for YouTube and Instagram?
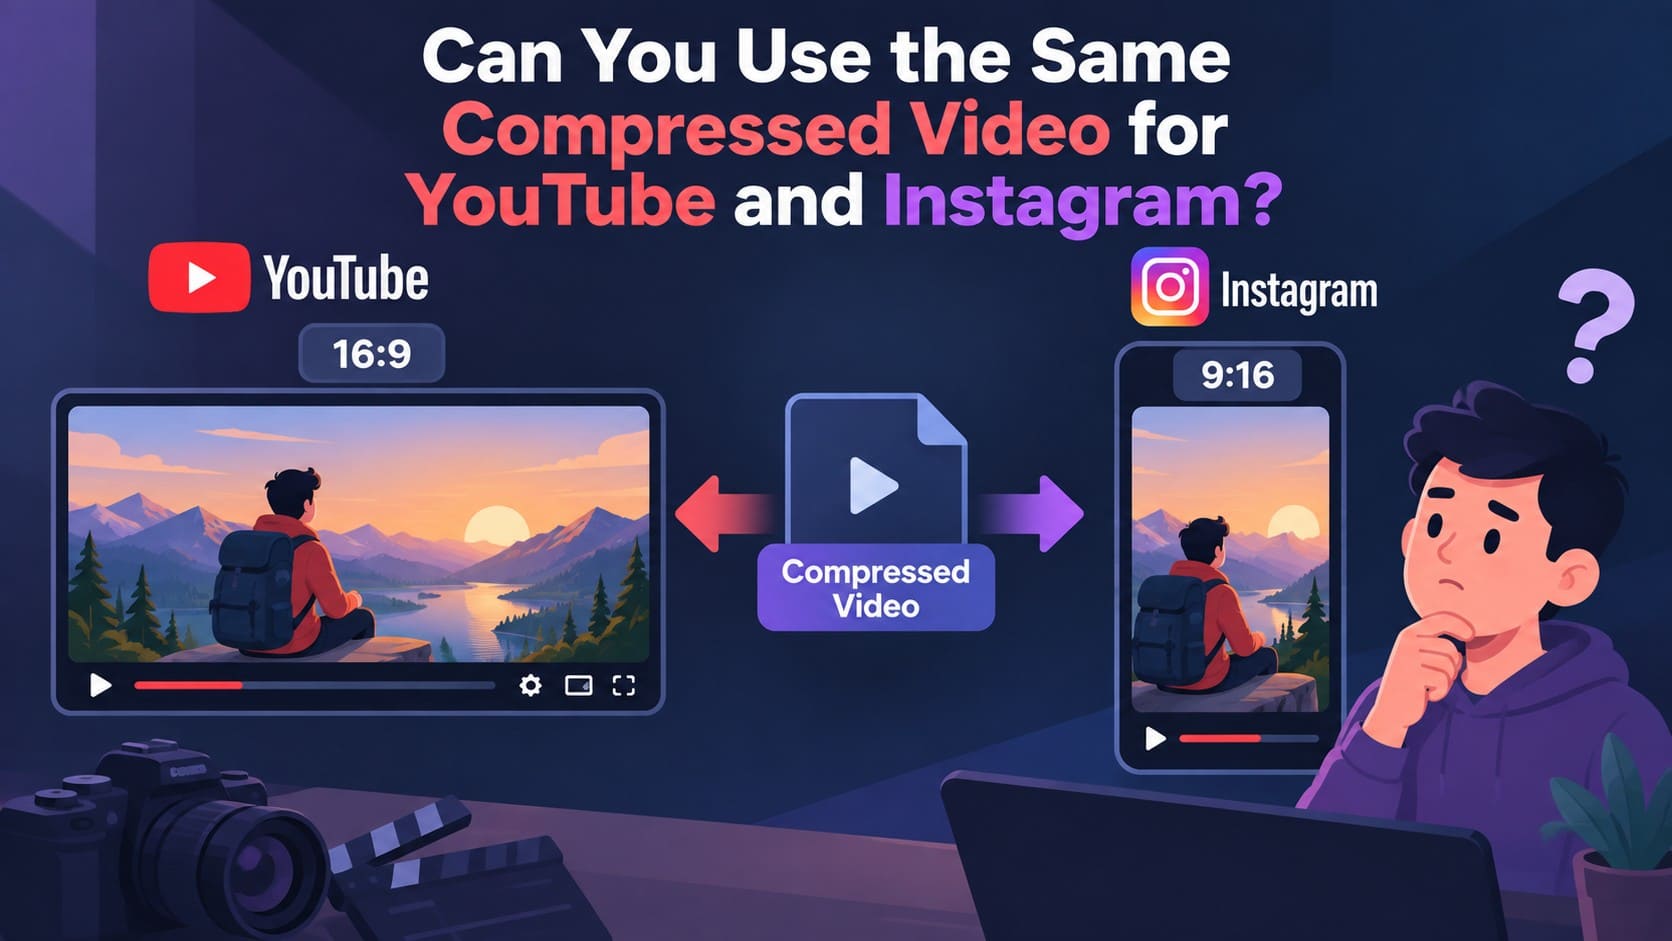
You’ll usually get better results by creating separate exports for each platform. Compression reduces file size, but it does not fix differences in framing. A standard 16:9 YouTube video may need reframing for a full-screen 9:16 Instagram Reel, while the vertical version can work well as a YouTube Short.
If you plan to compress video for YouTube and Instagram from the same source, keep faces, text, and other key details away from the edges. This makes the content easier to reframe for different aspect ratios. Keep one high-quality master and create separate platform-specific copies whenever cropping would remove important content.
Part 7. Why Does Your Video Look Blurry After Uploading?
Blurry uploads can result from quality loss that happens before the video even reaches the platform. Compression, resizing, and repeated exports can all reduce clarity. If you compress video for Instagram or YouTube before uploading, check these 5 common causes to identify what may be affecting the final quality:
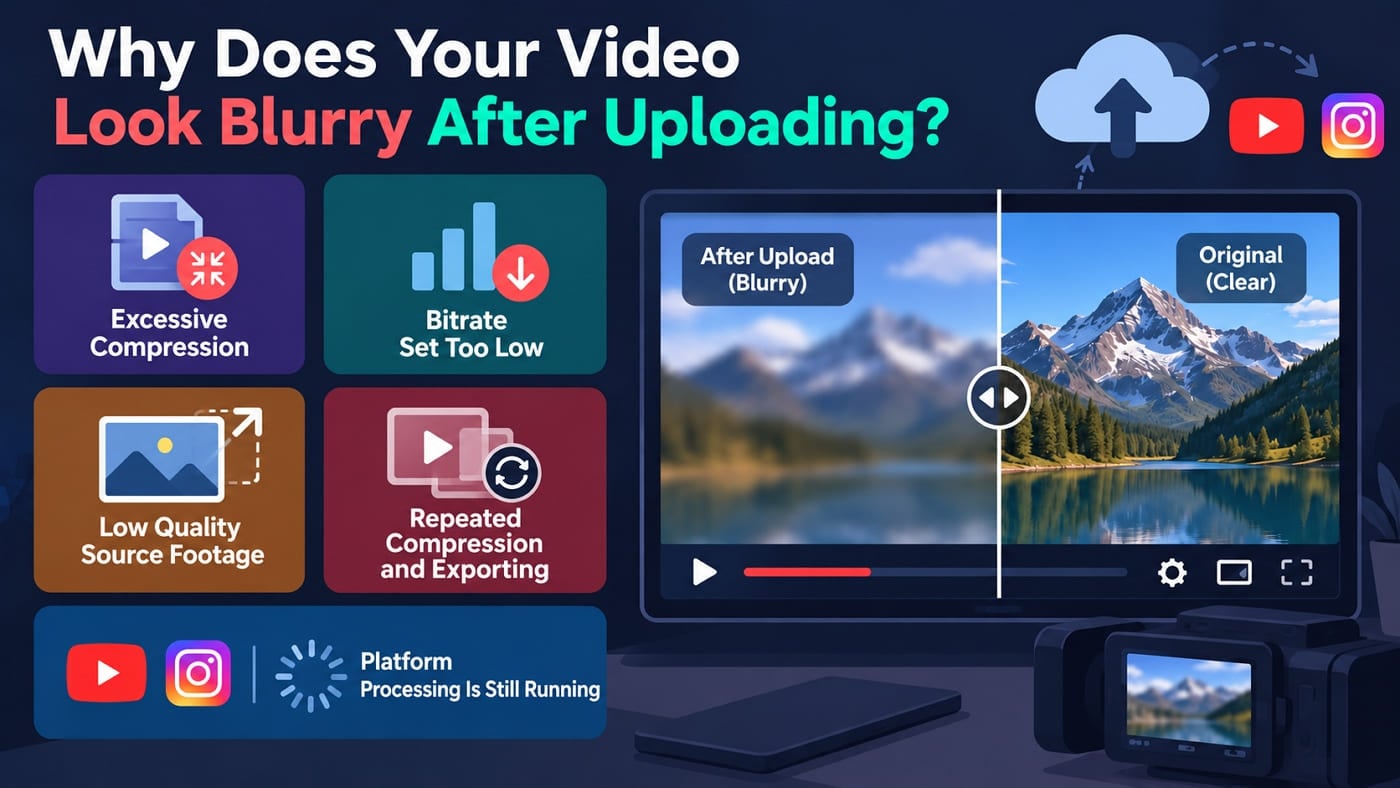
- Excessive Compression: Heavy compression removes fine visual details before upload. Using an aggressive compression level can make faces, text, textures, and other details appear noticeably softer.
- Bitrate Set Too Low: Resolution alone does not determine video clarity. A bitrate that is too low can reduce detail in fast motion or complex scenes, even when the video is exported at 1080p.
- Low-Quality Source Footage: Compression cannot improve details that are already missing from the original video. Upscaling low-resolution footage to 1080p or 4K may increase its dimensions, but it cannot restore lost clarity.
- Repeated Compression and Exporting: Re-encoding an already compressed video can cause further quality loss. Create each YouTube or Instagram version directly from the high-quality master instead of repeatedly exporting compressed copies.
- Platform Processing Is Still Running: According to YouTube, newly uploaded videos may initially appear in lower quality while higher resolutions are still processing. The video can temporarily look blurry until HD processing finishes.
Part 8. What If the Video Is Still Too Large or Slow to Upload?
If your video is still too large or slow to upload, reduce its size in stages instead of lowering quality immediately. The following 5 areas cover practical ways to remove unnecessary data and optimize export settings. Use them when you need to compress a video for Instagram or prepare a smaller YouTube upload:
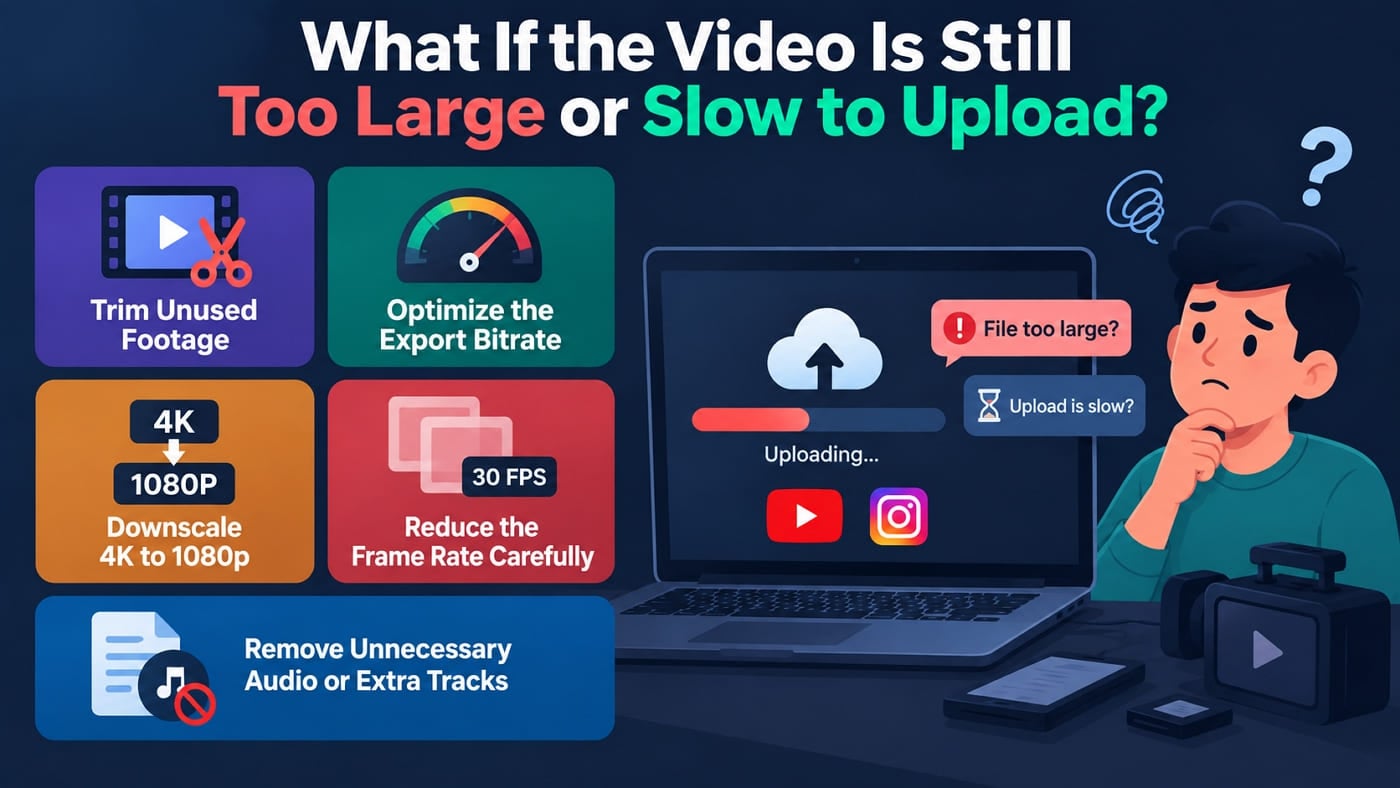
- Trim Unused Footage: Remove unnecessary intros, outros, pauses, and other unwanted sections first. This reduces file size without lowering the quality of the footage you keep.
- Optimize the Export Bitrate: Avoid using a bitrate that is unnecessarily high for your resolution and frame rate. Follow platform recommendations to reduce file size while maintaining suitable video quality.
- Downscale 4K to 1080p: Export in 1080p when 4K resolution is unnecessary. This can significantly reduce file size while still providing Full HD quality for YouTube or Instagram.
- Reduce the Frame Rate Carefully: Lowering a high frame rate can reduce file size, but it may affect motion smoothness. For Instagram Reels, maintain at least 30 FPS for suitable playback quality.
- Remove Unnecessary Audio or Extra Tracks: Delete unused audio tracks and other unnecessary media before export. Removing data viewers do not need can further reduce the final file size without lowering video resolution.
Conclusion
The best way to compress video for YouTube/Instagram is to create an export that fits each platform instead of relying on one generic version. YouTube favors high-quality uploads, while Instagram requires more attention to mobile-friendly framing and file optimization.
For videos stored on your phone, Dr.Fone App provides a convenient way to reduce file size directly. With the right compression method and export settings, you can achieve smaller files without sacrificing noticeable video quality.
Frequently Asked Questions
-
1. Does YouTube compress videos after they are uploaded?
Yes. YouTube re-encodes uploaded videos into different resolutions and formats for playback across various devices and connection speeds. Uploading at YouTube’s recommended bitrate helps preserve quality during this processing. -
2. Does Instagram compress every video you upload?
Instagram processes uploaded videos to optimize playback across different devices and connections. Starting with a properly sized, high-quality video helps reduce unnecessary quality loss during this processing. -
3. Is 1080p better than 4K for Instagram videos?
For most Instagram Reels, 1080 × 1920 is a practical choice for balancing visual quality and file size. Uploading 4K does not guarantee better final quality because Instagram processes uploaded videos for delivery. -
4. Can the same compressed video be uploaded to YouTube and Instagram?
The same video can be uploaded to both platforms, but the framing may not suit each one. A 16:9 YouTube video will not fill a 9:16 Reel, so creating separate platform-specific versions usually delivers better results.


James Davis
staff Editor
Generally rated4.5(105participated)