


 TL;DR:
Use a passport size photo compressor only after confirming the application portal's required dimensions, format, framing, and file-size range.
- Dr.Fone App can compress prepared passport photos directly on an iPhone and lets you review the estimated reduction before saving.
- Windows Photos and Mac Preview can resize dimensions and adjust quality, while an online tool can target a maximum size in KB.
- Compression cannot fix blurry images, incorrect framing, unsuitable backgrounds, or altered facial appearance.
Ask AI for a summary
 ChatGPT
 Perplexity
 Gemini
 Claude
 Grok
Grok
A photo that looks fine on your phone can still get rejected during upload. Passport and visa portals set specific requirements for file size, pixel dimensions, format, and framing. Since these requirements vary by country and application, there is no universal passport photo size. A passport size photo compressor can help reduce the file size once your photo meets the other requirements.
Before compressing, always check the official application guidelines. This guide explains 4 practical ways to reduce passport photo size on iPhone, Windows, Mac, and online. You’ll also learn how Dr.Fone App offers a convenient mobile option.
- Part 1. Check the Passport Photo Requirements Before You Compress
- Part 2. Crop, Resize, or Compress: What Does Your Passport Photo Actually Need?
- Part 3. How to Reduce Passport Photo Size?
- Part 4. How to Compress a Passport Photo to 20KB, 50KB, or 100KB?
- Part 5. Why Is Passport Photo Still Rejected After Compression?
- Part 6. How to Protect Passport Photo Quality While Reducing File Size?
- Part 7. When Should You Retake the Passport Photo Instead of Compressing It?
- Frequently Asked Questions
Part 1. Check the Passport Photo Requirements Before You Compress
Before you compress a passport-size photo, check the official passport or visa portal requirements. Digital photo specifications vary across countries and applications, including dimensions, file size, format, and framing. Confirm these key requirements before reducing your photo size:
| Requirement to Check | What It Controls | Why It Matters |
|---|---|---|
| Pixel Dimensions | Minimum and maximum image dimensions | Required dimensions vary by authority. For example, UK digital passport photos must be at least 600 × 750 pixels. |
| Aspect Ratio | Shape and proportions of the photo | Some authorities specify an exact ratio. U.S. digital visa photos, for example, require a square image. |
| File-Size Range | Minimum or maximum upload size | Portals can set different KB or MB limits, so check the official requirements before compression. |
| File Format | Accepted image file types | Accepted formats differ by portal. Some applications require JPEG, while others may support additional formats. |
| Background | Background color and appearance | Countries have different background requirements, and compression cannot correct a non-compliant background. |
| Photo Quality | Sharpness and facial detail | Heavy compression can reduce visible detail and potentially make the photo unacceptable. |
| Editing Restrictions | Permitted digital modifications | Rules for retouching and digital alterations vary, so avoid changing facial features or appearance unless permitted. |
Part 2. Crop, Resize, or Compress: What Does Your Passport Photo Actually Need?
People often confuse cropping, resizing, compression, and format conversion, but each operation solves a different passport photo issue. Review the table below to understand when to use a passport photo size reducer and when another adjustment is more appropriate:
| Action | What It Changes | When You Need It | Main Risk |
|---|---|---|---|
| Crop | Composition and framing | The photo has extra space or does not match the required framing. | Incorrect cropping can affect head position, spacing, or composition. |
| Resize | Pixel dimensions | Image dimensions exceed or fall outside the permitted range. | Going below minimum dimensions or distorting the face by changing the aspect ratio. |
| Compress | File size, usually at the same dimensions | File size exceeds the portal's KB or MB limit. | Excessive compression can reduce facial detail or produce a file below the minimum. |
| Convert File Format | Image file type | The current image format is not accepted by the portal. | Re-encoding into a lossy format can reduce image quality. |
Part 3. How to Reduce Passport Photo Size?
Since different devices offer different ways to reduce file size, choose the method that best matches your needs. Here are 4 practical ways to use a passport photo compressor on iPhone, Windows, Mac, or online:
Method 1. Compress a Passport Photo on iPhone Using Dr.Fone App
Most passport photos are already stored on your phone, so moving them to a computer just to reduce file size adds an unnecessary step. Dr.Fone App simplifies the process with a dedicated Compressor tool featuring separate options for photos and videos. Its photo compressor lets you select images and review the expected file-size reduction before starting compression.
After processing, you can preview the compressed result and check its final size and visual quality before saving it. The app also includes additional AI tools for tasks such as image enhancement and colorization. With a straightforward workflow, Dr.Fone App provides a convenient option for reducing prepared passport photos directly on your phone.
Dr.Fone App - Photo & Video Compressor for iPhone
Compress Photos & Videos to Free Up iPhone Storage
- Compress Large Photos to Reduce File Size
- Compress Large Videos Instead of Deleting Them
- Free Up More Storage Space for New Photos, Videos, and Apps
- Manage Space-Consuming Photos and Videos More Efficiently



Guide to Compress the Passport Size Image with Dr.Fone App
Follow these simple steps to use Dr.Fone App to reduce passport photo size directly on your phone:
-
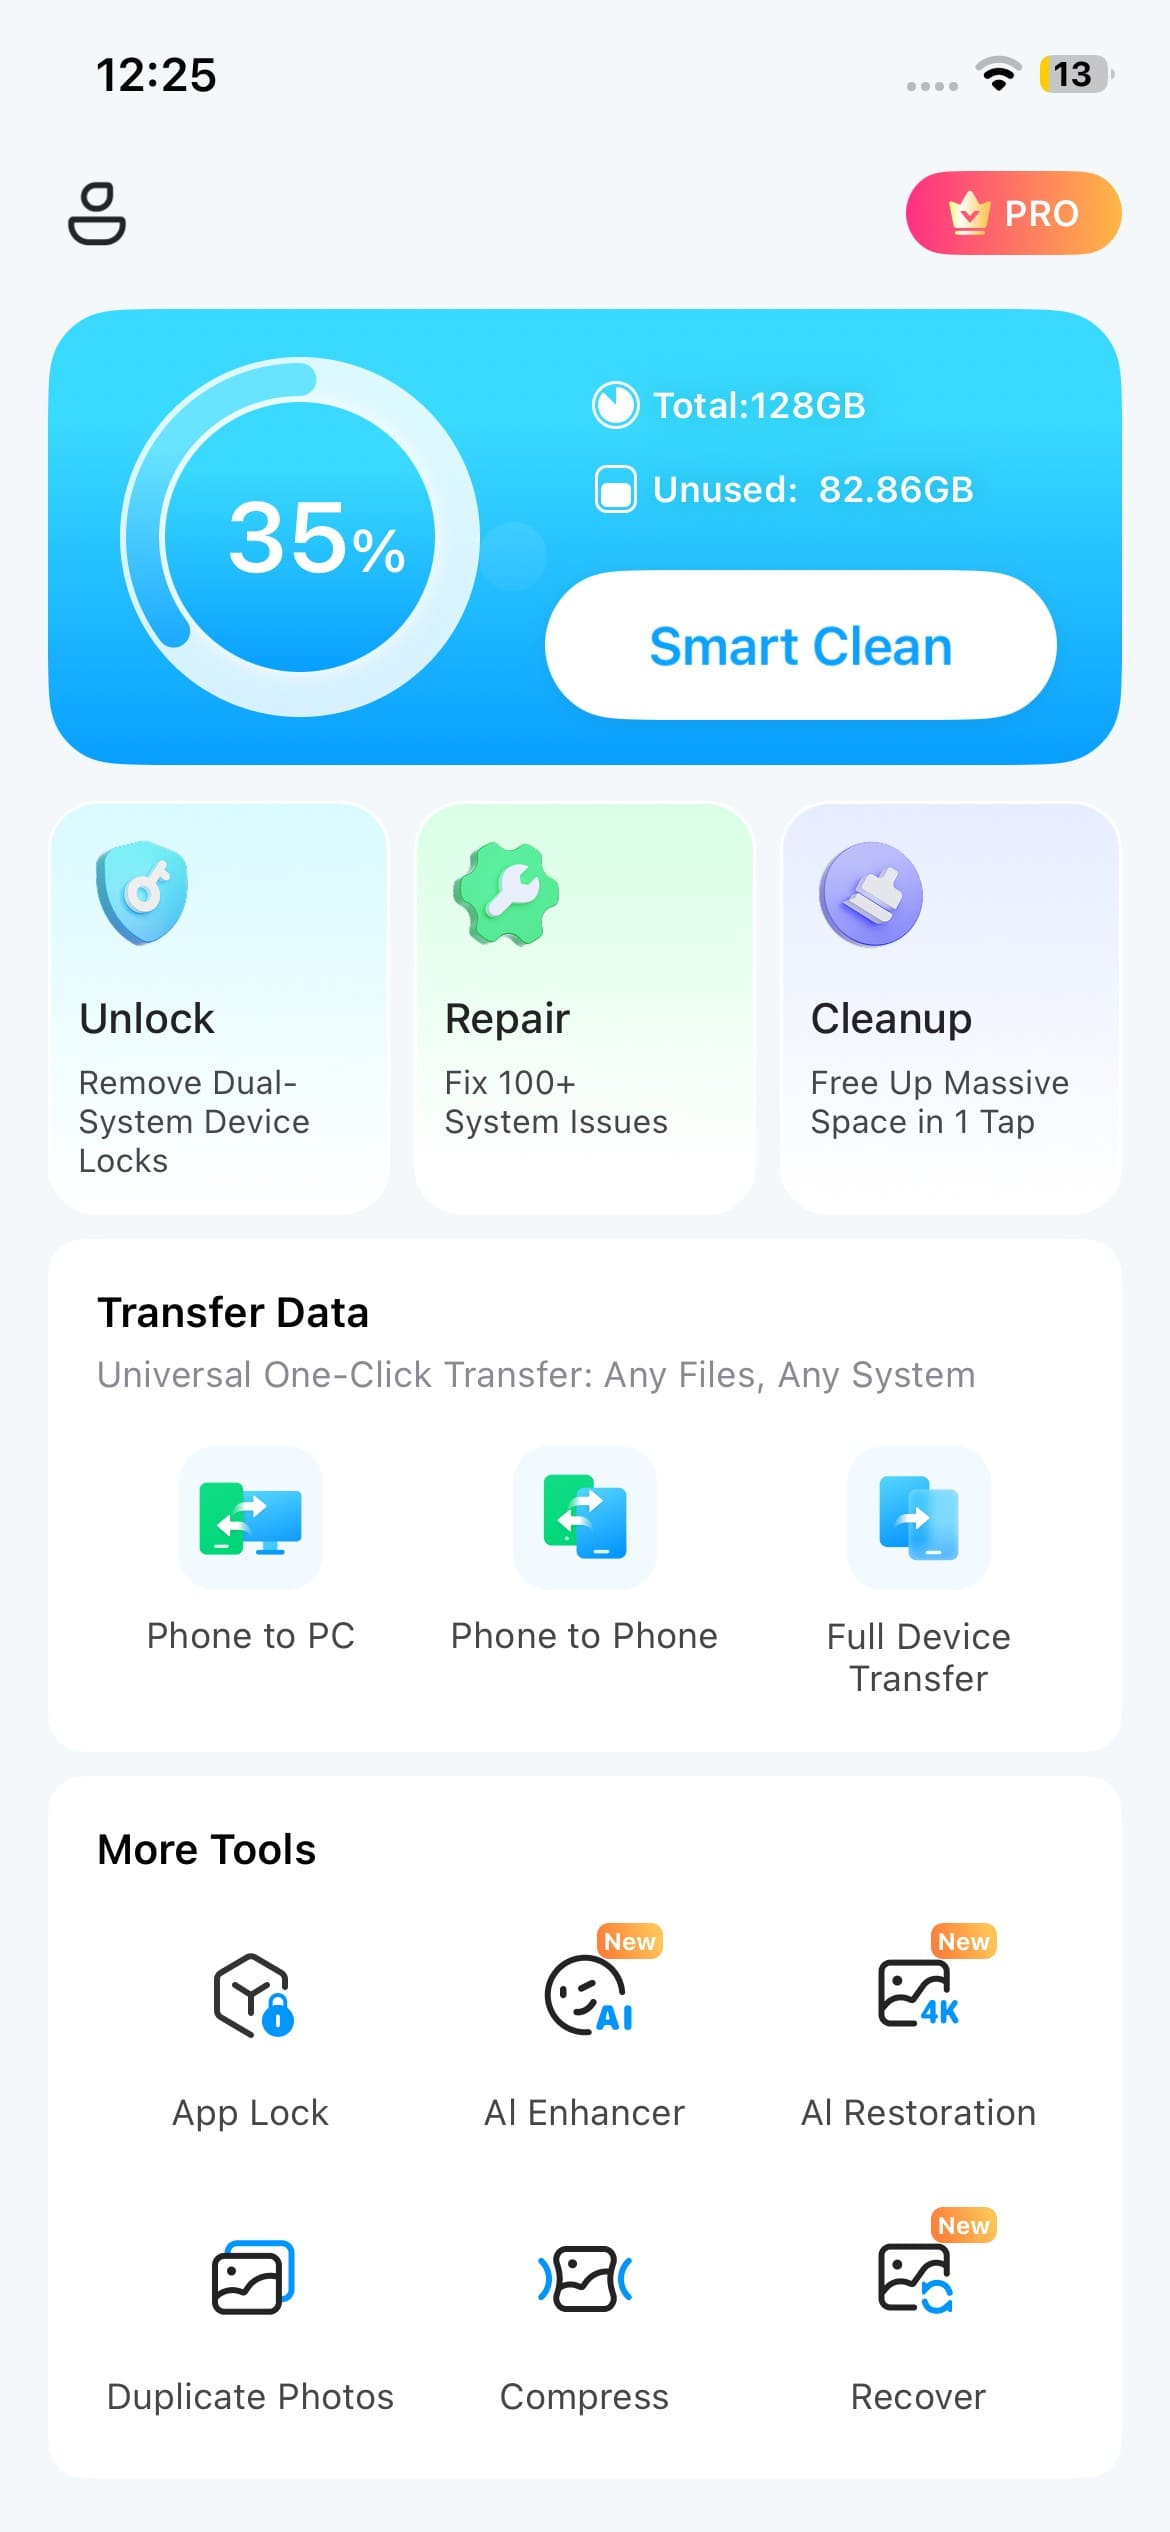
Step 1 Choose the Compressor Tool
From the “More Tools” section, select the “Compressor” tool to open the compression interface.
-
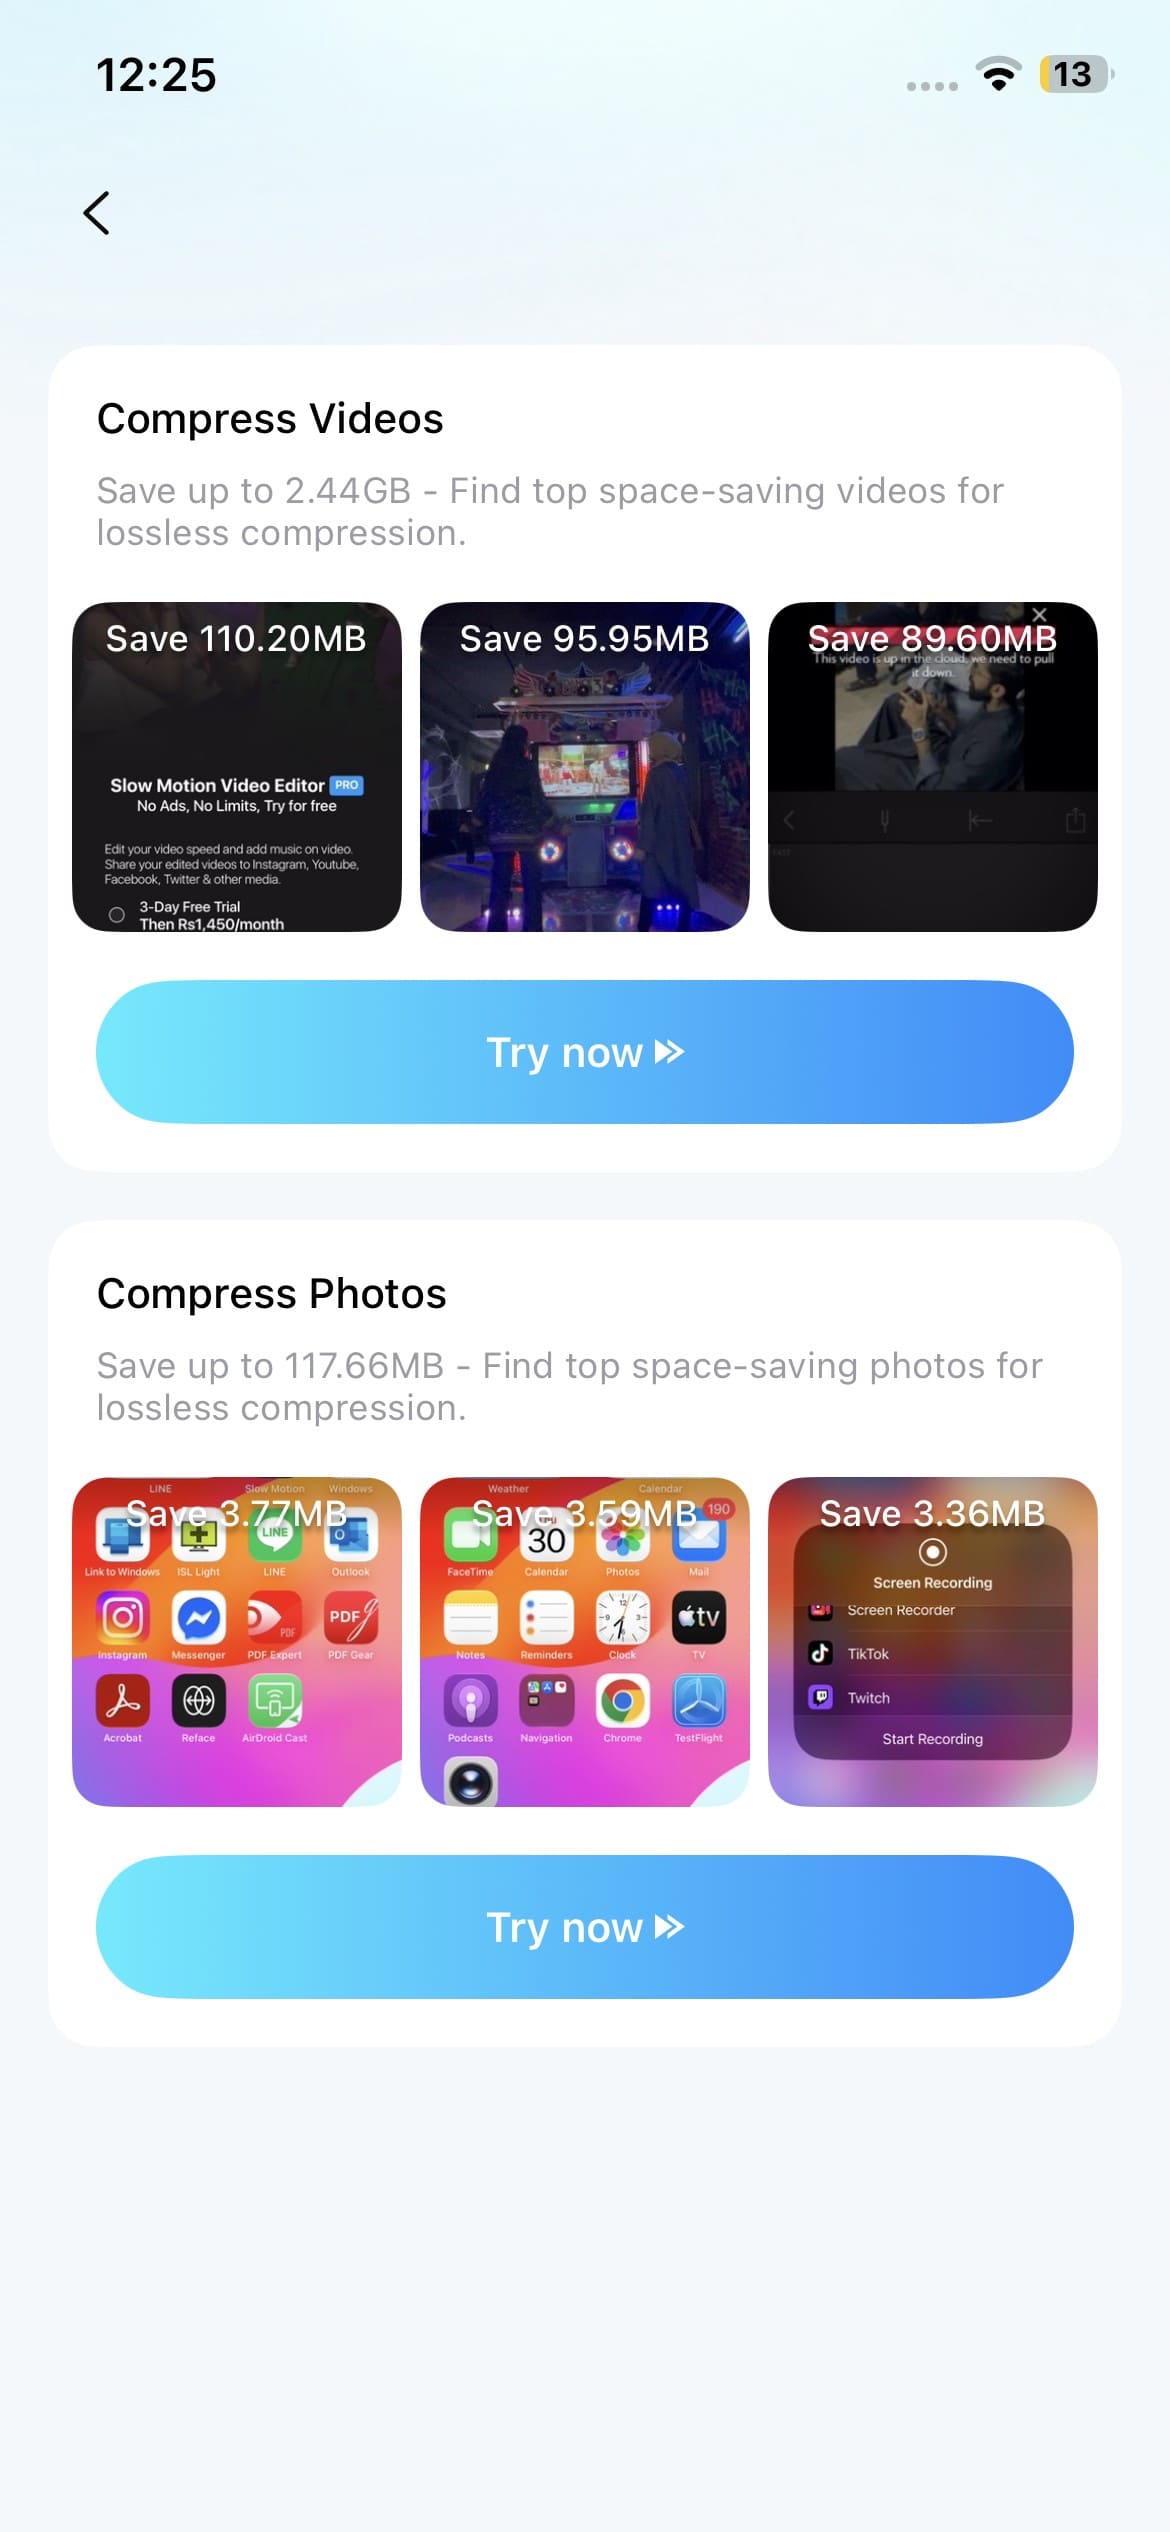
Step 2 Compress the Images in the App
Locate the “Compress Photos” section and tap “Try now” to select the passport photo you want to compress.
-
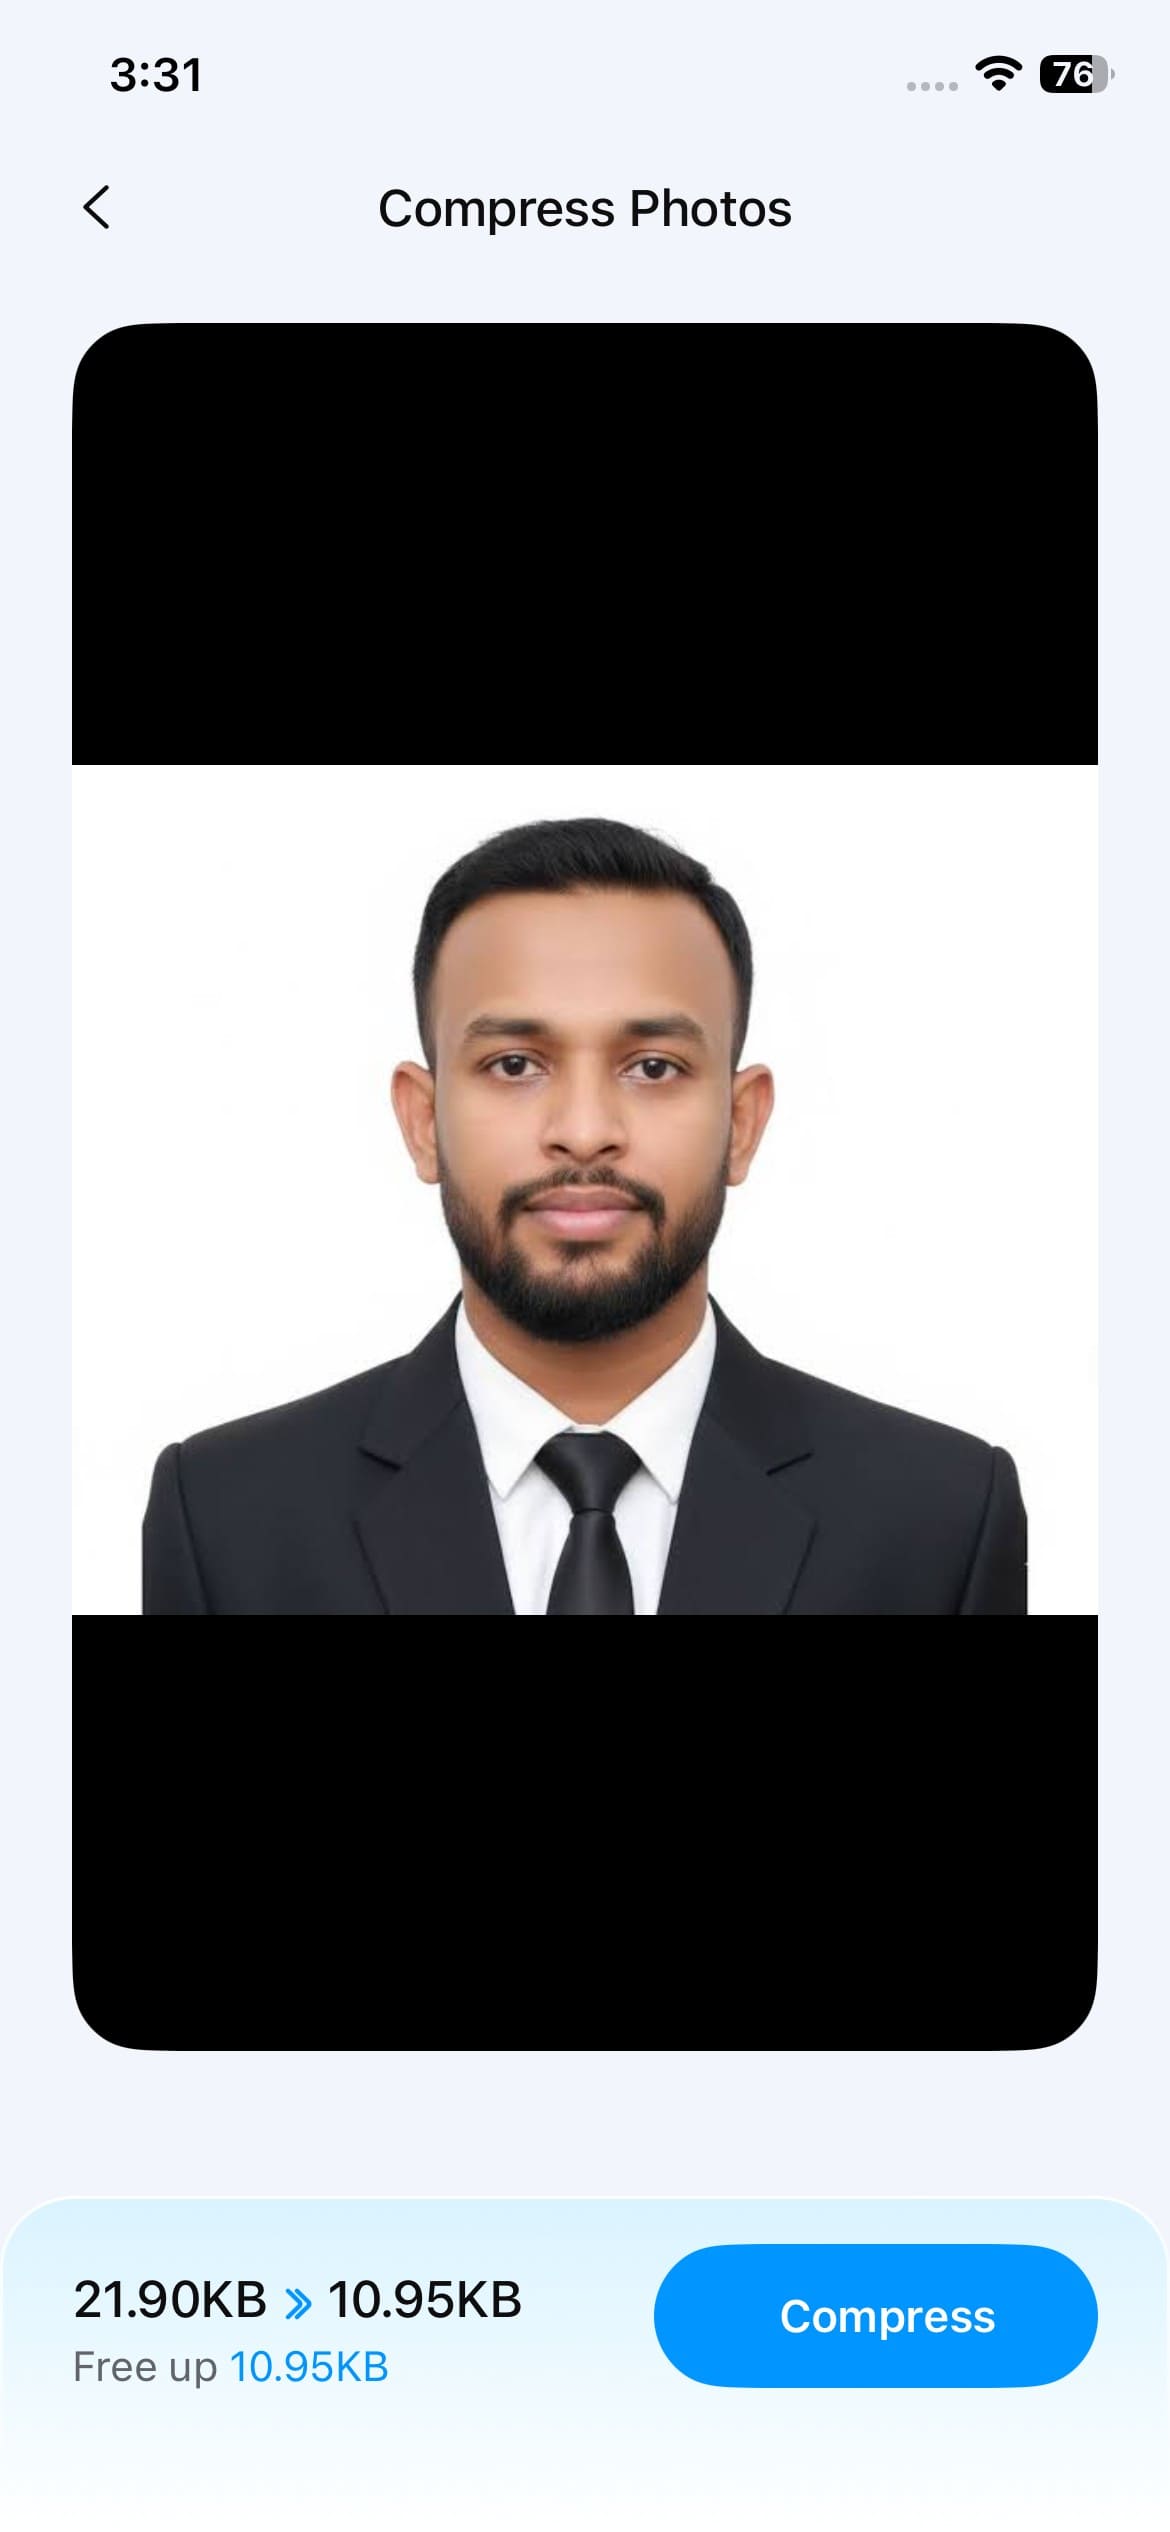
Step 3 Review and Tap on Compress
Review the displayed file-size reduction and confirm that the estimated size meets the passport or visa portal requirements. Tap “Compress” to process the photo. Once completed, preview the result, check its quality and final file size, and tap “Save” to export it.
Method 2. Use an Online Passport Photo Compressor
When a passport or visa portal sets a strict file-size limit, manually testing different compression levels can take time. ImageCompressorTools simplifies the process by letting you enter a maximum target size and choose low, medium, or high compression quality. The online tool supports JPG, JPEG, and PNG files. Follow these steps to compress a passport photo according to your application requirements:
-
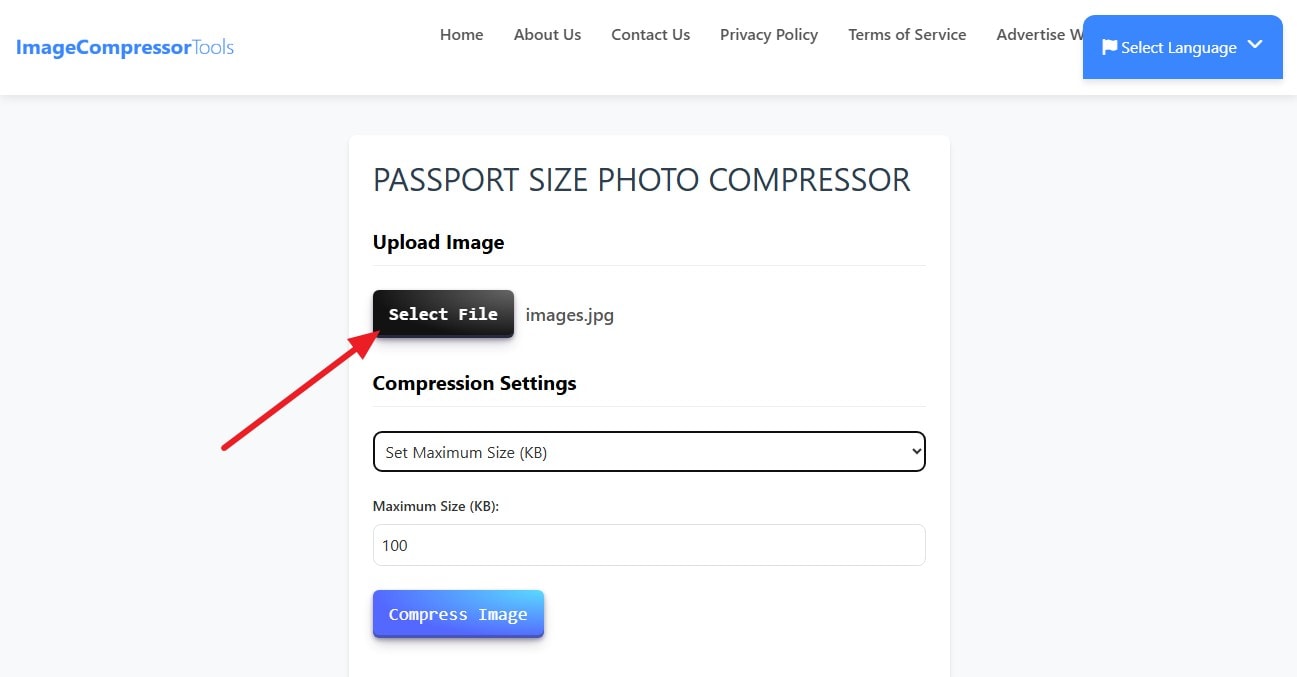
Step 1 Select the Passport File
Tap on the “Select File” button and import the image. Make sure the image already follows the portal’s required framing, background, and dimensions.
-
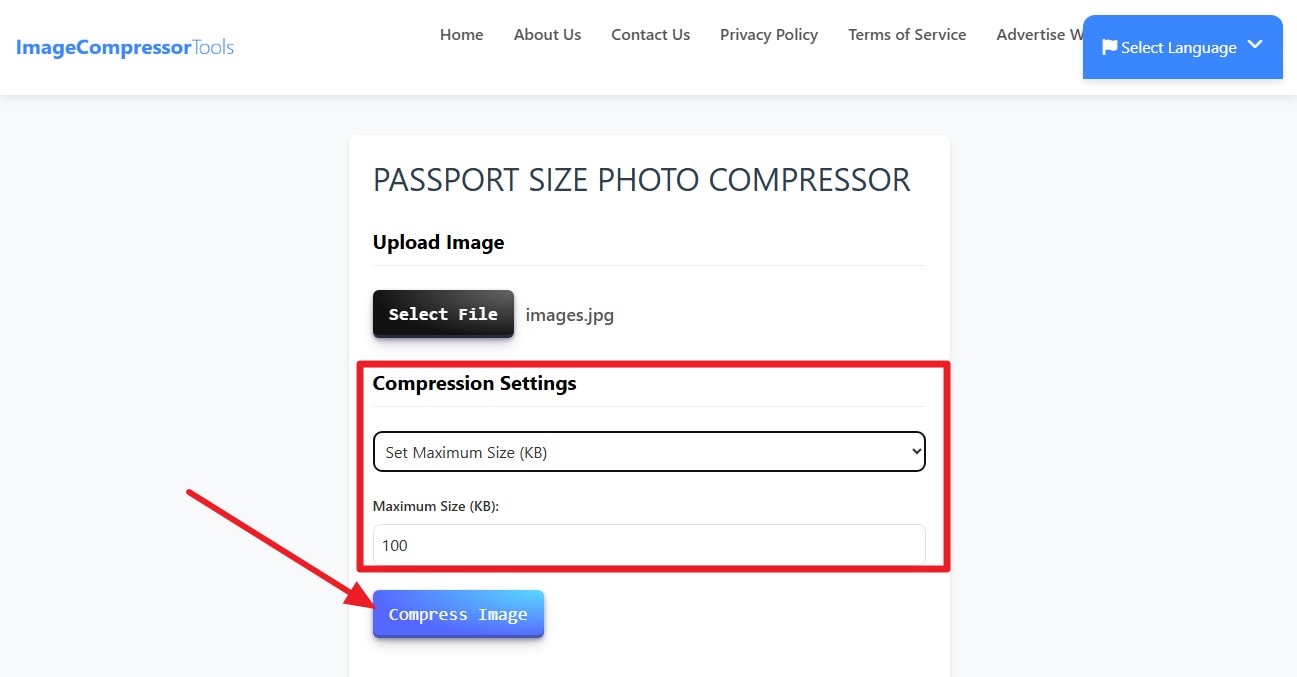
Step 2 Set the Maximum Size
Choose “Set Maximum Size (KB)” under Compression Settings and enter the required maximum file size in KB. Once the target size is set, click “Compress Image” to reduce the passport photo within the specified limit.
-
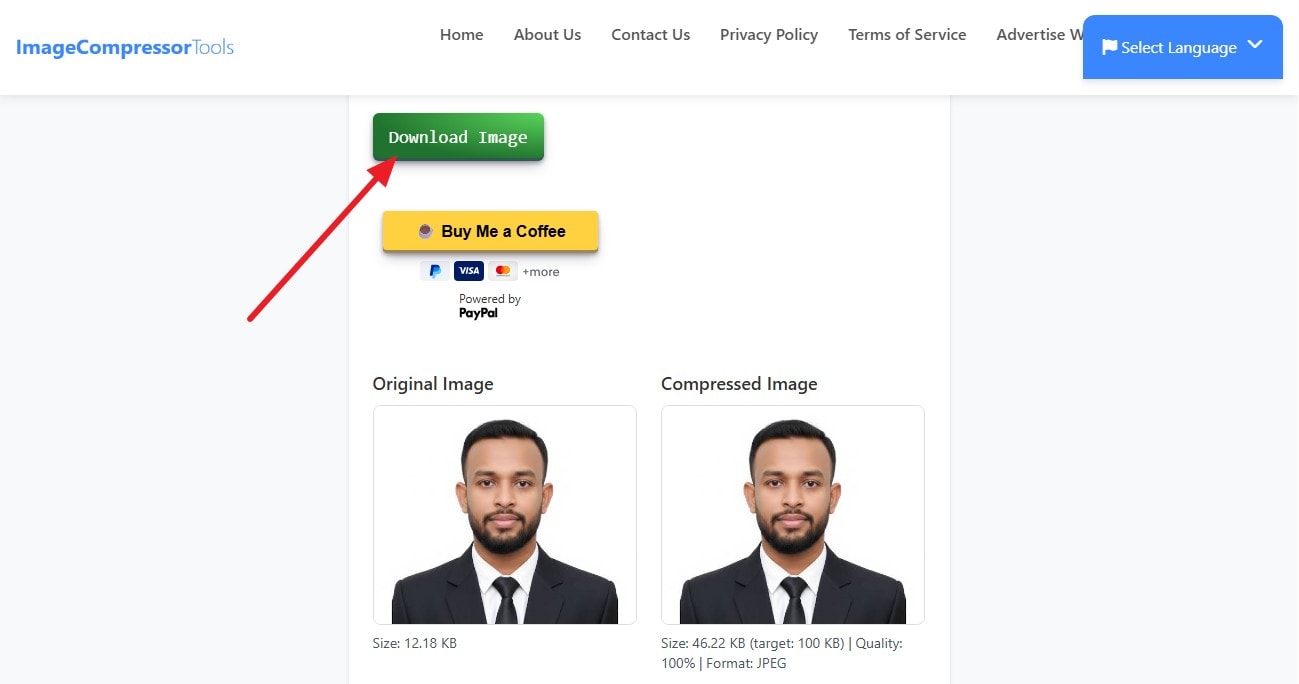
Step 3 Download the Image
Compare the original and compressed versions, paying close attention to facial sharpness and fine details. Confirm that the final file size falls within the required range, then click “Download Image” to save the compressed passport photo.
Method 3. Reduce Passport Photo Size on Windows with the Photos App
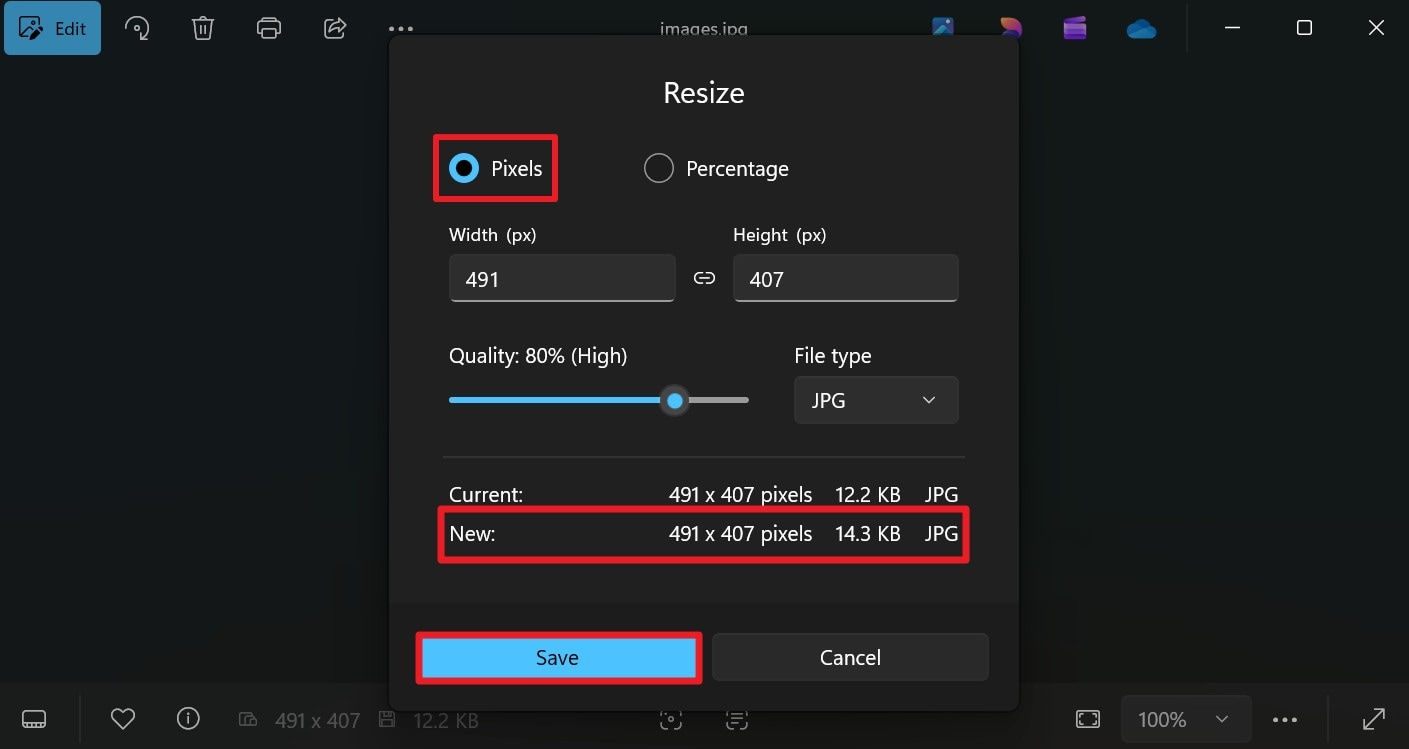
Some passport and visa portals require specific pixel dimensions along with file-size limits. The Windows Photos app provides a built-in way to resize an image by adjusting its width and height. When saving in JPG format, you can also adjust image quality to help reduce file size.
However, it does not target an exact KB value, so a separate passport photo compressor may still be needed. Follow these steps to resize and adjust your passport photo:
-
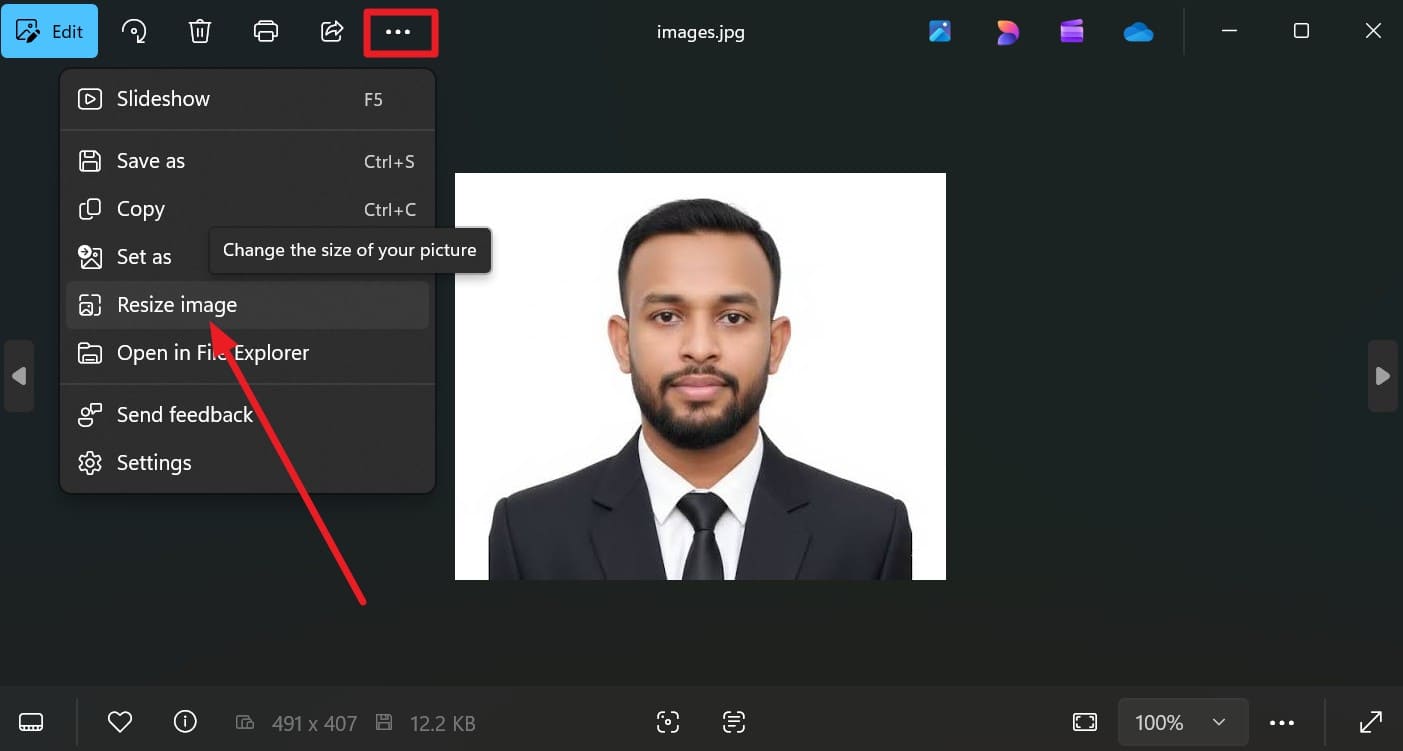
Step 1 Open Resize Image
Open the image in the Photos App and tap the “Three Dots” to choose the “Resize Image” option.
-
Step 2 Review New Details and Save
Choose “Pixels” and enter the width and height required by the passport or visa portal. If saving as JPG, adjust the “Quality” slider as needed to reduce file size. Review the estimated “New” dimensions and file size, then select “Save” to export the resized photo.
Method 4. Reduce Passport Photo Size on Mac with Preview
macOS Preview provides built-in tools for adjusting both image dimensions and file size. You can resize a passport photo to the required width and height, then use the JPEG quality slider during export to reduce its file size. While Preview cannot target an exact KB value, it shows the estimated size as you adjust quality. Follow these steps to use Preview as a passport photo size reducer:
-
Step 1 Adjust the Image Size
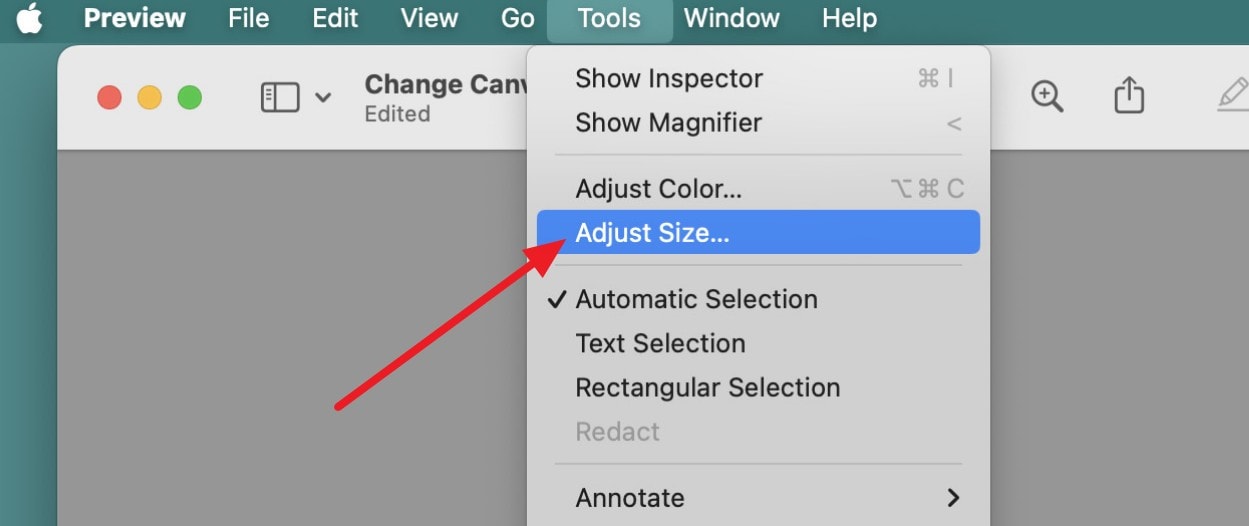
Open the passport photo in Preview, choose “Tools > Adjust Size” to enter the width and height specified by the passport or visa portal.
-
Step 2 Resample the Image
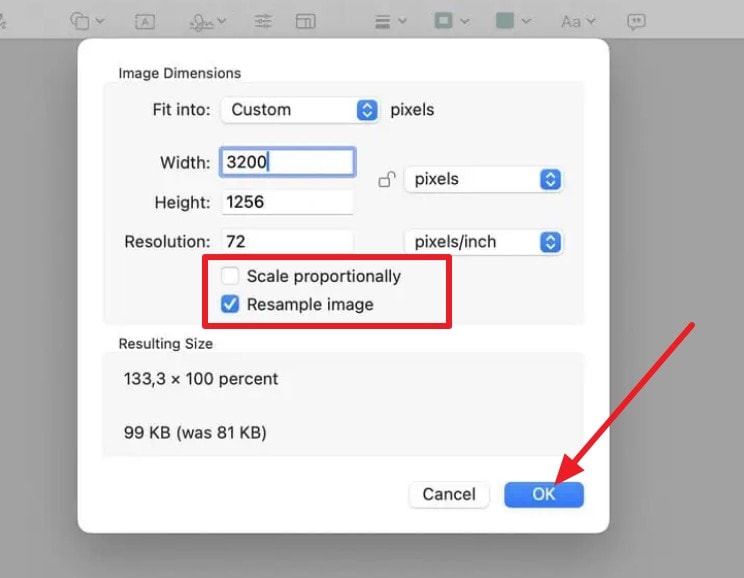
Enable “Resample Image” to change the photo’s actual pixel dimensions. Then, keep “Scale Proportionally” enabled so the width and height adjust together without distorting the image. Once the required dimensions are set, review the changes and click “OK” to apply them.
-
Step 3 Choose the Quality and Save
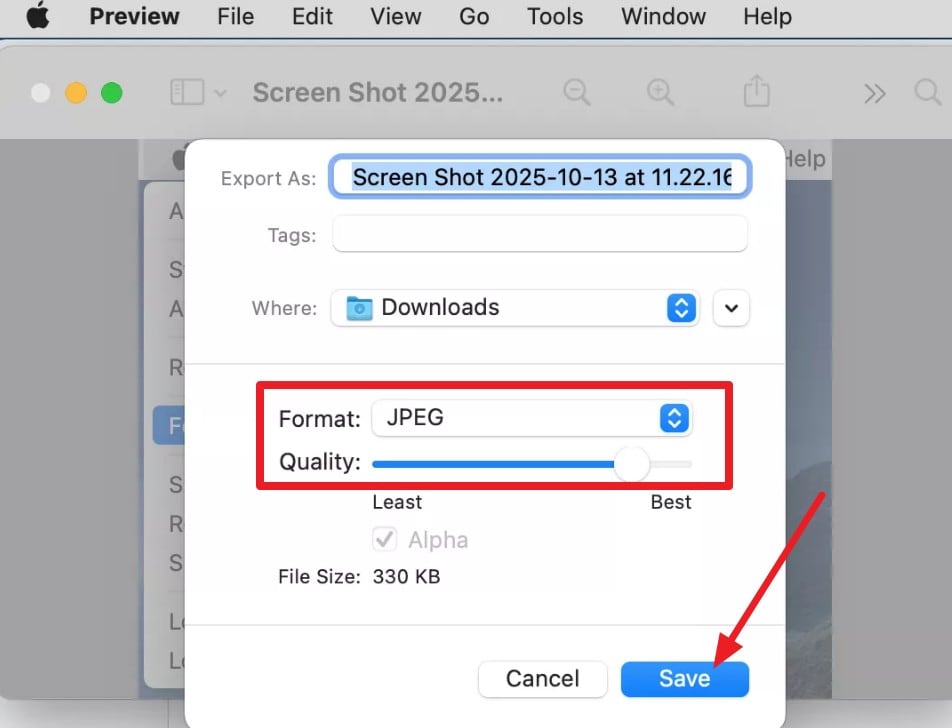
Choose “File > Export” and select “JPEG” if the application accepts it. Adjust the “Quality” slider while checking the estimated file size. Once the photo falls within the required size range, click “Save” to export it.
Part 4. How to Compress a Passport Photo to 20KB, 50KB, or 100KB?
Target sizes such as 20KB, 50KB, or 100KB come from specific application portals, not a universal passport standard. Since requirements vary, compress the image to passport size based on the limits set by your application. Follow these 5 rules to get the file size right:
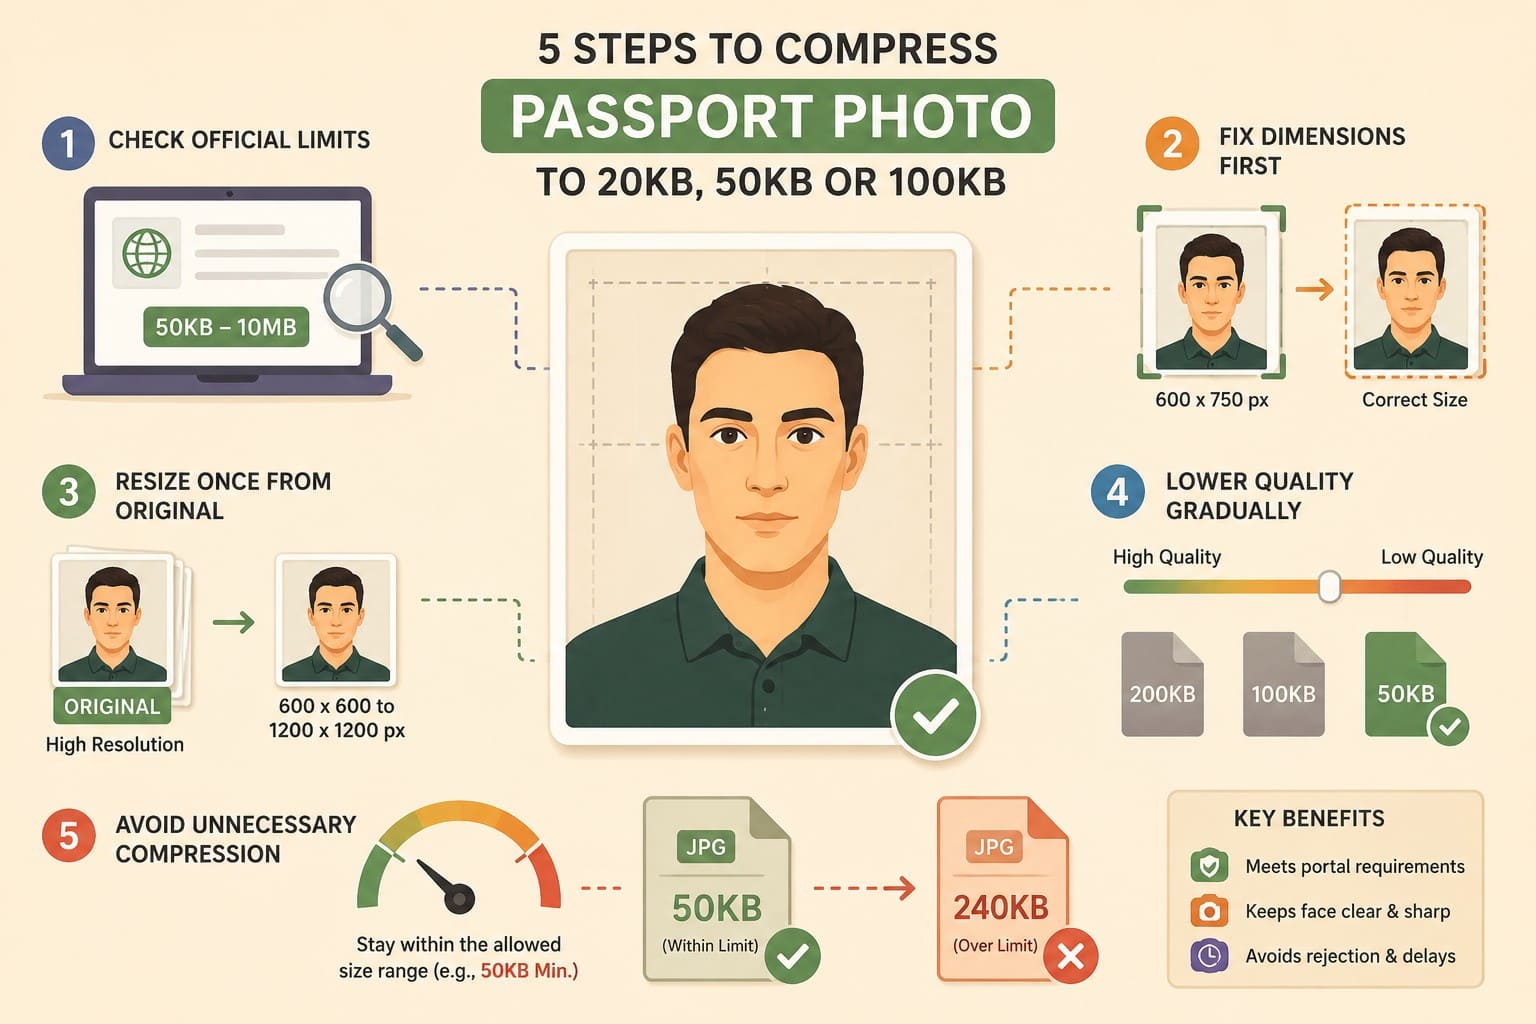
- Check Official Limits First: Verify the exact file size and dimensions on the official application portal instead of relying on general estimates. Requirements vary significantly, from the UK digital passport requirement of 50KB to 10MB to different limits set by other authorities.
- Fix Dimensions Before Compression: Match the required pixel dimensions before reducing JPEG quality. Crop only if the issuing authority permits or requires it. Some application systems handle cropping during the upload process, so unnecessary cropping could affect the required framing.
- Resize Only Once from Original: Work from the original high-quality image and resize it once to the required dimensions. For example, U.S. digital visa photo guidelines specify a square image from 600 × 600 to 1200 × 1200 pixels.
- Lower Quality Gradually: Reduce JPEG quality in small steps until the image meets the required file-size limit. Avoid excessive compression that damages facial details. U.S. digital visa images, for example, have a maximum file size of 240KB and should not exceed a 20:1 compression ratio.
- Avoid Unnecessary Compression: Do not keep reducing the file after it meets the required range. A smaller file does not automatically mean a better submission. Some authorities also specify minimum sizes, including the UK requirement of at least 50KB, making over-compression potentially non-compliant.
Dr.Fone App - Photo & Video Compressor for iPhone
Compress Photos & Videos to Free Up iPhone Storage
- Compress Large Photos to Reduce File Size
- Compress Large Videos Instead of Deleting Them
- Free Up More Storage Space for New Photos, Videos, and Apps
- Manage Space-Consuming Photos and Videos More Efficiently
Part 5. Why Is Passport Photo Still Rejected After Compression?
Even after you compress a passport-size photo, the application may reject it for reasons unrelated to file size. The table below covers common rejection causes and what you should check before uploading again:
| Rejection Reason | What Went Wrong | What to Check |
|---|---|---|
| File Still Too Large | Compression did not meet the maximum limit | Portal’s maximum file size |
| File Below Minimum Size | Photo was compressed too aggressively | Whether the portal specifies a minimum file size |
| Wrong Pixel Dimensions | Image dimensions fall outside the permitted range | Required minimum and maximum width and height |
| Wrong Aspect Ratio | Image proportions changed during resizing | Required aspect ratio and whether proportions stayed locked |
| Unsupported Format | Uploaded file type is not accepted | Formats specifically accepted by the application portal |
| Blurry or Pixelated Face | Heavy compression or a low-quality original reduced detail | Facial sharpness, focus, and visible details |
| Incorrect Crop | Framing does not meet the photo requirements | Head position, spacing, and required framing |
| Altered Appearance | Filters or digital edits changed the applicant’s appearance | Whether the authority permits the edits applied |
| Background Issue | Background color, shadows, or objects violate requirements | Official background and lighting requirements |
| Wrong Portal Specification | Requirements from another country or application were followed | Rules published by the authority handling your application |
Part 6. How to Protect Passport Photo Quality While Reducing File Size?
If you use a passport photo compressor, follow these 5 practices to reduce file size while protecting image quality and meeting application requirements:
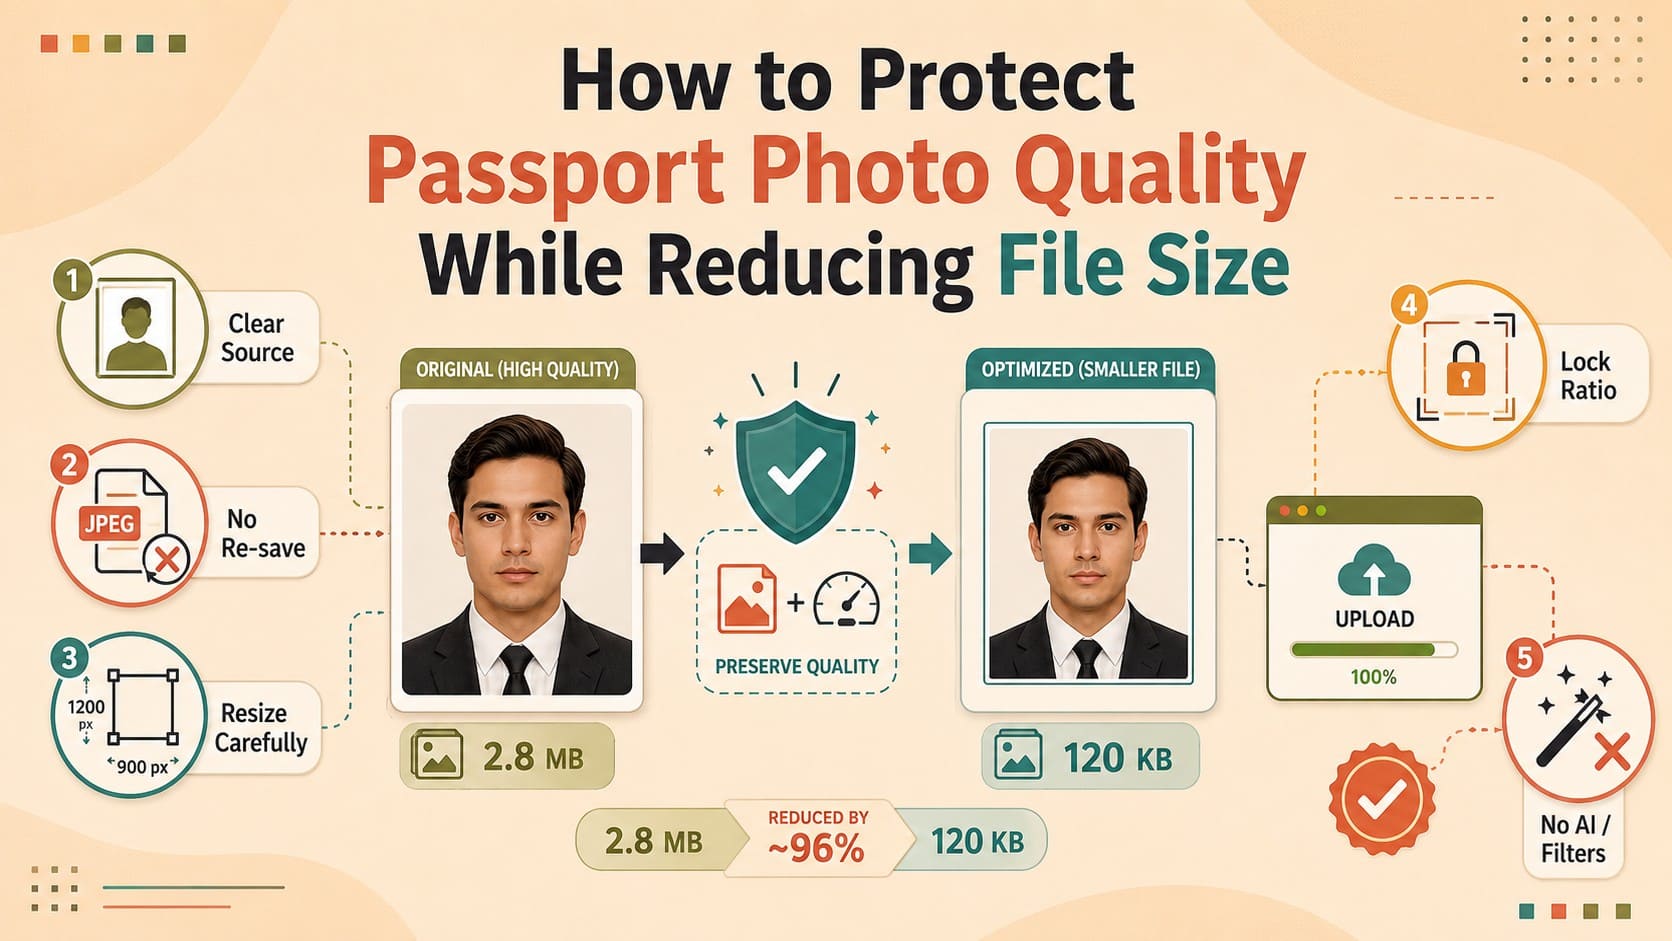
- Start With a Clear Source: Use the sharpest original photo available because compression cannot restore missing details. The UK passport photo requirements, for example, require digital photos to be clear, sharp, and in focus.
- Avoid Repeated Recompression: Avoid repeatedly saving an already compressed JPEG because lossy compression can progressively reduce fine image details. Instead, create each smaller version directly from the original file to preserve as much image quality as possible.
- Prevent Excessive Resizing: Resize only as much as needed to meet the portal’s specified dimensions. Going too small can reduce facial detail or violate minimum dimensions. Requirements vary by authority, so always follow the dimensions stated for your application.
- Lock the Aspect Ratio: Keep the proportions locked while resizing unless the application specifically requires another ratio. This prevents the face from appearing stretched or compressed. For example, U.S. digital visa photo requirements specify a square image.
- Avoid AI and Appearance-Changing Filters: Do not use beauty filters, skin smoothing, or AI reconstruction that changes your natural appearance. Passport authorities generally require an accurate representation of the applicant, so check the issuing authority’s editing rules before making modifications.
Part 7. When Should You Retake the Passport Photo Instead of Compressing It?
Some issues cannot be fixed with compression or resizing because the original photo itself does not meet application requirements. In these cases, a passport photo size reducer will not solve the problem. The table below explains when retaking the photo is the better option:
| Problem | Best Action | Why |
|---|---|---|
| Photo is Blurry, Grainy, or Pixelated | Retake the photo | Compression cannot restore missing detail and may further reduce image quality. |
| Face or Head Position is Incorrect | Retake the photo | Compression or resizing cannot correct pose, expression, or head-position requirements. |
| Background Does Not Comply | Retake against the required background | File-size reduction cannot correct an unacceptable background, shadows, or surrounding objects. |
| Facial or Hair Detail is Missing | Retake instead of using AI reconstruction | AI-generated details may alter the applicant’s natural appearance and violate application requirements. |
| Requirements are Difficult to Reproduce | Use a professional passport-photo service | Professional capture can make it easier to meet specific lighting, framing, and background requirements. |
| Portal Provides Its Own Crop or Upload Tool | Follow the portal’s instructions | Built-in tools may apply the authority’s required cropping, positioning, or validation process. |
Conclusion
Check the official requirements before using any compression tool, as file-size limits, dimensions, and formats vary by application. Once the photo is compliant, Dr.Fone App provides a convenient passport size photo compressor for reducing files directly on your phone. Keep compression to the level needed to meet the upload limit while preserving facial clarity.
Remember, compression cannot correct improper framing, an unacceptable background, or poor image quality. If the original photo fails these requirements, retaking it may be better than repeatedly resizing or compressing it.
FAQ
-
1. Does compressing a passport photo change its dimensions?
Not necessarily. Compression primarily reduces file size by lowering image data or quality, while pixel dimensions can remain unchanged. Changing the photo’s width and height is resizing, and application portals may set separate requirements for both. -
2. How can I reduce a passport photo to a specific KB size?
Check the portal’s required file-size range and dimensions first. Resize if needed, then use a passport size photo compressor to reach the target KB. Always review the final file size and image quality before uploading. -
3. Can a passport photo be rejected for being too small in file size?
Yes, if the application specifies a minimum file size. For example, UK digital passport photos must be at least 50KB. Since requirements vary, always check the official portal before compressing your photo. -
4. Is it safe to use an online compressor for a passport photo?
It can be, but check the tool’s privacy and file-retention policies before uploading a passport photo. For greater privacy, consider an on-device passport photo compressor that reduces the file directly on your phone.


Selena Lee
staff Editor
Generally rated4.5(105participated)