How to Free Up Space on Android: The Ultimate 2026 Guide
Selena LeeOriginally published Jul 27, 2026, updated Oct 22, 2026
:
TL;DR:
Freeing up space on an Android device immediately resolves performance lags, app crashes, and system update failures. The most effective approach involves a combination of removing hidden cache files and offloading large media.
Clear app caches and system partition: Removes temporary junk files without deleting personal data or app configurations.
Offload heavy media: Move large videos, offline maps, and old downloads to cloud storage (Google Drive) or a PC.
Deep clean for privacy or resale: Use professional data erasure tools to permanently wipe hidden fragments if basic methods fail to restore sufficient internal storage.
Your Android phone can rapidly slow down when its internal storage is filled to the brim, turning everyday tasks into a frustrating experience. Before long, annoying low-storage warnings appear, preventing you from capturing new photos or downloading critical updates. A major part of the issue is that countless hidden files, system caches, and long-forgotten apps silently drain your memory capacity in the background.
Understanding exactly how to free up space on Android is an absolute necessity if you want to maintain peak device performance. By proactively managing your digital footprint, you avoid system crashes and battery drains. In this comprehensive guide, we will explore highly effective, risk-free strategies to help you deeply clean your internal storage and recover gigabytes of memory fast, all without deleting the files that truly matter to you.
Part 1. Assess Storage Before You Clean: Know What's Taking Up Space
Diving straight into randomly deleting files is rarely an effective strategy. You should always begin by analyzing exactly what is consuming your phone's memory. This initial audit provides you with a clear roadmap, helping you strategize how to free up space on your Android phone with maximum efficiency. Below, you will discover how to access your device's built-in storage manager and identify the specific data categories that require immediate attention.
How to Access Storage on Android
Before you begin the deletion process, navigating to your native storage settings is highly recommended. This integrated dashboard breaks down exactly which files, media, and applications are monopolizing your internal memory. Armed with this knowledge, clearing out junk data becomes a streamlined and much safer process. As you learn how to clear internal storage on Android, carefully follow these steps to conduct a thorough storage audit:
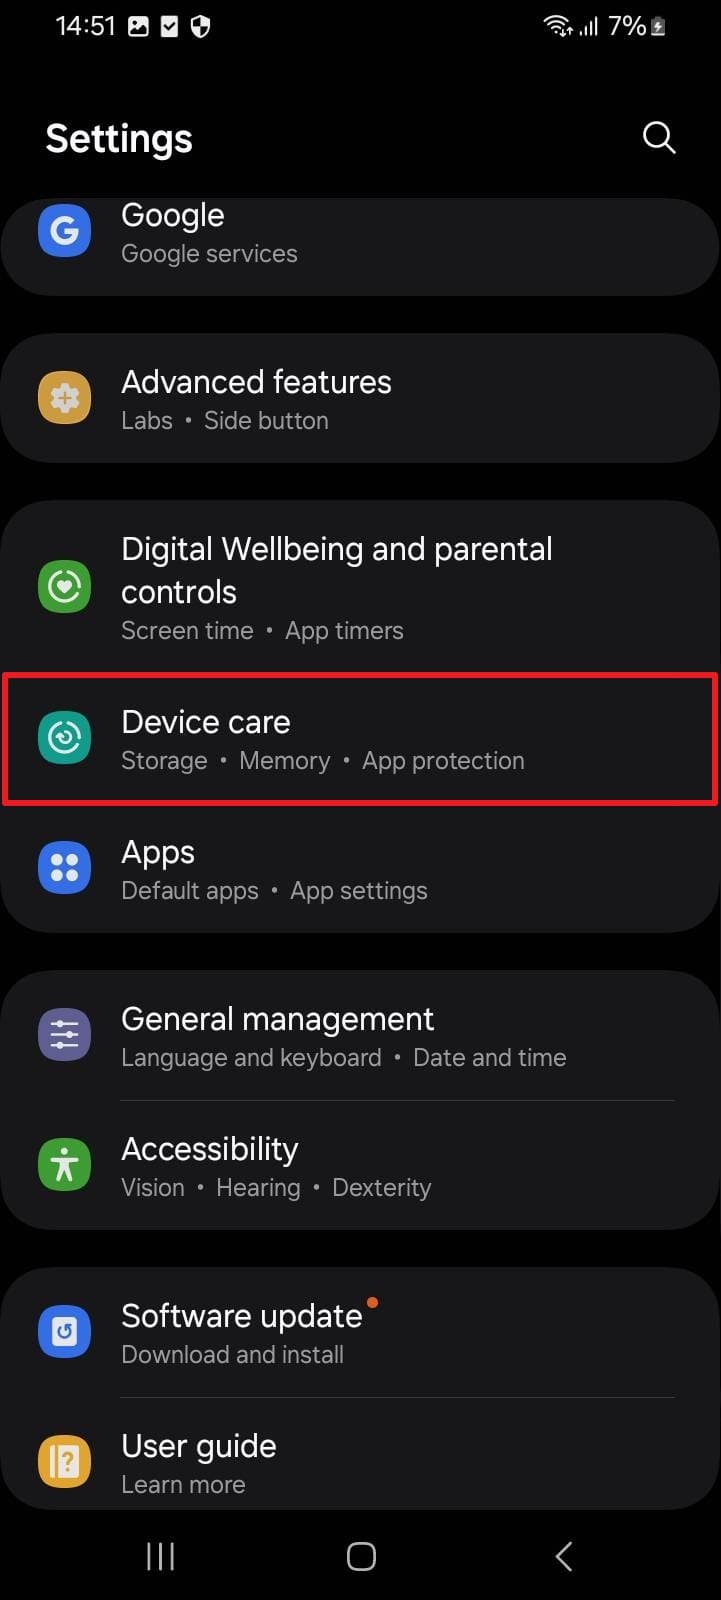
Step 1 Access the Device Care Settings
Upon unlocking your device, open your phone's native Settings app. Scroll through the options and tap the "Device Care" or "Battery and Device Care" section (depending on your specific Android brand).
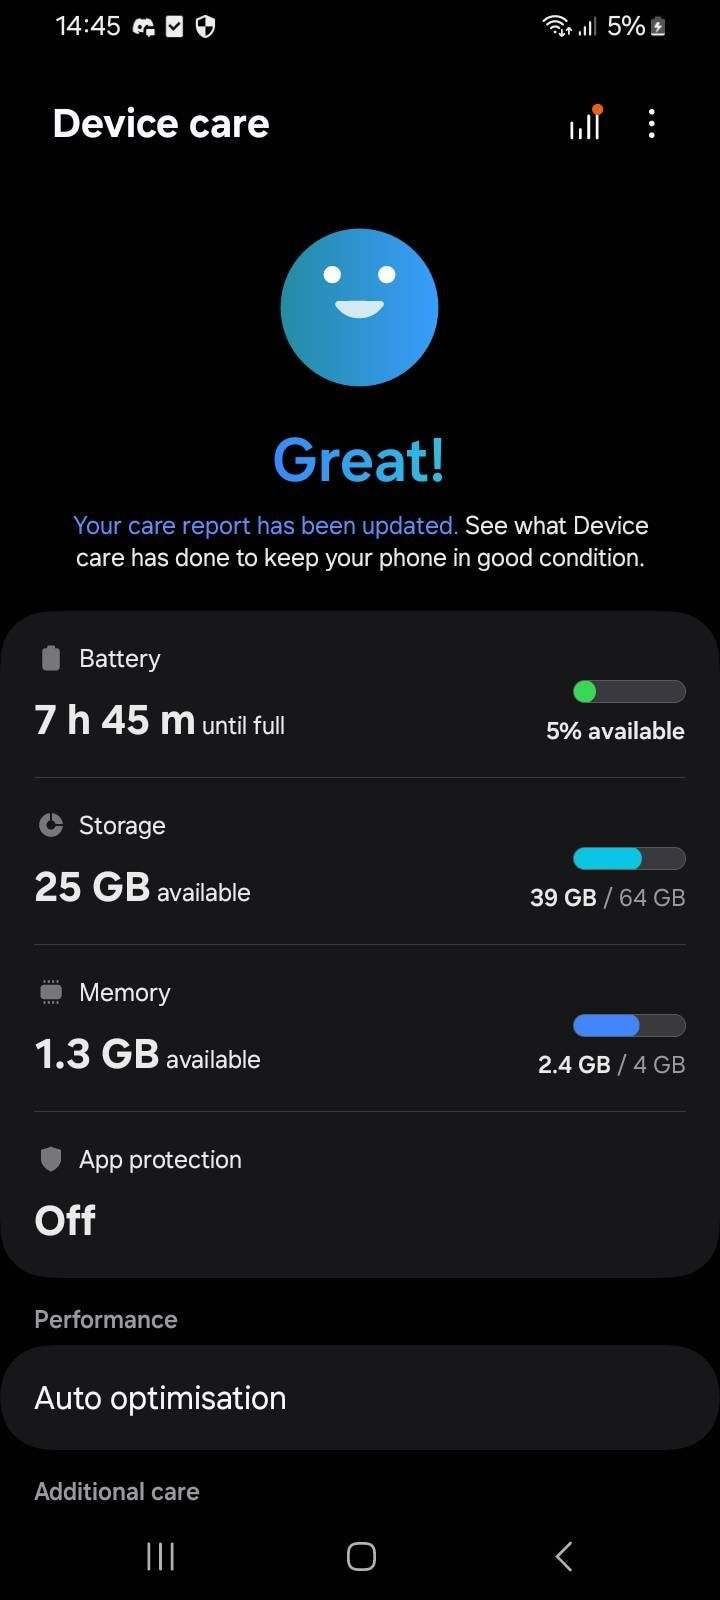
Step 2 Review Total and Available Storage
Following that, tap on "Storage." Here, you will be presented with a visual breakdown of your device's total capacity, currently used space, and exactly how much memory is consumed by apps, images, videos, and system files.
Which Apps Should You Delete to Free Up More Phone Storage?
Once you check your storage details, spotting the heavy applications that are needlessly wasting your memory becomes effortless. Focusing on eliminating these specific categories of software is one of the quickest ways to recover massive amounts of space:
Applications you rarely open or haven't used in months consume core storage without offering any real utility or benefit.
Graphics-heavy games that you no longer play tend to take up significant gigabytes of memory on modern phones.
Media and streaming apps may secretly store offline content, episodes, and movies, using significantly more storage than initially expected.
E-commerce and shopping apps keep extensive image caches and search histories, slowly choking your memory over time.
Old utility or optimization apps for tasks that are now natively handled by your updated Android OS merely clutter your storage.
Pro Tip. Wipe All Data on Your Android Permanently with Dr.Fone – Data Eraser
Dr.Fone - Data Eraser
Erase iOS & Android Data Permanently
Permanently erase all data on iOS & Android — completely unrecoverable.
Military-grade wiping to fully protect your privacy.
Generate verified erasure reports to boost device resale value.
Selectively erase private data and remove junk & large files.
There are times when your phone may still feel sluggish even after diligently cleaning the cache or deleting unused media. When complete privacy, deep optimization, and permanent cleaning truly matter, Dr.Fone - Data Eraser becomes the absolute best professional solution available on the market. It safely and completely erases all deep-rooted information in any Android device while guaranteeing maximum privacy. With this software, you can confidently erase all types of data, such as private photos, hidden system caches, and sensitive financial details, rendering them completely beyond recovery.
This industry-leading tool follows strict military-grade cleaning algorithms for unmatched data safety during complete removal. It seamlessly supports all major Android manufacturers, adapting perfectly to the newest Android 16 architecture. Furthermore, you receive a detailed, certified erasure report that greatly boosts trust and maximizes device resale value. If you are learning how to get more storage on Android from a systemic level, this report includes extensive diagnostic information like IMEI details for complete transparency.
Detailed Guide to Wipe All Data on Your Android Permanently with Dr.Fone
If you are looking for a foolproof strategy, review the step-by-step instructions below to learn how to clear storage on Android via this innovative, professional-grade data eraser tool:
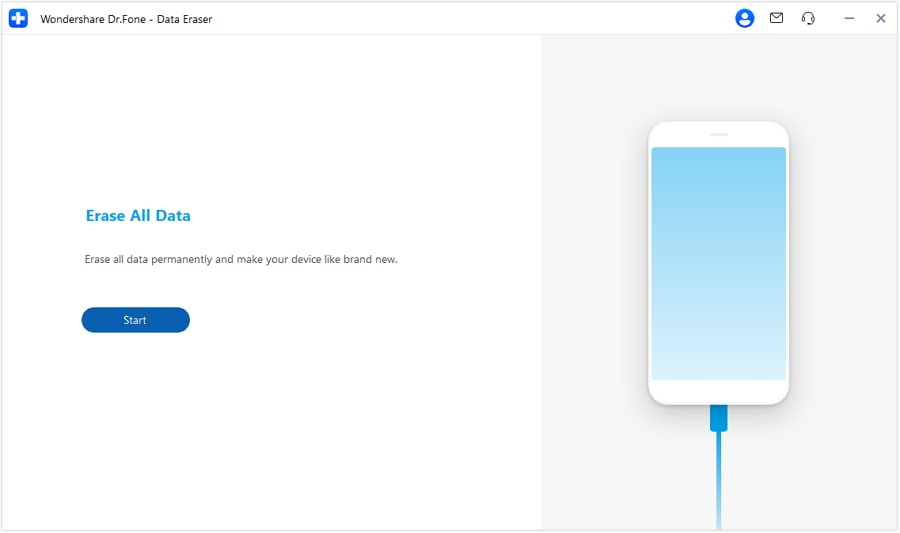
Step 1 Access the Android Data Eraser Tool
Launch the Dr.Fone software on your computer. As you head to the "Toolbox" tab on the main interface, click the "Data Eraser" feature. Use a robust USB cable to connect your Android phone to the PC. Upon successfully detecting your device, simply press the "Start" button on the following confirmation screen.
Step 2 Choose the Erase Mode for Your Phone
Afterward, carefully opt for your preferred "Erase Level" from the drop-down prompt based on your privacy needs, and press the "OK" button. To prevent accidental deletions, you will need to type a displayed confirmation code and click "Erase Now." You will then select your desired option for erasing specific or all data and hit "Next."
Step 3 Erase Your Phone's Data via Dr.Fone
Adhere strictly to any remaining displayed on-screen prompts to perform the final specific tasks on your phone, then click "Next." Dr.Fone will automatically initiate the deep erasing process for your device data. Please wait patiently until it shows a final confirmation screen indicating that the internal storage is completely wiped and optimized.
Part 2. How to Clear Internal Storage on Android without Losing Data: 10 Solutions
Apart from the advanced wiping tool discussed above, various native, built-in options are also highly effective at liberating memory. This upcoming section thoroughly explains 10 practical and accessible ways to understand how to free up storage on Android without losing your critical files.
Solution 1. Clear Cache (Of Certain App)
App caches intentionally store temporary background data to help software load significantly faster during your daily use. However, over time, this cached data rapidly inflates and fills your phone's memory unnecessarily. By actively deciding to clear cache, you can instantly recover gigabytes of free space without forcibly deleting your actual app or losing any personal login information. Go through the given steps to understand how to delete junk files in an Android phone individually:
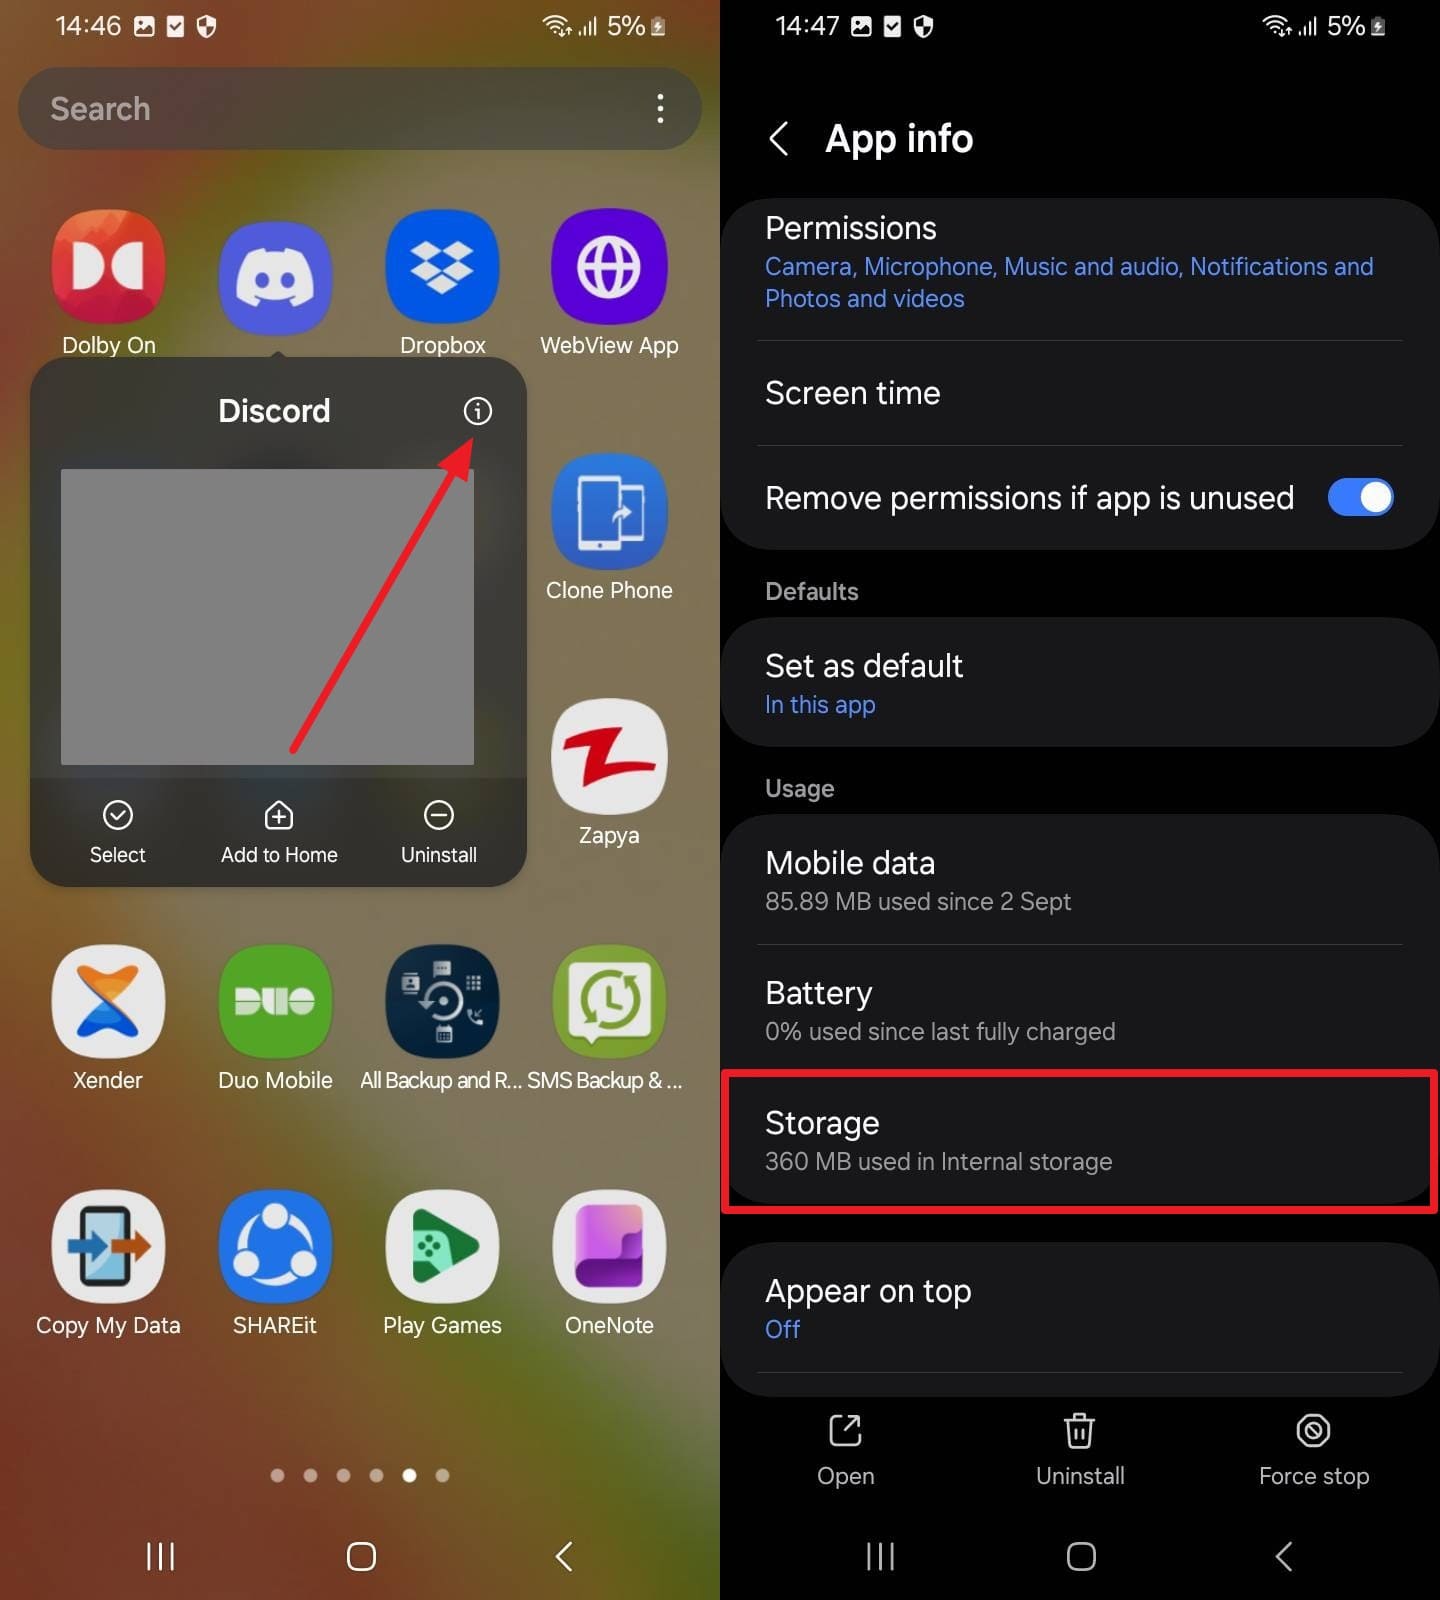
Step 1 Access App Info
Navigate to your app drawer or home screen. Press and hold the target app icon for a few seconds until a mini menu appears, then tap the "i" (App info) icon to access the "Storage" parameters.
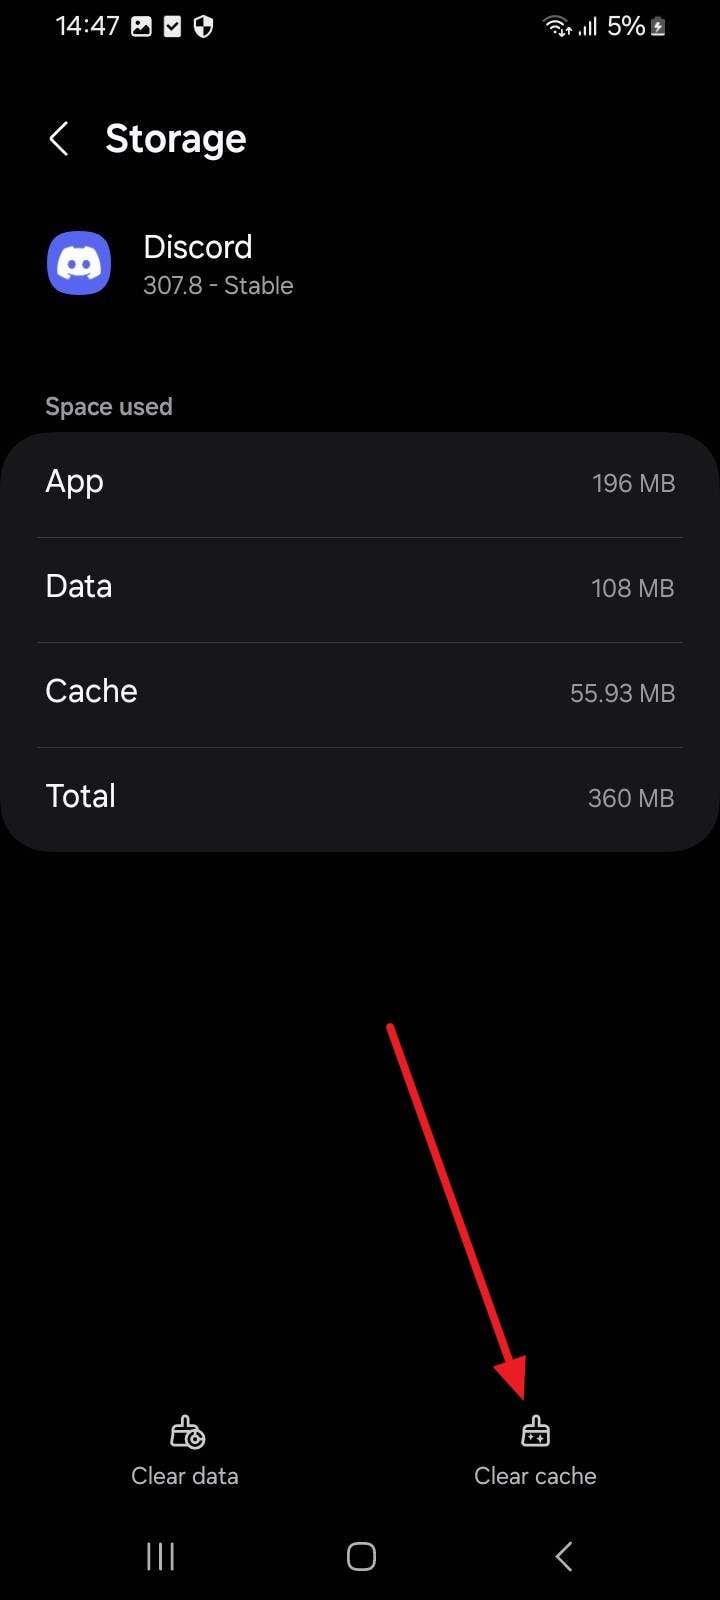
Step 2 Clear the Cache
Moving forward into the storage view, tap the "Clear Cache" icon located at the bottom right to finish the task. Notice how the cache size instantly drops to zero.
Solution 2. Delete Downloads (From Files App)
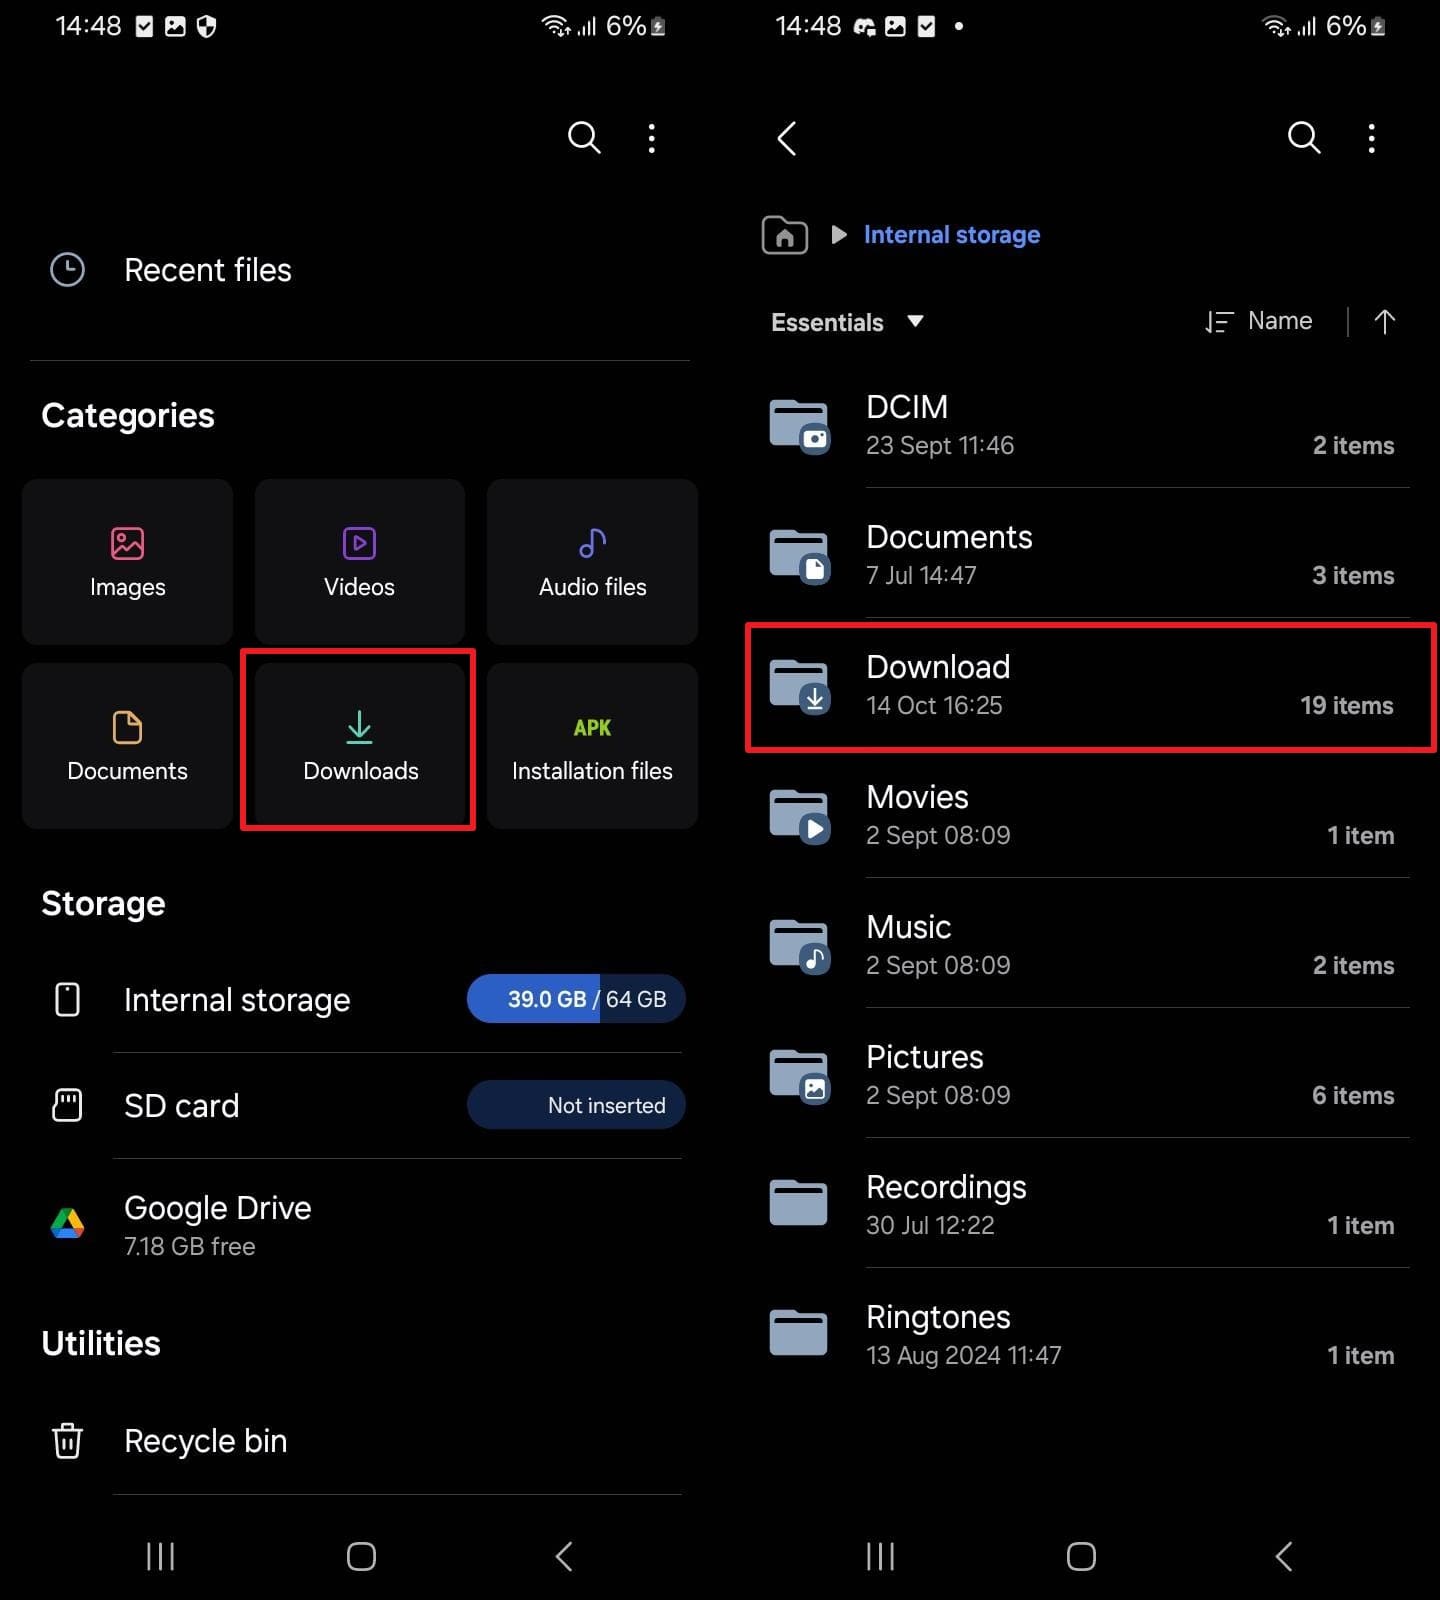
Your system's default Downloads folder acts as a massive collection point for large PDF documents, zipped files, meme images, or old APK app installers. A vast majority of these files remain forgotten and unused, yet they silently consume your valuable storage space. Consequently, taking the time to delete old or unnecessary downloads can recover vast amounts of memory within seconds. In case you find yourself wondering, "how can I free up space on my Android phone effortlessly?", take direct guidance from the steps below:
Step 1 Open the Native Files App
Locate and tap your device's "My Files" or "Google Files" app. Upon heading to the main directory, tap directly into the dedicated "Downloads" section.
Step 2 Delete Redundant Files
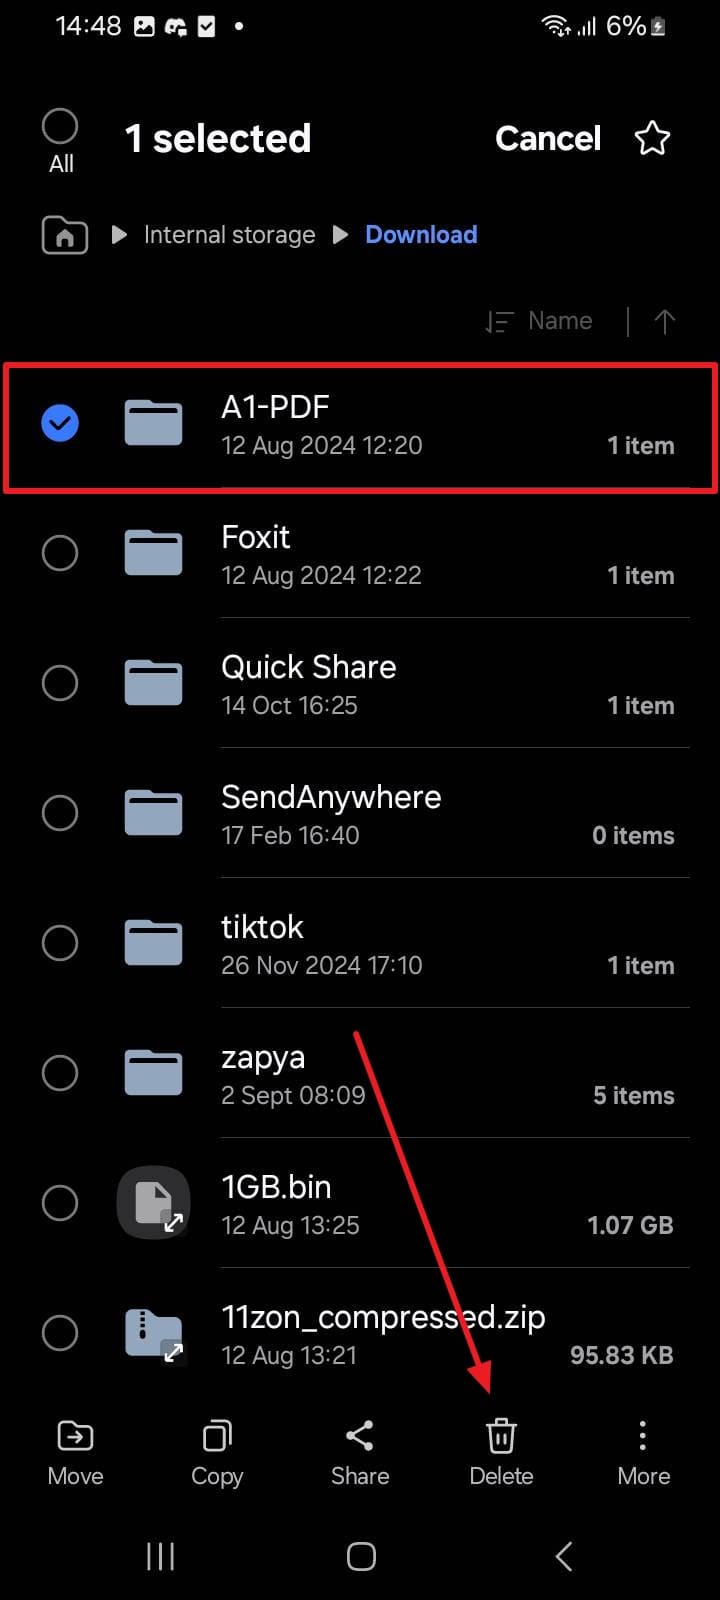
Afterward, carefully review the list. Long-press to select any heavy or unnecessary data files, then simply press the "Delete" or "Trash" icon at the top or bottom of the screen.
Solution 3. Empty Trash (In Gallery)
An often-overlooked fact is that whenever you delete any media file, Android first moves it to a hidden Trash or Recycle Bin folder. These supposedly "deleted" files actually still take up full internal space for up to 30 days. Emptying your gallery's trash manually clears this lingering hidden data that fundamentally slows your phone down. It helps recover a surprisingly large amount of space, particularly for users with extensive high-resolution media files. Adhere to the robust guide below to find out how to clear up storage on Android via the Gallery:
Step 1 Open the Gallery Menu
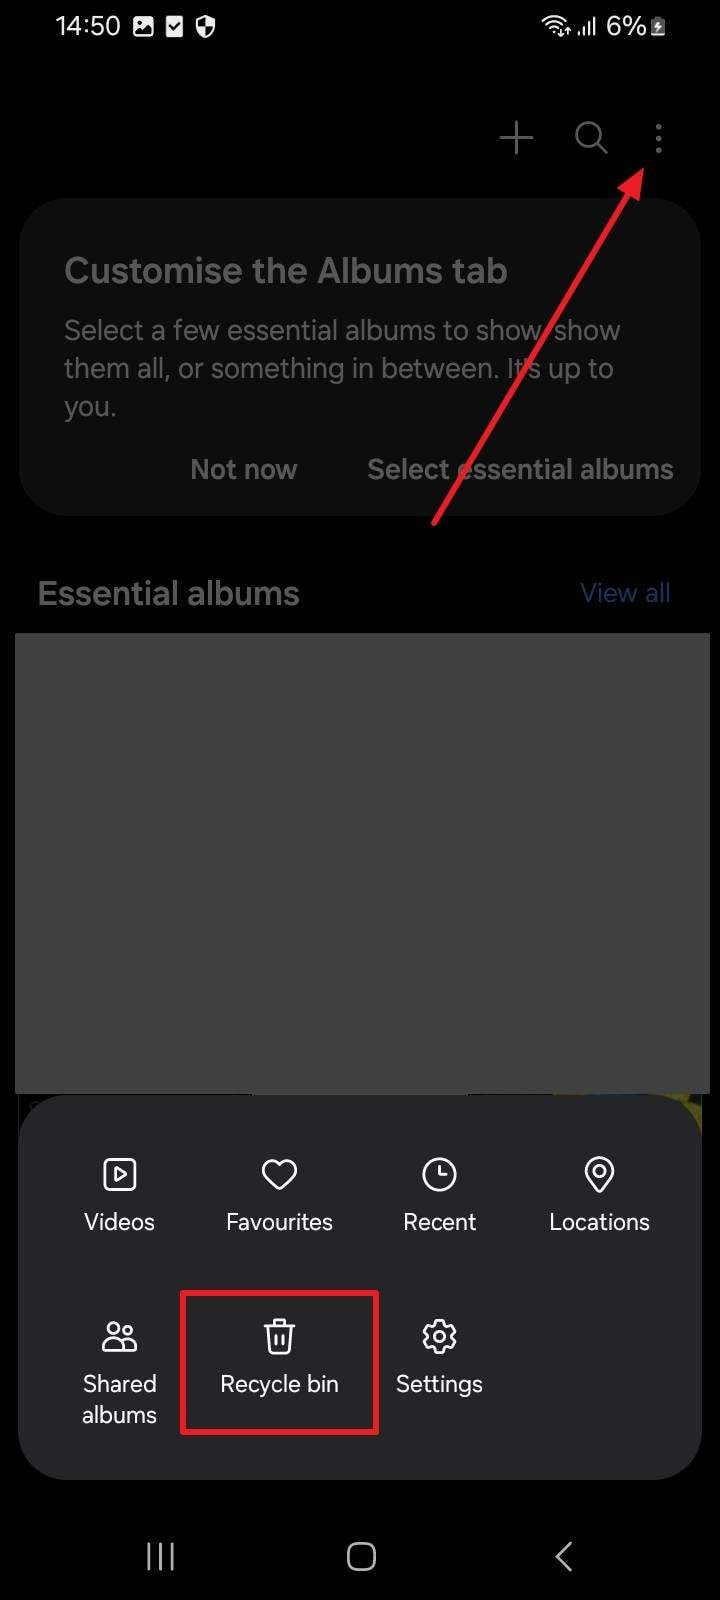
Initially, open your main Gallery app. Tap the "Three Dots" or "Hamburger" icon located at the corner of the main screen and opt for the "Recycle Bin" or "Trash" option.
Step 2 Purge the Trash
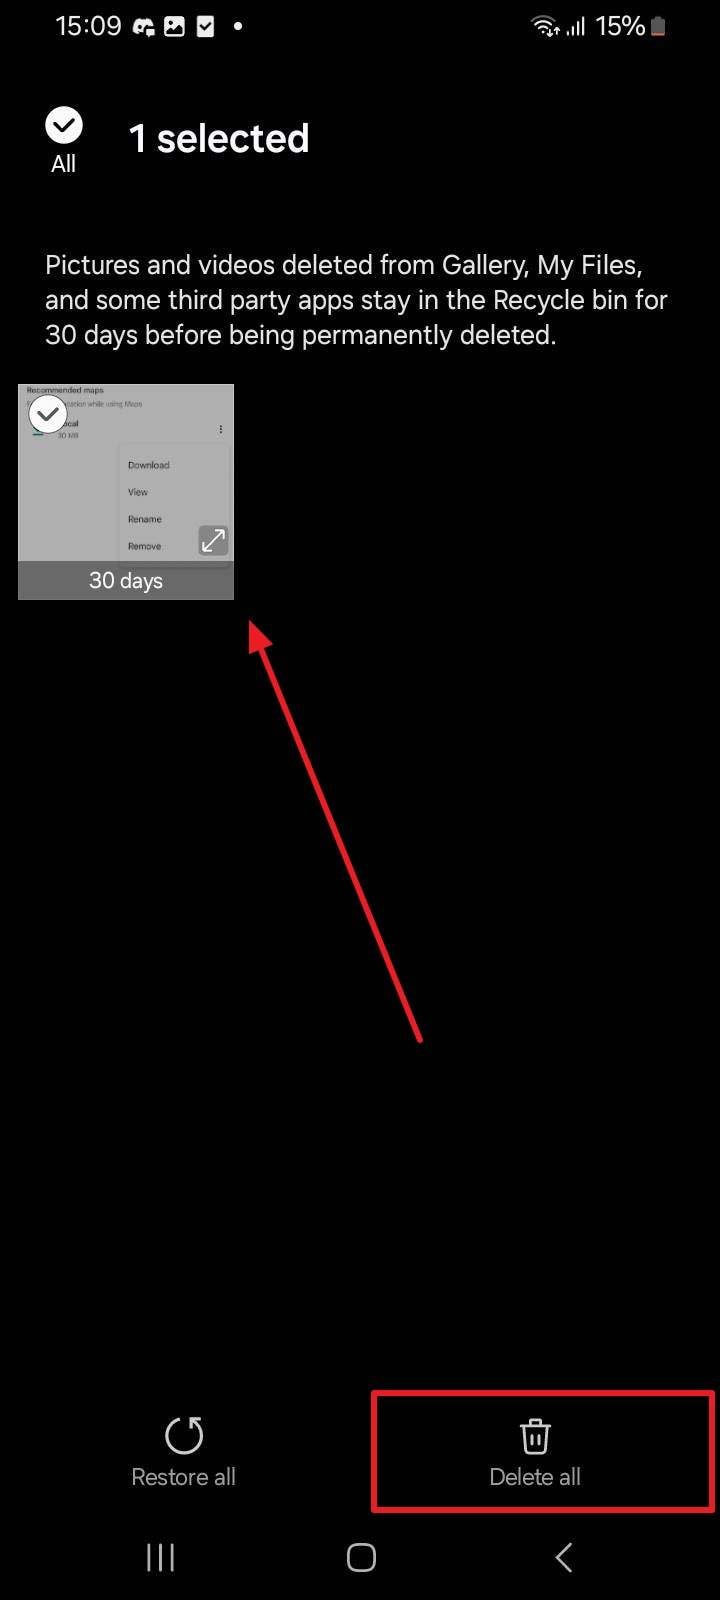
When you enter the folder and see all your recently deleted photos and videos, tap the "Empty" or "Delete All" icon to permanently obliterate them from your memory.
Solution 4. Uninstall Unnecessary Apps
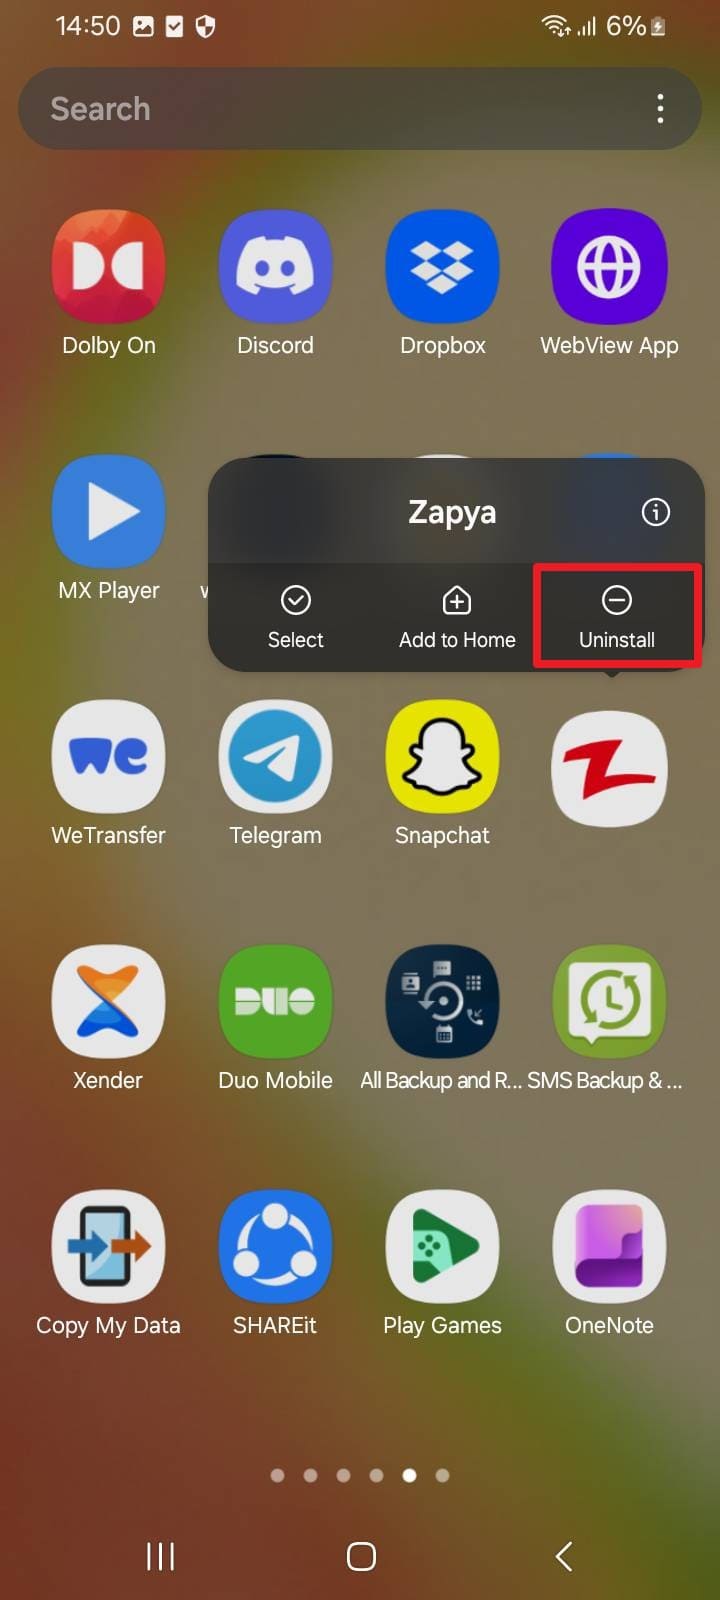
Another highly practical solution is to ruthlessly delete the apps you rarely use to free up your device's core space. Uninstalling software not only frees gigabytes of data but also massively reduces background activity (like silent updates or location tracking) that can bottleneck phone performance. It directly assists in streamlining the phone by ensuring you are retaining only the most useful and commonly utilized applications. Whenever you actively query, how do I free up space on my Android phone, evaluating your app library is paramount:
Step 1 Select App for Uninstallation
Navigate to your home screen or app drawer. Upon long-pressing the heavy or unwanted app icon, opt for the "Uninstall" option from the quick-action popup.
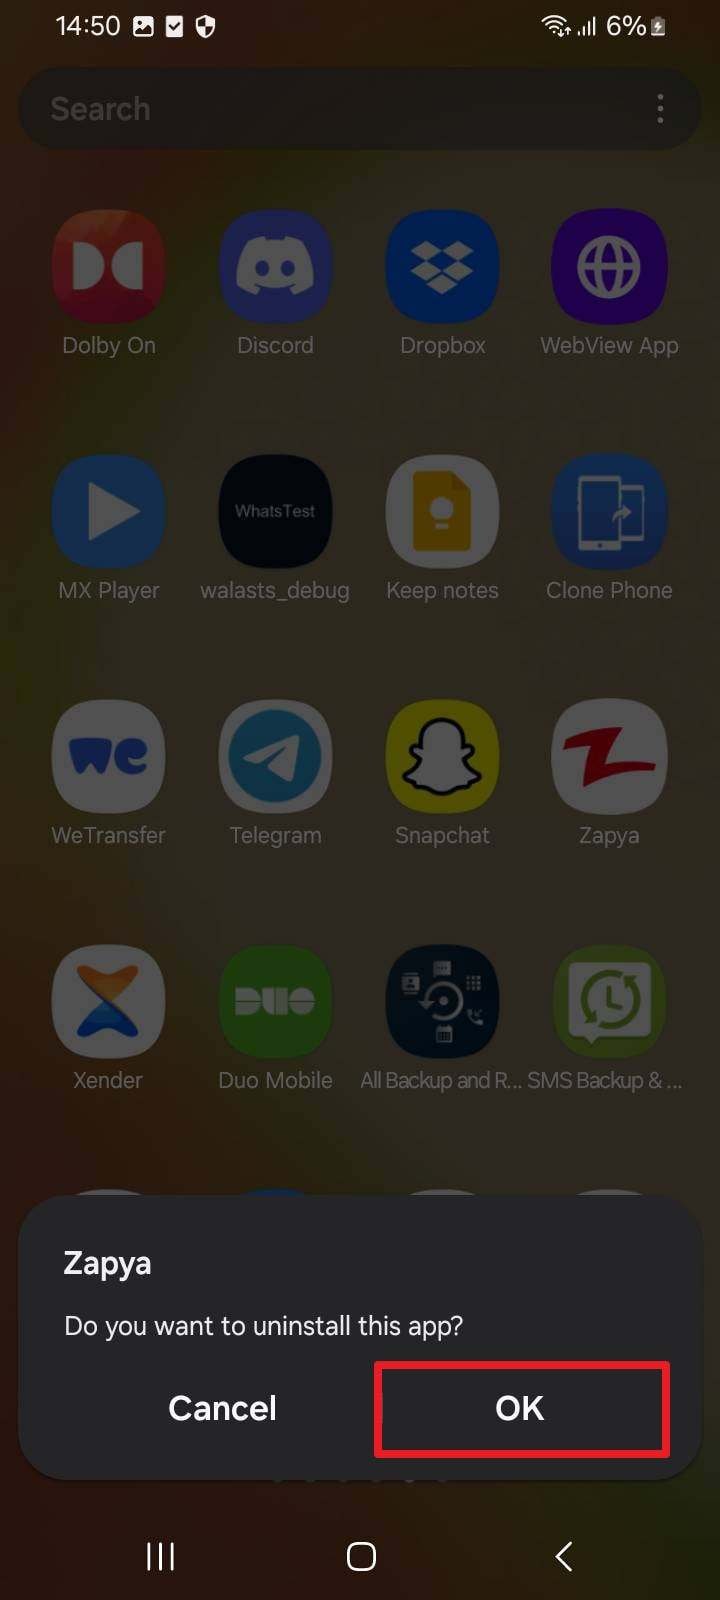
Step 2 Confirm Deletion
When you see a bottom-up confirmation prompt asking if you want to remove the software, tap "OK" to uninstall it permanently from your system directory.
Solution 5. Move Photos/Videos to the Cloud
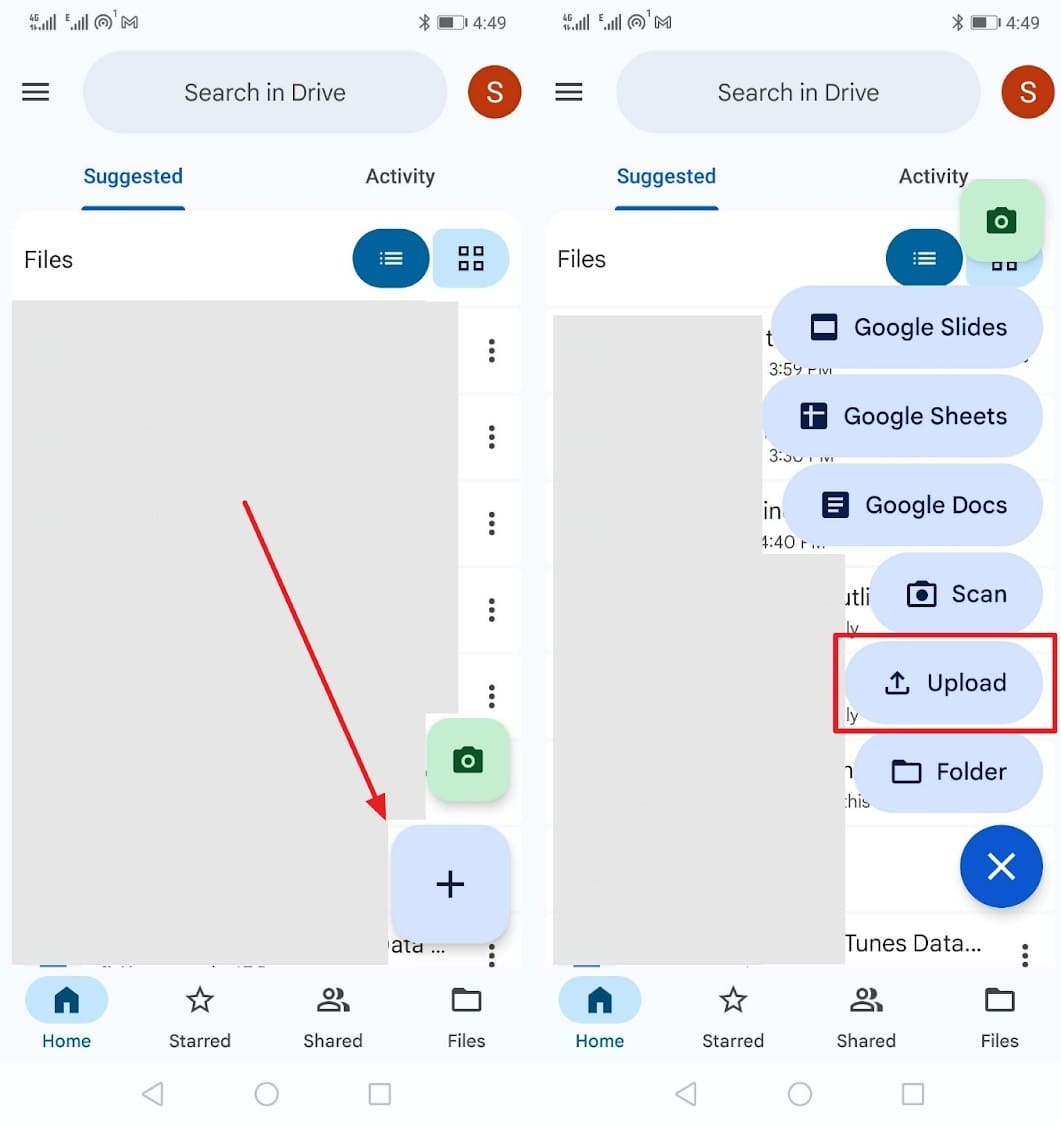
Instead of permanently deleting memories, users can effortlessly move their device's high-resolution photos and heavy 4K videos to remote cloud storage platforms like Google Drive or Google Photos. It allows you to reliably access your media anytime, anywhere, from any connected device, all while keeping it securely encrypted. This method dramatically saves hardware internal storage and ensures smooth phone performance for extensive periods. Furthermore, it helps cost-conscious users avoid strict storage limits without forcing them into learning how to buy more storage on Android. Let's explore how you can actively move media files to Google Drive:
Step 1 Initiate the Upload
Launch Google Drive. Press the vibrant "+" icon from the app's main screen and thoughtfully choose the "Upload" option to begin selecting the local media files you wish to back up.
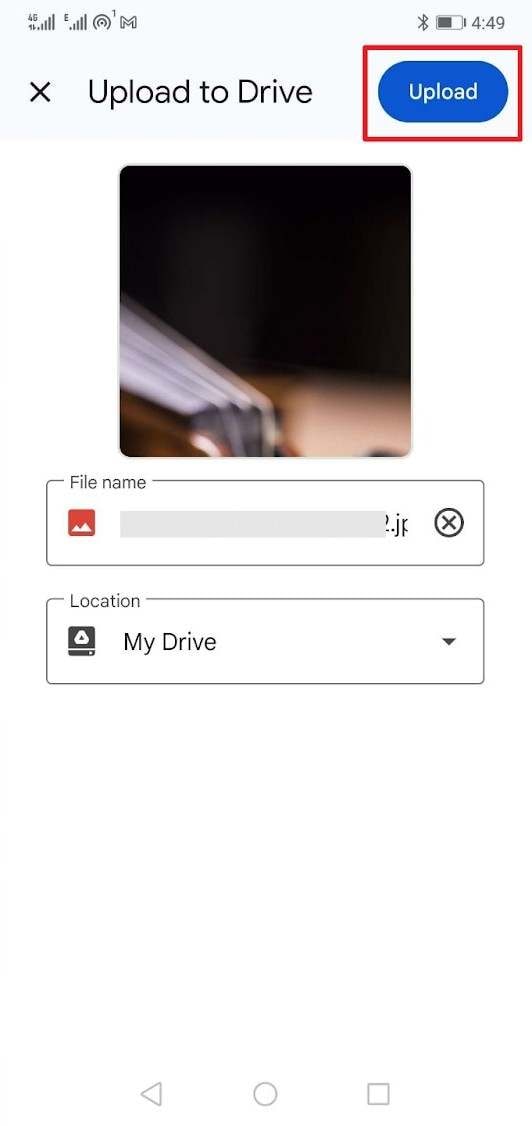
Step 2 Execute the Transfer
As you meticulously select multiple images or videos, tap the final upload prompt in the corner to move the media over a Wi-Fi connection. Once verified on the cloud, delete the local copies.
Solution 6. Transfer Data to a Computer
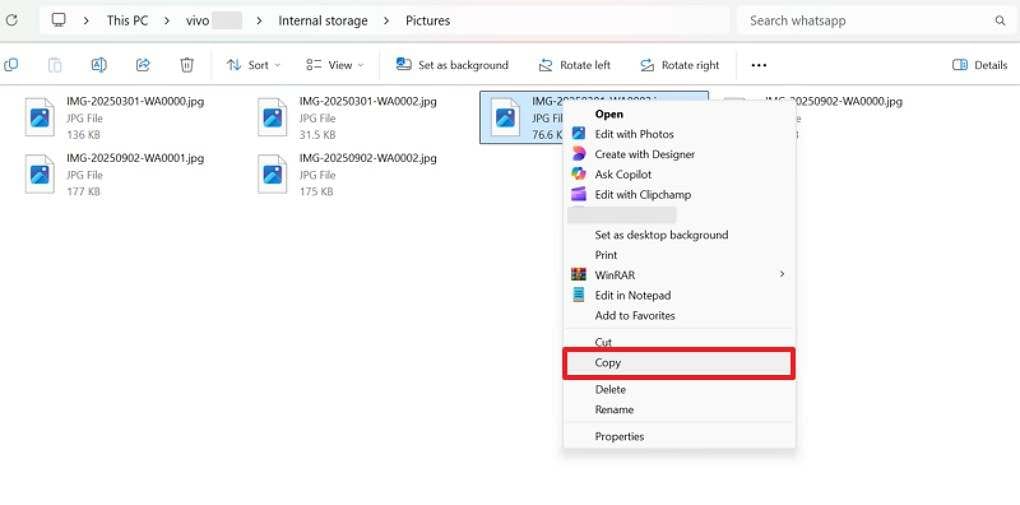
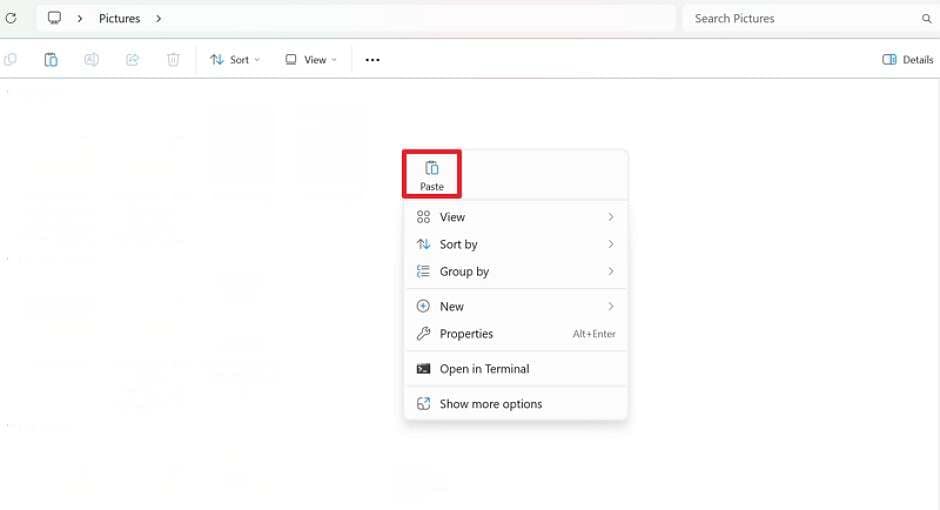
Another extremely reliable and traditional way to create extra space is to physically transfer raw data to a personal computer. It helps you quickly move immense file directories like cinematic videos and raw camera photos without the painful requirement of deleting anything. This localized process keeps your phone storage remarkably lighter while preserving every critical file on a larger hard drive. Better yet, you can organize data with absolute precision on your computer and access it whenever needed offline. Go through the streamlined guide below to migrate your phone's heavy data via a physical connection:
Step 1 Access Phone Internal Storage via PC
After linking your smartphone with the PC using a USB data cable, navigate into the internal shared storage of your mobile through Windows "File Explorer." Here, highlight the heavy media, right-click on the data you wish to offload, and strategically choose "Copy" or "Cut."
Step 2 Paste and Secure on PC
Later, head directly to a safe partition on your PC's local storage, create a dedicated backup folder, right-click on any empty area, and definitively select "Paste." Once verified, delete the mobile source files.
Solution 7. Clear WhatsApp/WhatsApp Business Data
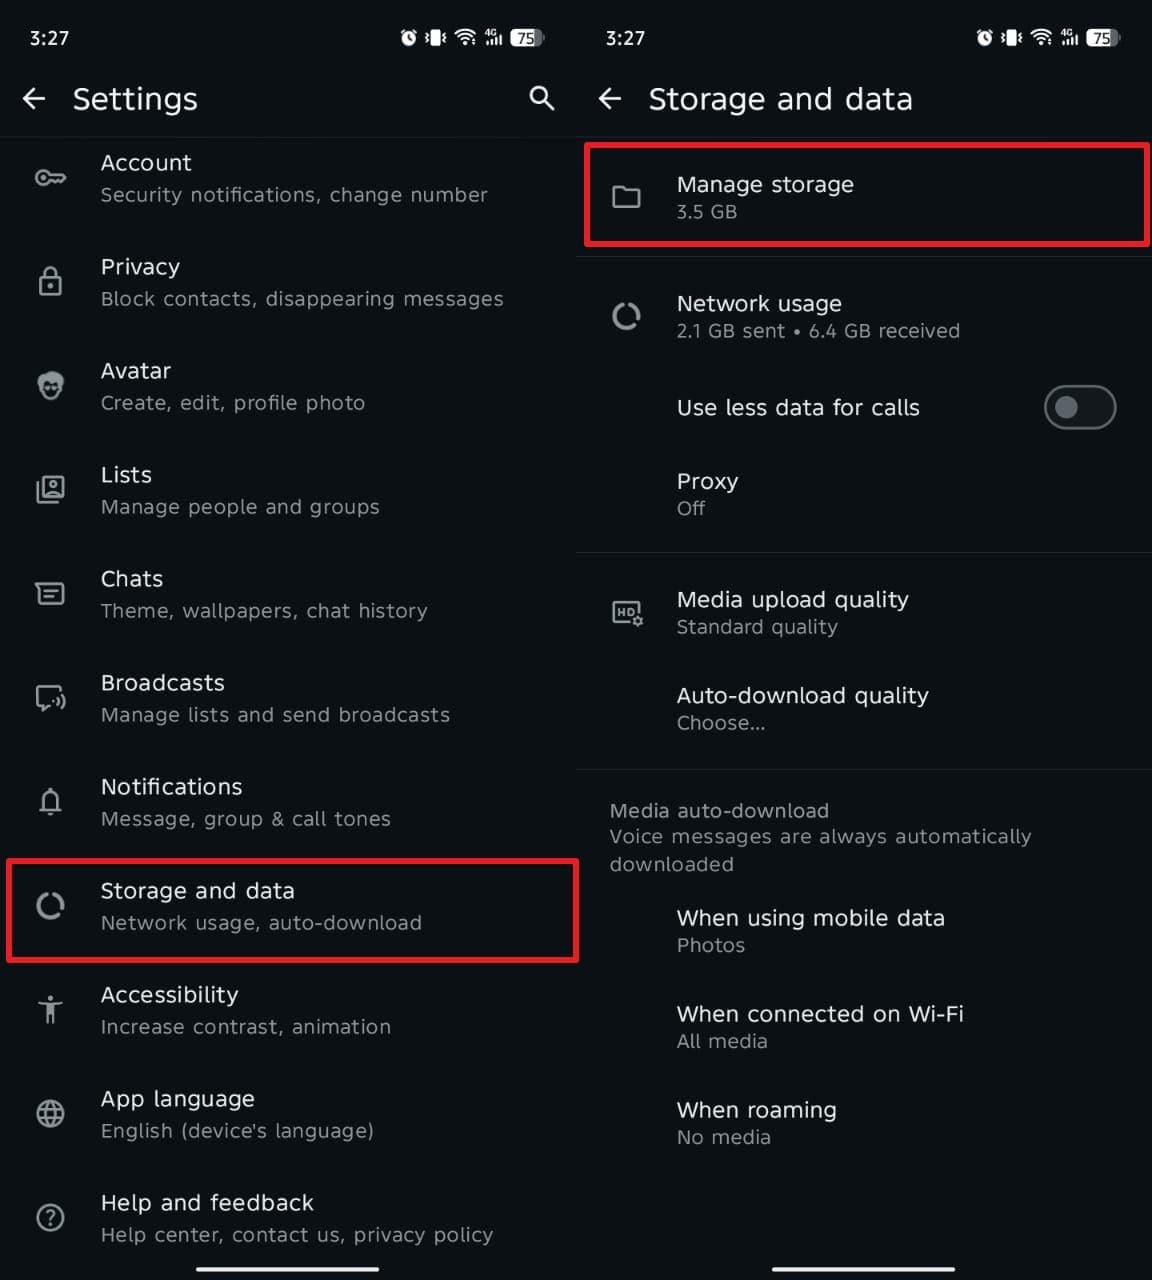
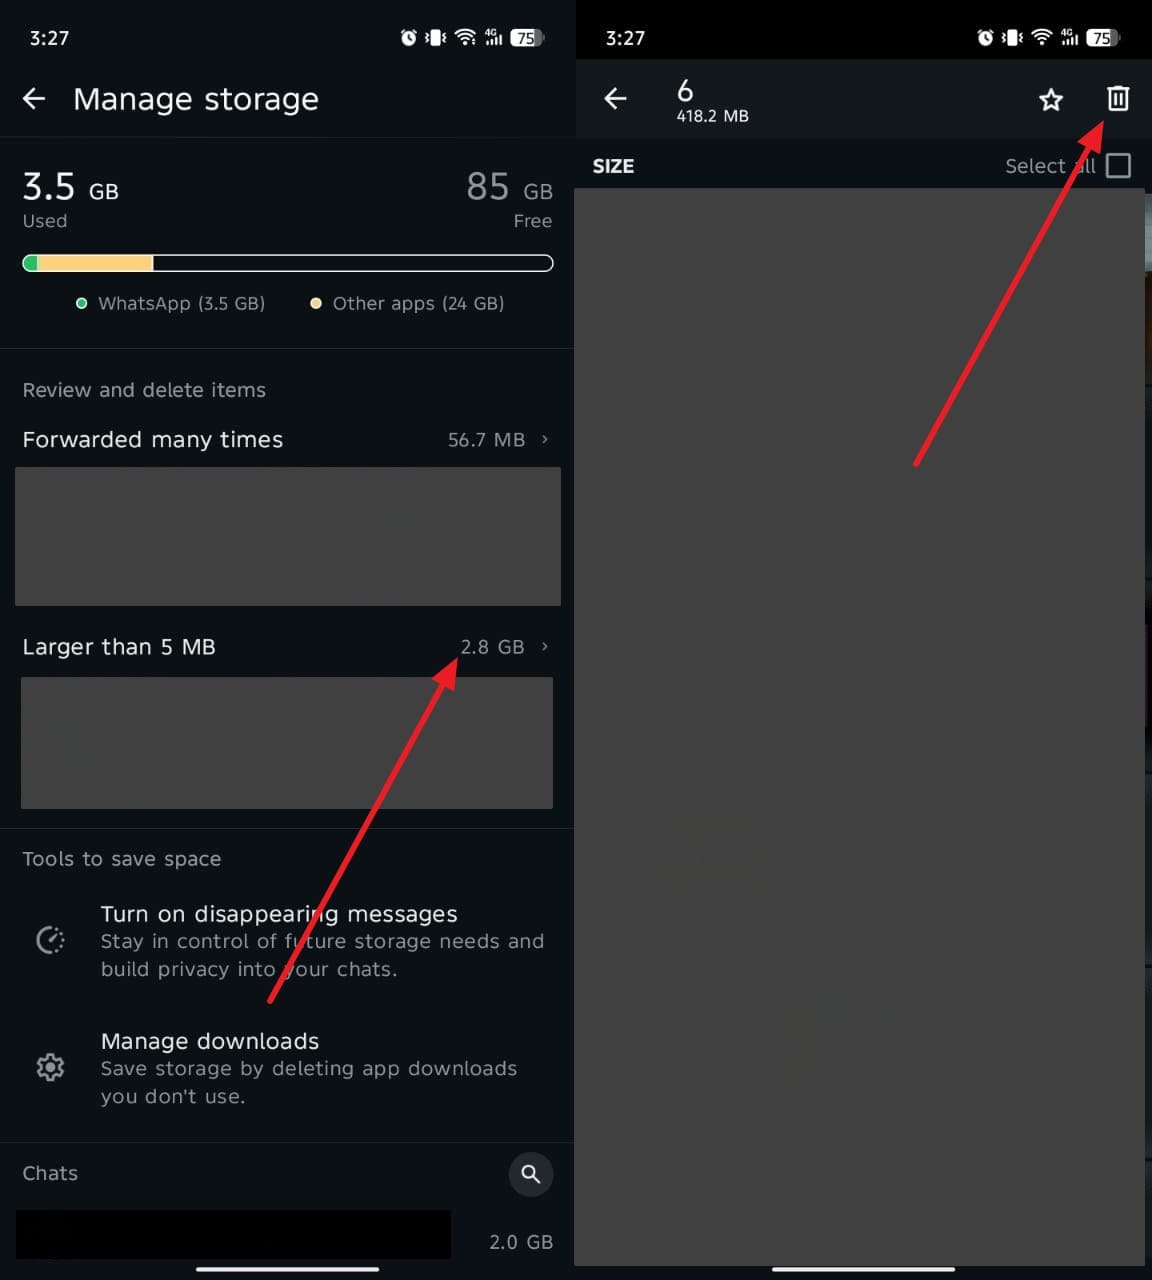
WhatsApp automatically stores incoming media files, voice notes, and bloated chat data that slowly but surely consume massive amounts of internal storage space. When you manually clear this specific app data, it accurately removes redundant large files without deleting your important text chats or contact list. Both standard WhatsApp and WhatsApp Business offer sophisticated native storage management controls. It easily allows users to sort, review, and remove heavy forwarded videos, viral images, and PDF documents. Review the following strategic steps to clear storage effectively through this ubiquitous messaging app:
Step 1 Open Storage Manager
When you navigate to the in-app "Settings" via the top-right menu, tap on "Storage and Data" and sequentially access the "Manage Storage" dashboard to see a visual breakdown.
Step 2 Delete Large Media
Afterward, head directly to the highlighted media section labeled "Larger Than 5 MB" to rapidly review all the heavy unnecessary files. Select the bulk culprits and press the "Delete" trash icon.
Solution 8. Remove Offline Maps from Google Maps
Offline maps are incredibly helpful when traveling across areas without a reliable internet connection, but they also notoriously consume extremely large blocks of storage space. These pre-downloaded city maps remain stubbornly stored even long after your trips conclude, continuing to silently occupy device memory. Therefore, removing these unused offline map packages frees up hundreds of megabytes without affecting your regular online Google Maps features or standard navigation routines. It also ensures the app itself stays agile and updated with new routes rather than relying on stale data. Follow the structured steps below to learn how to free up space on Android by managing map files:
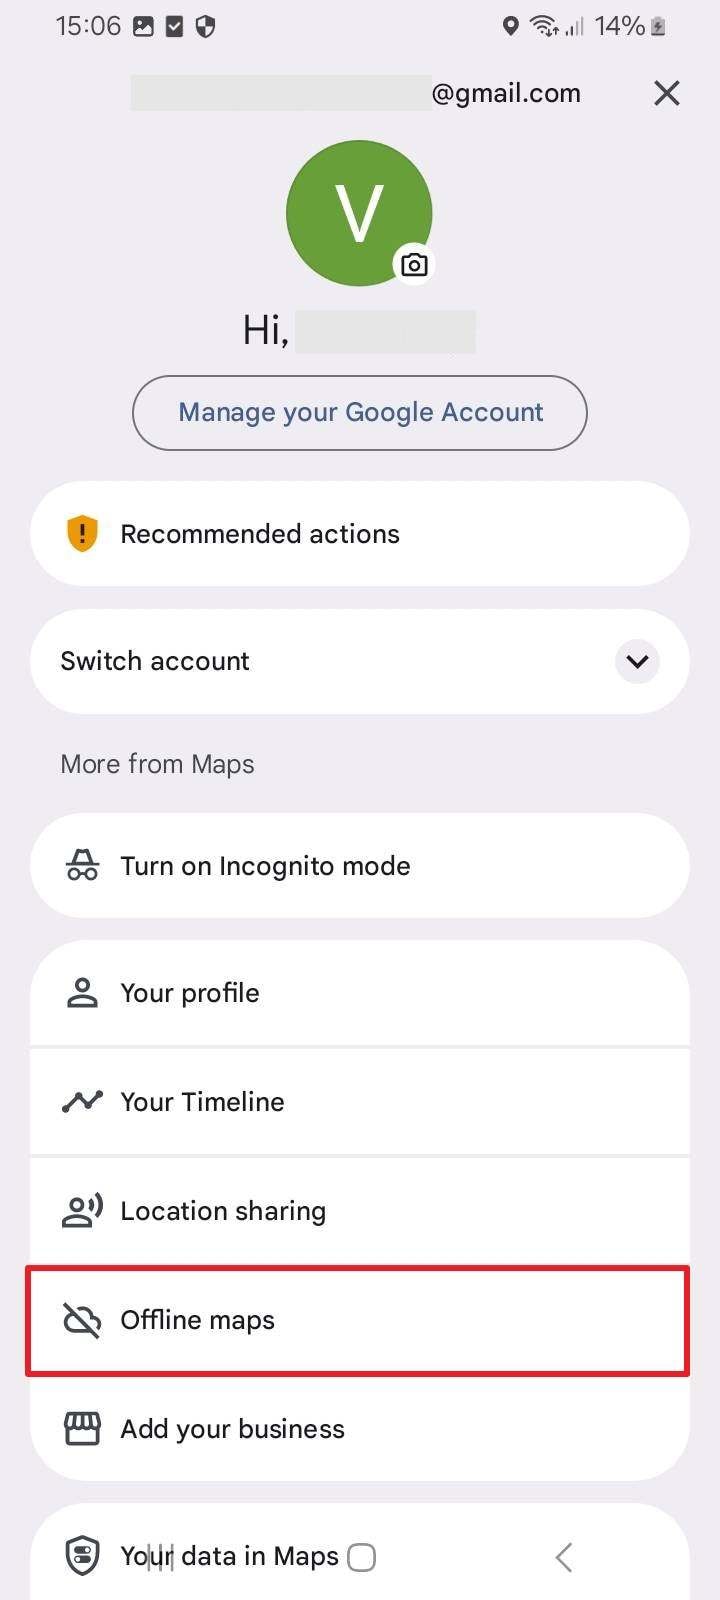
Step 1 Go to Offline Maps
Upon running the standard "Google Maps" app, tap your "Profile" icon located next to the search bar and thoughtfully choose the "Offline Maps" menu option.
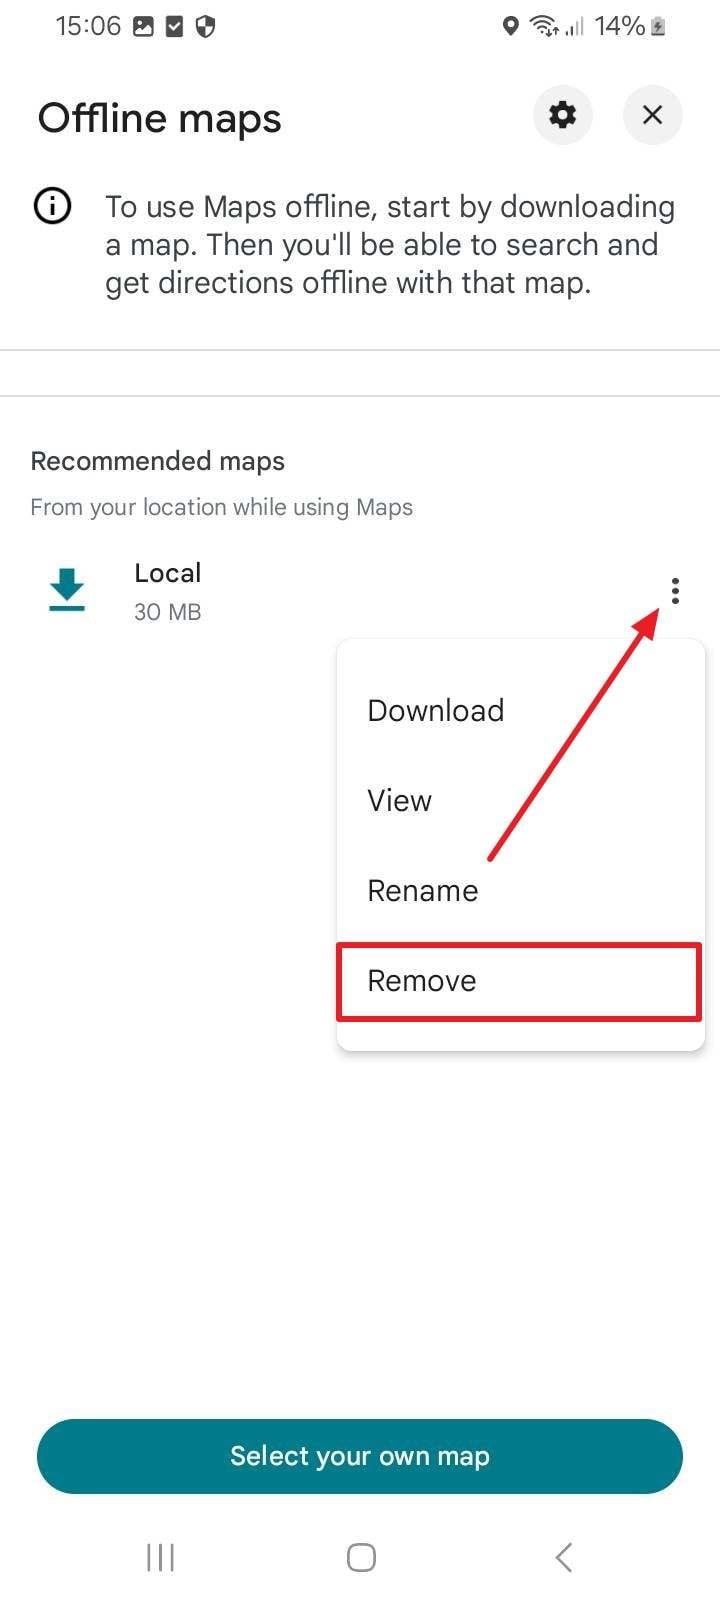
Step 2 Delete Expired Routes
Going ahead, review your saved map regions. Tap the "Three Dots" icon directly next to the heavy downloaded map you no longer need, and strictly opt for the "Delete" or "Remove" command.
Solution 9. Delete Unwanted Songs
Apart from the hefty visual files discussed above, high-fidelity music and podcast audio files also take up significantly more storage than users generally realize over time. Many heavily downloaded songs remain entirely unused, especially if you have transitioned to stream music via premium online apps like Spotify or Apple Music. Therefore, thoroughly deleting unwanted legacy audio files proactively helps free up space and keeps your local library highly organized. Plus, it essentially helps clean out old, forgotten playlists and rarely played tracks that have become digital clutter. When you continually ask how to get more storage on your Android phone, do not overlook your music folder; go through this guide:
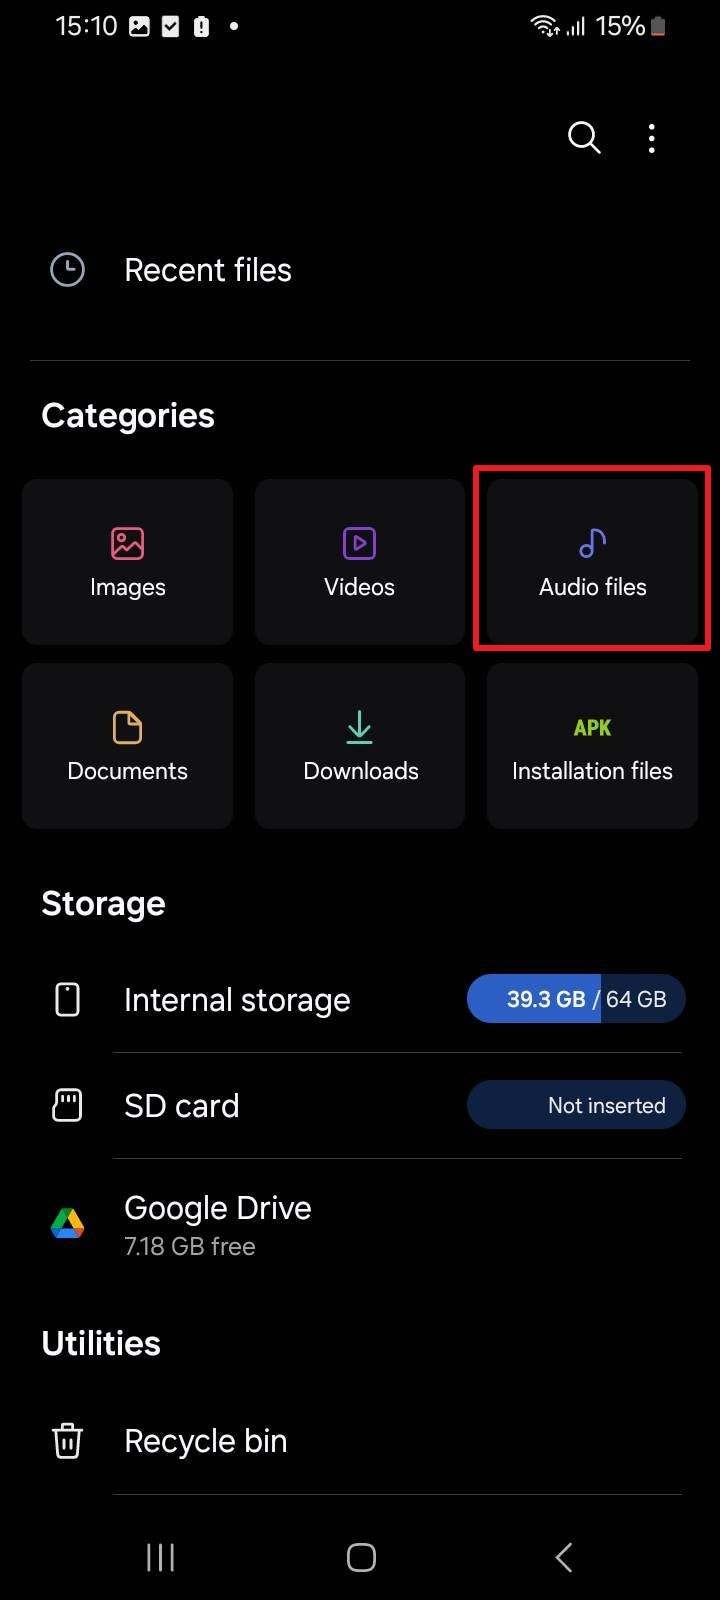
Step 1 Access the Audio Directory
From your Android device's native "Files" or "My Files" app interface, head directly to the categorized "Audio Files" or "Music" section to view all local sound data.
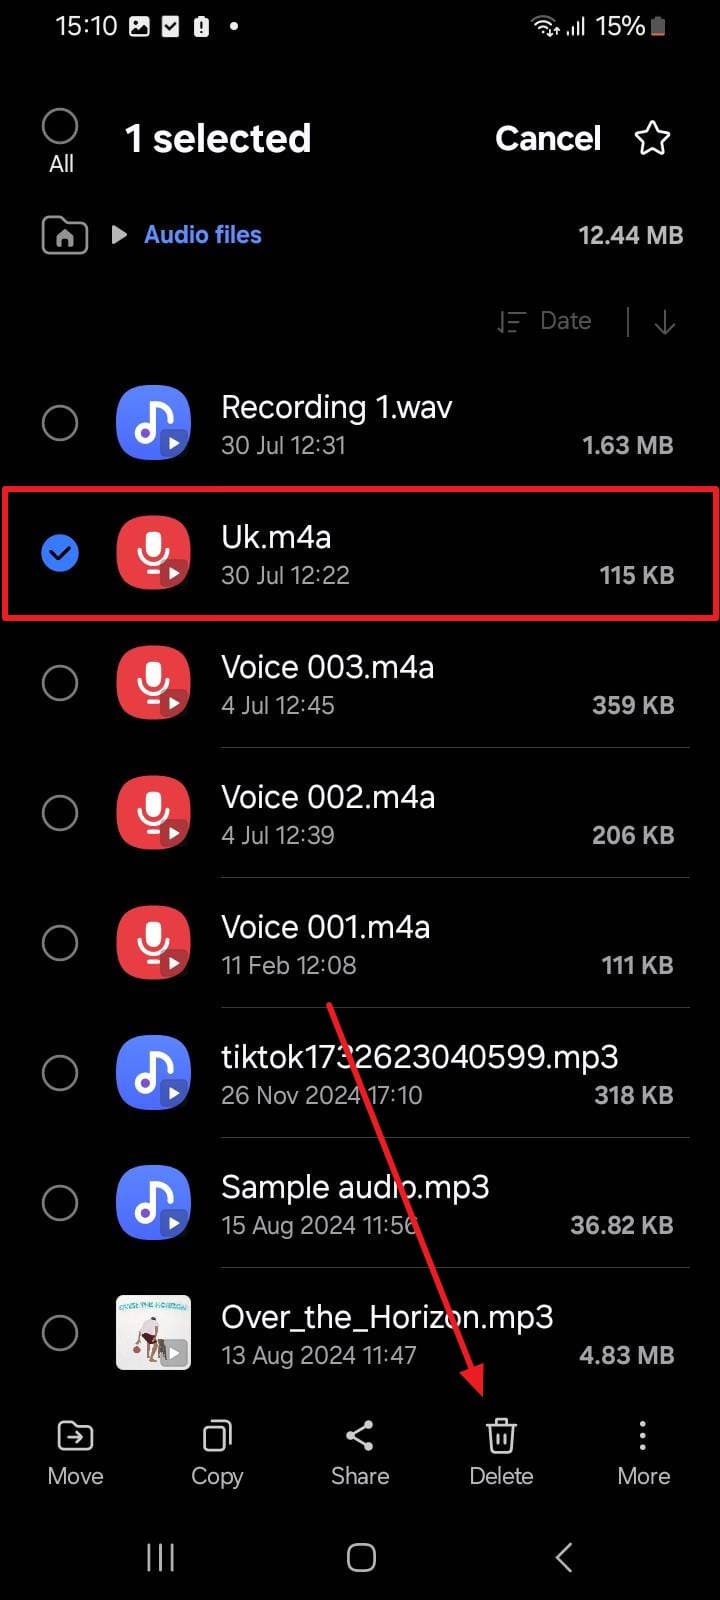
Step 2 Purge Unused Tracks
Next, meticulously locate and select the unnecessary MP3 songs or bloated podcast episodes, and decisively press the top "Delete" trash icon to clear them from your drive.
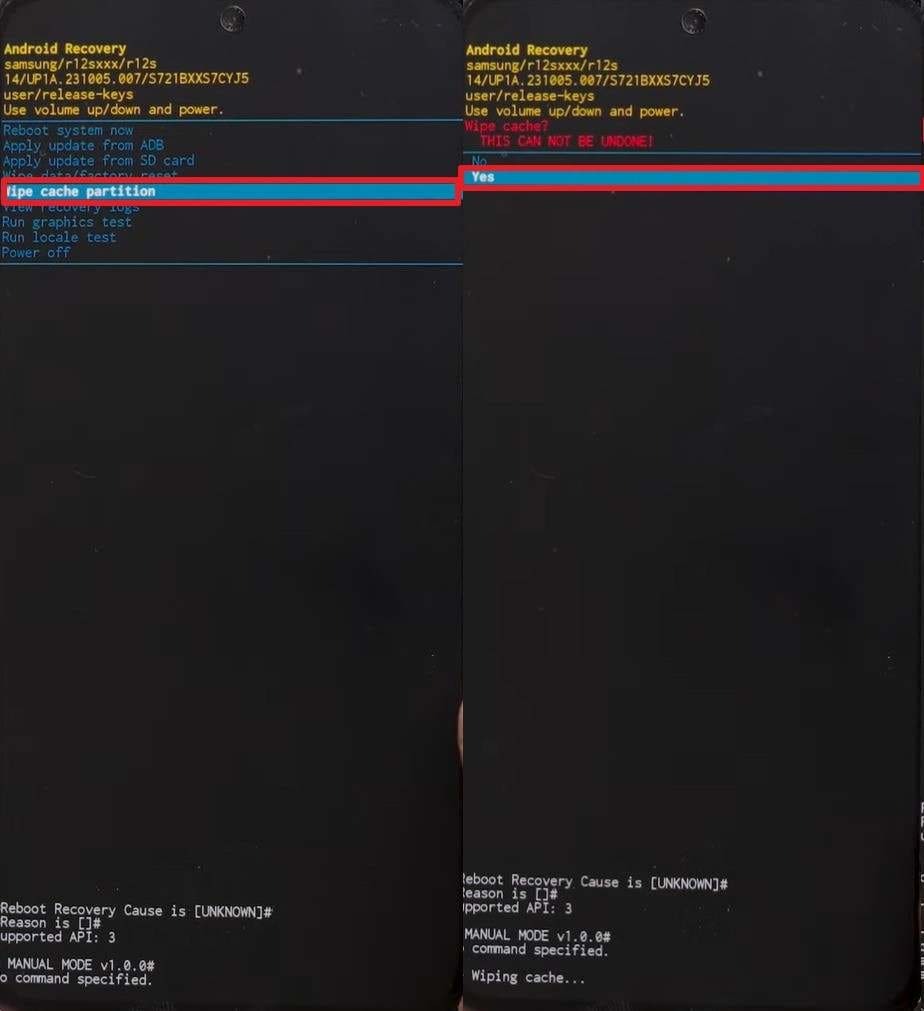
Solution 10. Clear System Cache Partition
Finally, the deeper Android system cache partition acts as a vast storage pool for complex temporary files generated by your phone's Operating System itself (not just user apps). Over extended periods, especially after multiple OTA (Over The Air) system updates, this foundational cache grows immensely and can slow down the core device performance significantly. When you actively clear the system cache from the recovery menu, your device instantly runs much more smoothly without deleting your critical personal photos or messages. Take expert guidance from these technical steps to comprehensively learn how to clean Android junk files from a root level:
Step 1 Boot into Recovery Mode
As your phone is completely powered off, press and strictly hold the "Power" and "Volume Up" hardware keys simultaneously until you see the manufacturer logo screen. Subsequently, use the volume keys to navigate and opt for "Wipe Cache Partition" using the Power button once you enter the technical "Recovery Mode," and confirm by selecting "Yes."
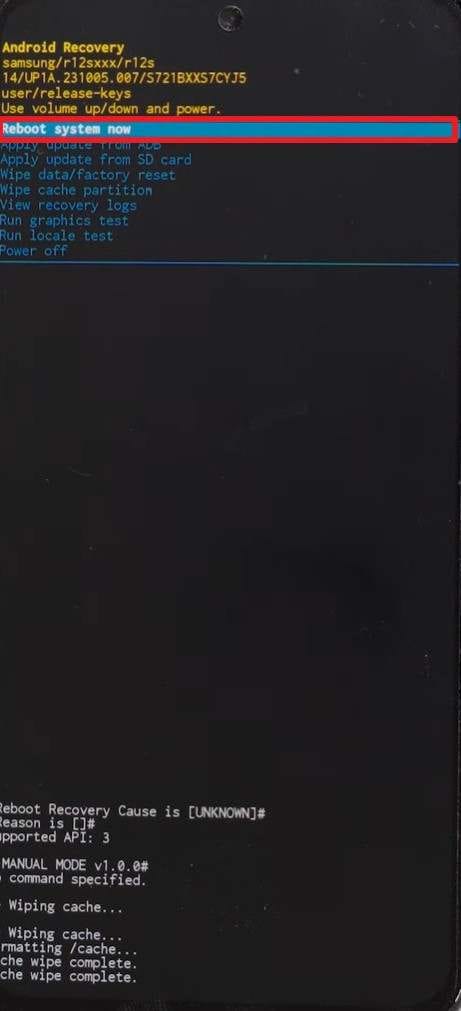
Step 2 Reboot the System
Going ahead, the menu will return to the main recovery screen. Opt for "Reboot System Now" by pressing the power button to finish the process and restart your optimized phone normally.
Conclusion
In summary, proactively managing your digital storage space regularly keeps your Android phone highly organized, incredibly responsive, and completely crash-free. This expansive article has thoroughly explored multiple built-in mechanisms and advanced strategies to properly understand how to free up space on Android. Consistently removing application caches, unused media, and heavy offline maps keeps your hardware healthy and prolongs its usable lifespan. However, if your device still feels frustratingly full or continues to be slow after cleaning all these files manually, we strongly advise you to try Dr.Fone - Data Eraser. It guarantees a 100% permanent data removal protocol that deeply cleans hidden fragments, successfully restoring your phone back to a pristine, factory-fresh operational condition.
1. Can deleting cached data affect app performance?
This method may temporarily slow down apps upon their initial next launch, as the system has to recreate necessary login tokens. However, it prevents massive system-wide storage overload. Apps intelligently rebuild the necessary cache components later, so performance quickly returns to normal usage levels. Ultimately, regular cache cleaning keeps internal memory heavily balanced without ever permanently harming your app's core functionality.
2. What happens if my phone storage is 100% full?
When internal storage completely fills up, core system apps may abruptly crash, and critical security update failures can occur quite frequently. Your entire phone will drastically slow down, which negatively affects basic multitasking and GUI performance over time. Therefore, actively deleting unused bulk data or transferring media files restores necessary breathing room for the operating system's normal functioning.
3. What's the safest way to wipe all personal data from my phone?
You should utilize a professional tool like Dr.Fone – Data Eraser, which actively ensures complete, military-grade data removal across all major Android OEM models. It securely overwrites deep memory sectors and produces detailed erasure reports, firmly verifying your total privacy protection when donating or reselling the device. Plus, this robust software guarantees 100% security while clearing absolutely everything well beyond any possible data recovery.
4. Will formatting an inserted SD card free up my internal Android storage?
No, formatting a micro SD card solely deletes the data explicitly stored on that external chip. While it gives you more removable storage capacity for future photos and files, it does not magically clear your Android device's native internal storage chip. To effectively free up internal space, you must manually move your internal apps or media files over to the freshly formatted SD card.
Chief Editor of the Dr.Fone team since 2012, Selena is a veteran technology editor known for turning complex iOS and Android topics into clear, user-focused guidance.
 Permanently erase all iOS & Android data—completely unrecoverable.

 100% Security Verified | No Subscription Required | No Malware

 :
: 
 ChatGPT
 Perplexity
 Gemini
 Claude
 Grok
Grok
 Permanently erase all data on iOS & Android — completely unrecoverable.




 Add Wondershare Dr.Fone as a preferred source on Google




