100% Security Verified | No Subscription Required | No Malware

 :
: 
 ChatGPT
 Perplexity
 Gemini
 Claude
 Grok
Grok
Imagine you just got back from the World Cup and now plan to sell your phone. So, before you erase your old phone before selling it after the World Cup, follow this guide to back up important data and protect your personal information.
Learn how Dr.Fone - Phone Backup and Dr.Fone - Data Eraser can help you secure World Cup memories and erase duplicates to make the device reset quickly.
In this article
- Part 1. Why You Should Reset Your Phone Before Selling It
- Part 2. Back Up Your Data Before Wiping Your Phone
- Part 3. Prepare Your Phone Before the Factory Reset
- Part 4. How to Factory Reset Your Phone
- Part 5. Total Privacy: Permanently Erase Data Beyond a Factory Reset
- Part 6. Final Checks Before Handing Over Your Phone
Part 1. Why You Should Reset Your Phone Before Selling It
Review the mentioned 5 reasons to know why you should wipe phone data before upgrading:
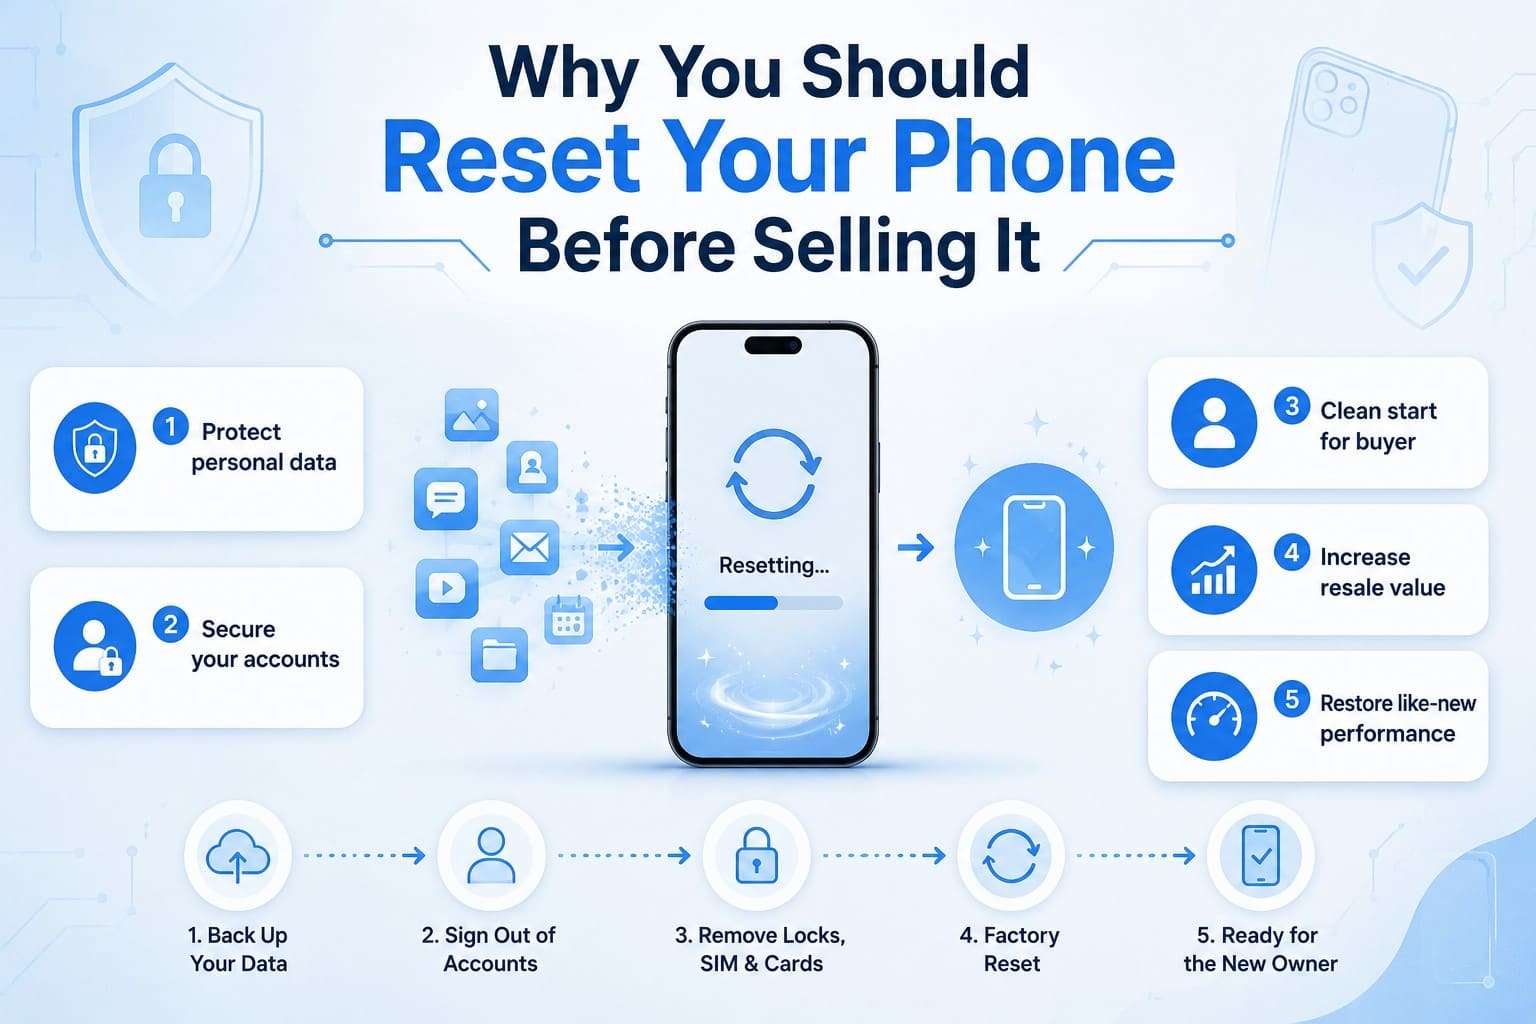
- Protect Your Personal Data: Your phone stores World Cup photos, videos, and other important information. Hence, a proper reset helps prevent unauthorized access and protects your personal data after the sale.
- Keep Your Accounts Safe: Note that Apple ID, Google account, and other services are linked to your device. So, if you sign out and reset the phone, it will prevent account access issues and security risks.
- Give the New Owner a Clean Start: Old settings, backups, and account links can cause syncing problems for the new owner. Thus, a factory reset removes personal data so the next user can set up the phone without issues.
- Improve Resale Value: A full reset phone shows buyers that the device has been prepared responsibly. This builds trust, improves the buying experience, and can help you sell the phone faster to negotiate a better resale value.
- Restore Like-New Performance: Over time, the phone collects cache files, temporary data, and unused apps that can affect the performance. So, a reset clears this clutter, improves responsiveness, and makes it feel cleaner for its next user.
Part 2. Back Up Your Data Before Wiping Your Phone
As you permanently erase your iPhone before resale, learn how to back up data for Android and iPhone in this section.
Option 1. Official Backup Methods for iPhone
To make a cloud or local backup, here are 2 options you can consider as an iOS user:
1. Back Up to iCloud
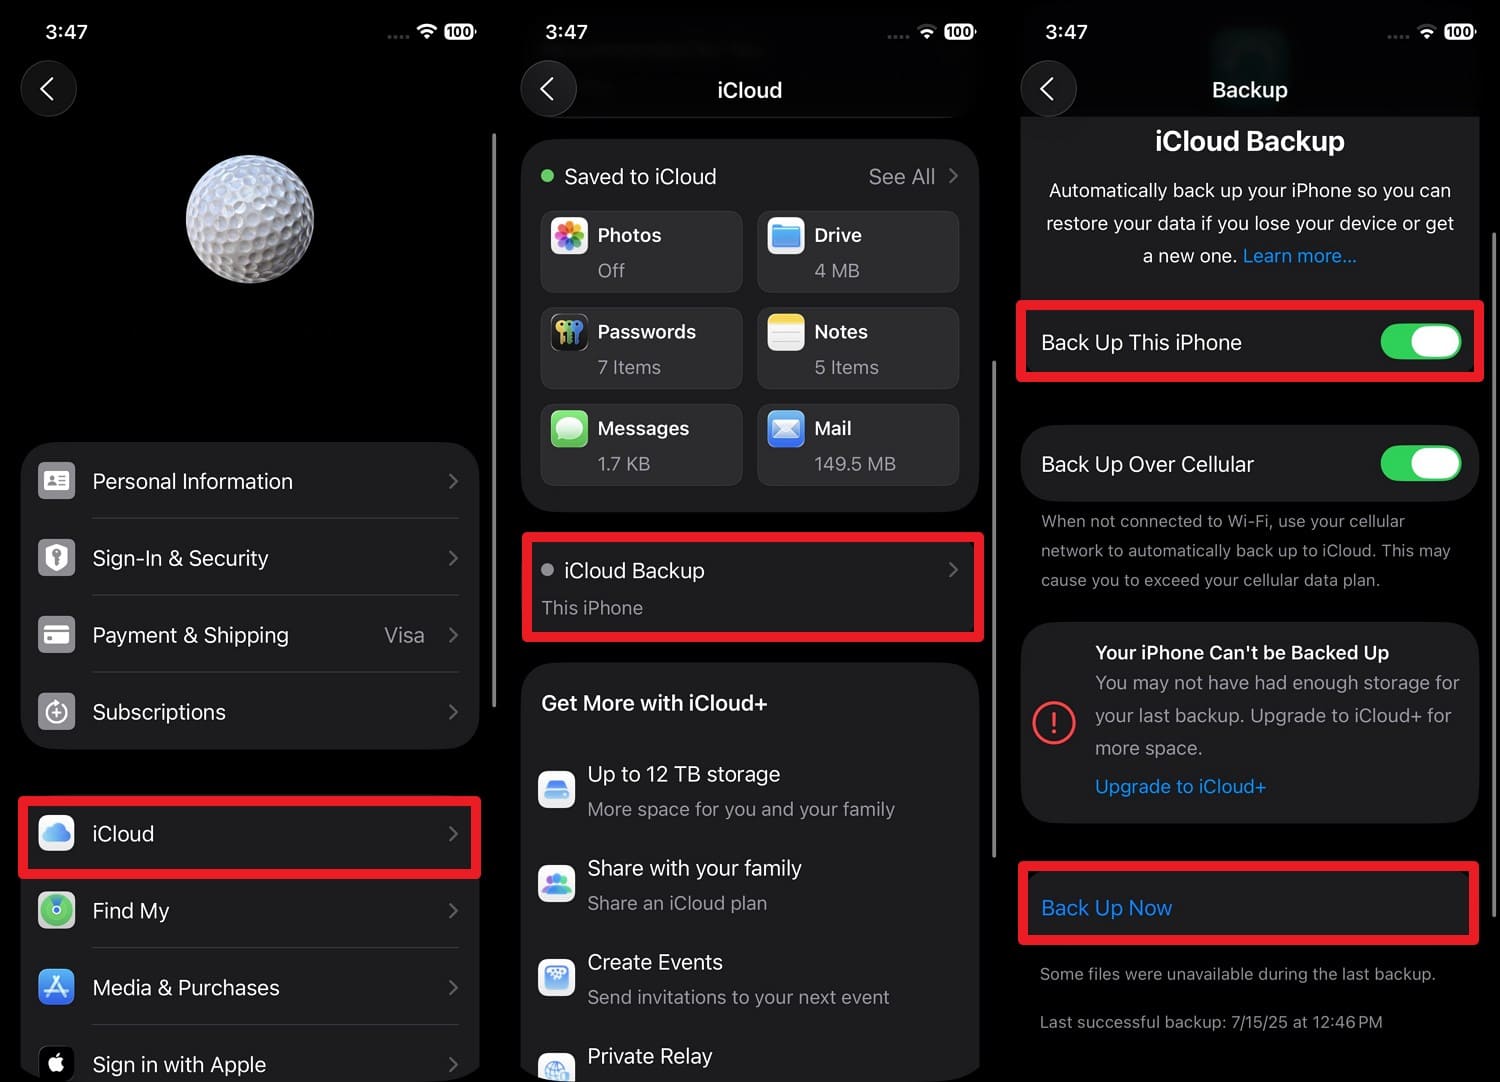
If anything goes wrong during the reset or when switching phones, you can easily restore data from the backup. Since it's stored in the cloud, you can access it anywhere using the same Apple ID once made via the mentioned steps:
Instructions. Tap the Apple ID in Settings, then go to “iCloud > iCloud Backup > Enable Back Up This Phone > Press Back Up Now.”
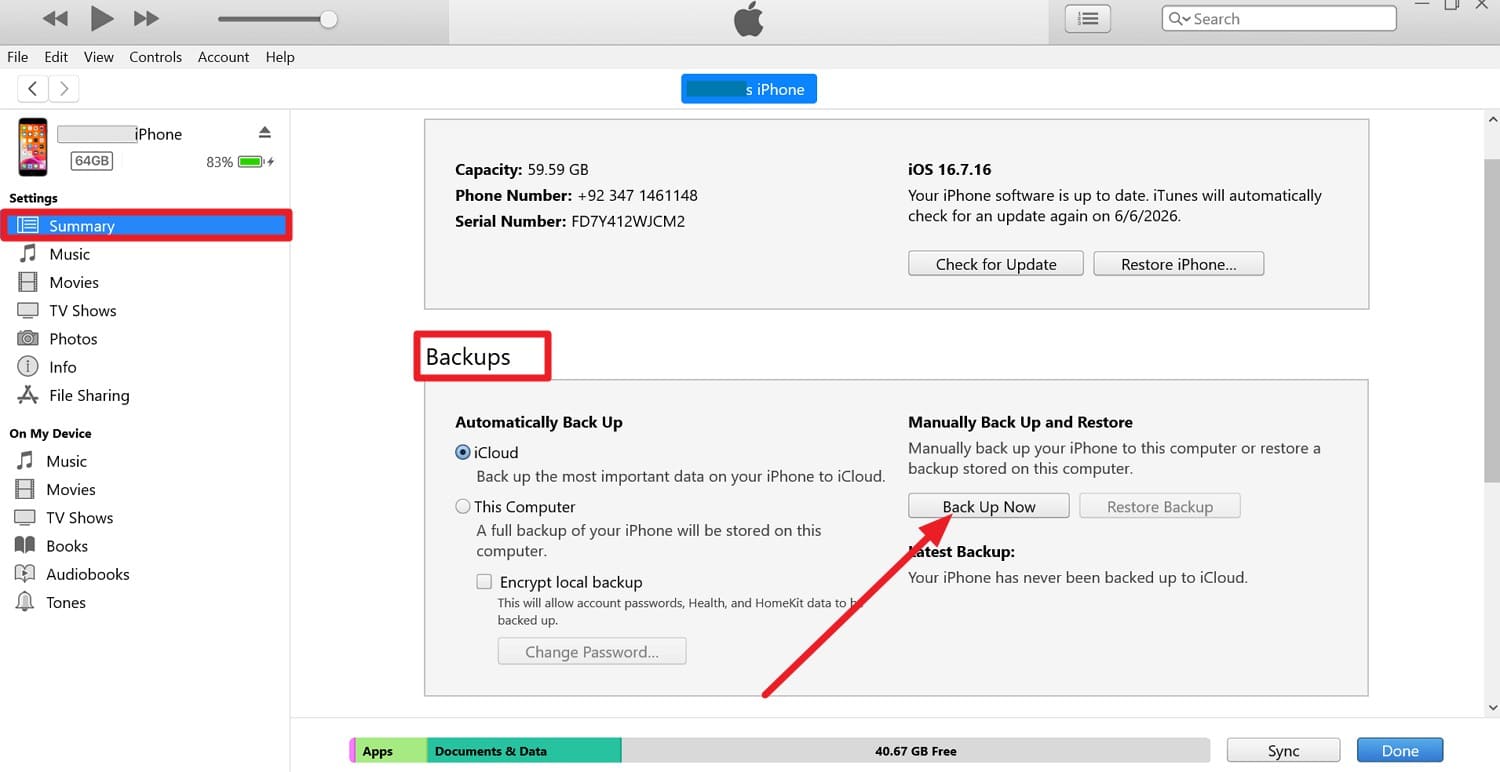
2. Back Up to a Mac or Windows PC via iTunes/Finder
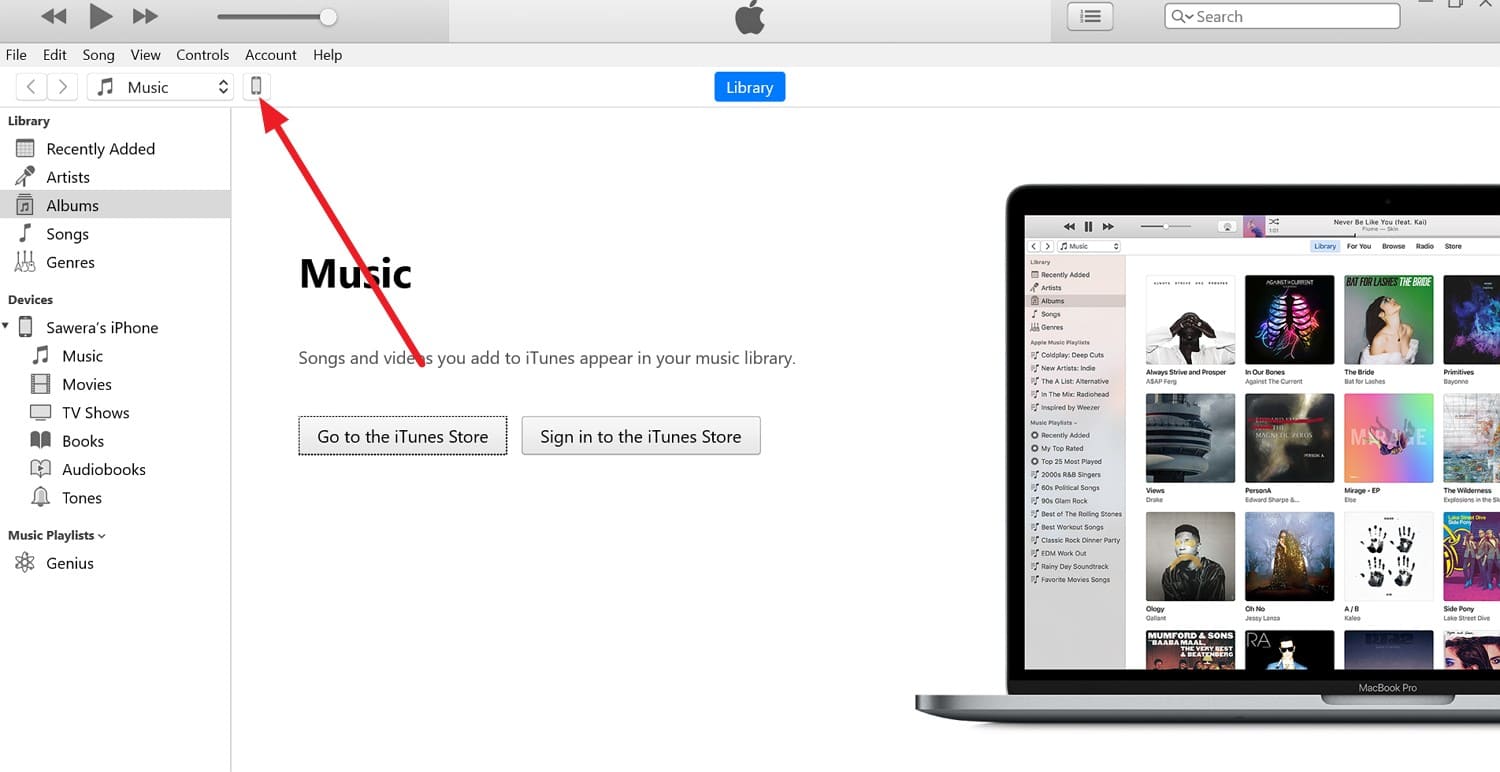
Try this method to create a full copy of your data, as it does not require internet access or cloud storage space. Since the backup can also be encrypted, here is how it's done for secure phone wipe after a trip:
-
Step 1 Connect the iPhone to iTunes > Press “Trust” on the iPhone > Select the “Phone” icon in iTunes.
-
Step 2 Go to “Summary > Backups > Encrypt Local Backup (Optional) > Back Up Now.”
Option 2. Official Backup Methods for Android
To save the important Android data, this section uncovers 2 standard backup options in detail:
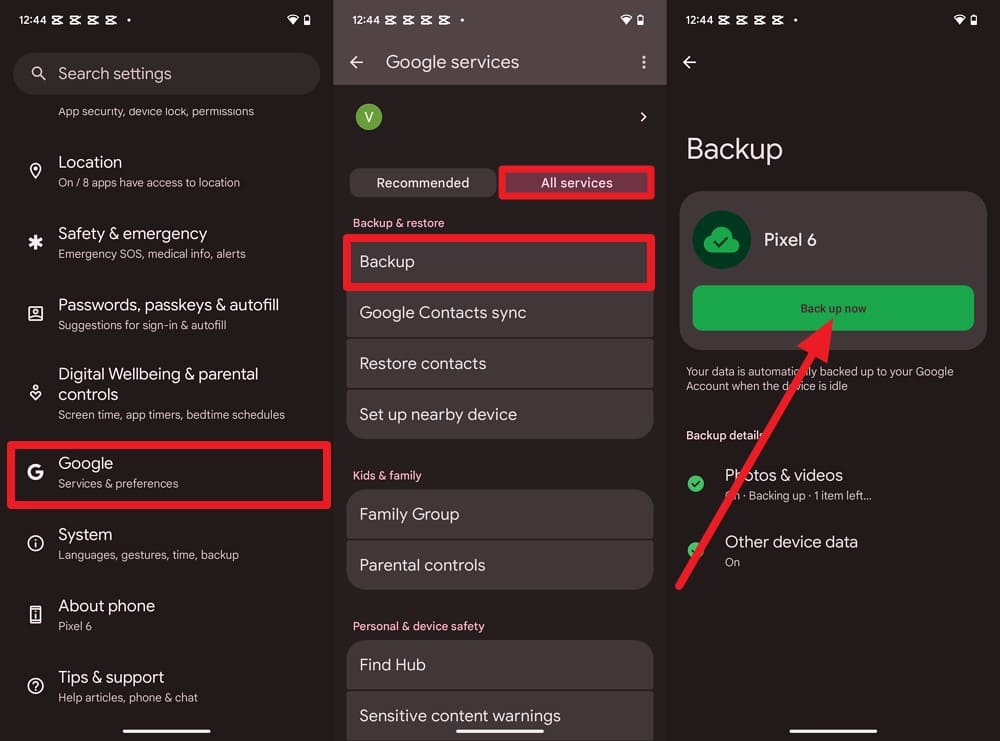
1. Back Up Using Google
When you reset the phone, you can restore this information to the new device via the same Google account. This backup can run automatically over Wi-Fi, so your data stays secure and is backed up.
Instructions. In the Android settings, go to “Google > All Services > Backup > Press Back Up Now.”
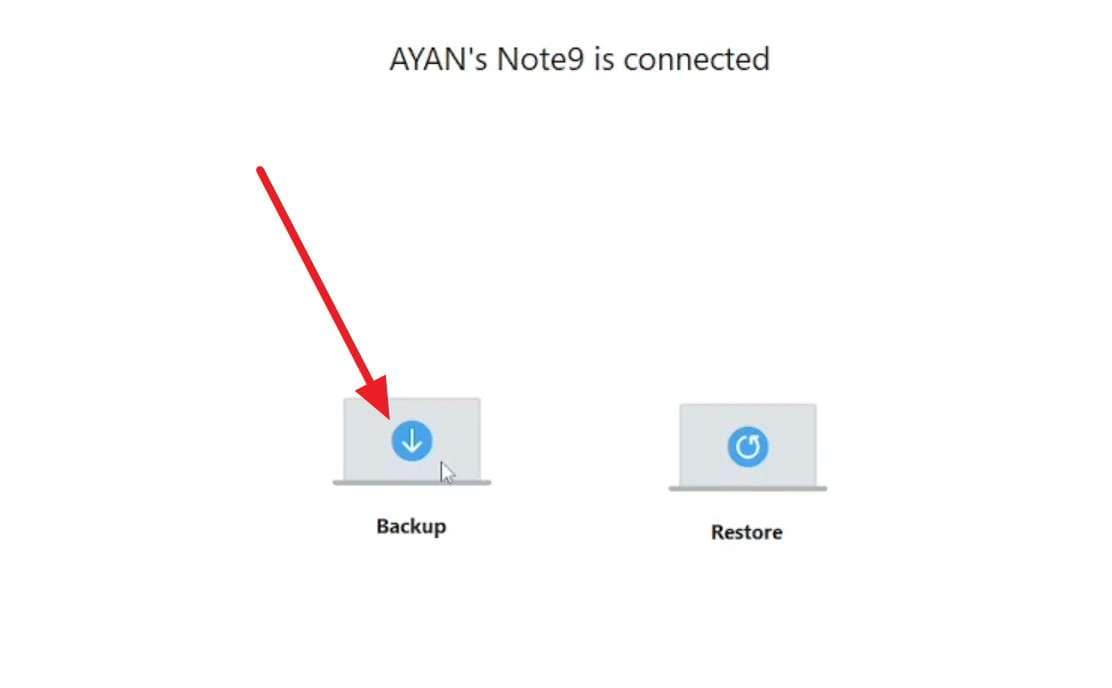
2. Back Up Using Apps Like Smart Switch
As a Samsung Galaxy device user, you can create a selective backup on your PC and later erase your old phone before selling it after the World Cup. You can pick the backup location and monitor the progress at the same time, as shown:
-
Step 1 Install the latest version of Smart Switch on PC > Connect devices > Pick “Backup.”
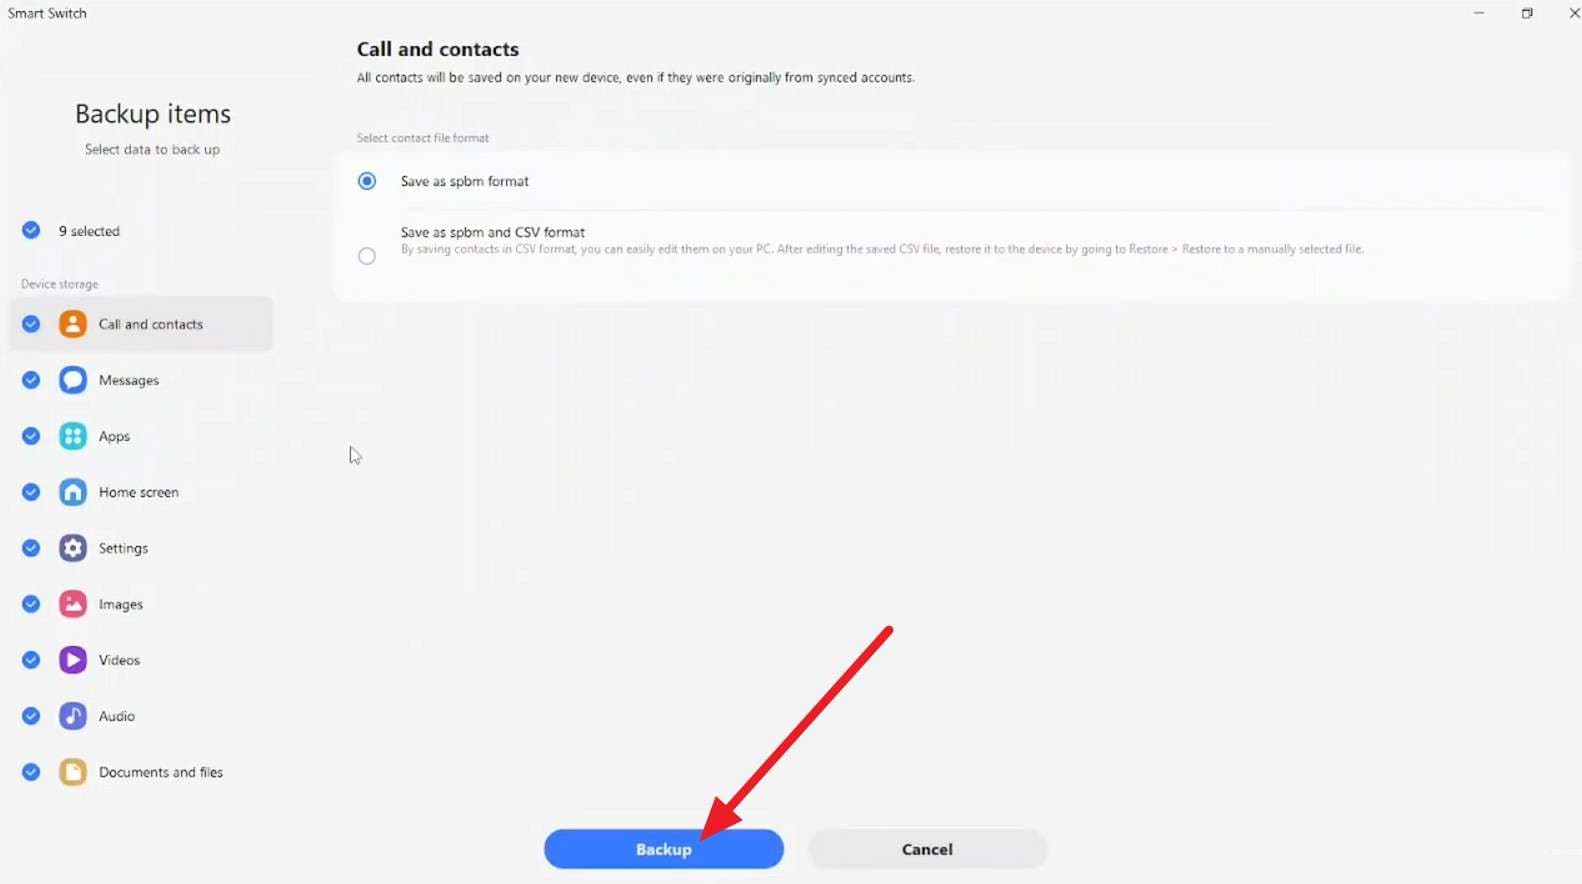
-
Step 2 Choose the data types, press the “Backup” button, select a backup location, and wait for the process to finish before wiping your phone.
Option 3. Use an All-in-One Backup Tool
When you are in a rush and need a comprehensive solution to back up Android and iOS devices, Wondershare Dr.Fone steps in. iOS users can save 26 data types, and Android users can back up 10 data types to phone and PC to later wipe phone data before upgrading. For iPhone users, backup options range from selective to incremental, and they can choose the backup location.
Once made, they can preview iCloud, iTunes, or Dr.Fone backups and restore them to any iPhone or Android device. As the Android tool is compatible with over 8,000 Android devices, you can also create a selective backup of data and apps, including WhatsApp.
 Effortlessly manage data through preview, delete, export, etc.
- Transfer all data between devices.
- Robust backup solutions for reliable data protection.
- Mirror screens to PC for meetings, teaching, and control.

Quick Guide to Manually Back Up Your iPhone Data via Dr.Fone
-
Step 1 Choose iOS Data Types to Back Up Now
Choose the data types and “Backup Path” in the “My Backup” section before pressing the “Back Up Now” button.

-
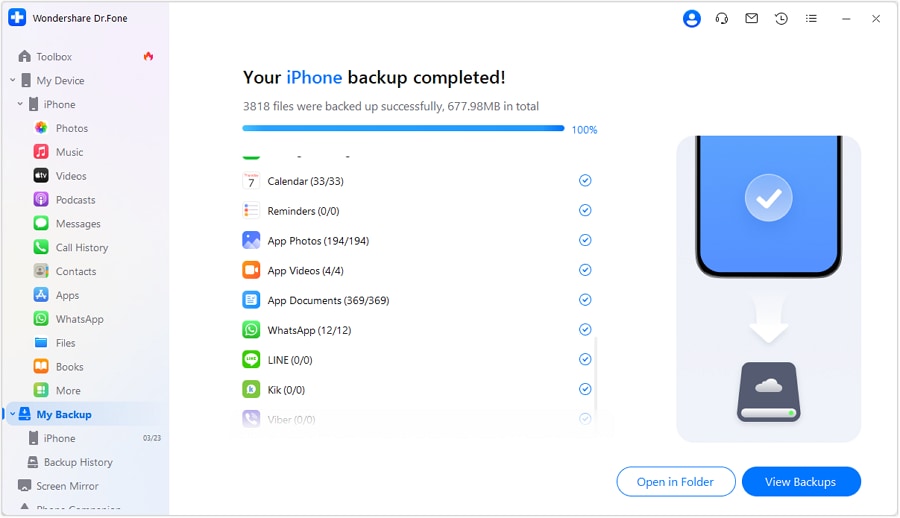
Step 2Preview the Backups to Wipe iPhone Later
When the slider ends, tap the “Open in Folder” or “View Backups” option to preview the saved data and wipe the device to sell.


Part 3. Prepare Your Phone Before the Factory Reset
Now that the data is safe, here is how you can prepare your device to wipe phone data before the upgrade:
-
1 Remove Physical SIM and SD/Memory Cards
This keeps the reset limited to the phone’s internal storage and ensures your number and carrier details are safe. The SD card may contain private data, but a phone reset normally does not erase it, so remove it before selling.
-
2 Sign Out of All Accounts (Apple & Android)
With this, you can prevent Activation Lock and FRP issues that could make the phone unusable for the next owner if your account is still linked. Since it also disconnects your personal data and any sync services, here is how it's done for secure phone wipe after a trip:
For iPhone
Instructions. Tap the “Name banner in the settings, scroll down to choose “Sign Out,” and follow the instructions.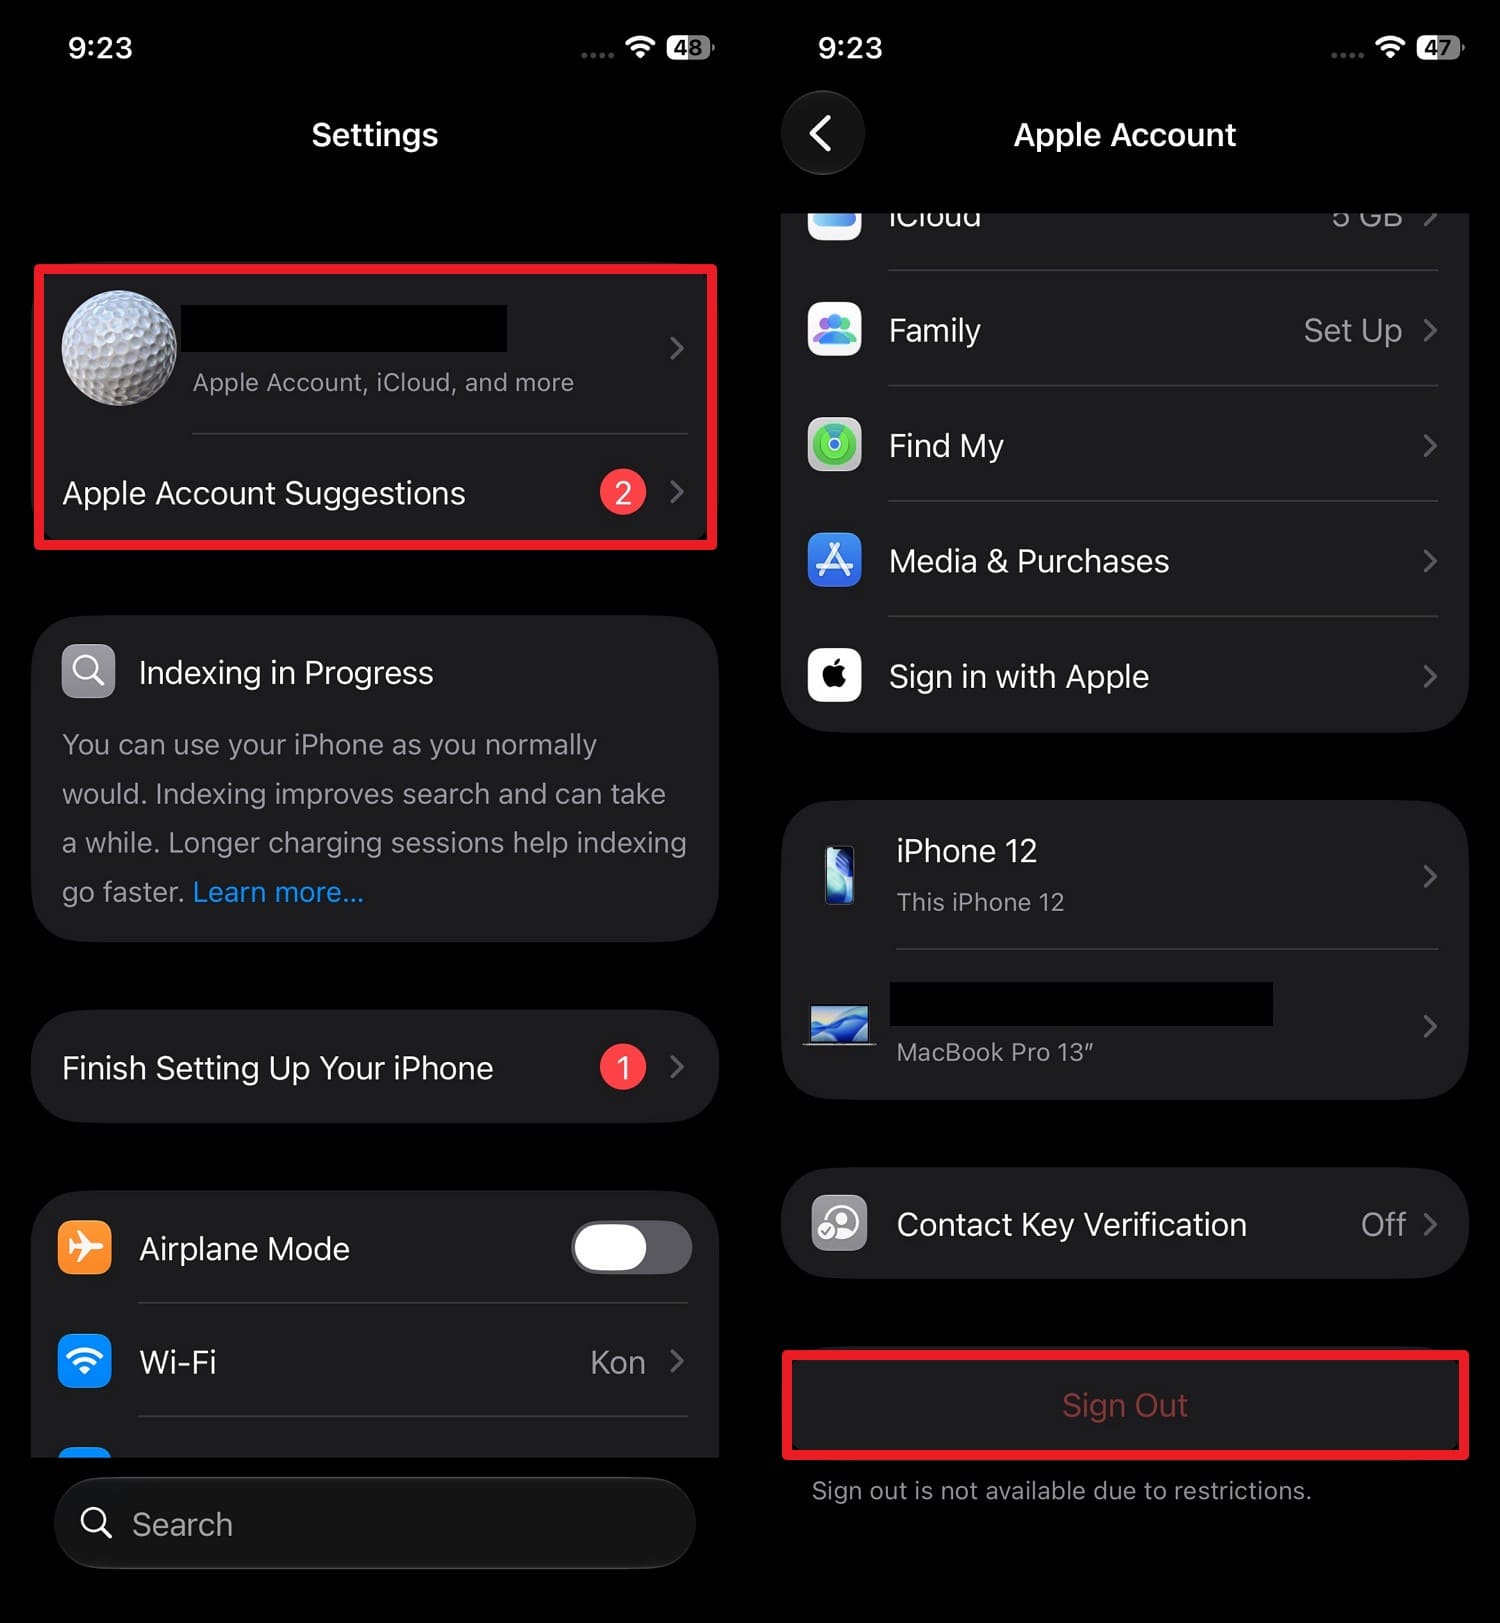
For Android
Instructions. Go to “Settings > Passwords, Passkeys & Autofill > Google account > Tap Remove Account > Confirm Remove Account.”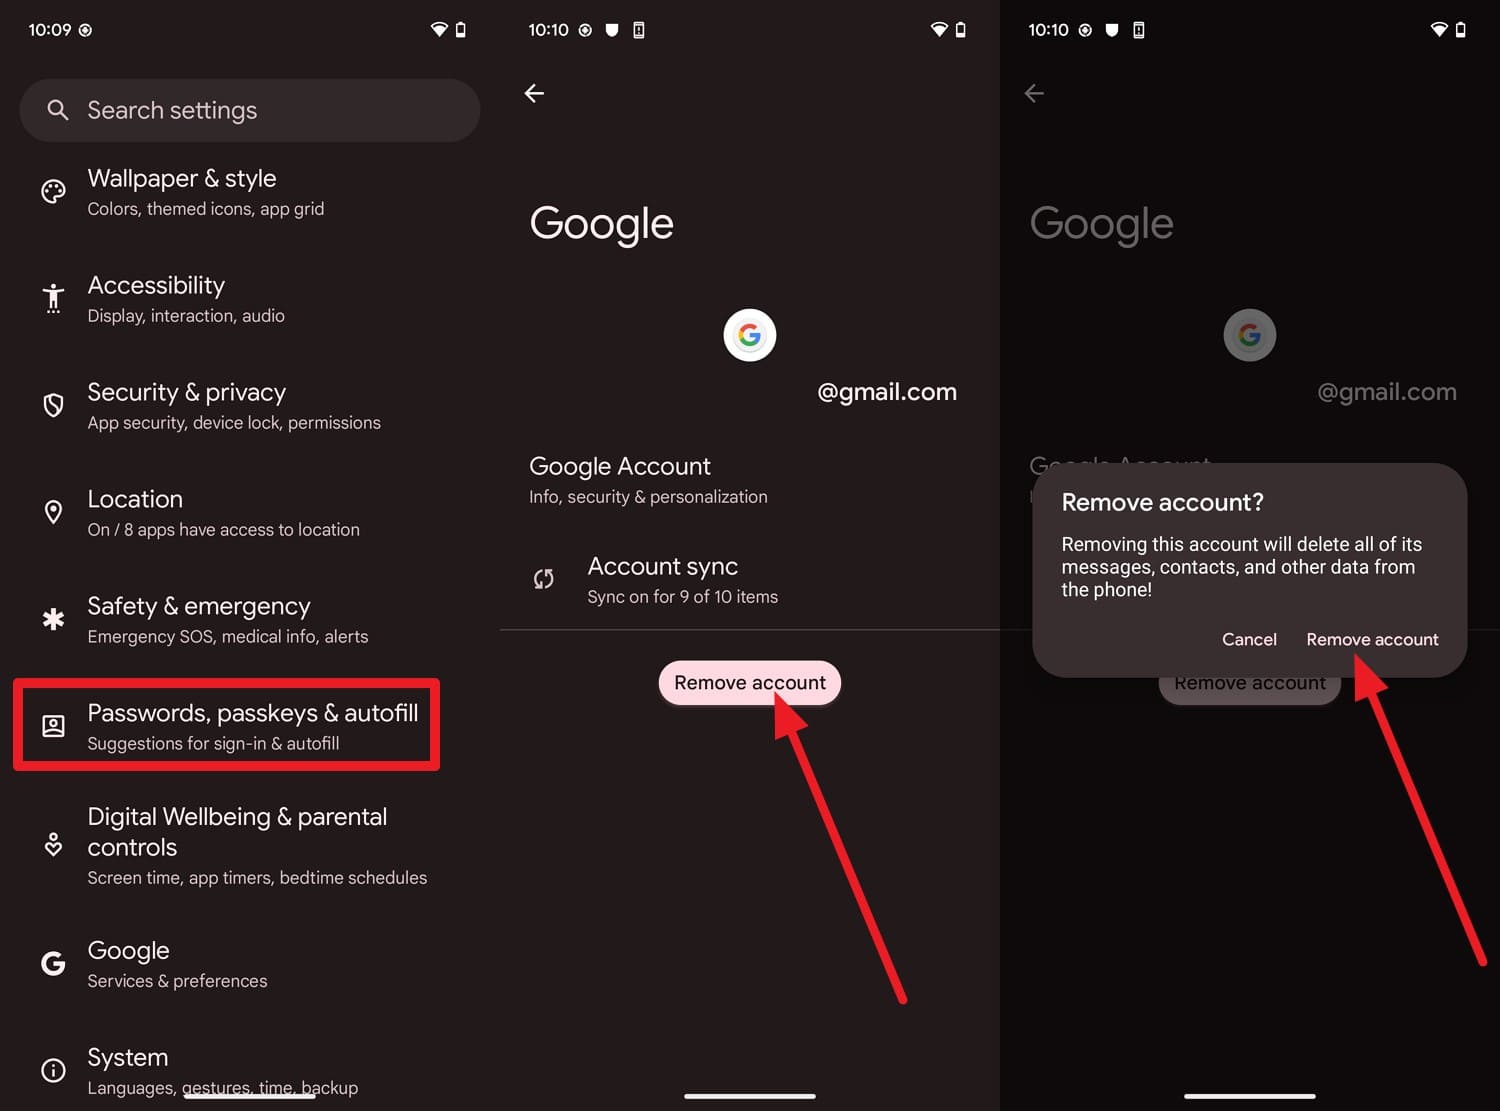
-
3 Turn Off Find My iPhone (Activation Lock)
For iPhone users, this action can also remove the Activation Lock and prevent the phone from being tied to your Apple ID. Once done via the mentioned steps, your Apple account will no longer appear in your Find My device list:
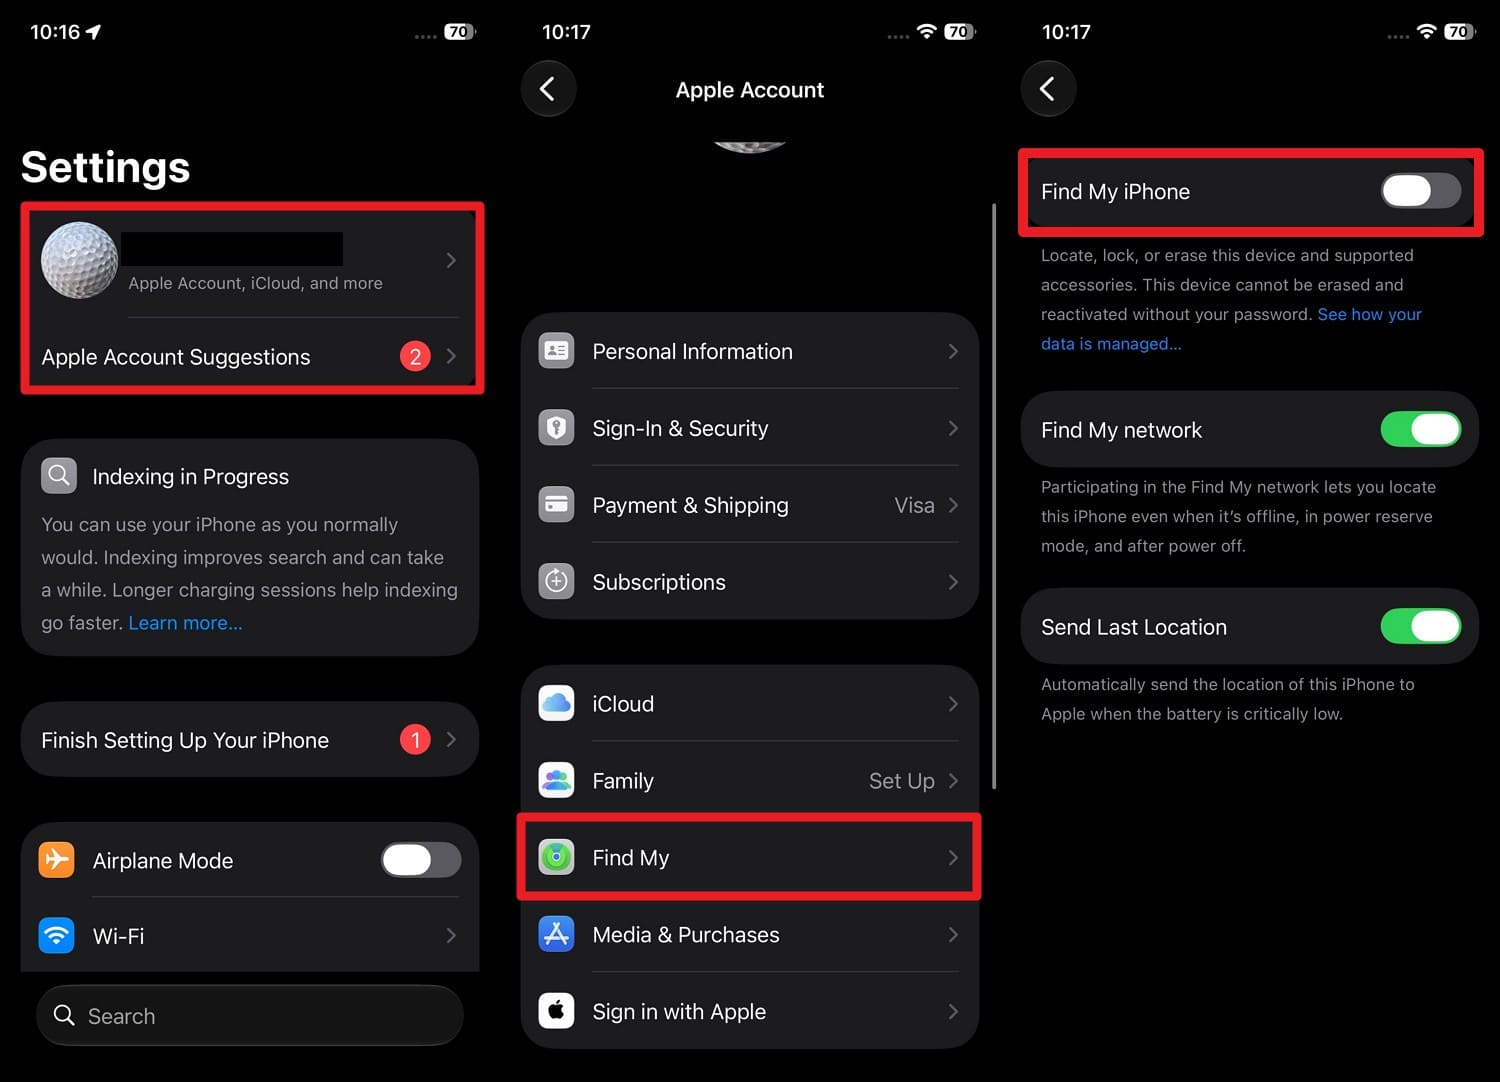
Instructions. Press Apple ID > Find My > Toggle off “Find My iPhone” > Add Apple ID to confirm.
-
4 Disable Factory Reset Protection (FRP)
This method prevents new Android buyers from getting stuck at the “Verify your account” screen. Since this requires previous Google Account details, you can remove it via Method 2 (Sign Out of All Accounts (Android)).
-
5 Remove Screen Locks & Biometrics
Before you erase your old phone before selling it after the World Cup, this method helps prevent lock-related issues. In addition, it ensures rest goes smoothly and reduces the risk of being locked out by forgotten credentials, as guided:
For iPhone
Instructions. Access the “Settings > Face ID & Passcode > Turn Passcode Off > Confirm.”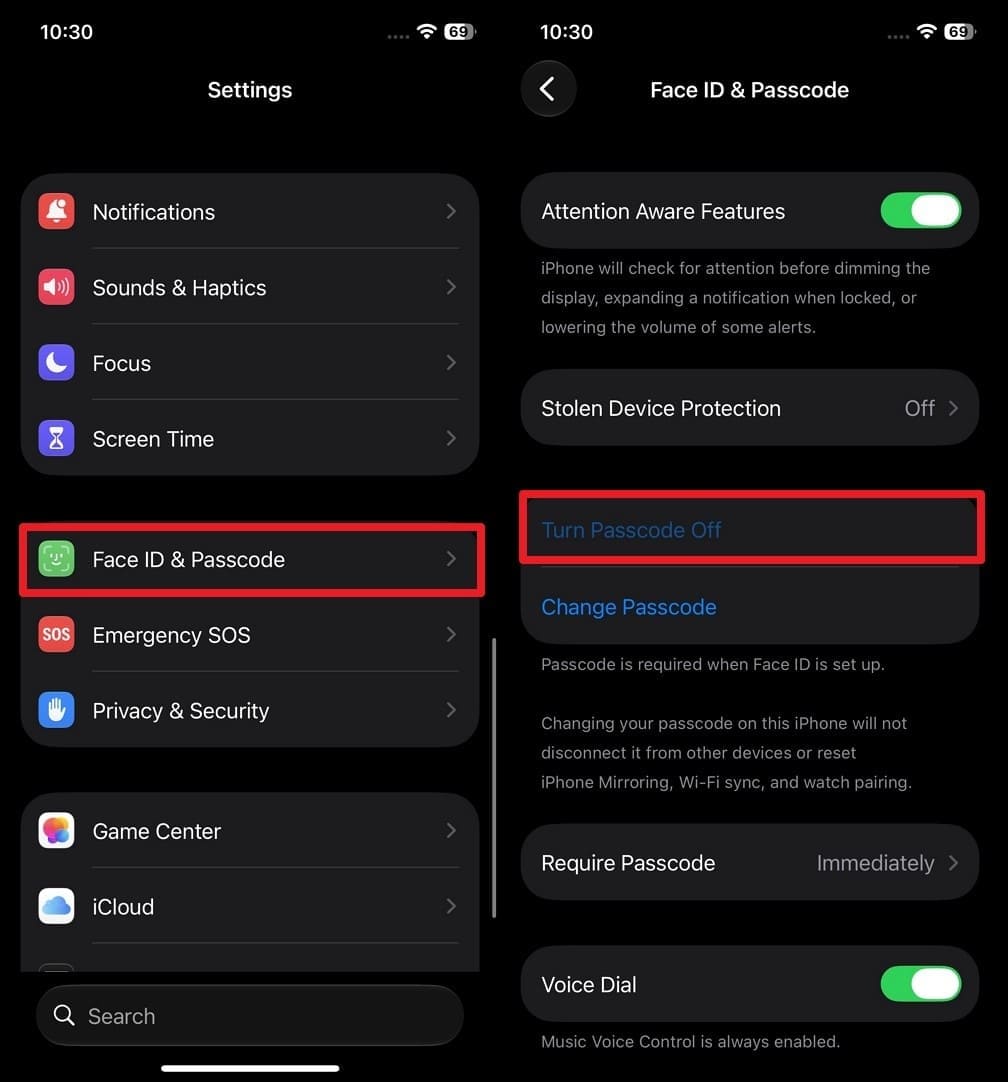
For Android
Instructions. Go to “Settings > Security & Privacy > Device Unlock > Screen Unlock > Add Passcode > None > Delete.”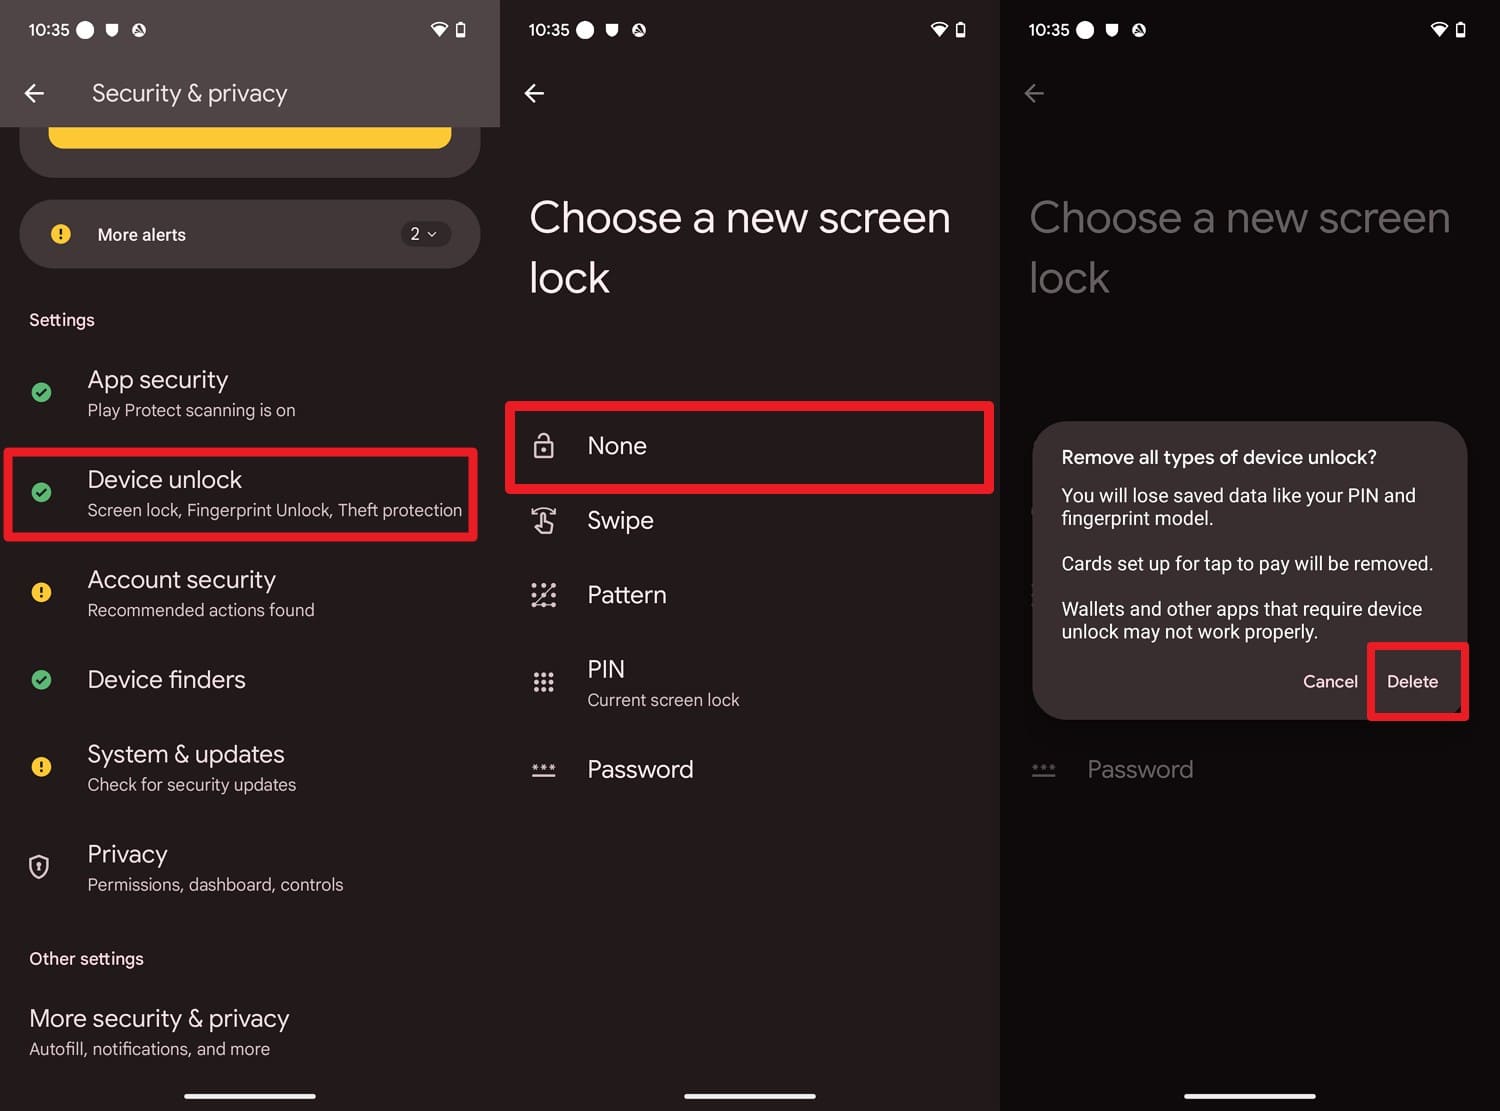
-
6 Remove eSIM Profiles
This limits the next user from accessing your calls, SMS, or mobile data and protects your identity and carrier account information. Through this, you can also ensure the phone is clean so the new owner can easily add their own once removed via the listed steps:
For iPhone
Instructions. Tap “Cellular or Mobile Data > Choose eSIM plan > Delete eSIM > Delete eSIM to confirm and wipe phone.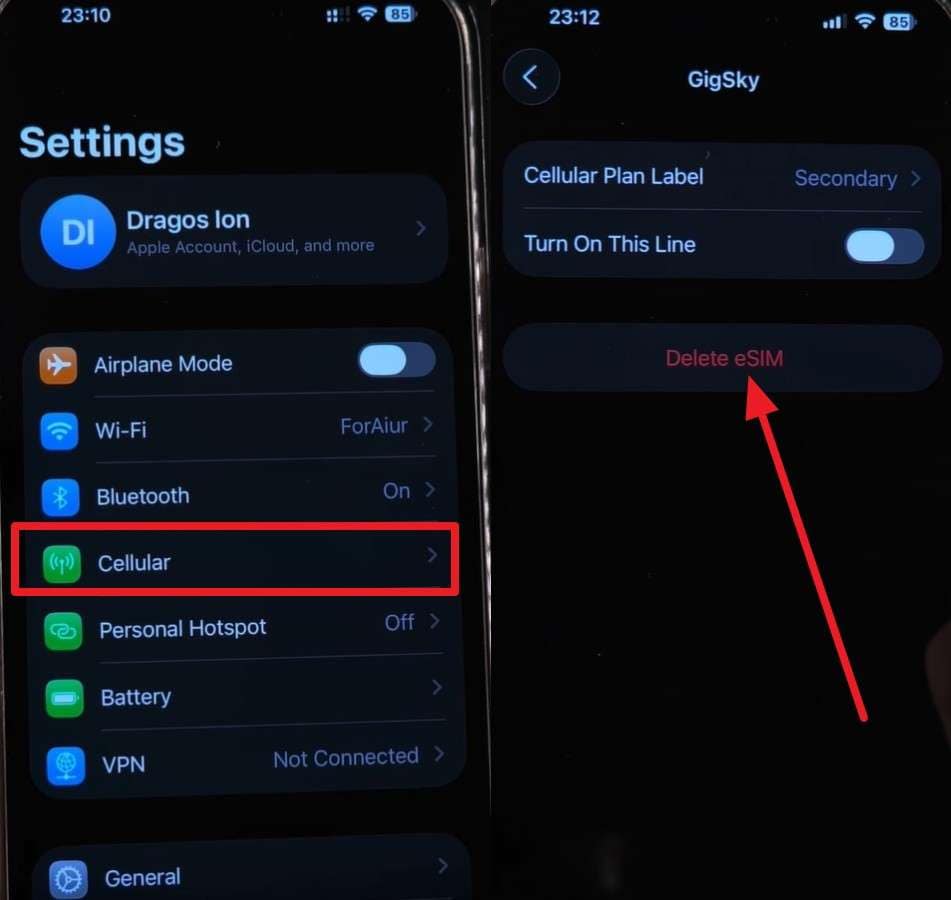
For Android
Instructions. Go to “Settings > Network & Internet > SIM > Tap the eSIM profile > Turn Off > Tap Delete SIM,” then add a PIN to confirm a secure phone wipe after the trip.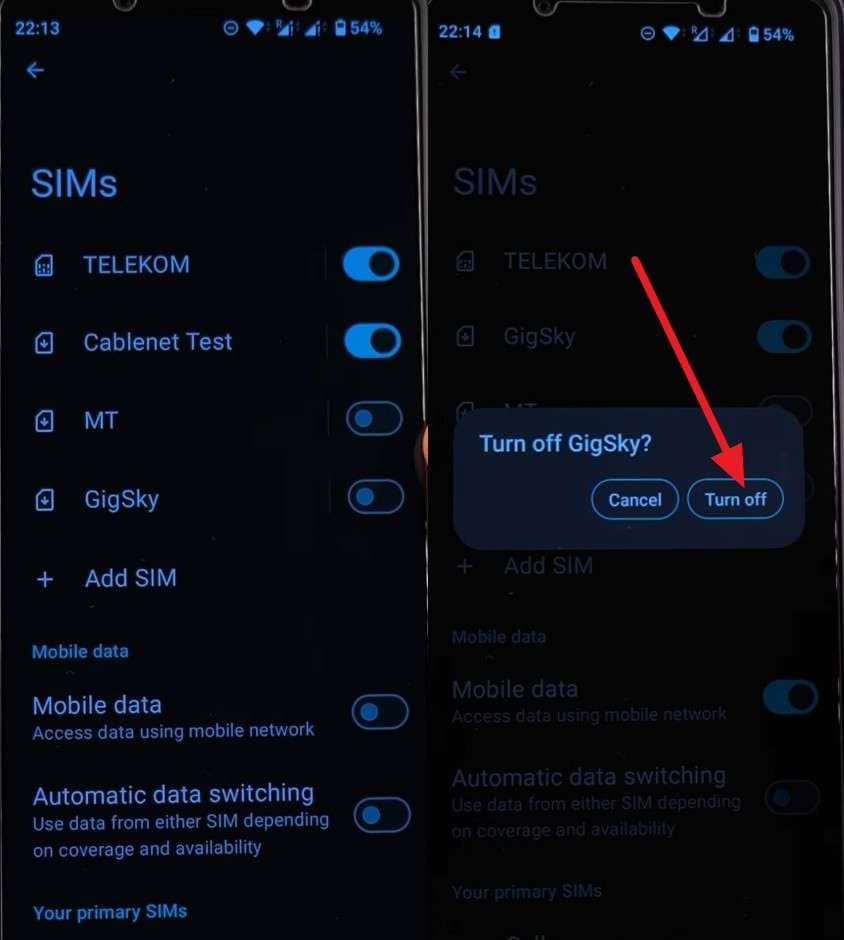
-
7 Remove Wallet & Payment Services
When you remove Apple Pay, Google Wallet/Pay, Samsung Pay, and banking cards, you secure your financial information. Since this ensures your card details and digital payment tokens are not linked, the mentioned steps will guide you:
Apple Wallet (iPhone): Access “Settings > Wallet & Apple Pay > Remove Card > Wipe the phone now.”

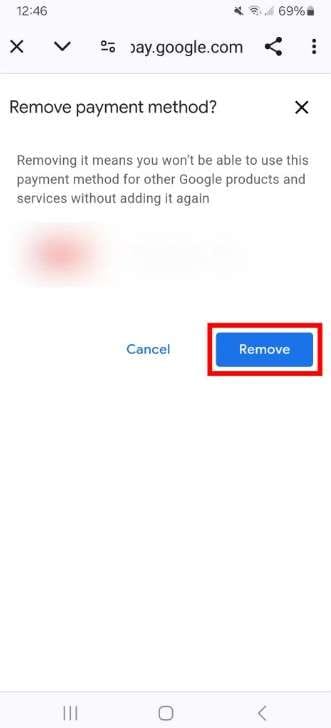
Google Wallet (Android): On the Google Wallet app, tap “Profile > Wallet settings > Select card > Remove Payment Method > Remove.”
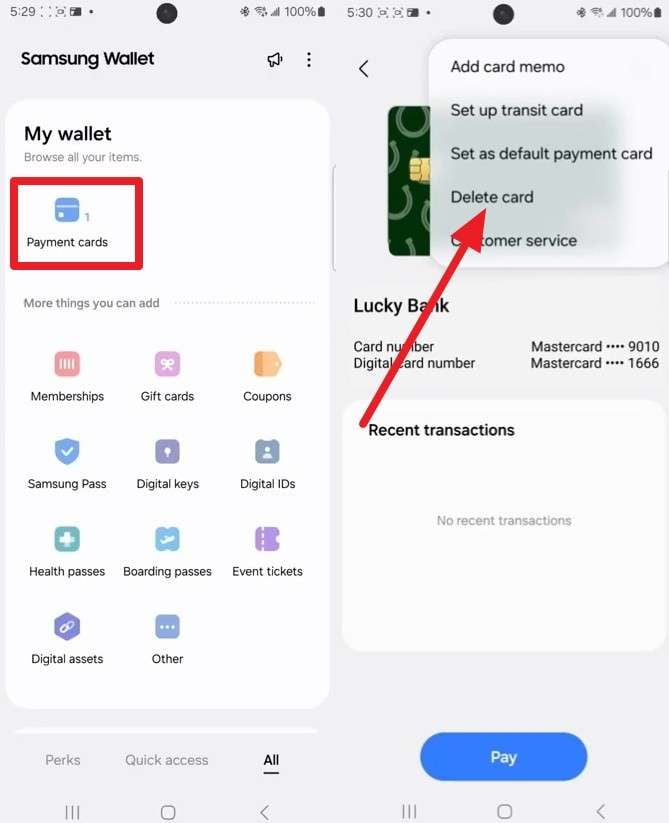
Samsung Wallet (Samsung Galaxy): Go to the “Samsung Wallet app > All menu > Choose a payment card > Press Three Dots > Delete Card.”
Part 4. How to Factory Reset Your Phone
Since the phone is ready, here is how you can erase your old phone before selling it after World Cup:
Method 1. Reset an iPhone
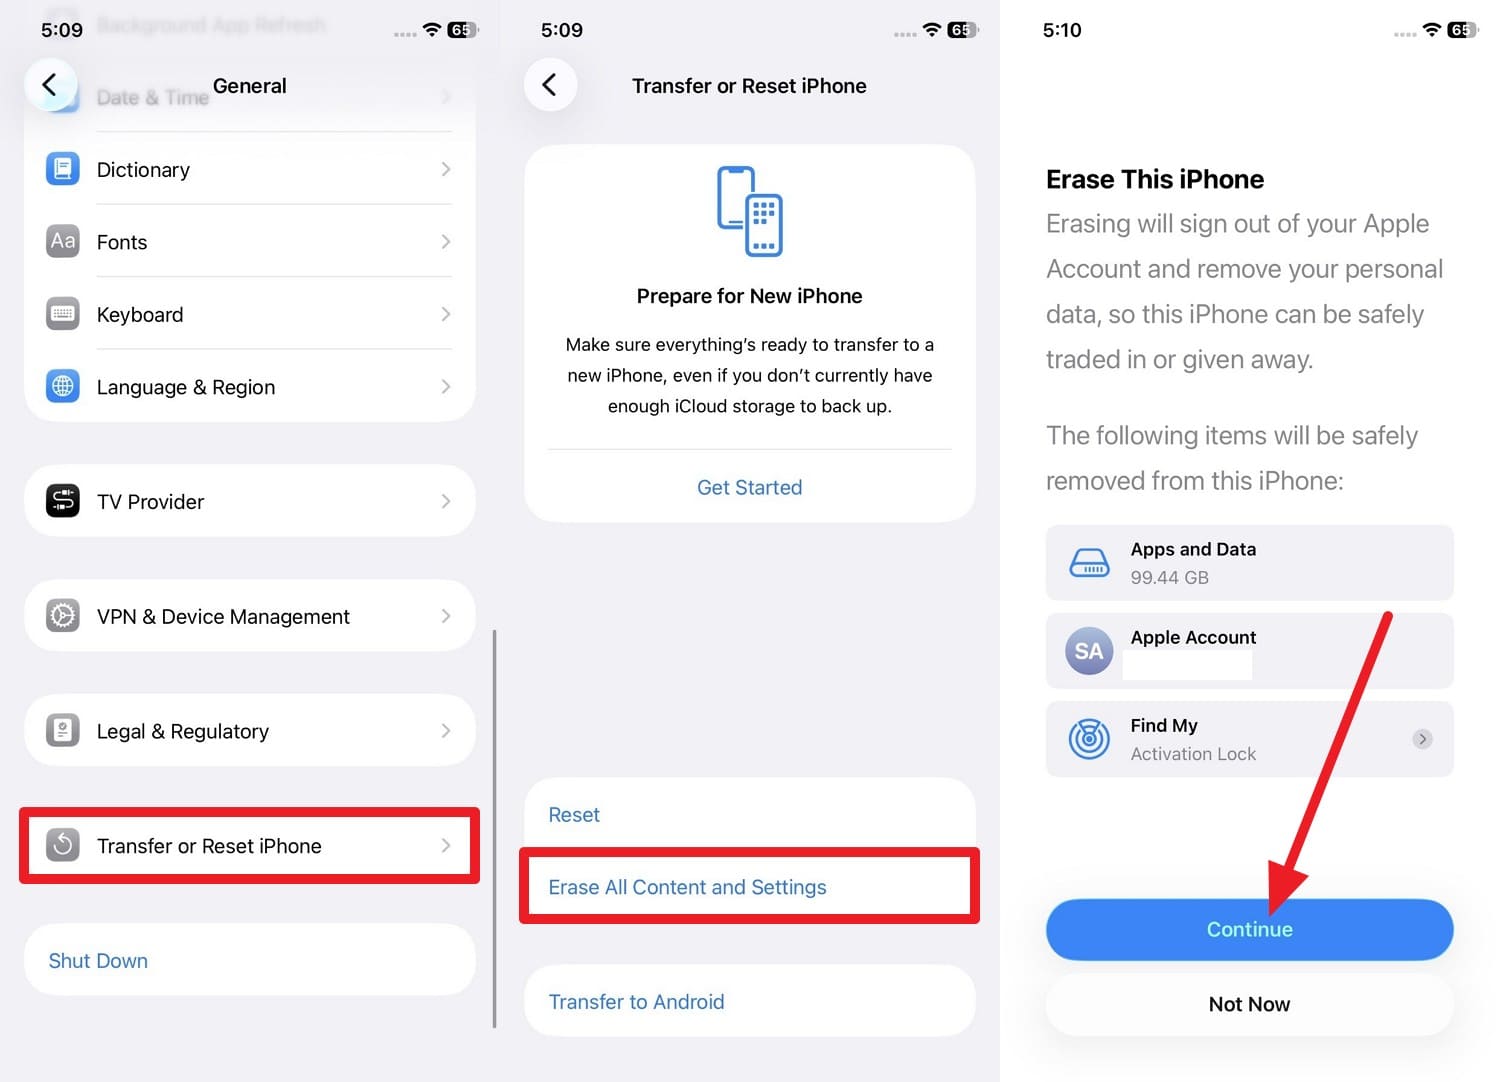
For the iPhone, follow the steps mentioned to access the Transfer or Reset iPhone button and erase the device.
Instructions. Go to “General > Transfer or Reset iPhone > Erase All Content and Settings > Continue to add Apple ID” and follow the given instructions.
Method 2. Reset an Android Phone
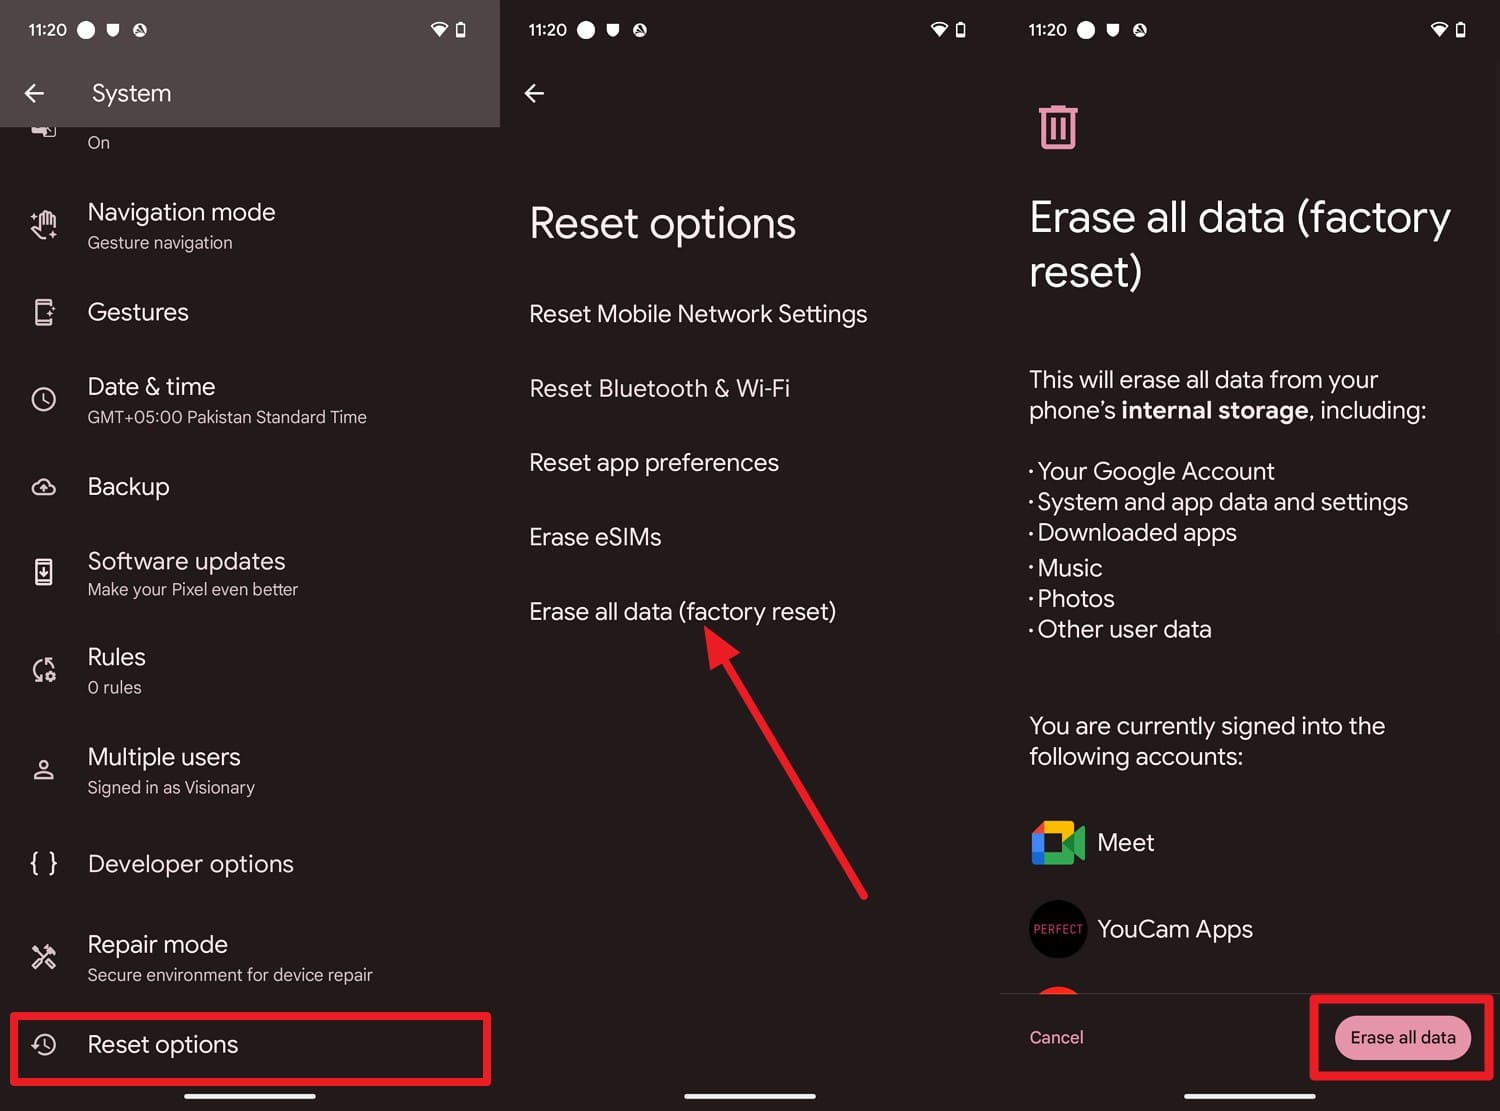
For Android, follow the mentioned guidelines to wipe phone data before the upgrade:
Instructions. In the System settings, go to “Reset options > Erase all data (factory reset),” then tap Erase All Data to confirm the action.
Part 5. Total Privacy: Permanently Erase Data Beyond a Factory Reset
The permanent erasure of the iPhone before resale is enough for normal use, as it returns the phone to a fresh state. To further know whether it's actually enough, and the recoverable data risks in this section.
Is a Standard Factory Reset Enough?
Yes, but it does not permanently erase everything, as some underlying data fragments may still exist on the storage and could be recovered with advanced tools. Due to this, a simple reset is fine to fix the issue or personal use, but not ideal if you want maximum privacy before you sell.
Use a Dedicated Data Eraser Tool
So, after you're done with the secure phone wipe after the trip, use a data-erase tool like Dr.Fone - Data Eraser (iOS). This goes beyond the factory reset and securely overwrites the storage so that the old data cannot be recovered. Besides that, you can also use this tool to remove junk and large files when selling is not the concern.
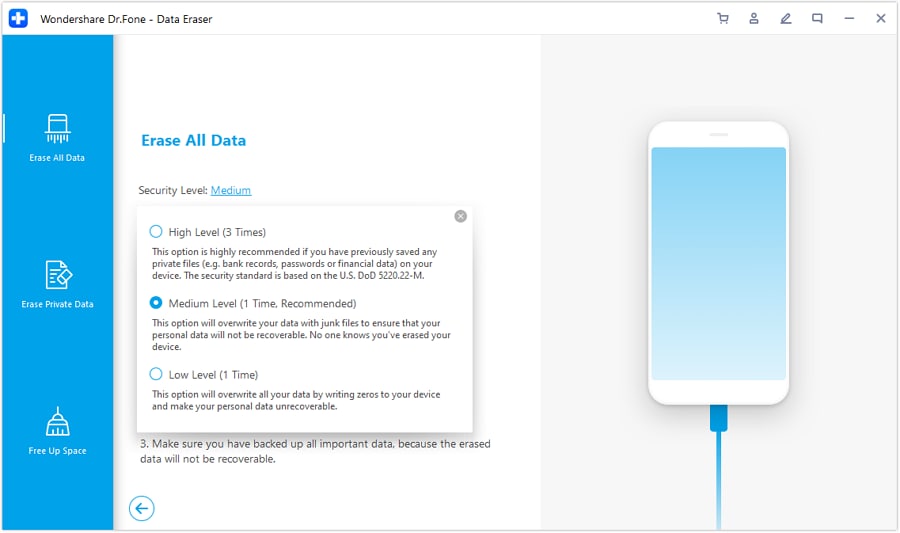
Since the tool is versatile, you can pick from 3 security levels and get a detailed report later. Unlike option tools or reset options, it asks for code to ensure the process is consensual and guided. To test this tool in the real world, you can follow this quick iPhone Data Eraser guide:
- Permanently erase all data on iOS & Android — completely unrecoverable.
- Military-grade wiping to fully protect your privacy.
- Generate verified erasure reports to boost device resale value.
- Selectively erase private data and remove junk & large files.
-
Step 1 Choose the Required Level to Erase All Data
In the “Erase All Data” tab, pick the “Start” button and choose the “Security Level” from the popup to continue.
-
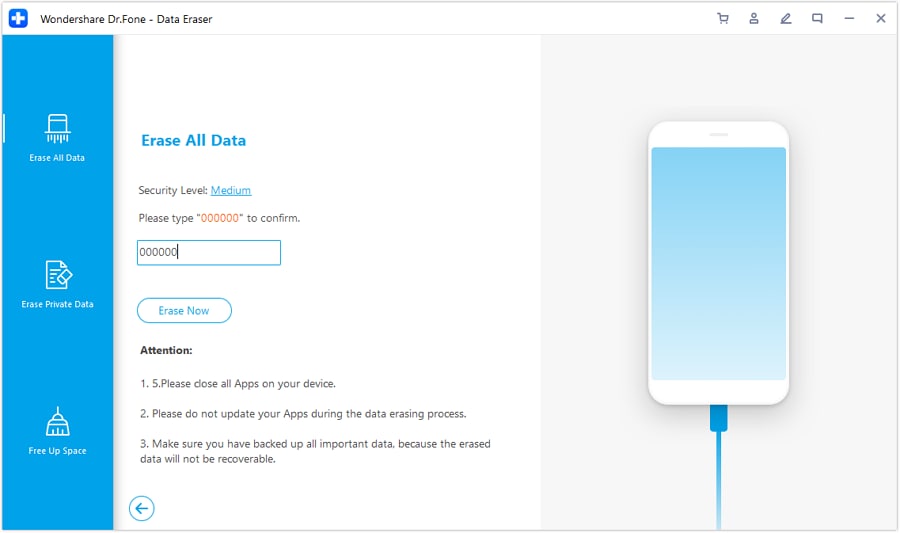
Step 2 Add 000000 Code to Erase All Data
To ensure the data is not recoverable, add the “000000” code, then click the “Erase Now” button to confirm the action and receive a detailed report later.
Part 6. Final Checks Before Handing Over Your Phone
Once you wipe phone data before the upgrade, perform the last checks before you hand over the phone:
| Step | What to Check |
|---|---|
| Backups Done | Dr.Fone, iCloud, Google, or PC backup completed |
| Accounts Removed | Apple, Google, and Samsung accounts signed out |
| Security Locks Off | Find My, FRP, PIN, and biometrics removed |
| SIM/eSIM & SD Removed | All cards and profiles removed |
| Wallet Cleared | Payment cards removed from wallet apps |
| Factory Reset Done | Device erased from Settings |
| Extra Wipe | Dr.Fone - Phone Data Eraser used |
| Device Tested | Reaches the setup screen normally |
| Accessories Removed | Personal accessories taken off |
| Records Saved | IMEI, serial number, and sale proof saved |
Conclusion
You need to properly erase your old phone before selling it after the World Cup, and this guide has discussed the process in detail. Start by backing up important data with Dr.Fone - Phone Backup. Afterward, perform a factory reset and use Dr.Fone - Data Eraser (iOS) to securely erase any remaining traces of personal data from the device.
FAQ
-
1. Do I really need to erase my phone before selling it after the World Cup?
Yes, it protects your personal data and accounts and prevents unauthorized access after resale or transfer. -
2. Can deleted World Cup photos still be recovered?
Yes, but you can use Dr.Fone - Data Eraser after the reset and choose from 3 Security Levels to permanently remove the leftover data fragments. -
3. Can I reuse the same Apple ID or Google account on a new phone?
Yes, you can safely reuse your Apple ID or Google account on a new device. Signing out of the old phone is recommended before selling it, but you can still log in to another device even if the account remains signed in on the old one.
 Add Wondershare Dr.Fone as a preferred source on Google