How to Clear System Data on iPhone: 2026 Complete Cleanup Guide
Selena LeeOriginally published Jul 27, 2026, updated Oct 14, 2026
:
TL;DR:
To effectively manage and clear System Data on your iPhone without losing essential files, the most reliable approach is combining automated cleaning tools with regular manual iOS maintenance.
Use a dedicated data eraser: Tools like Dr.Fone - Data Eraser can safely scan and wipe hidden caches, temporary files, and corrupted logs that iOS cannot easily remove.
Offload heavy applications: Navigating to iPhone Storage and offloading large apps removes accumulated cache while keeping your personal app data intact.
Clear browser and message caches: Regularly deleting Safari history and setting Messages to auto-delete after 30 days significantly reduces the hidden system data footprint over time.
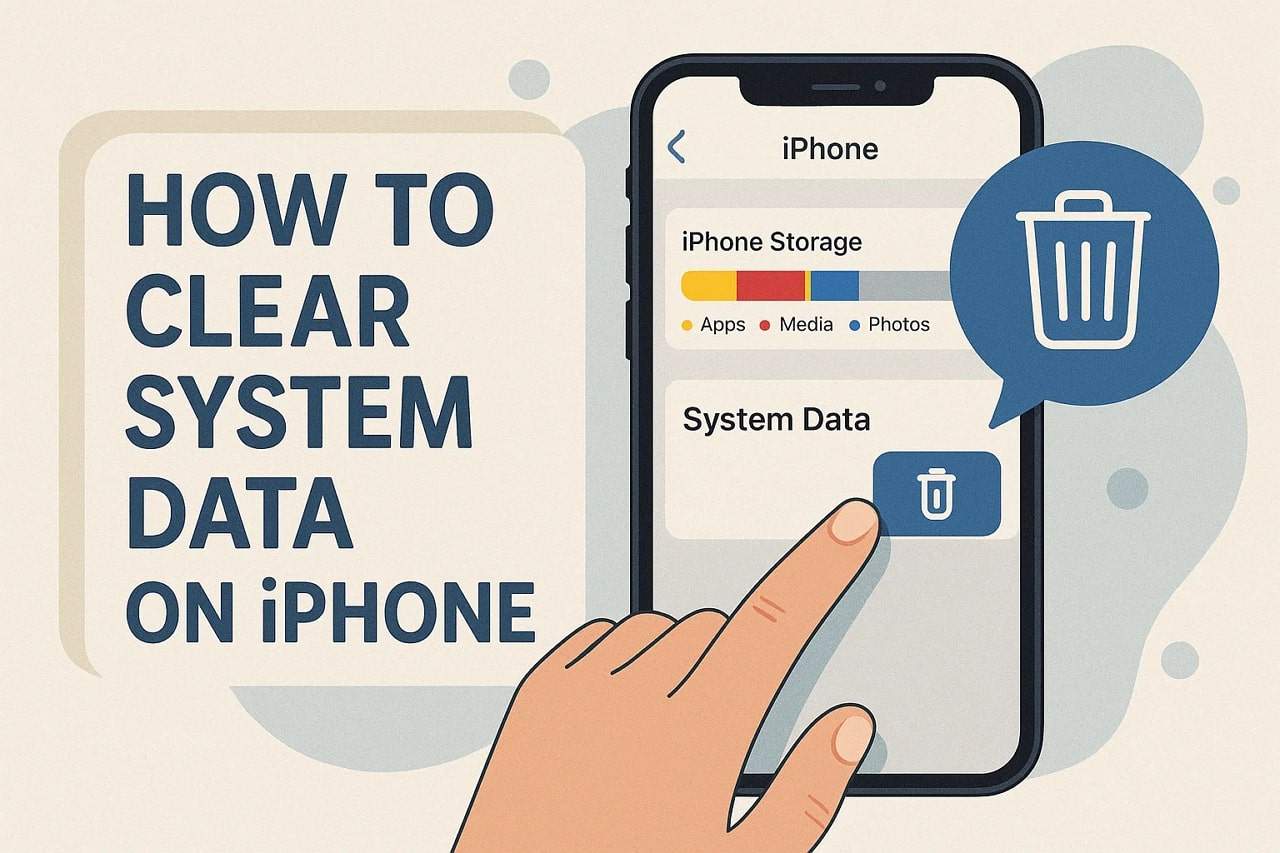
System Data on an iPhone often takes more space than expected, causing your device to slow down or display a "storage full" warning. Many users face this frustrating issue in 2026 but do not fully understand what counts as system data or how to safely reduce it without losing important personal files. Therefore, this comprehensive guide will show you exactly how to clear system data on iPhone using straightforward methods that boost speed and keep your smartphone running smoothly.
With a few built-in iOS adjustments and standard maintenance routines, you won't need a steep learning curve or complex technical setups. Dive into the detailed solutions below to learn how to get rid of system data and discover how dedicated data eraser tools and smart photo cleaner applications can be incredibly handy for maintaining long-term device health.
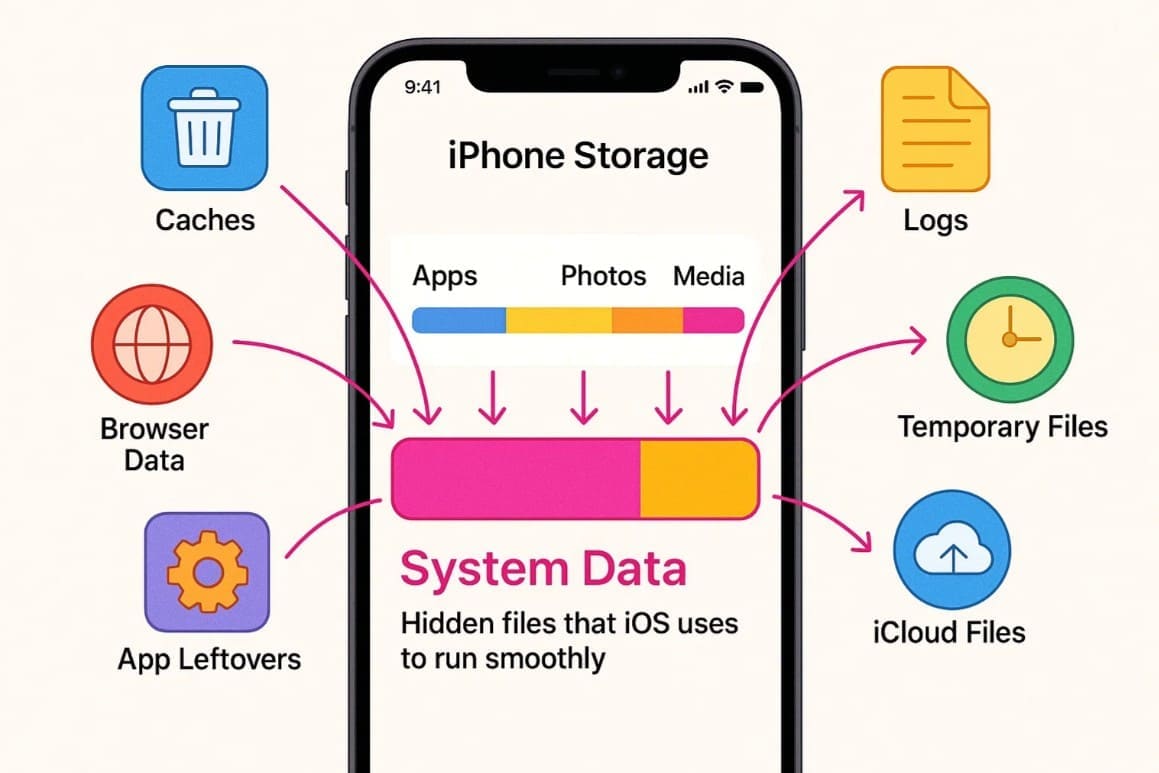
As you question how to reduce system data on iPhone, it is essential to establish what this storage category actually encompasses. System data on an iPhone is a specific portion of your device's storage dedicated to holding system files, cached media, and temporary data that do not fall under standard categories like apps, photos, or media. Essentially, it works as a flexible catch-all area that iOS leverages to store temporary operational files and support background processes that help the phone run fluidly.
Additionally, this dynamically changing storage block often holds vital caches, application logs, and temporary resources created by both iOS and third-party apps. It may also accumulate your browser cache, downloaded Siri voices, extra fonts, dictionaries, search index data, and various background sync files related to iCloud or your Messages application.
How Does It Differ from iOS (System)?
It is important to know that iOS (or "System") is the core operating system software that runs the entire iPhone environment. At the same time, system data is the extra peripheral space holding support files and temporary data that sit on top of the main OS. The system part remains fairly stable and consistent in size because it contains the unalterable core files required for the phone to function, whereas system data fluctuates wildly based on your daily usage.
How to Check iPhone System Data Storage?
Thus, while actively learning how to delete system data on iPhone, you should first adhere to the listed ways to review exactly how much storage it is currently occupying:
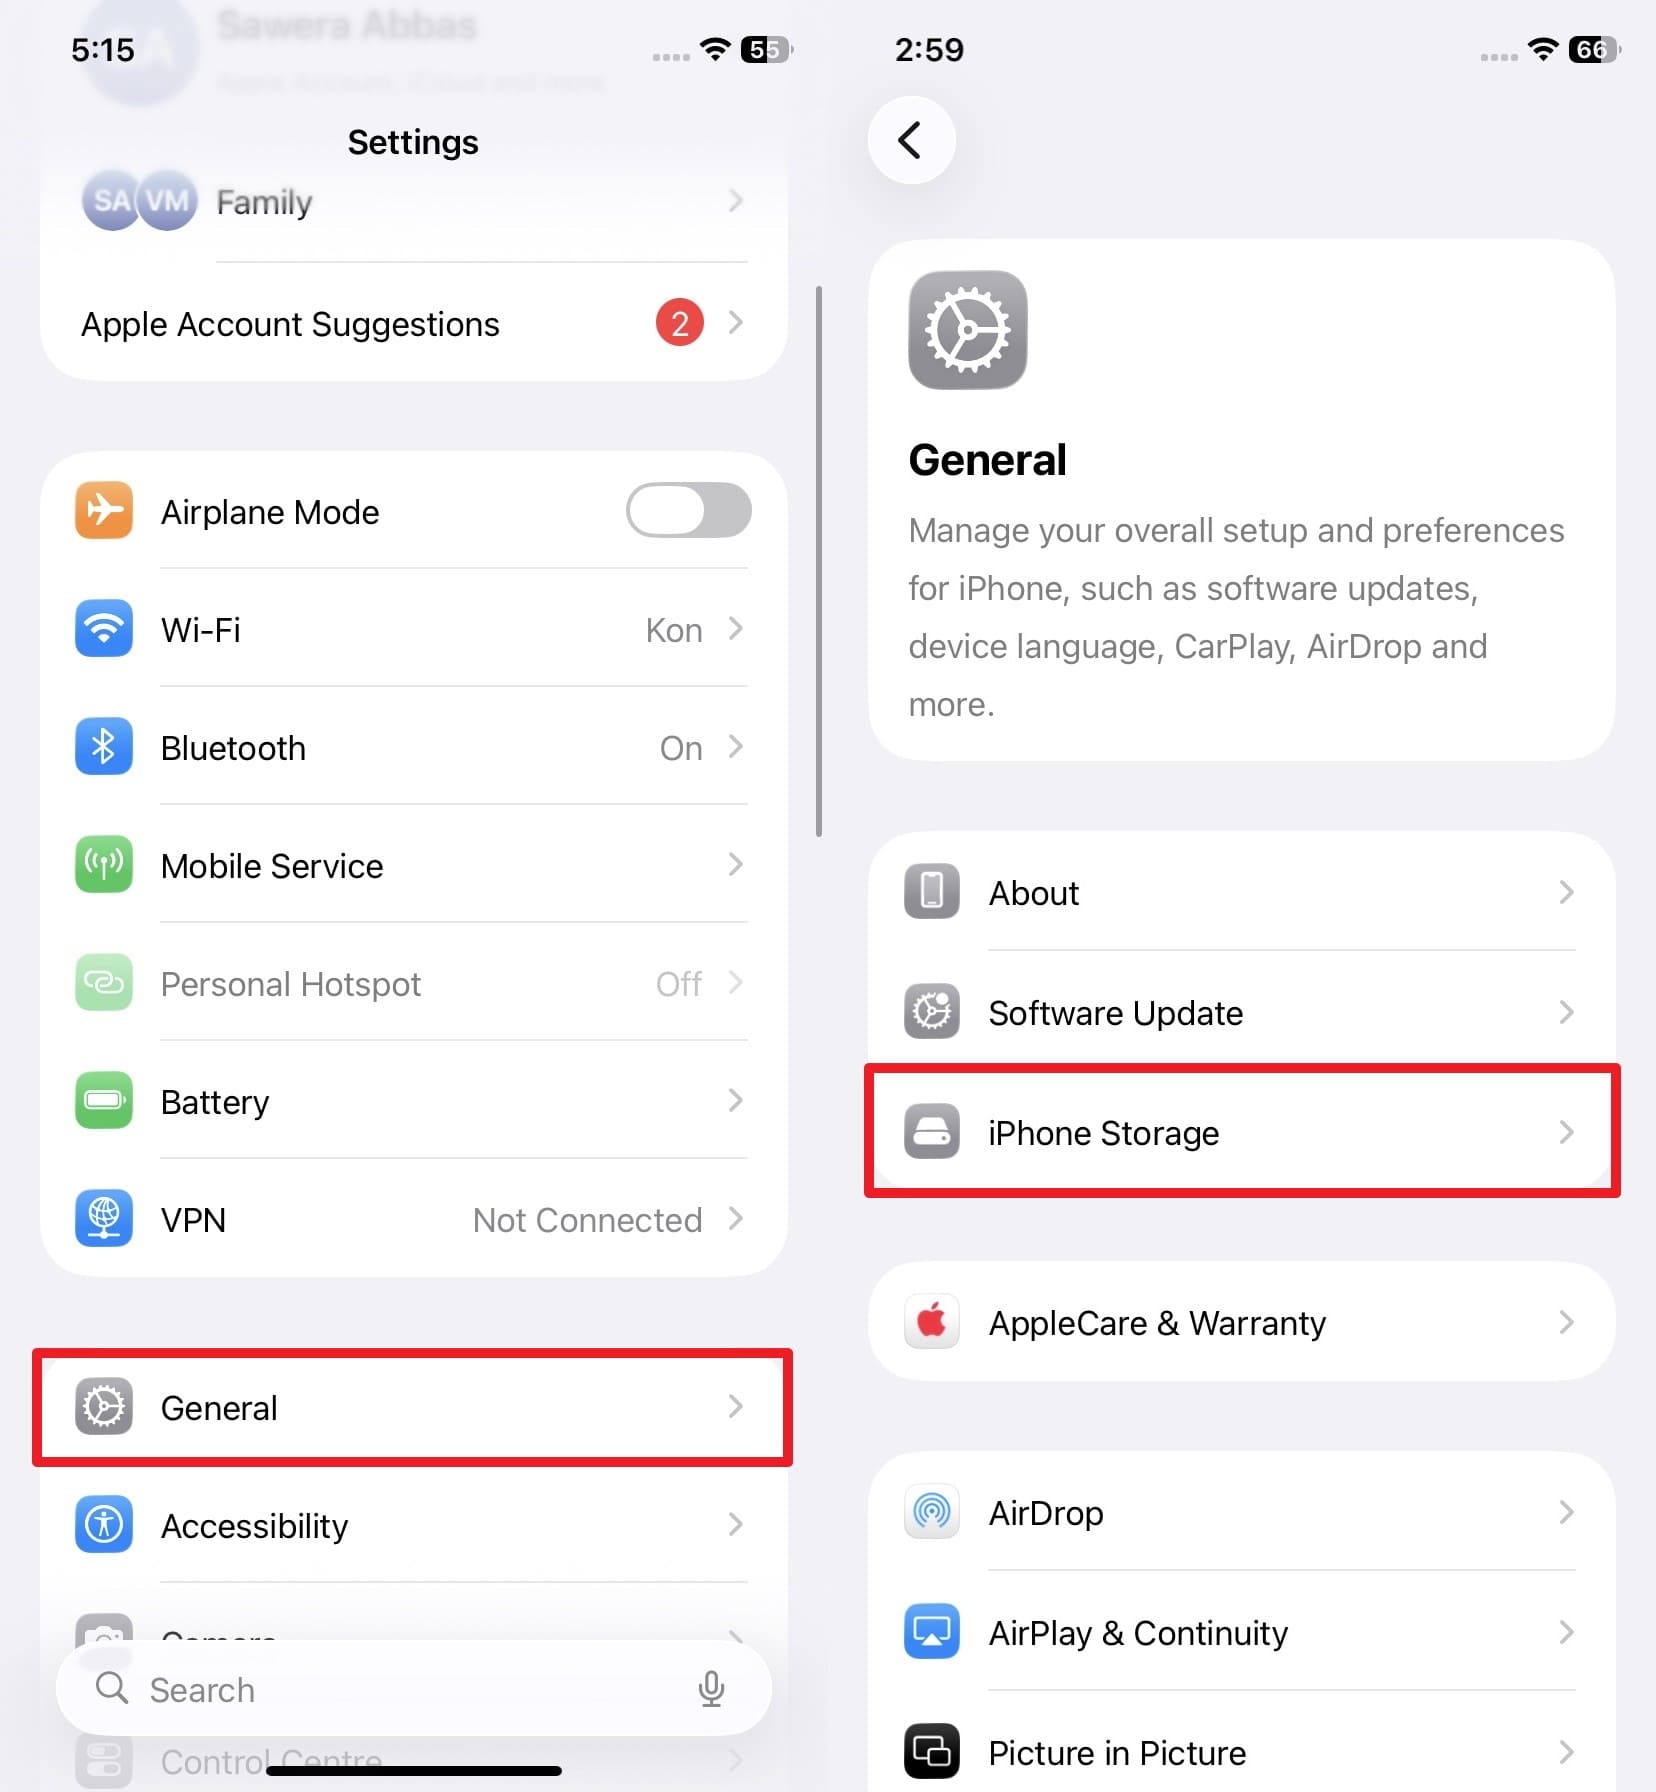
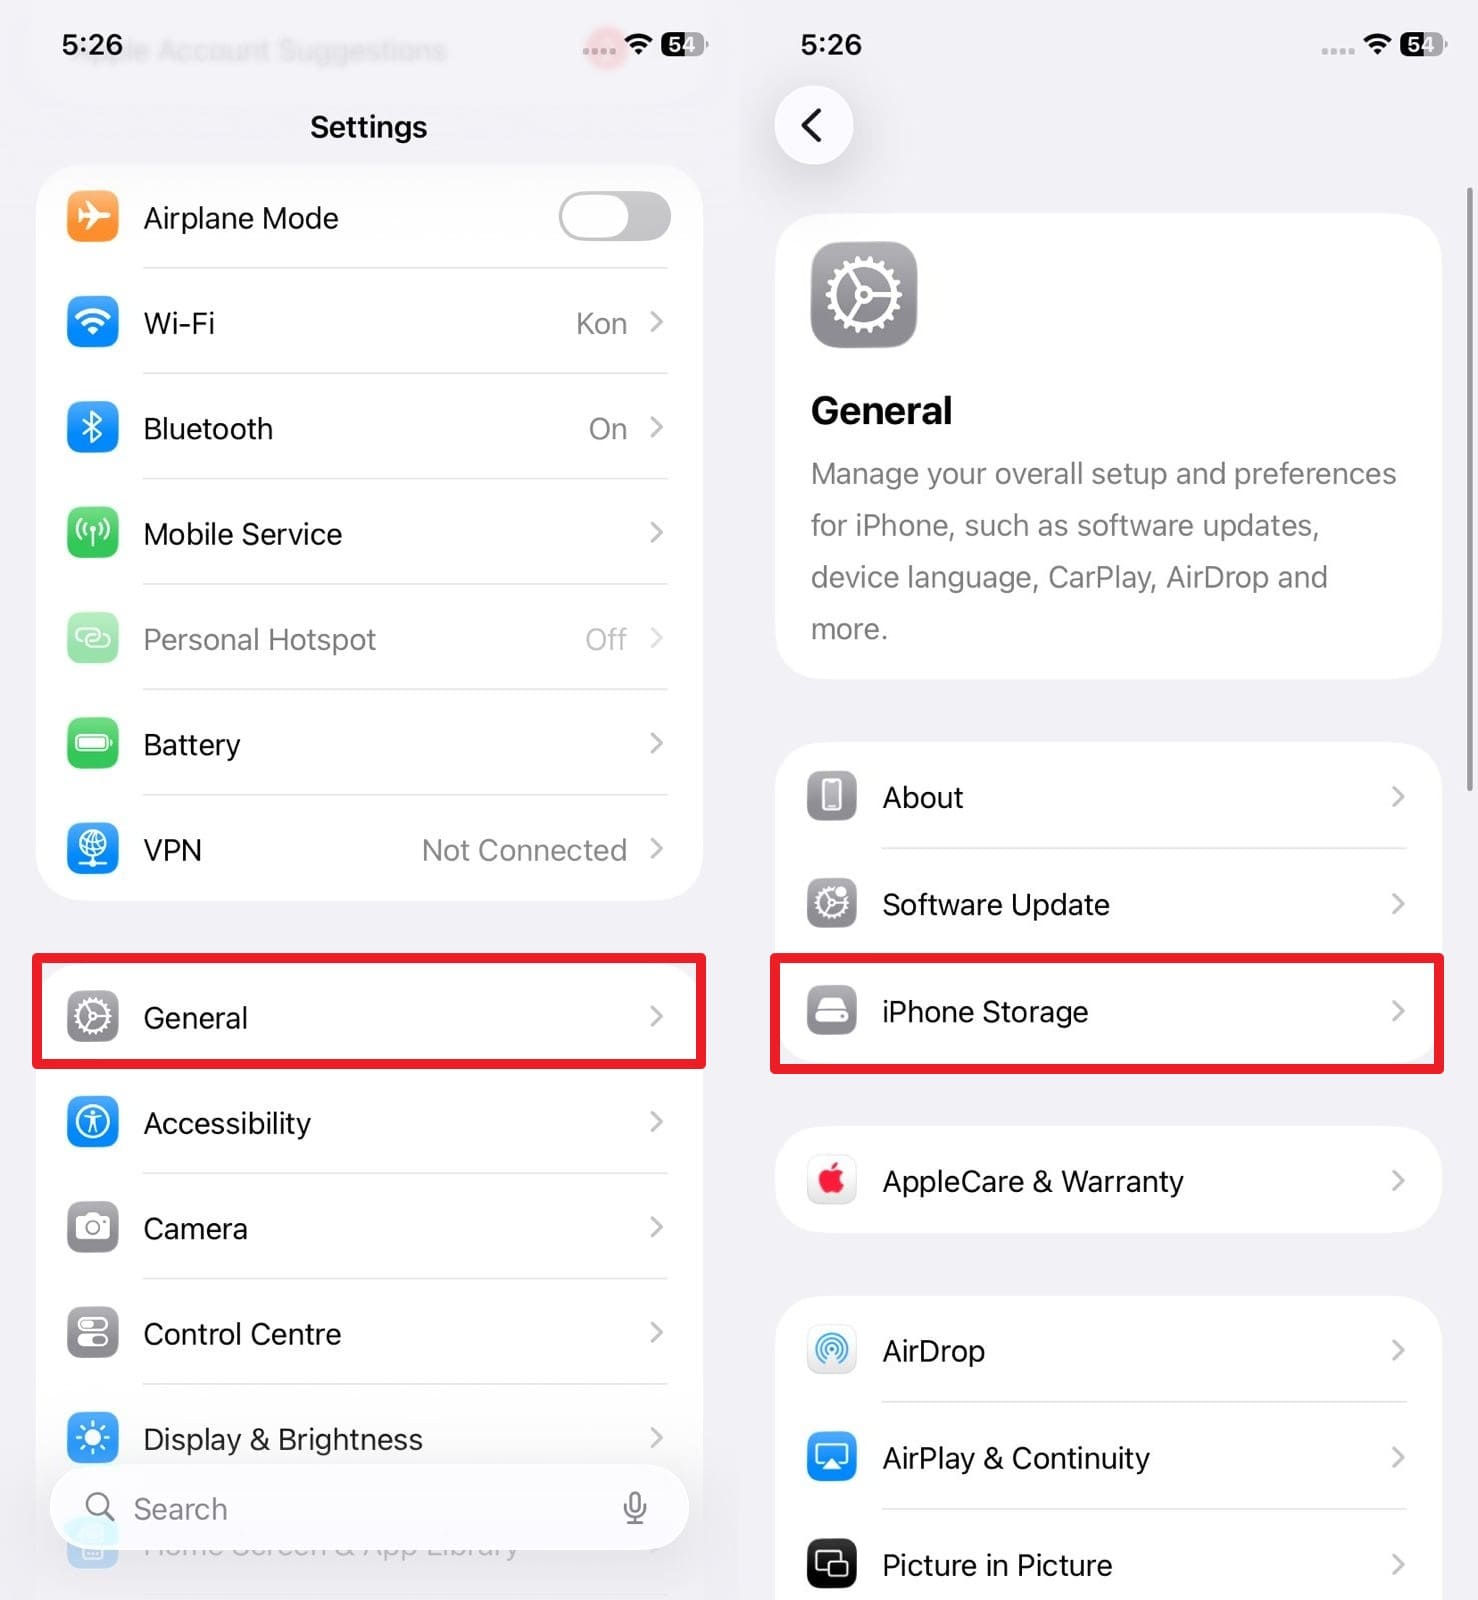
Step 1 Access iPhone Storage
From your iOS home screen, open the "Settings" app, navigate to the "General" menu, and tap on the "iPhone Storage" option.
Step 2 Locate System Data
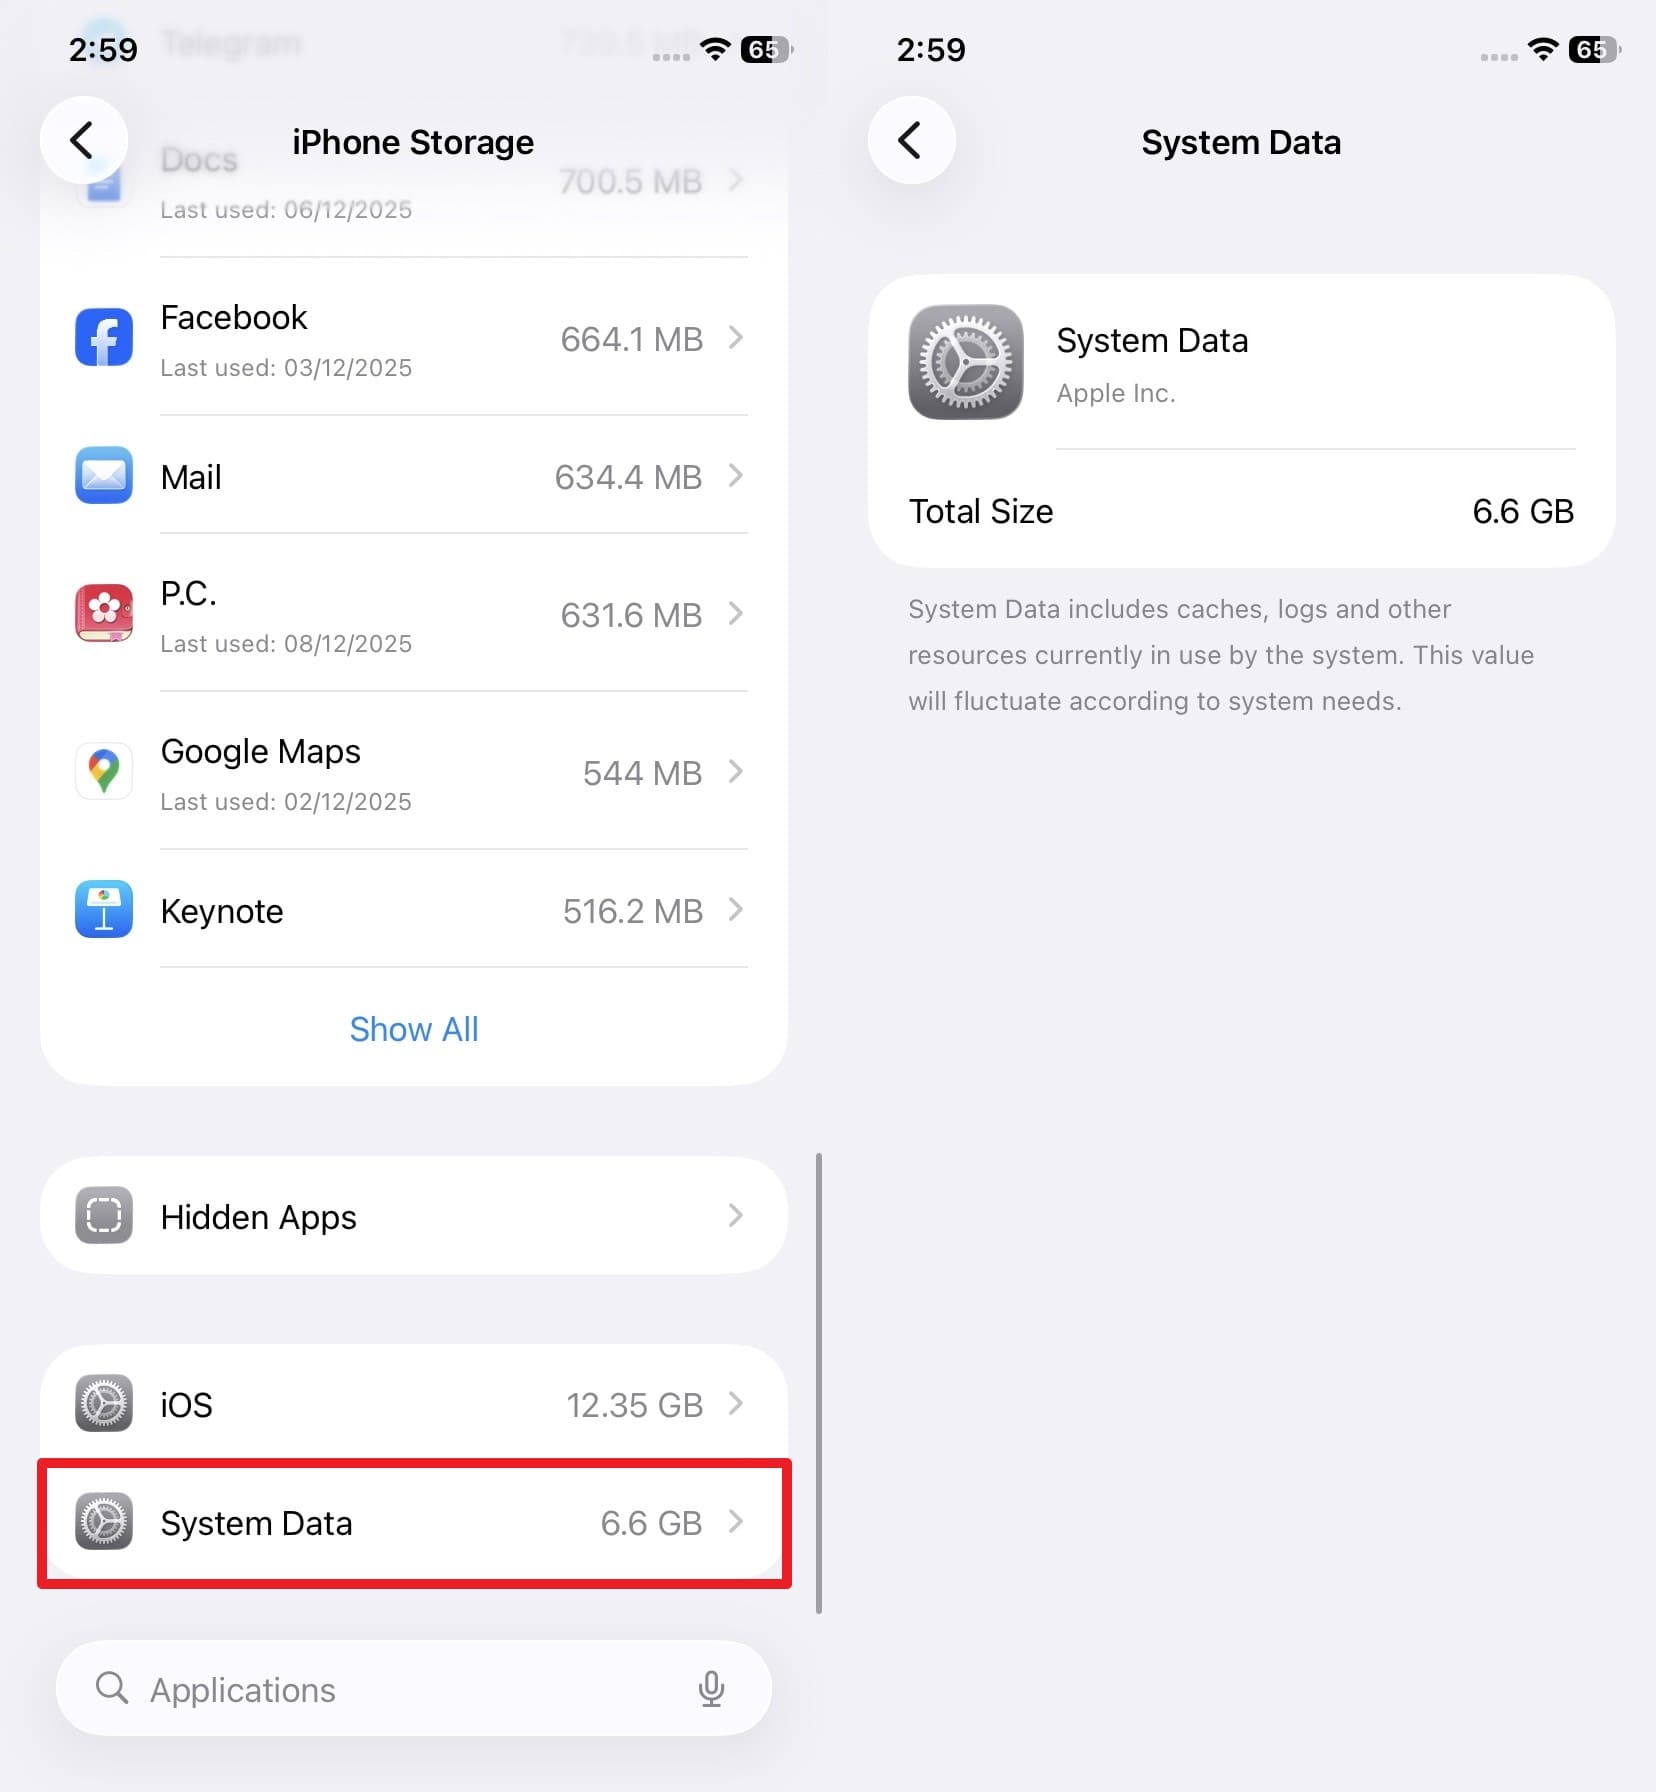
Scroll all the way down to the bottom of the new storage screen and tap the "System Data" option, which will display precisely how much gigabyte space System Data is currently using.
Why Does System Data Occupy So Much Storage on an iPhone?
When one starts wondering how to get rid of system data on an iPhone, the immediate next query that pops up is why it takes so much space in the first place. Though the stored caches help the phone load websites quickly and save network data, they steadily grow with time. So, if you frequently stream high-definition movies, listen to podcasts, or heavily browse the web, these leftover temporary files can easily reach several gigabytes.
Additionally, iOS keeps large message attachments, mail files, and background data from extensive apps safely stored. Hence, some of these files are deliberately stored here rather than in the Photos app or the parent application itself, especially when they are temporary or still syncing with iCloud servers. Furthermore, iOS constantly generates diagnostic logs, crash reports, Siri voices, system dictionaries, and localized search index files that all pile up inside the system data category.
Part 2. The Easiest Way: How to Delete System Data on iPhone with Dr.Fone (One-Click Cleanup)
Dr.Fone - Data Eraser
Erase iOS & Android Data Permanently
Permanently erase all data on iOS & Android — completely unrecoverable.
Military-grade wiping to fully protect your privacy.
Generate verified erasure reports to boost device resale value.
Selectively erase private data and remove junk & large files.
To comprehensively understand how to get rid of system data without spending hours manually sifting through settings, users can rely on Dr.Fone - Data Eraser. This powerful desktop utility allows users to expertly scan and clear up junk data that iOS naturally hides. Unlike tedious manual methods that only scratch the surface, this targeted solution ensures a complete and secure wipe in just a few simple steps, with absolutely no advanced technical skills required. Additionally, the tool seamlessly offers broad compatibility for the latest iOS updates in 2026 and manages massive files effortlessly.
When you utilize this tool to clear iOS system data, you can selectively choose from multiple cache repositories or temporary file locations to save massive manual effort. Besides deeply cleaning hidden caches, you can also use it to safely remove unnecessary applications with an intuitive option to filter and isolate the largest files occupying your storage. This is the optimal strategy for learning how to remove system data from iphone permanently.
How to Remove the iOS System Data via Dr.Fone - Data Eraser
Since the specialized tool makes it incredibly seamless to completely remove deep-rooted junk files, strictly adhere to the given comprehensive guide and learn how to lower system data on iPhone efficiently:
Step 1 Select the Erase Junk Files Feature
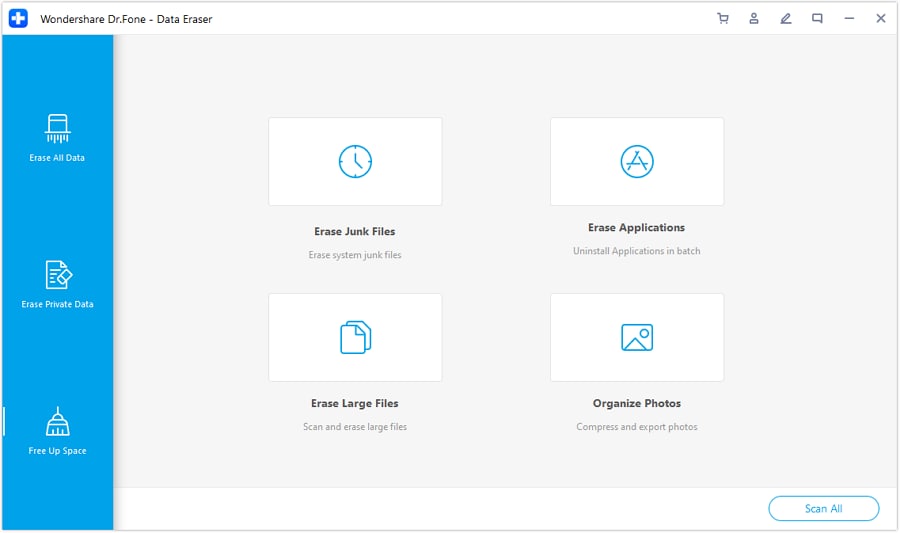
First, successfully connect your iPhone to your computer using a certified cable. Launch the Data Eraser tool for iOS and directly choose the "Erase Junk Files" option located within the "Free Up Space" main dashboard tab.
Step 2 Choose the System Data You Seek to Remove
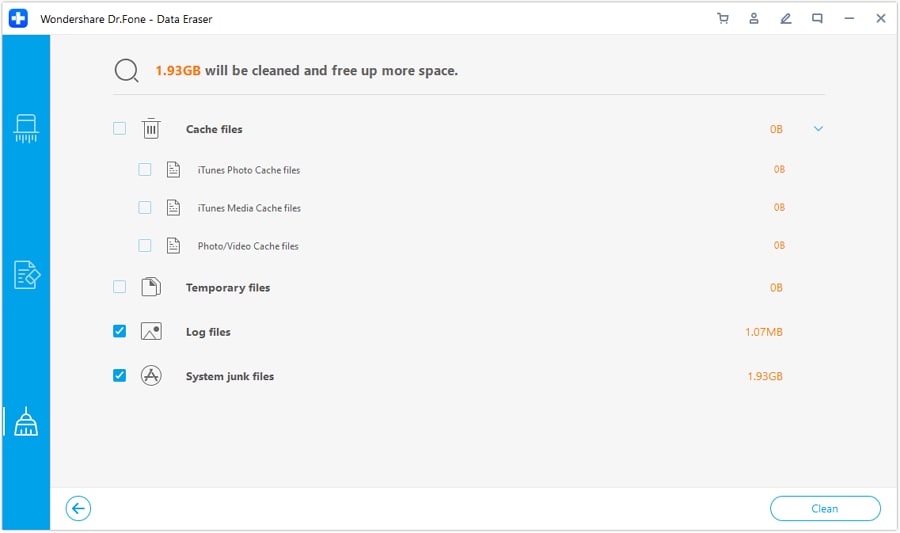
After the software performs a deep scan, carefully review the results and selectively choose between accumulated cache, temporary diagnostic files, and other fragmented files you wish to remove. Finally, press the "Clean" button strategically placed at the bottom right corner of the interface.
Step 3 Conclude the iPhone Data Eraser Process
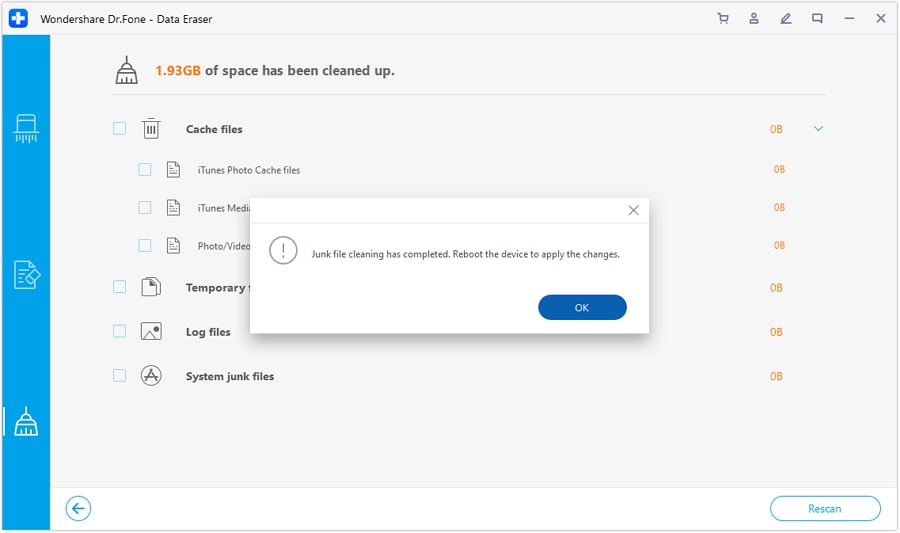
When the intensive data wiping process ends, you will be automatically prompted on the screen regarding the freed space, where you simply have to click the "OK" button to conclude the entire operation successfully.
Pro Tip. Go Deeper: Free up iPhone Storage Using Smart Clean
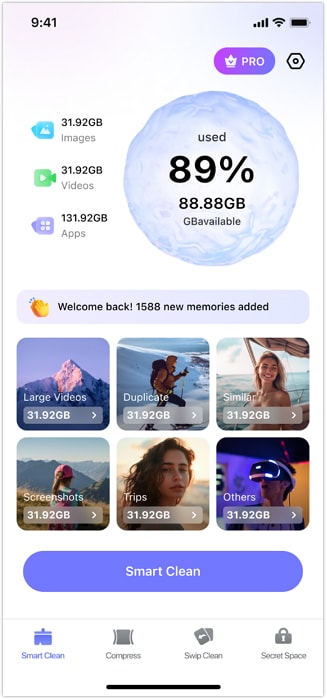
While desktop solutions handle the most stubborn junk and temporary files efficiently, making it an excellent first step when learning how to remove system data from iphone, you might also have excessive media clutter. For even deeper storage optimization, you can seamlessly pair it with the mobile cleanup app via the Try It Free link. This highly intelligent mobile application strictly helps clear duplicate images, blurry screenshots, overwhelmingly large videos, and other unnecessary media files through a highly convenient batch selection process, ultimately giving your device an even cleaner overall storage footprint.
Furthermore, it dynamically scans your entire gallery to sharply highlight space-consuming media you may not have actively noticed. Users can quickly preview these isolated items before securely deleting them, ensuring completely safe and accurate cleanup. With its blazing-fast scanning algorithms and intuitive one-tap removal mechanics, it serves as a remarkably reliable companion for maintaining completely smooth iPhone storage stability in the long term.
Part 3. How to Clear System Data on iPhone [Manual Methods]
Other than the innovative and largely automated ways offered by dedicated desktop utilities, this section outlines some of the most effective manual ways on how to clear system data on an iPhone natively:
1. Restart and Update iOS Version
Performing a basic restart and executing an iOS update help system data radically shrink because they inherently force the phone to completely clear old temporary files, properly fix small backend errors, and cleanly refresh system background tasks. A simple device restart reliably removes stale temporary caches, abruptly clears stuck background processes, and completely stops underlying services like Spotlight indexing or Siri algorithms if they continuously keep creating extra error logs. This universally simple step often naturally cuts the sheer size of system data without introducing any data loss risk.
Additionally, software updates directly help because newly patched versions explicitly fix documented core bugs that can cause incorrect storage reports or excessive hidden file growth. So, properly review the precisely listed ways below and learn how to lower system data on iPhone via reliable update and restart procedures in just a few taps:
Restart iOS
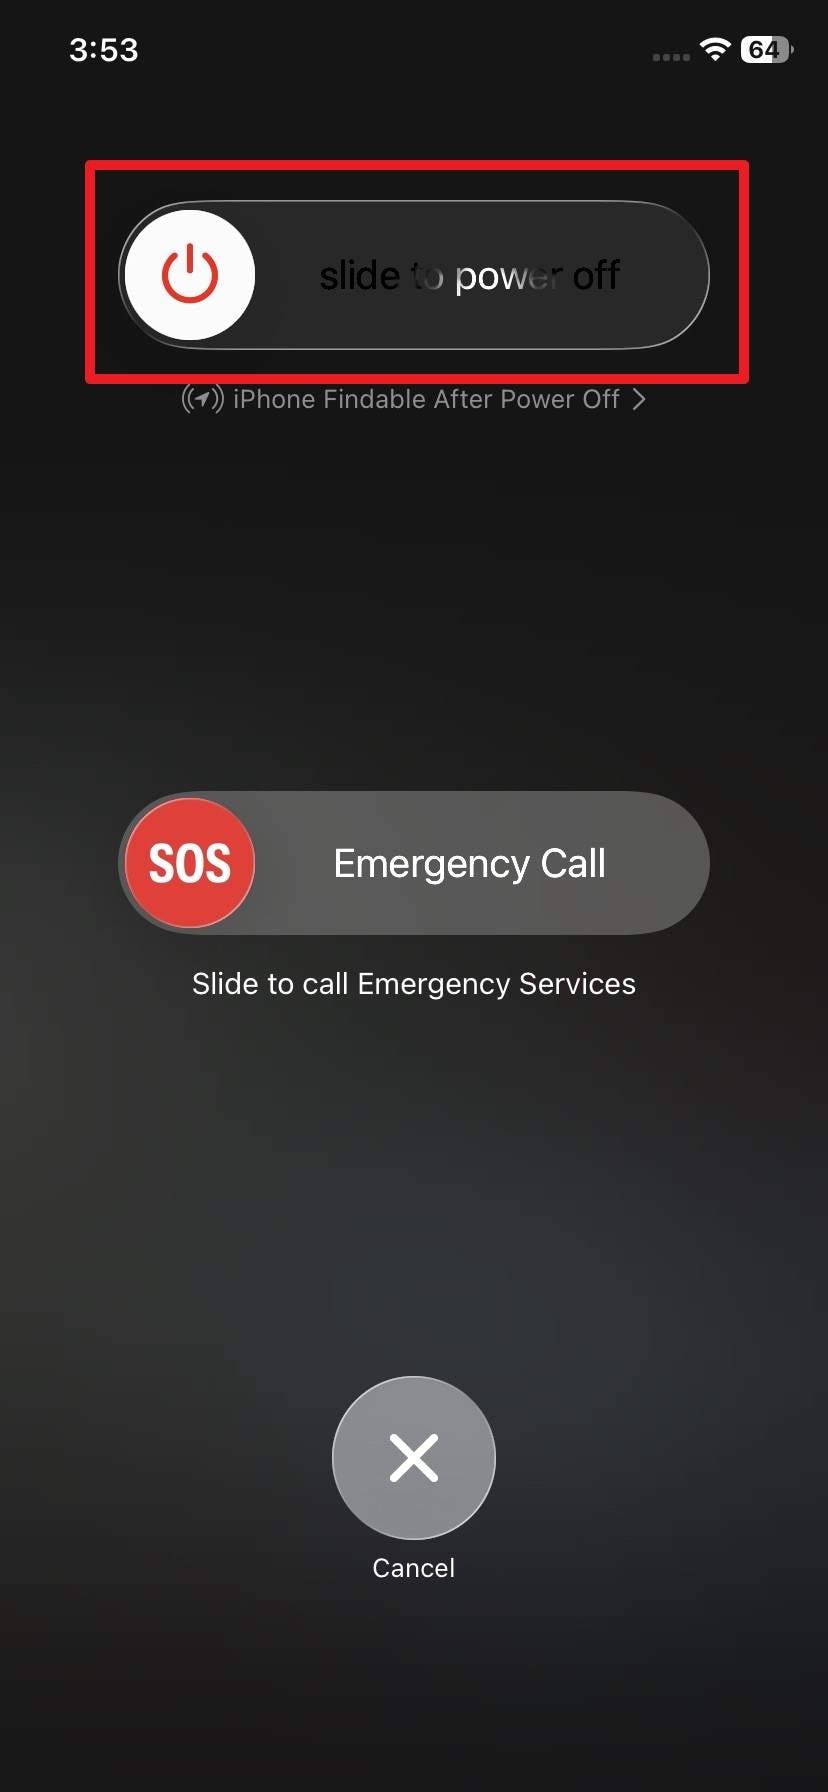
Instructions: Firmly press and hold the designated "Power" button alongside the "Volume Up" button until the interactive "Slide to Power Off" slider vividly appears on the screen. After that, physically slide the slider, patiently wait for the screen to go completely black, and subsequently press the "Power" button again to properly restart the entire operating system.
Update iOS Version
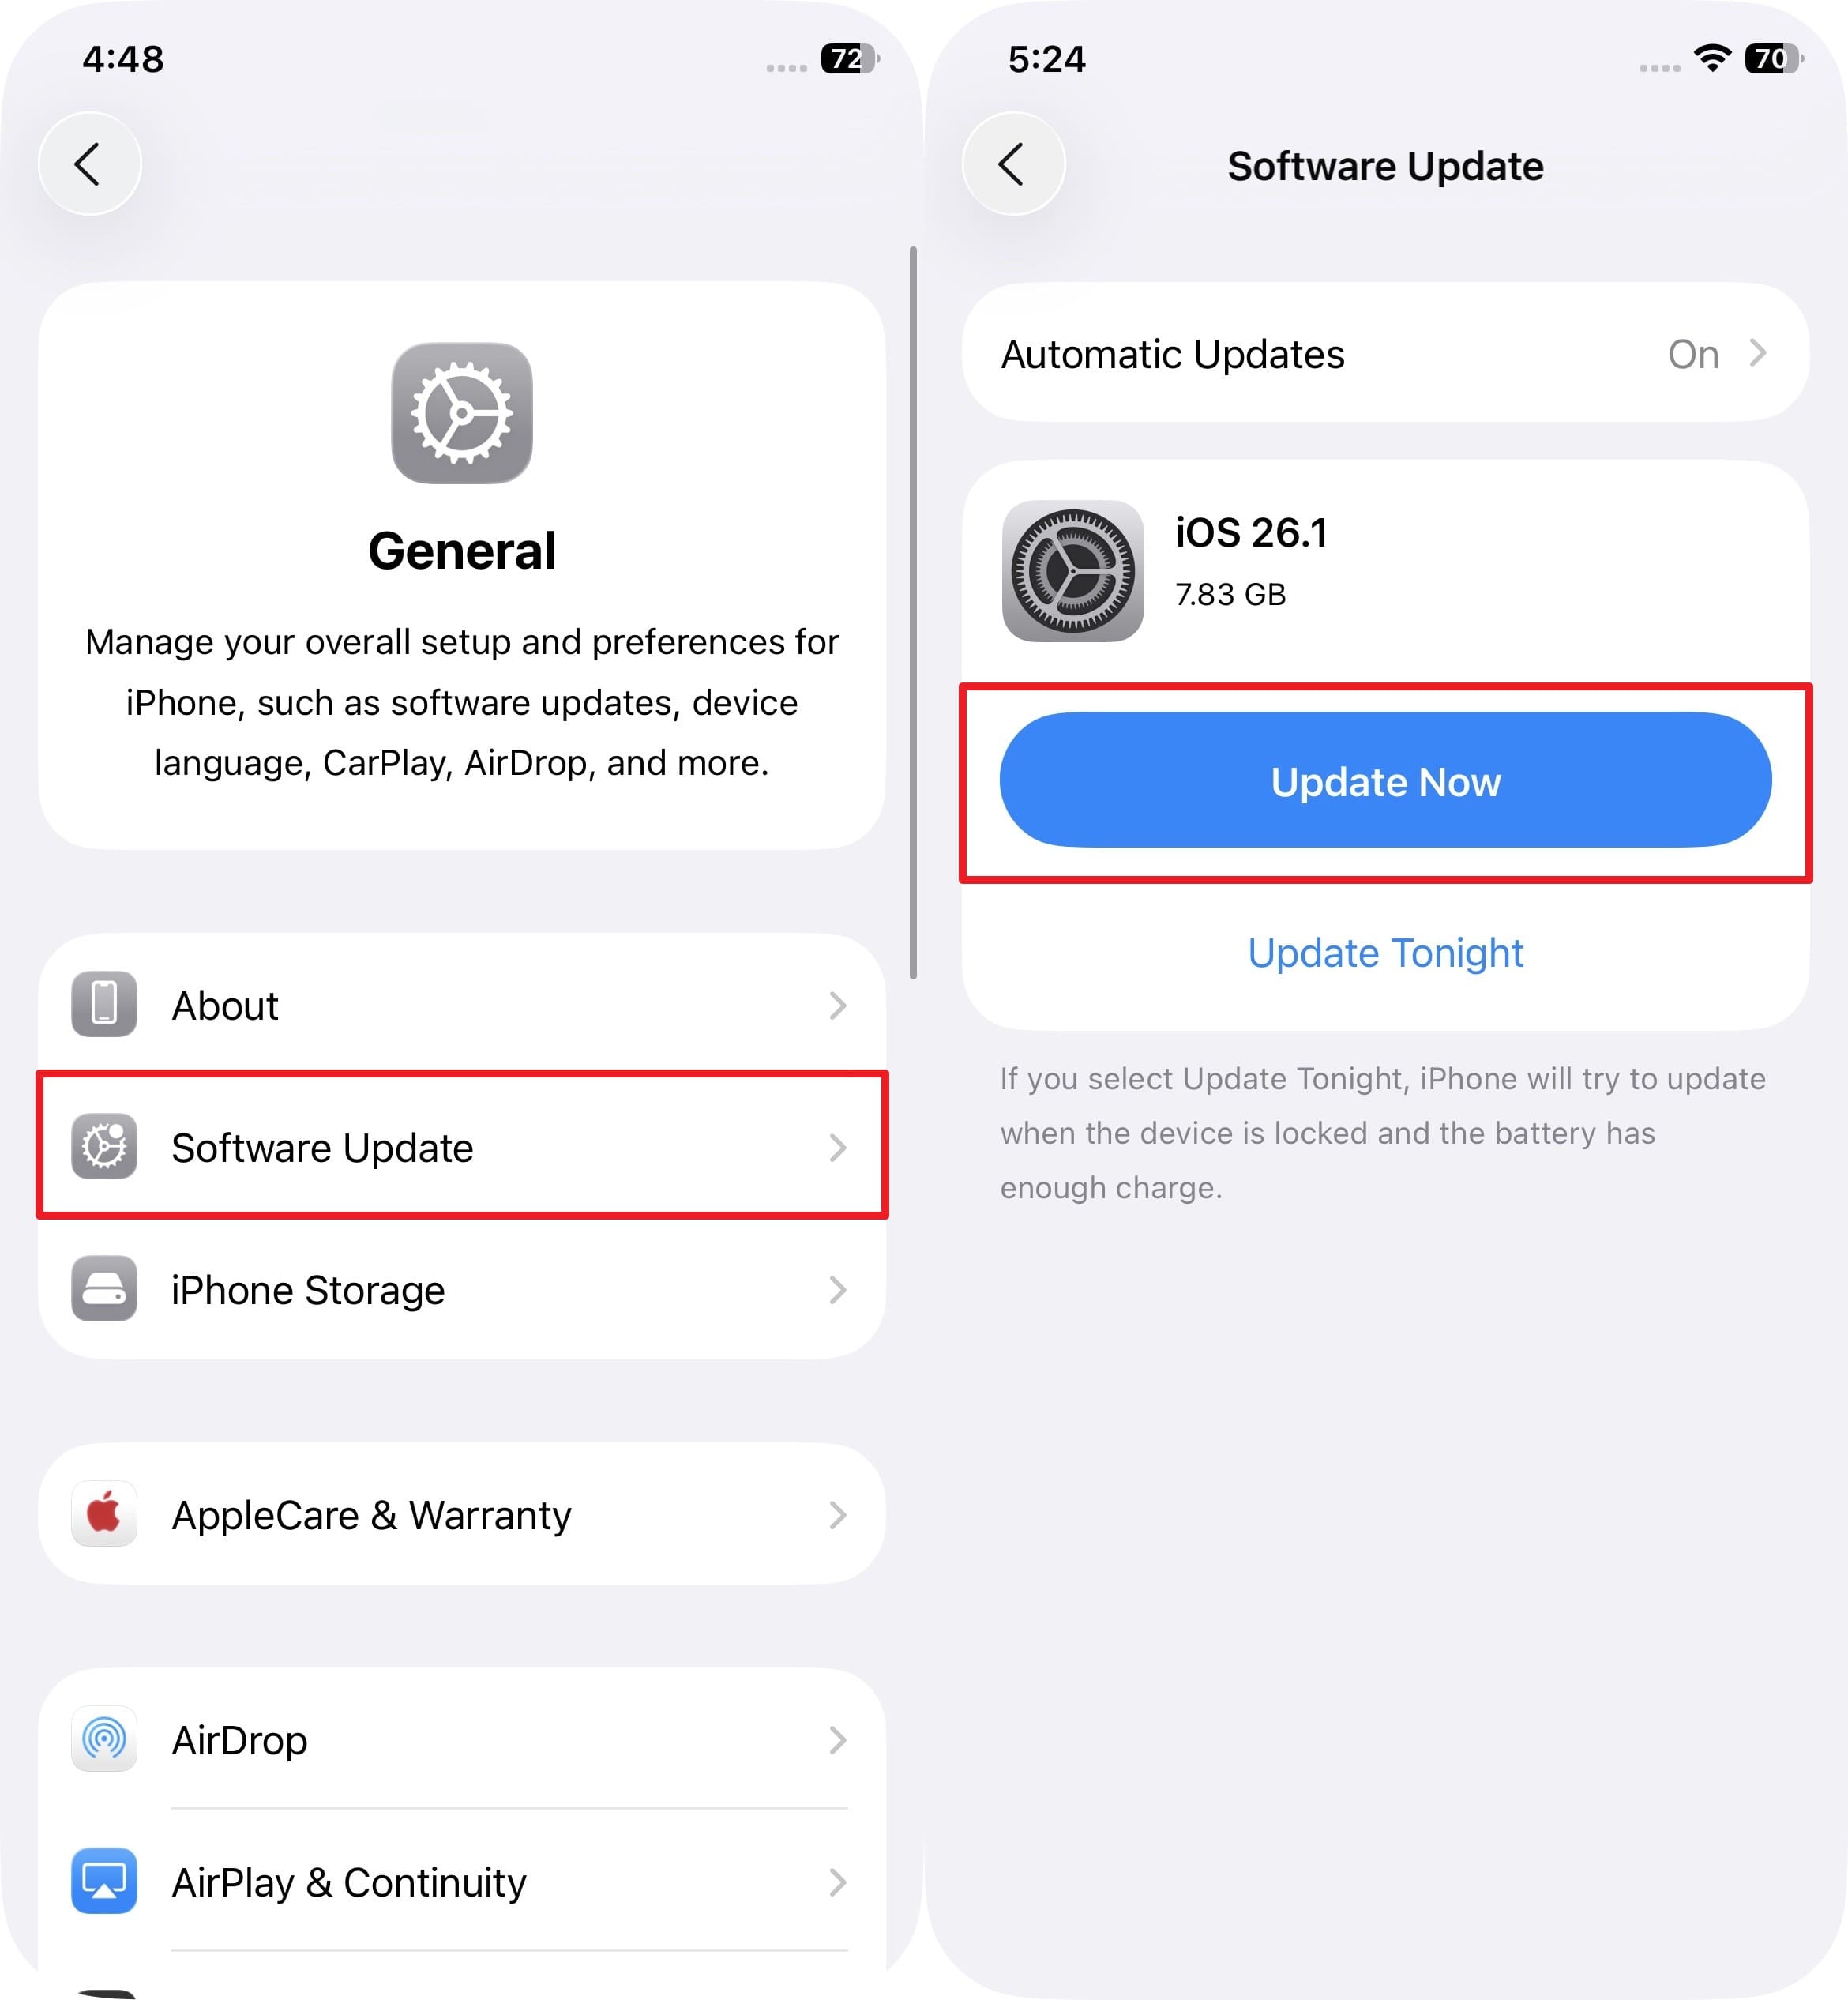
Instructions: Deep in the General settings menu, accurately choose the "Software Update" option, and if an officially signed update is currently available, confidently tap the "Update Now" button or securely schedule it for later installation overnight.
2. Offload or Reinstall Heavy Apps
To masterfully learn how to reduce system data on an iPhone, utilizing this specific solution proactively forces the iPhone to forcefully remove the heavy cache and massive temporary files that the app continually leaves behind. Many prominent social networks, streaming video platforms, detailed map tools, and heavy browser apps quietly build large amounts of extra cache data that notoriously sit inside the system data partition instead of directly under the app itself. When you strategically offload or completely delete and then reinstall the app, all of these invisible, hidden files are permanently removed, as reliably guided below:
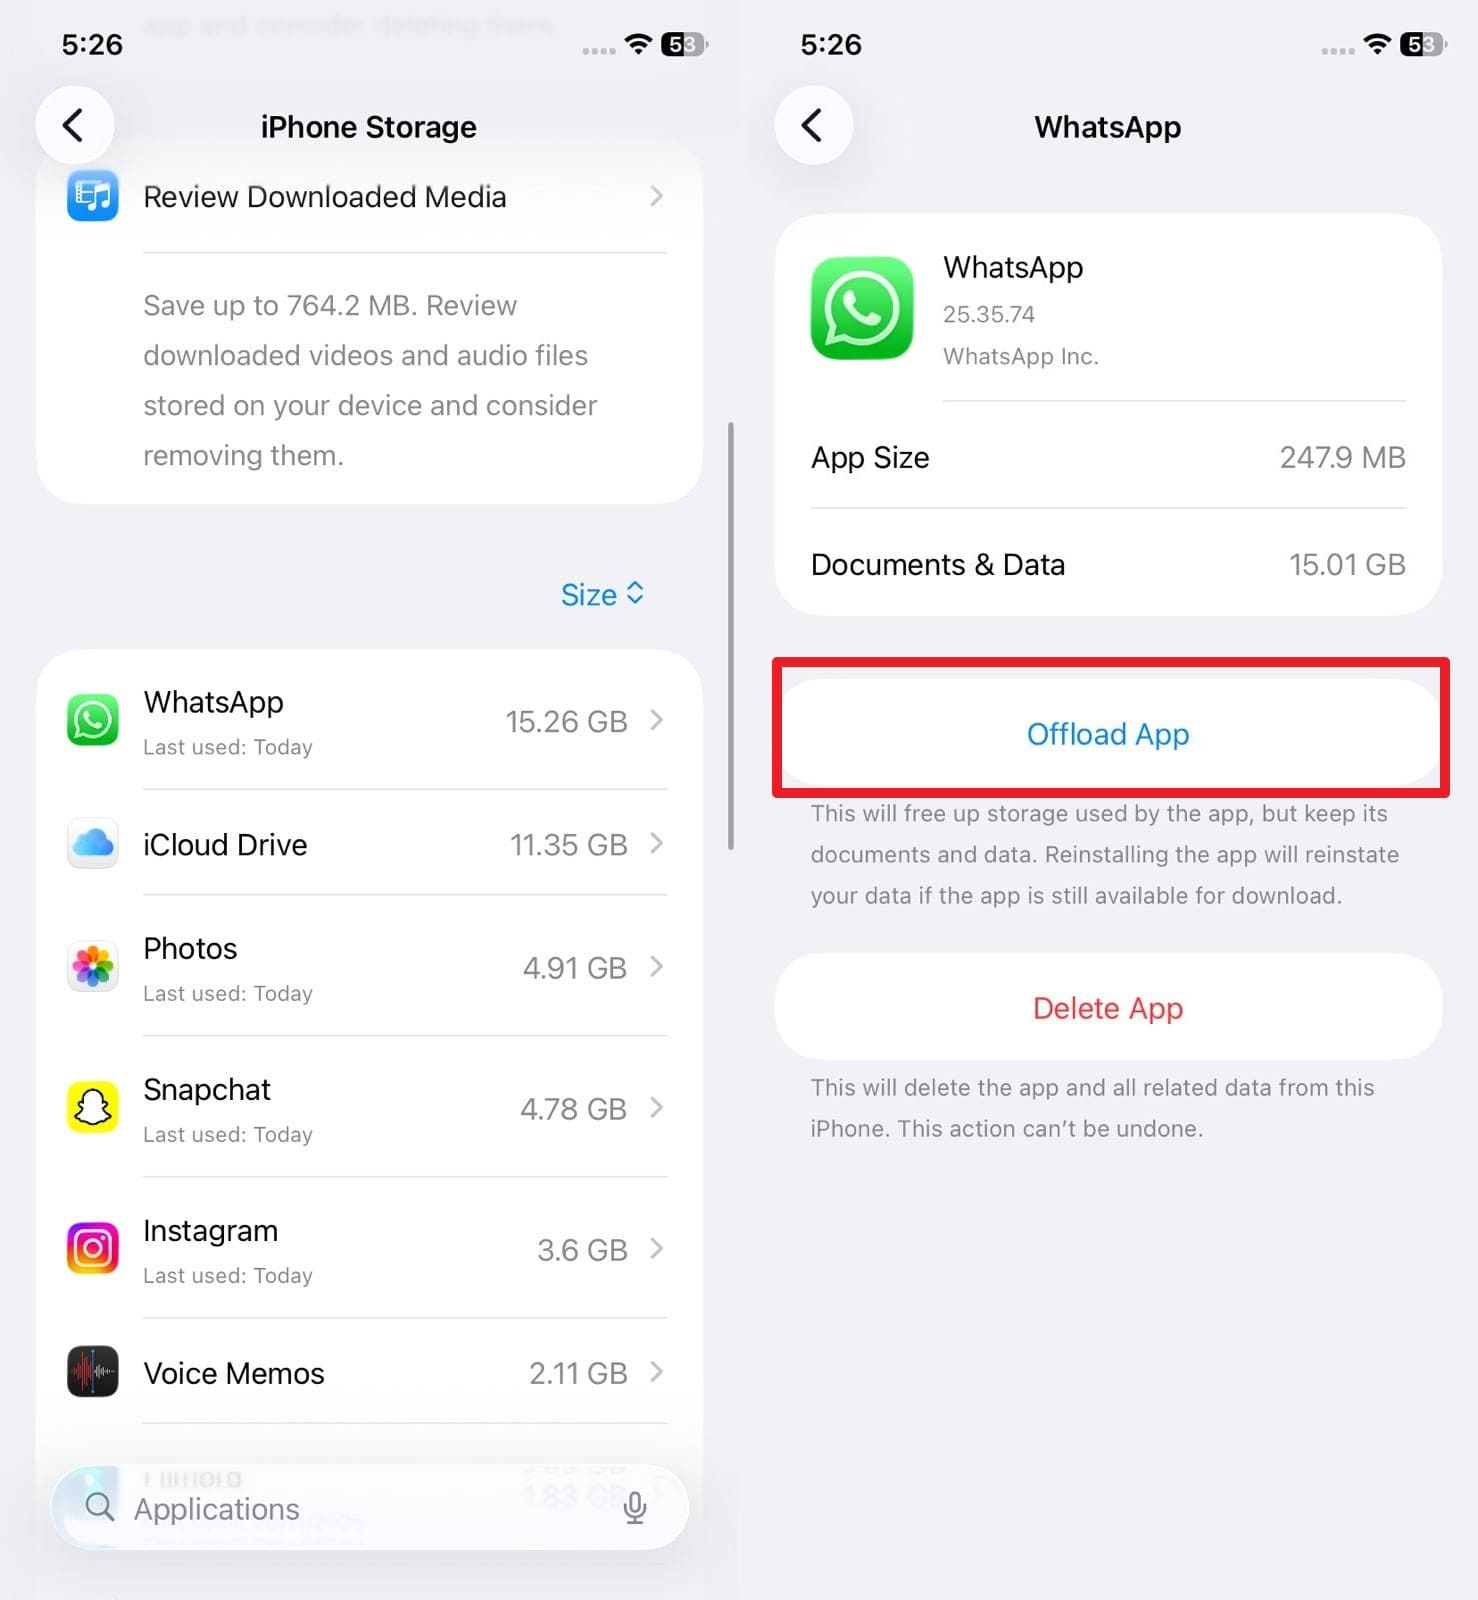
Step 1 Select App in Storage Settings
Directly from the main iOS settings menu, carefully choose the "General" option and subsequently pick the "iPhone Storage" option to actively select a specific storage-heavy app from the comprehensively generated list.
Step 2 Execute the Offload Action
After that, explicitly pick the "Offload App" option so you logically delete the core app binary but seamlessly reinstall it later without ever losing your stored accounts or internal settings.
3. Clear Browser Cache & History
As a heavy mobile browser continuously saves optimized images, complex scripts, tracking cookies, and extensive website data, iOS often arbitrarily stores these miscellaneous files right in System Data, allowing this hidden data pool to grow to a very large and unmanageable size. So, as you systematically remove history and website data, it securely clears these accumulated files and immediately reduces the system data load. Additionally, it strongly boosts your mobile privacy because it thoroughly removes invasive tracking data, old predictive searches, and saved third-party cookies, once properly performed via the meticulously listed steps:
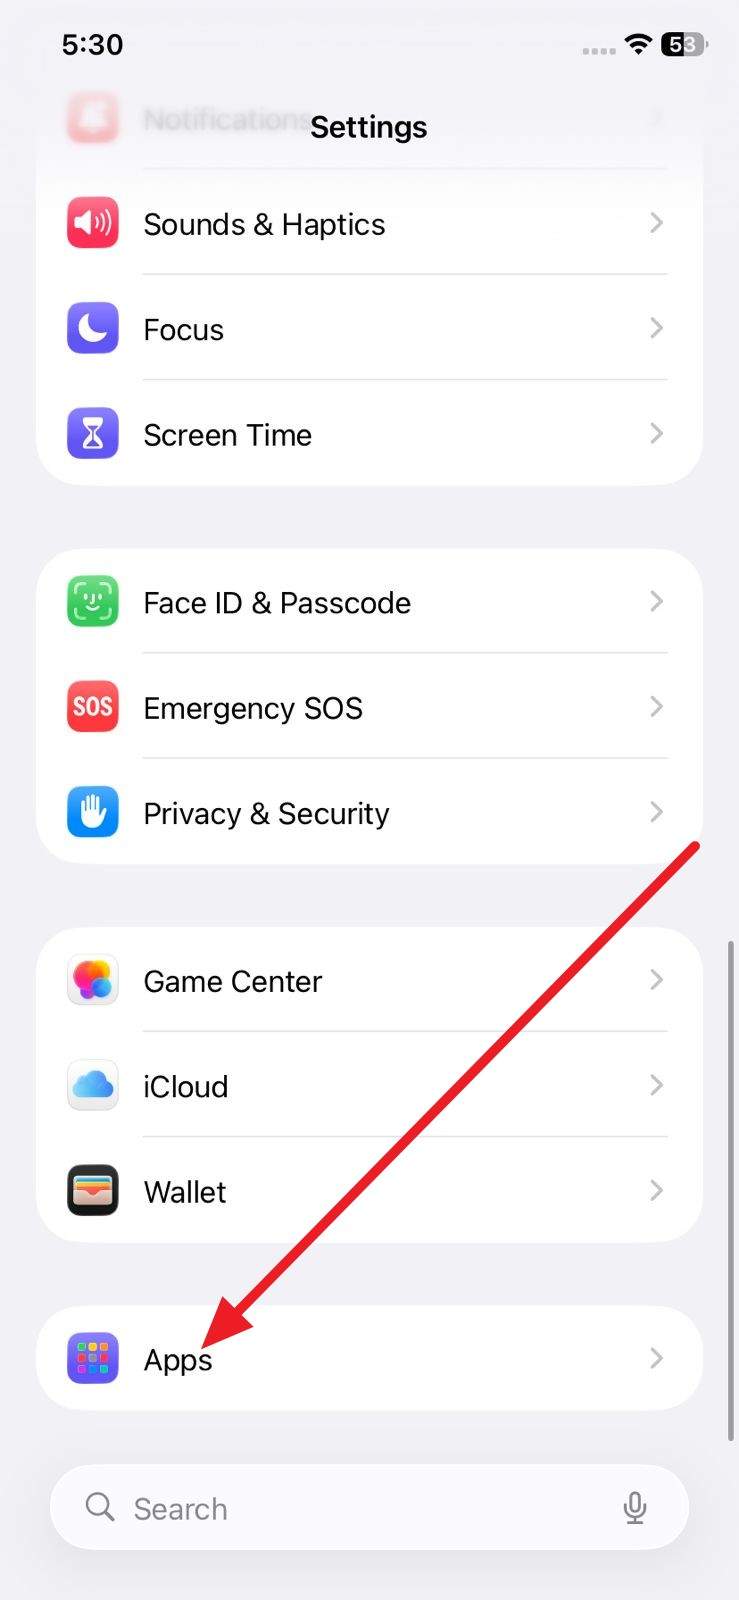
Step 1 Access Safari Settings
Carefully scroll down in the main Settings application interface and explicitly select the "Safari" app configuration from the broad "Apps" section.
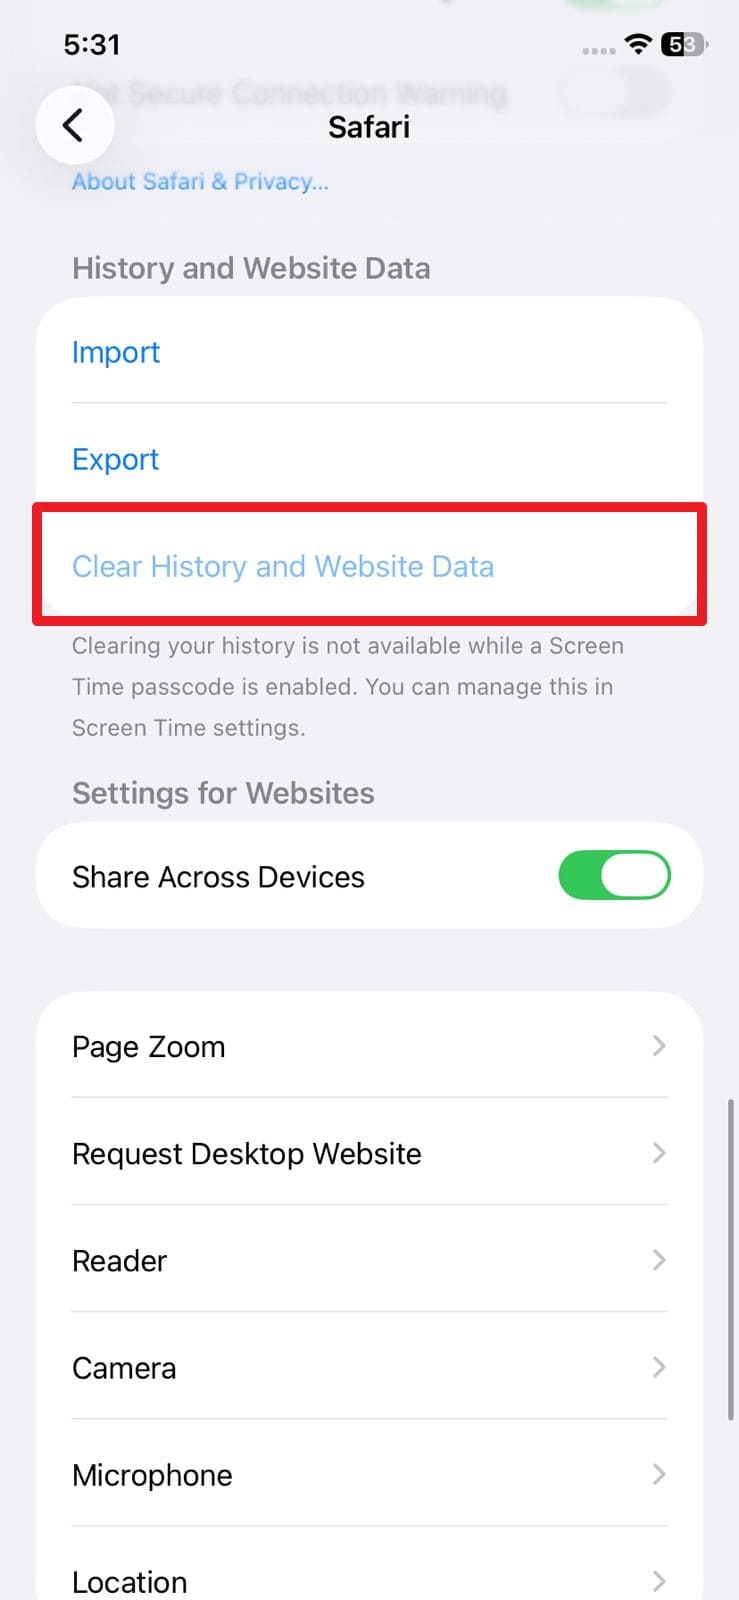
Step 2 Clear Browsing Data
Directly on the new configuration interface, confidently select the distinct "Clear History and Website Data" option to wipe the entire browser footprint.
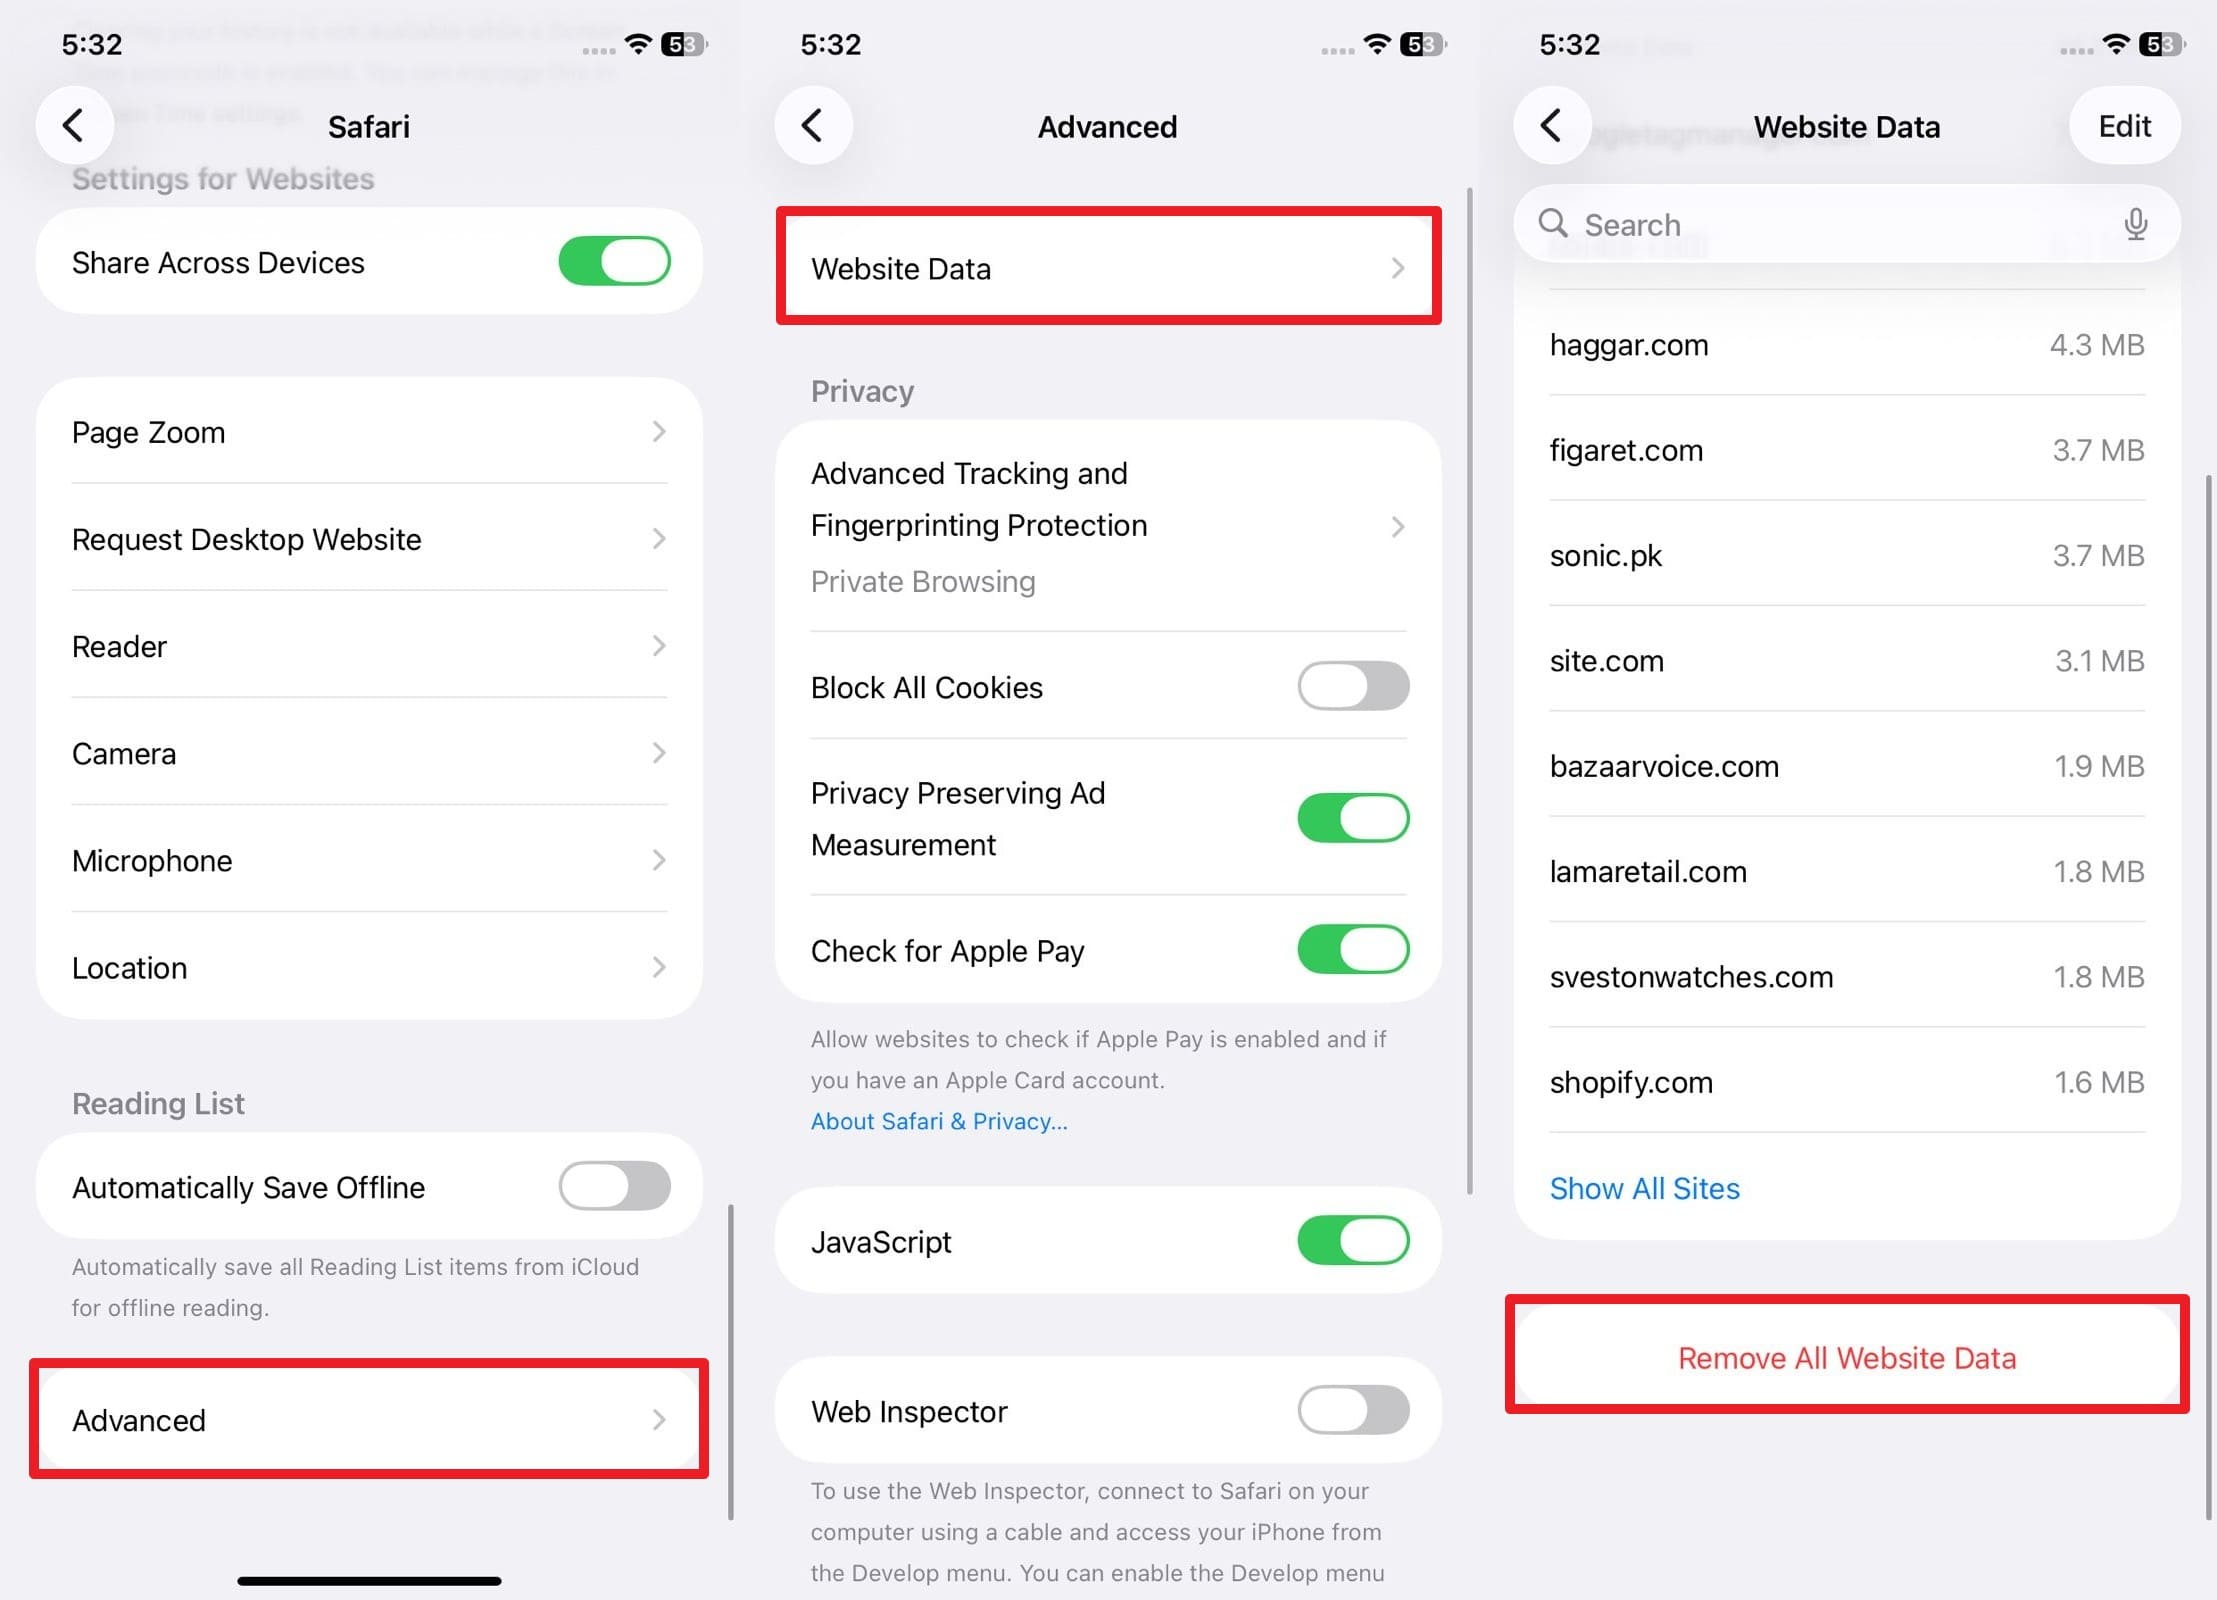
To Remove Only Website Data
Instructions: If you want to keep your browsing history, within Safari app settings, smoothly scroll to the absolute bottom of the screen to explicitly choose the "Advanced > Website Data > Remove All Website Data" option to just dump the heavy cached files.
4. Delete Old Messages & Update Settings
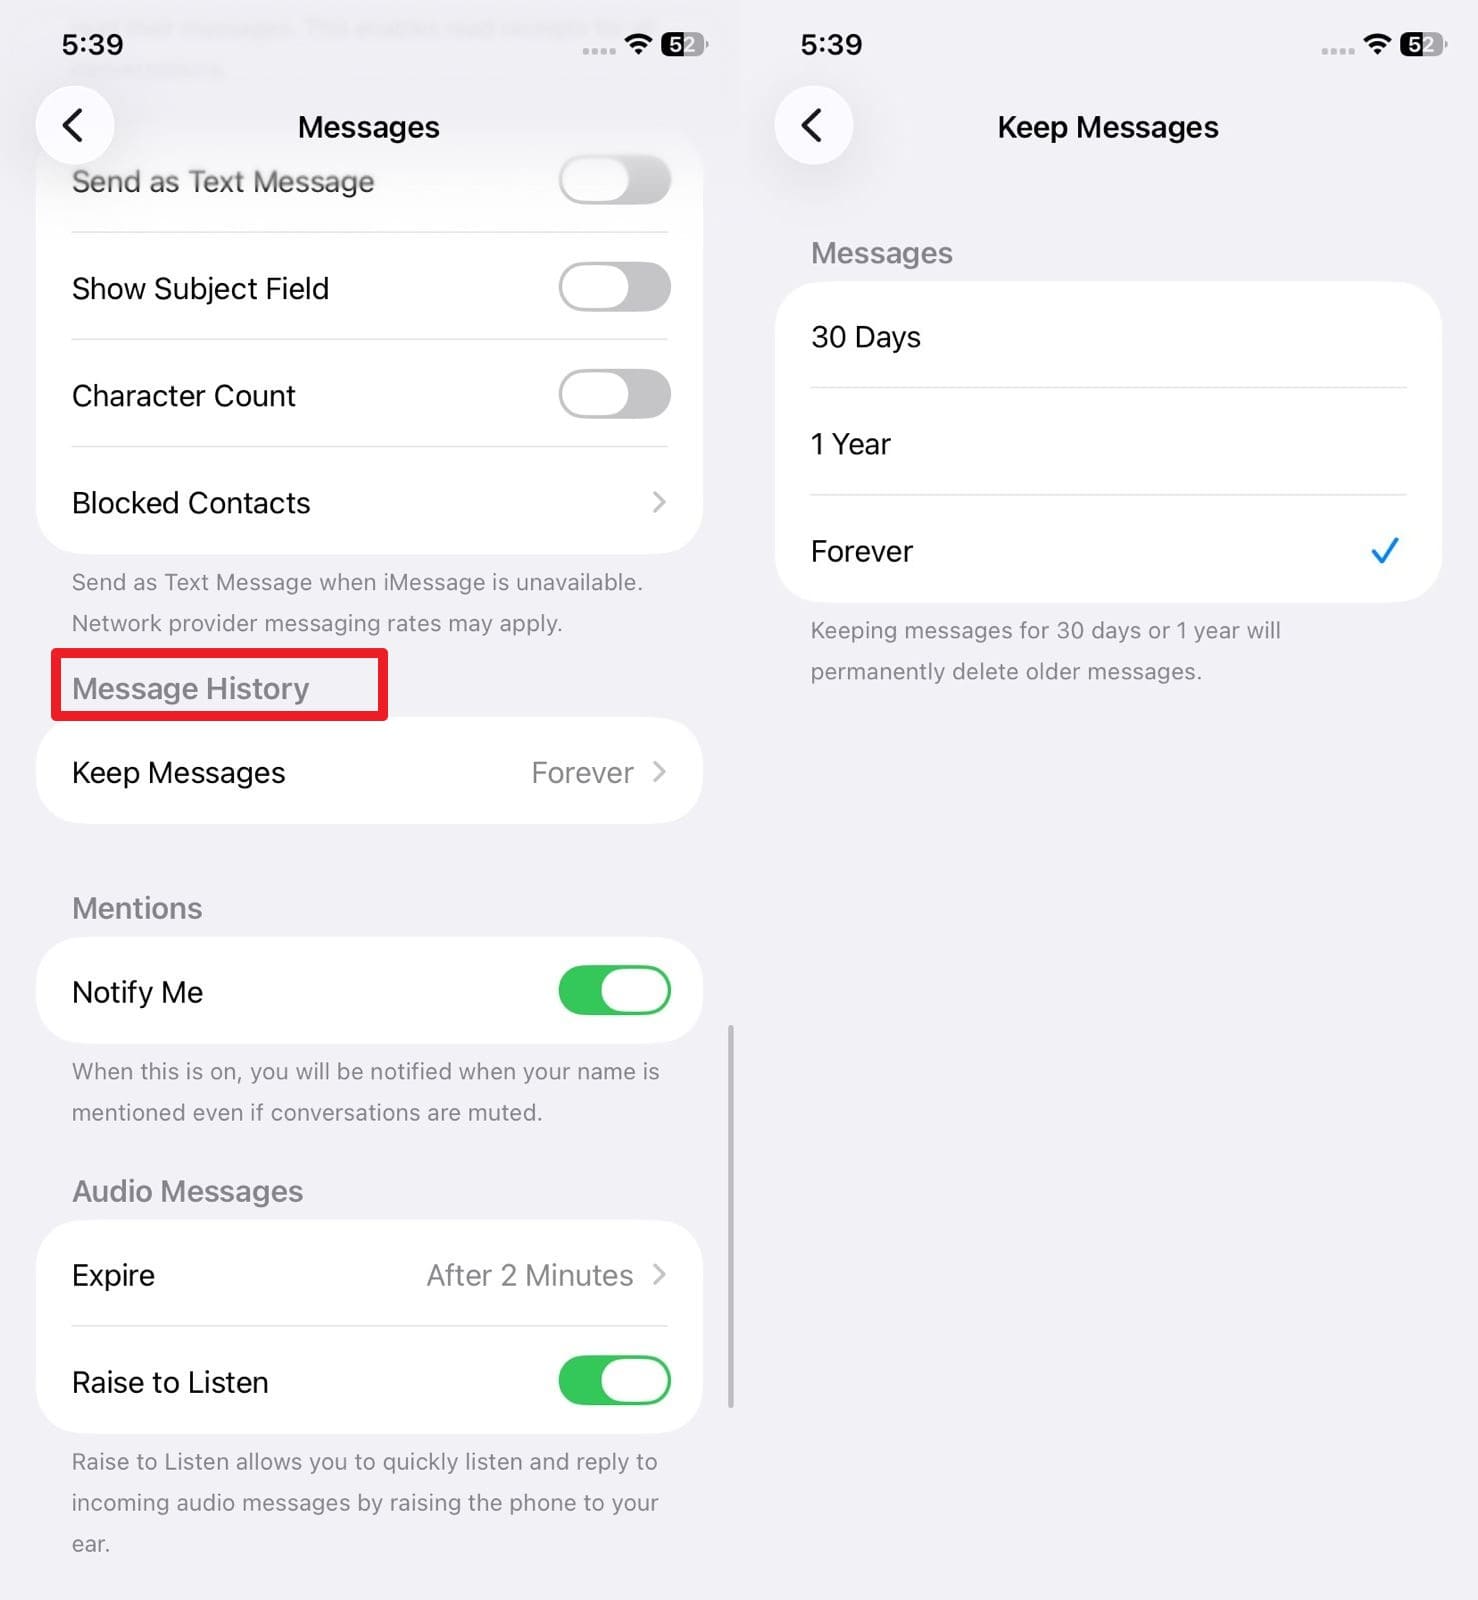
If you still heavily question how to get rid of system data on an iPhone after browser cleanup, immediately delete ancient old messages and strategically change the overarching Messages settings. Know that endless text threads bloated with high-resolution photos, 4K videos, and other shared files take up substantial hidden space, and massive group messages or old forgotten conversations with heavy media can easily add several invisible gigabytes to System Data. So, intelligently set the "Keep Messages" parameter to 30 Days or 1 Year to autonomously and automatically remove old stagnant chats and cumbersome attachments in the given functional ways:
Delete Old Messages
Step 1 Select Messages
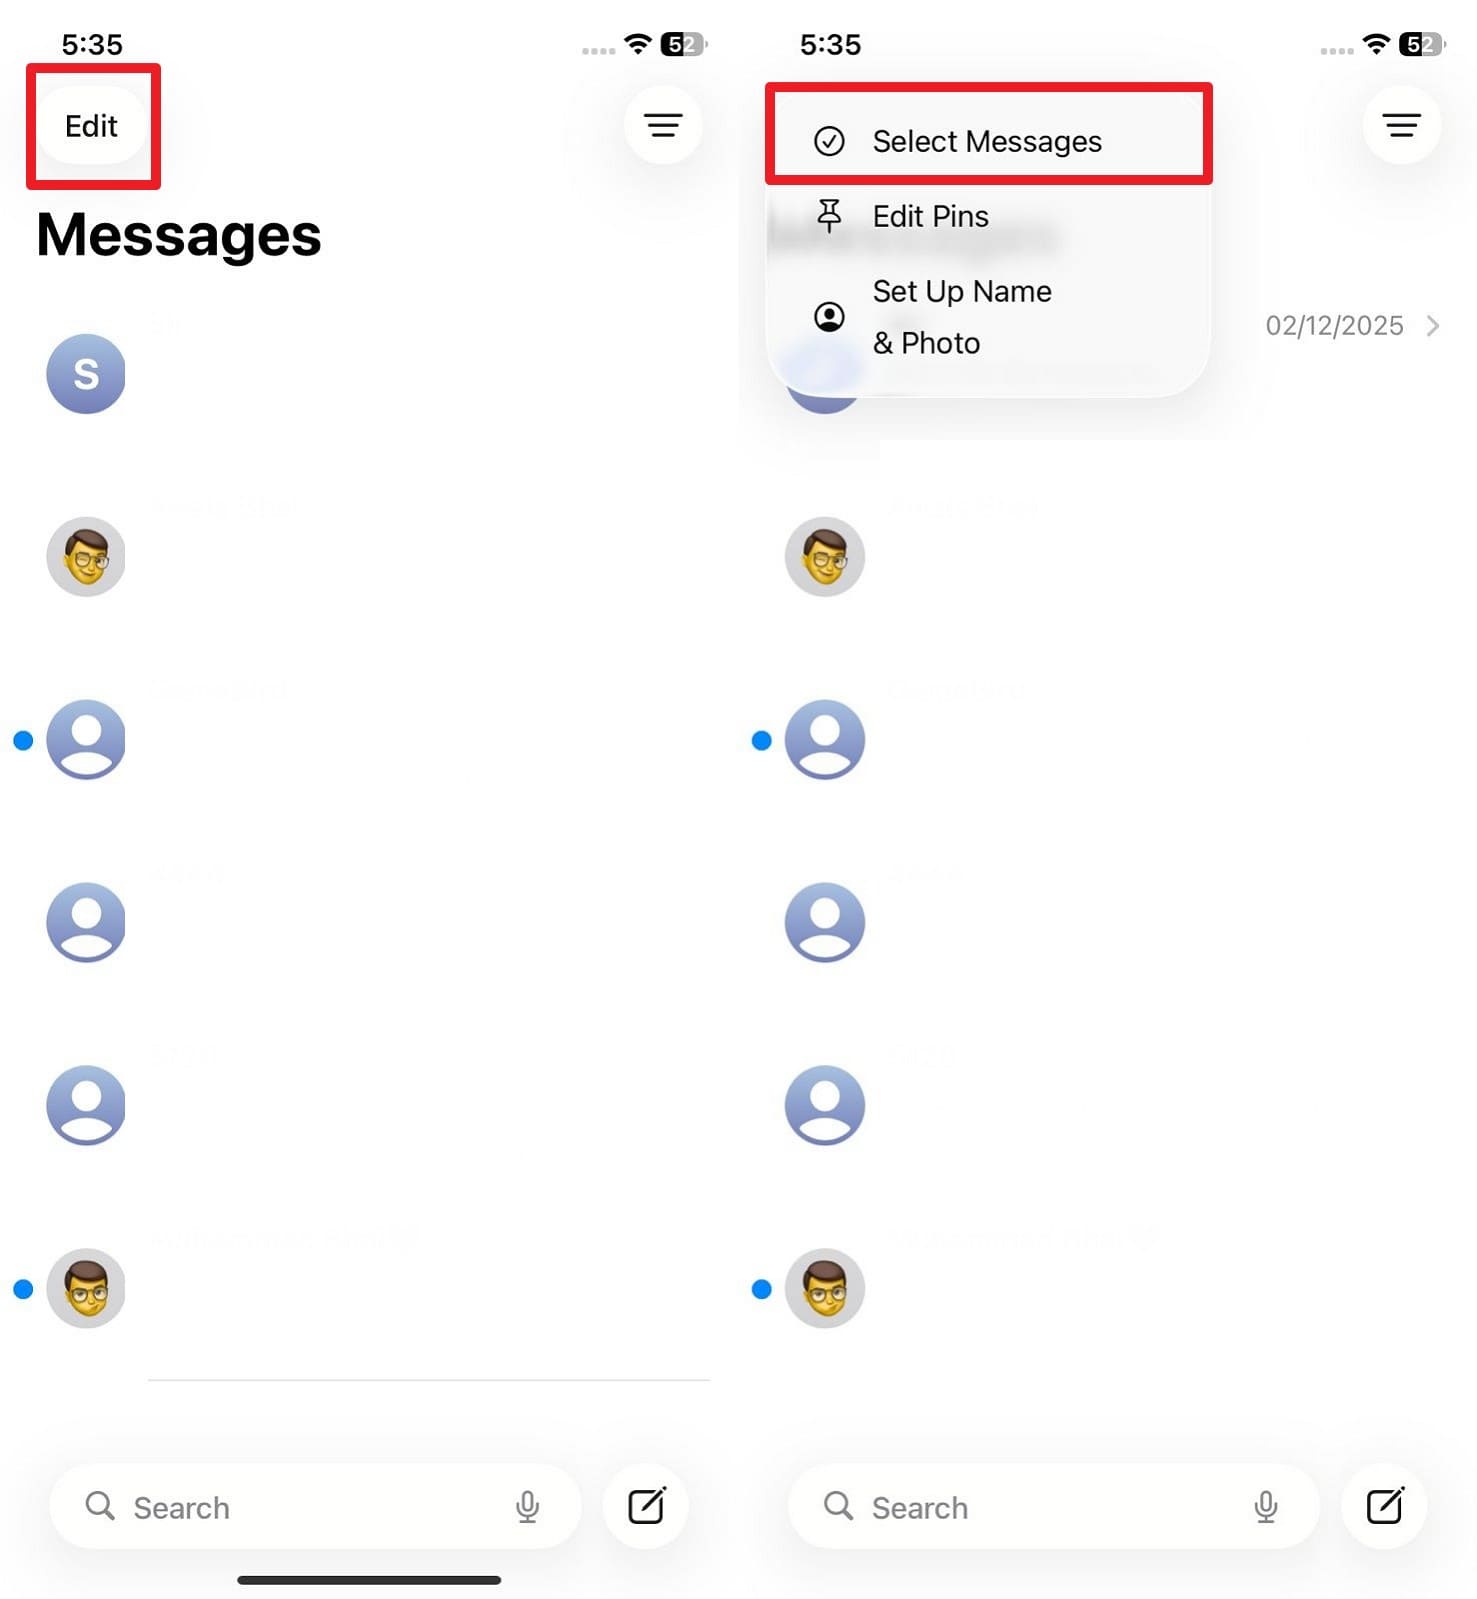
Directly on the main Messages inbox list, explicitly choose the "Edit" option located at the top left corner to securely pick the "Select Messages" action.
Step 2 Delete Selected Threads
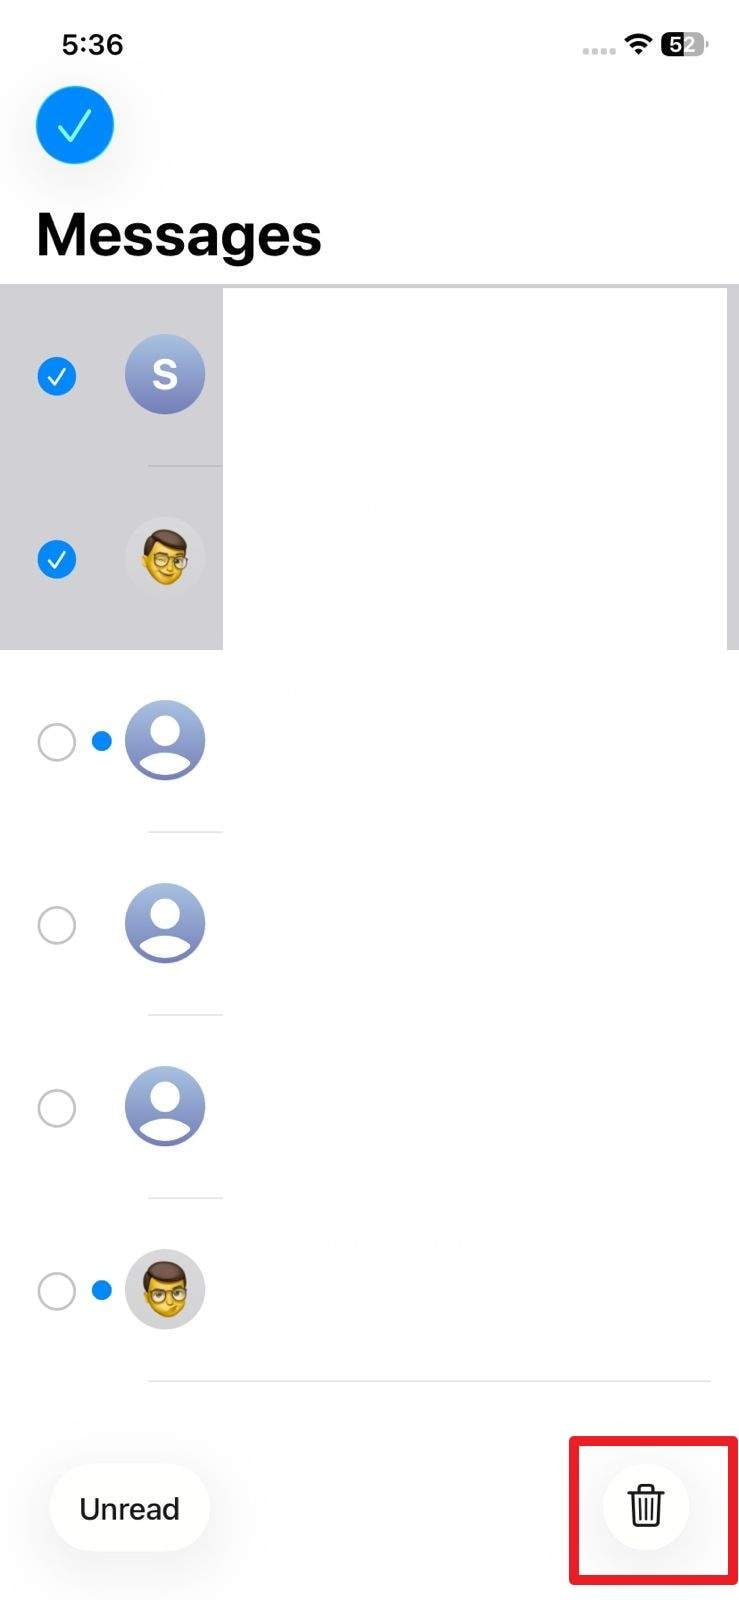
Carefully choose all the extremely large or outdated Messages threads you desperately want to remove and decisively press the "Delete" trash icon.
Update Settings
Instructions: Navigating directly from the "Apps > Messages" settings menu, immediately go to the "Message History" section and pragmatically select the 30 days retention option to prevent future buildup.
5. Remove Large Attachments
Make sure to intentionally remove heavily bloated large attachments stored within Messages and Apple Mail to dramatically reduce system data because these varied files and their persistent caches often mysteriously sit strictly in this category instead of the native Photos app or the parent communication apps themselves. So, executing this particular solution rapidly frees a tremendous amount of usable storage space and significantly lowers system data more effectively via the given guide. It additionally makes your routine cloud backups remarkably smaller and much quicker to complete since iCloud or local iTunes software no longer tirelessly stores old, excessively large files from dead chats or archaic emails.
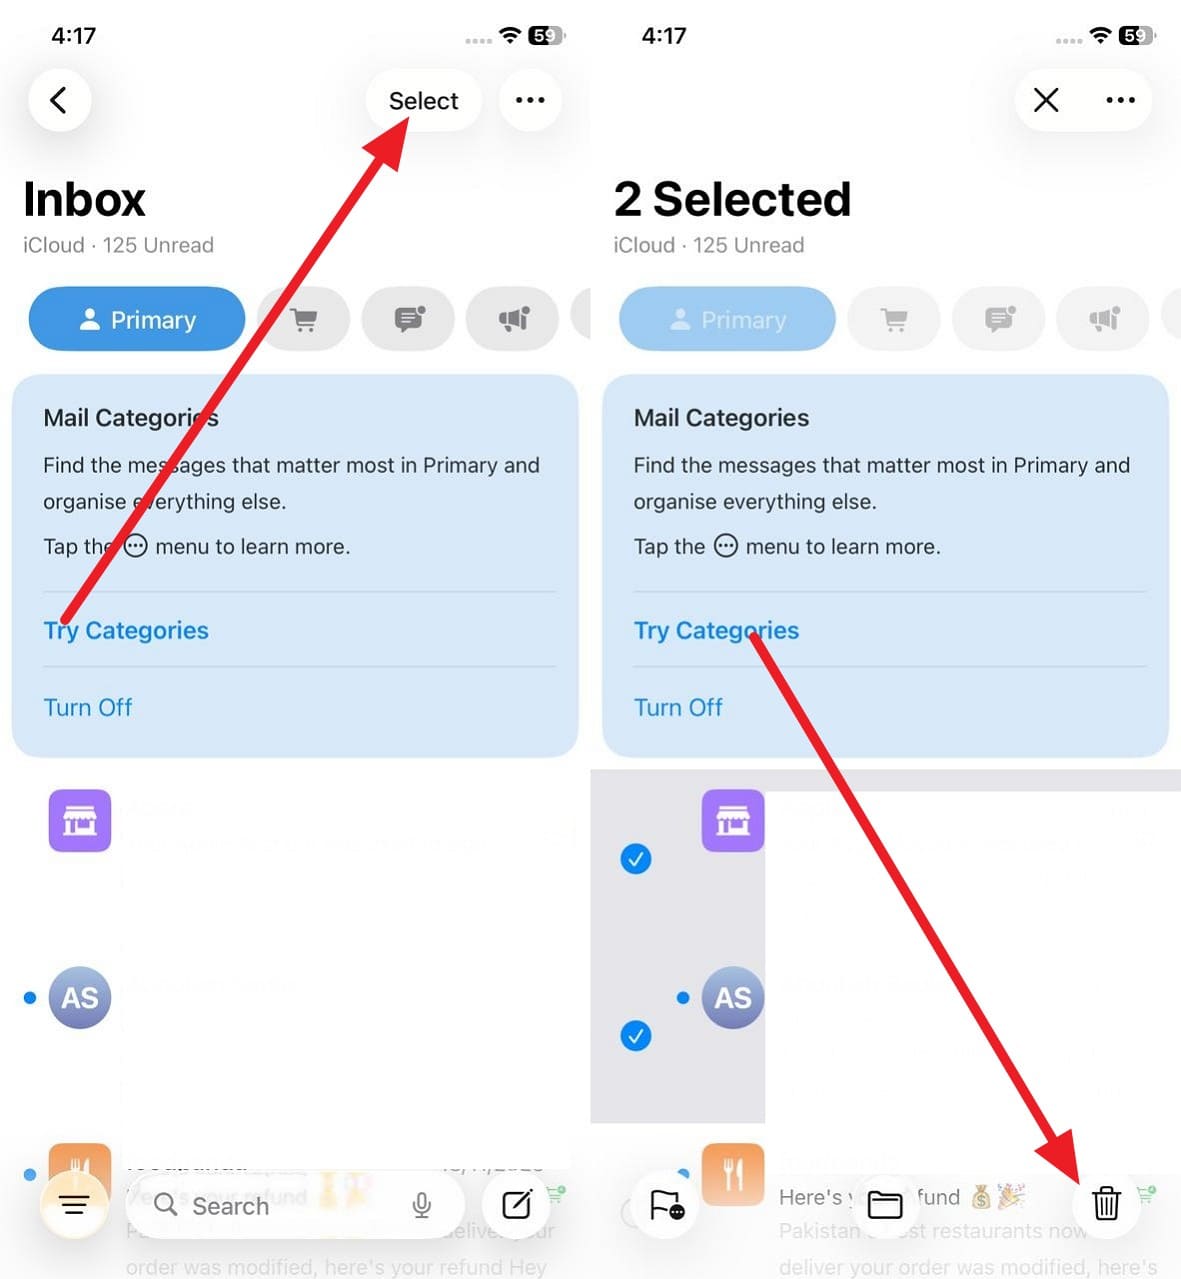
Instructions: Systematically choose the top "Select" button directly in the Mail app, carefully mark the heavy emails you actively seek to completely remove, and finally tap the distinct "Delete" icon.
6. Factory Reset Your iPhone
On the ultimate quest for how to get rid of system data completely, this drastic final solution thoroughly wipes the whole entire device and perfectly puts iOS firmly back to a pristine, fresh state, definitively removing all entrenched cache or highly corrupted older files. This aggressively deletes all third-party apps, their hidden data, fragmented error logs, and stubborn temporary system files, leaving only exactly what is genuinely needed for the OS to function. Additionally, once accurately accessed via the carefully illustrated steps, it successfully removes all deeply orphaned or heavily corrupted files that iOS natively cannot safely clear on its own.
Step 1 Access the Reset Menu
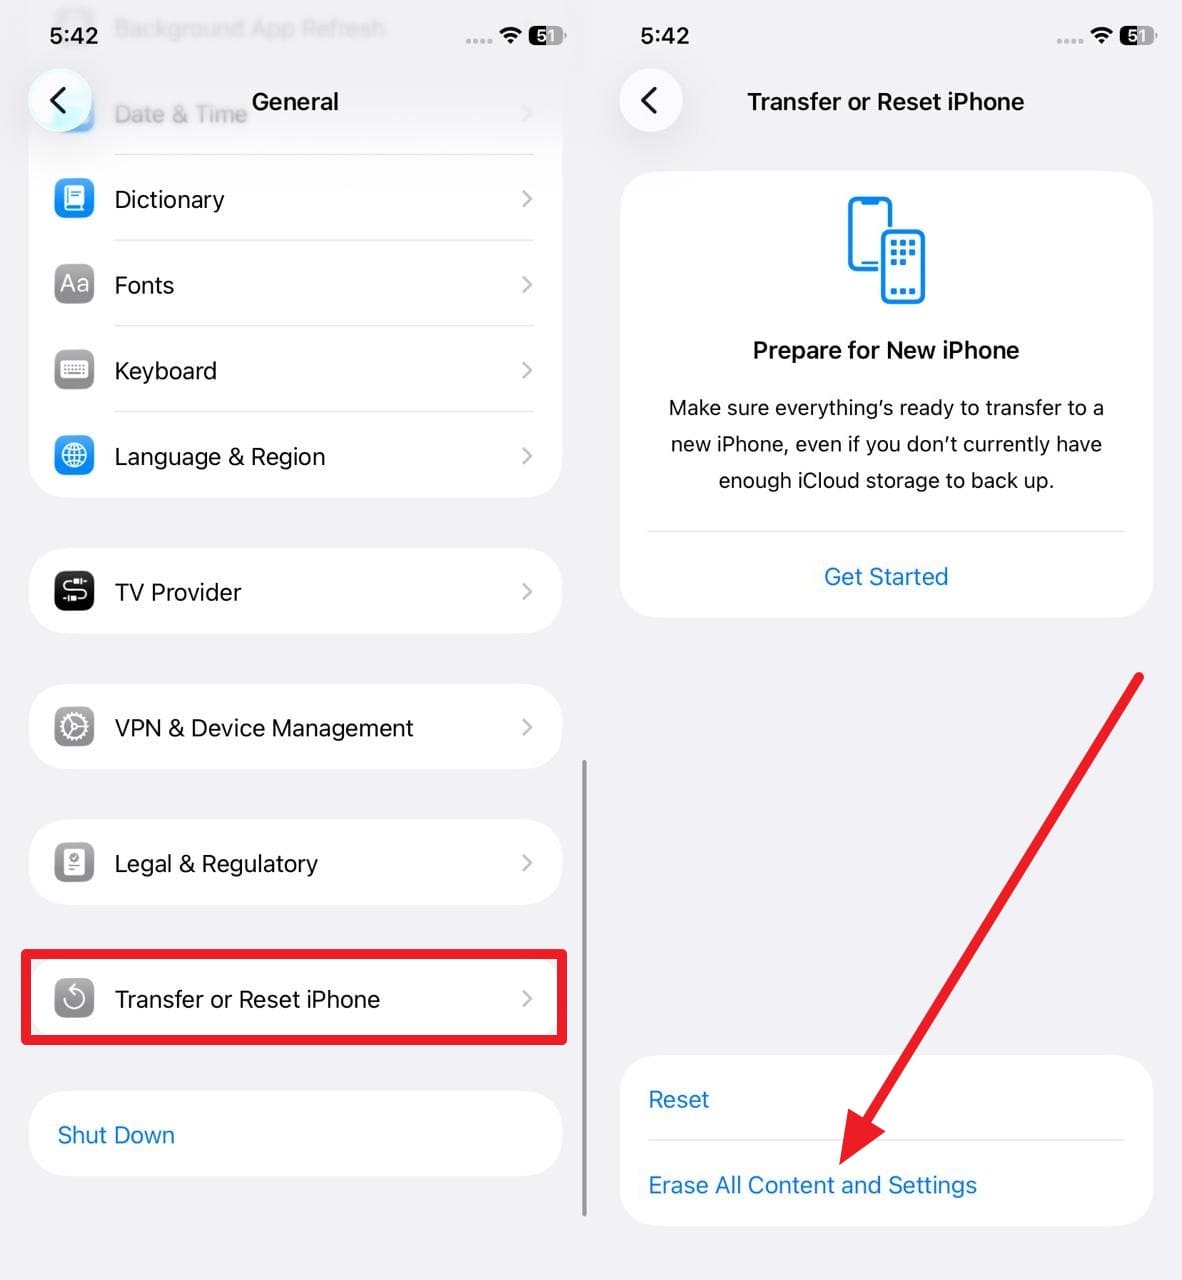
Deliberately choose the crucial "Transfer or Reset iPhone" option directly from the overarching General settings menu and confidently pick the "Erase All Content and Settings" operational option.
Step 2 Confirm and Erase
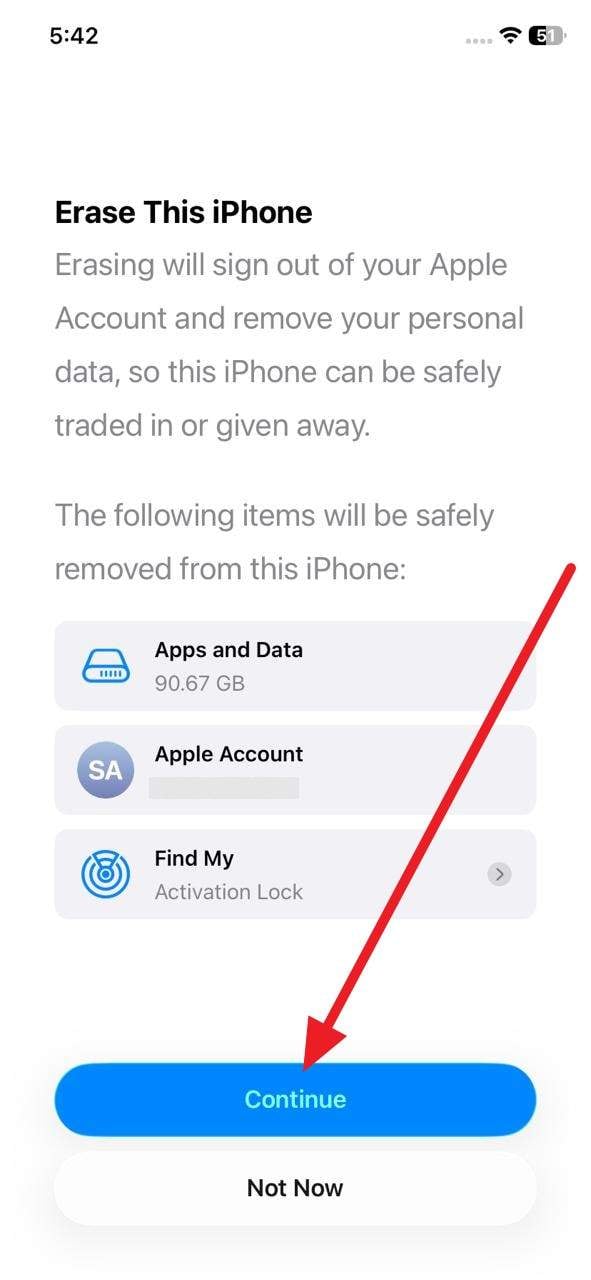
Right here on this prompt, firmly press the "Continue" option and the iPhone will securely wipe itself entirely and seamlessly restart cleanly to the initial welcome setup screen.
Conclusion
To decisively wrap up, this heavily comprehensive guide has successfully resolved the persistent query on how to clear system data on iPhone storage by meticulously giving fully detailed manual and automated, straightforward ways. However, for everyday users who desperately need remarkably quick and foolproof access, Dr.Fone's highly specialized tools are strongly suggested to vastly save you from the intense manual hassle and complex learning curve. A specialized tool like Dr.Fone - Data Eraser allows you to safely clean up system data on iPhone by forcefully removing deeply hidden junk files and stubborn caches in 2026, and you can also strategically use the Try It Free utility link to quickly remove messy duplicates with absolute ease.
FAQ
1. Can System Data delete itself?
Yes, iOS automatically manages and safely removes some localized temporary files and predictive caches dynamically to manage system data space when storage runs critically low. However, some overwhelmingly large or heavily corrupted backend files persistently stay indefinitely until you manually clear caches, offload apps, or completely reset the device yourself.
2. Will deleting System Data delete my apps or personal files?
No, system data mostly holds underlying system background information and temporary operational files, not your actual installed apps or highly personal user files like photos or notes. However, some drastic methods, like executing a complete factory reset, intentionally erase absolutely everything, so strongly back up your core data to iCloud before aggressively proceeding with resets.
3. Can iCloud or backup reduce System Data?
No, iCloud and local iTunes backups solely function to store your critical personal data safely in external environments, but they absolutely do not natively reduce the system data size residing actively on the phone. System data inherently stays anchored on the local device until you actively intervene to clear heavy caches, dump message attachments, or forcefully reset iOS entirely.
4. How often should I clear system data on iPhone?
For optimal device performance in 2026, it is generally recommended to actively clear your iPhone system data every few months, or immediately whenever you start noticing distinct sluggish performance or annoying "Storage Almost Full" system warnings that prevent standard software updates.
Chief Editor of the Dr.Fone team since 2012, Selena is a veteran technology editor known for turning complex iOS and Android topics into clear, user-focused guidance.
 Permanently erase all iOS & Android data—completely unrecoverable.

 100% Security Verified | No Subscription Required | No Malware

 :
: 
 ChatGPT
 Perplexity
 Gemini
 Claude
 Grok
Grok
 Permanently erase all data on iOS & Android — completely unrecoverable.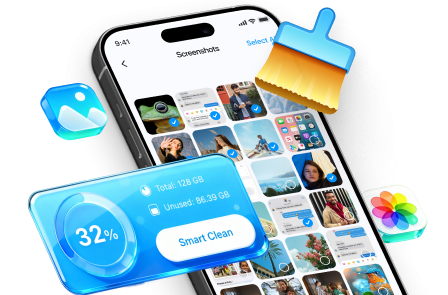





 Add Wondershare Dr.Fone as a preferred source on Google