

 100% Security Verified | No Subscription Required | No Malware

 :
: 
 ChatGPT
 Perplexity
 Gemini
 Claude
 Grok
Grok
During or after World Cup matches, if your media files get lost or you encounter carrier lock issues, it can ruin the fun. Hence, this guide explains the World Cup travel phone checklist once you are done packing.
This guide also shows how Dr.Fone can help with backup, transfer, and SIM unlock tasks during World Cup travel.
In this article
Part 1. Why You Need a Phone Checklist Before World Cup Travel?
Darktrace's report says that sports events are more prone to cybercriminals and hacktivists because they tend to steal sensitive data or disrupt event infrastructure. So, before you prepare your phone for a football trip, learn why you need to perform basic checks via the mentioned reasons:
| Reason | Why It Matters |
|---|---|
| Protect Match Memories | World Cup moments are once-in-a-lifetime and cannot be recreated. |
| Avoid Phone Switch Loss | Upgrading phones can lead to missing data during transfer. |
| Fix SIM & Roaming Issues | A locked SIM or incorrect settings can cause no network abroad. |
| Keep Apps & Tickets Ready | Tickets, apps, and 2FA are needed for stadium access. |
| Avoid Storage & Battery Problems | Heavy usage drains storage and battery during matchdays. |
Part 2. Backup Your Phone Before You Travel
As your first step, back up your phone before international sports travel to the United States, Mexico, or Canada for the World Cup via the mentioned ways:
Method 1. Back Up an iPhone
Learn how to create cloud and local backup on phone or PC via the mentioned ways:
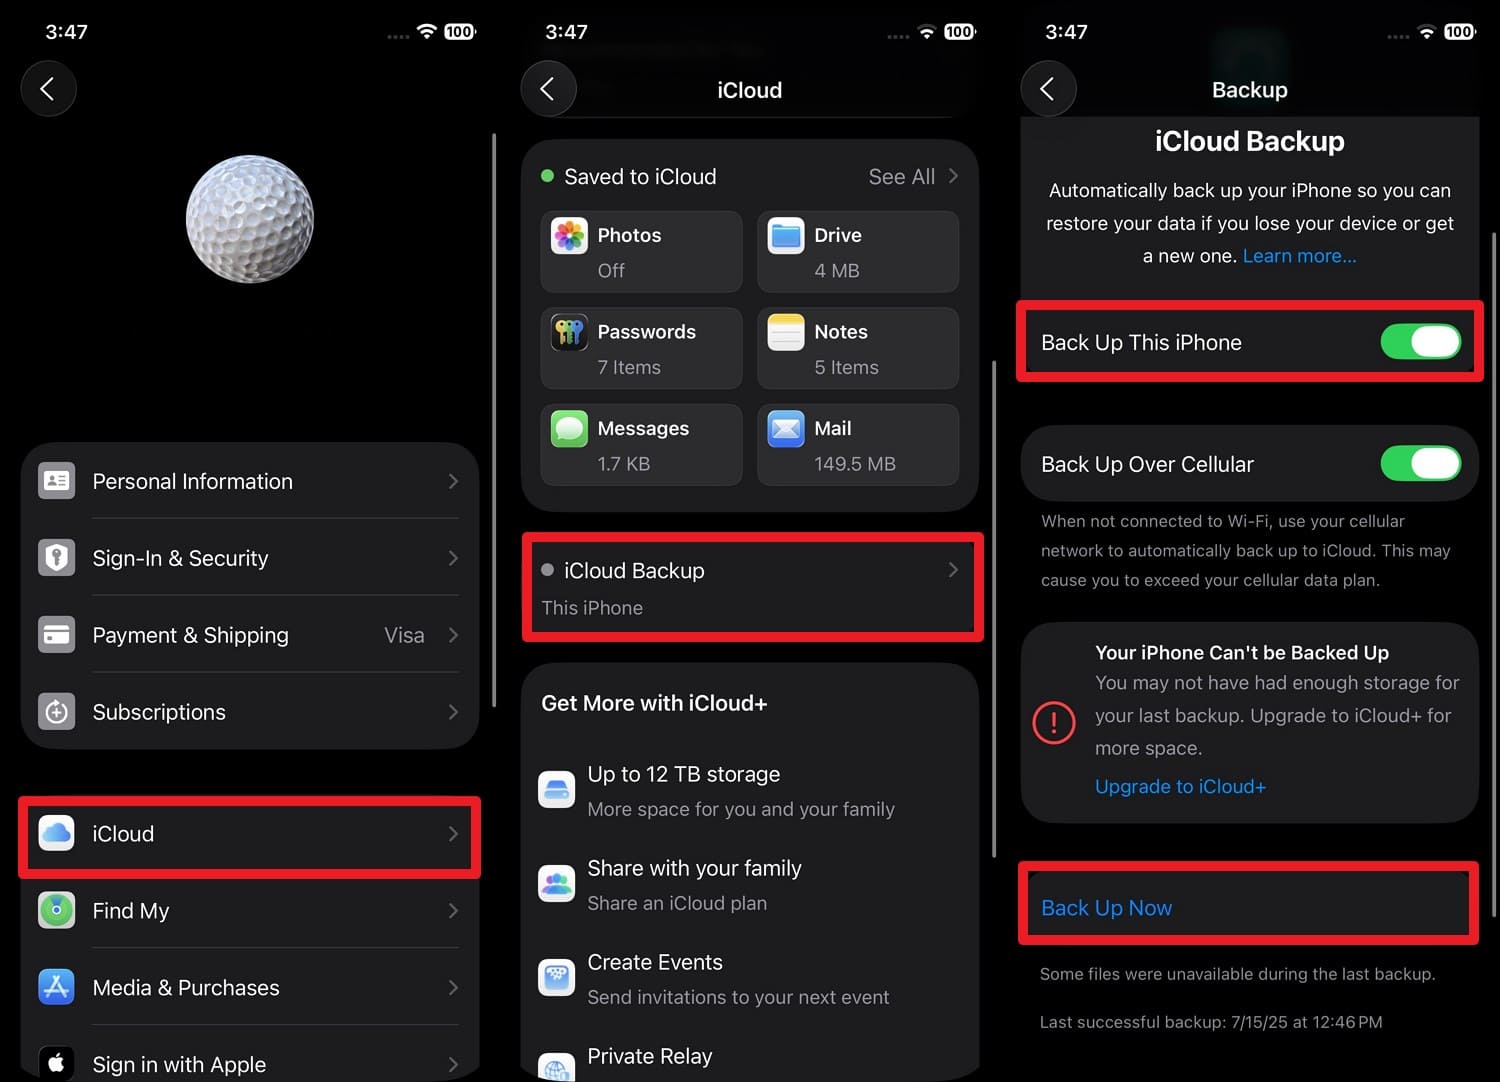
1. Create an iCloud Backup
You can easily move old or World Cup data to a new iPhone since iCloud automatically backs up your phone, as shown:
Instructions. Go to “Apple ID > iCloud > iCloud Backup > Back Up This Phone > Back Up Now.”
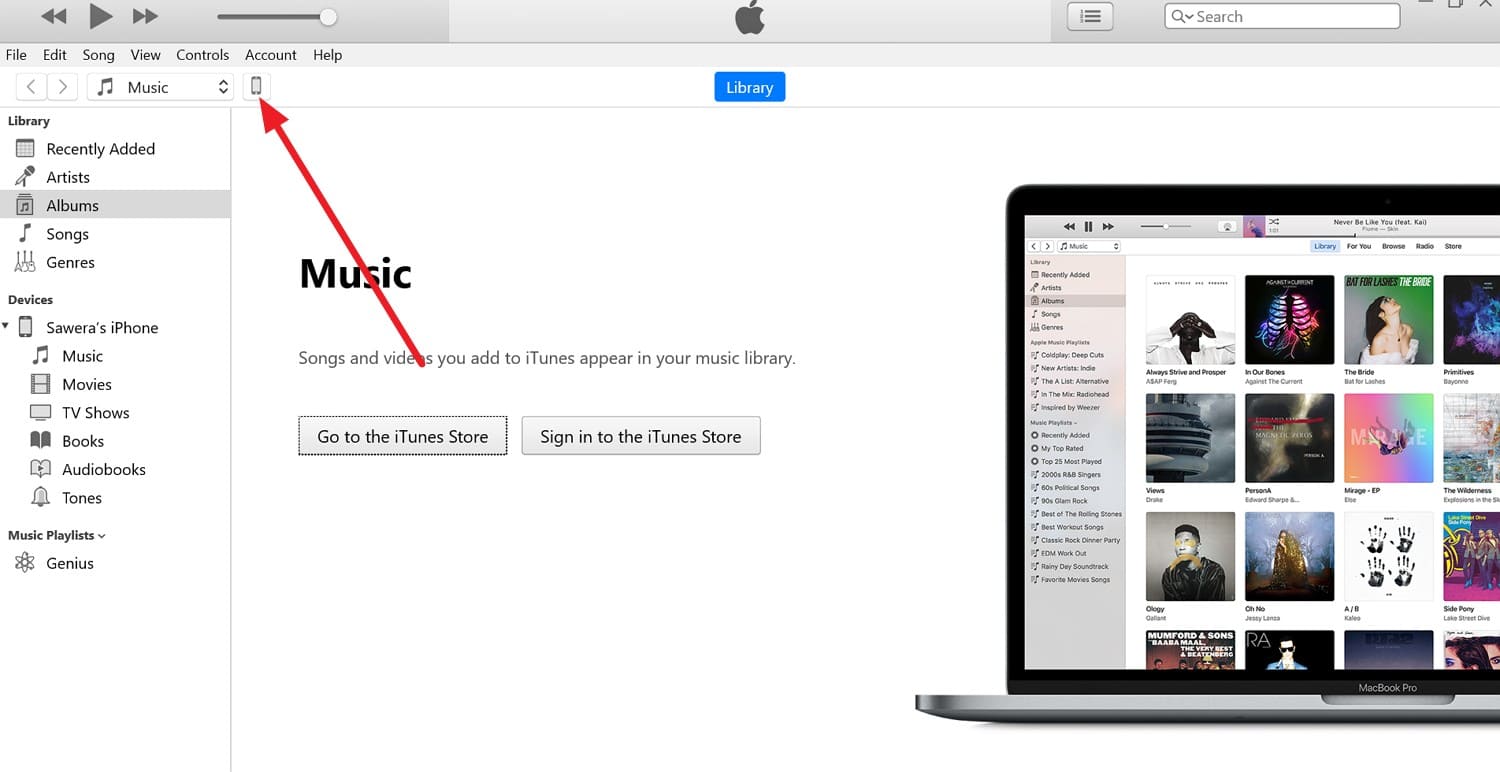
2. Back Up iPhone to a Mac or Windows PC via iTunes/Finder
As you prepare your phone for a football trip, you can use iTunes/Finder on Windows or Mac to make a local or encrypted backup via the given guide:
-
Step 1 Connect the iPhone to iTunes, then pick the “Phone” icon in iTunes and tap the “Trust” button on the iPhone.
-
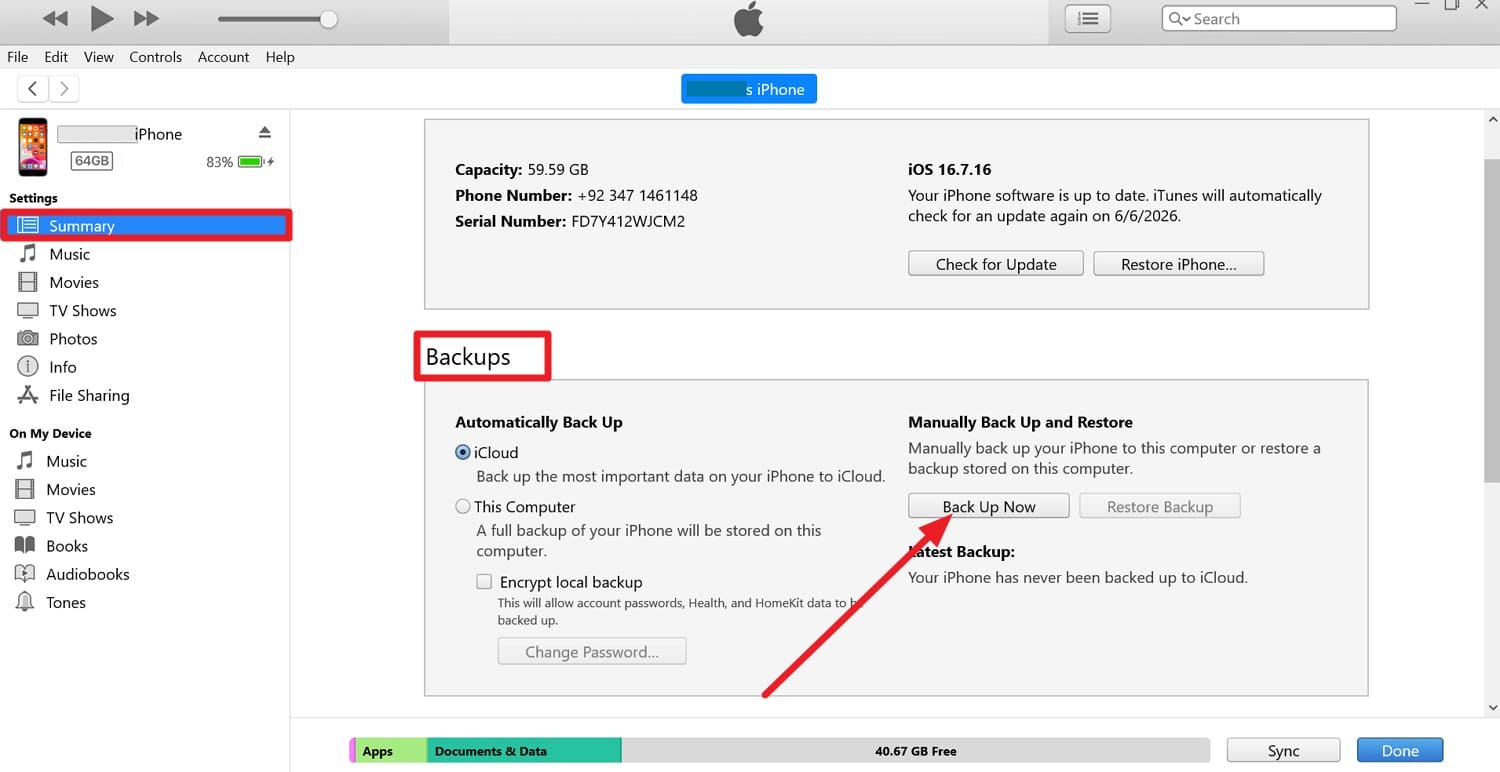
Step 2 In the “Summary” tab, go to “Backups > Back Up Now” while you choose to tick the “Encrypt Local Backup.”
Method 2. Back Up an Android Phone
For Android users, those who want to back up their phone before international sports travel, follow the 2 listed ways:
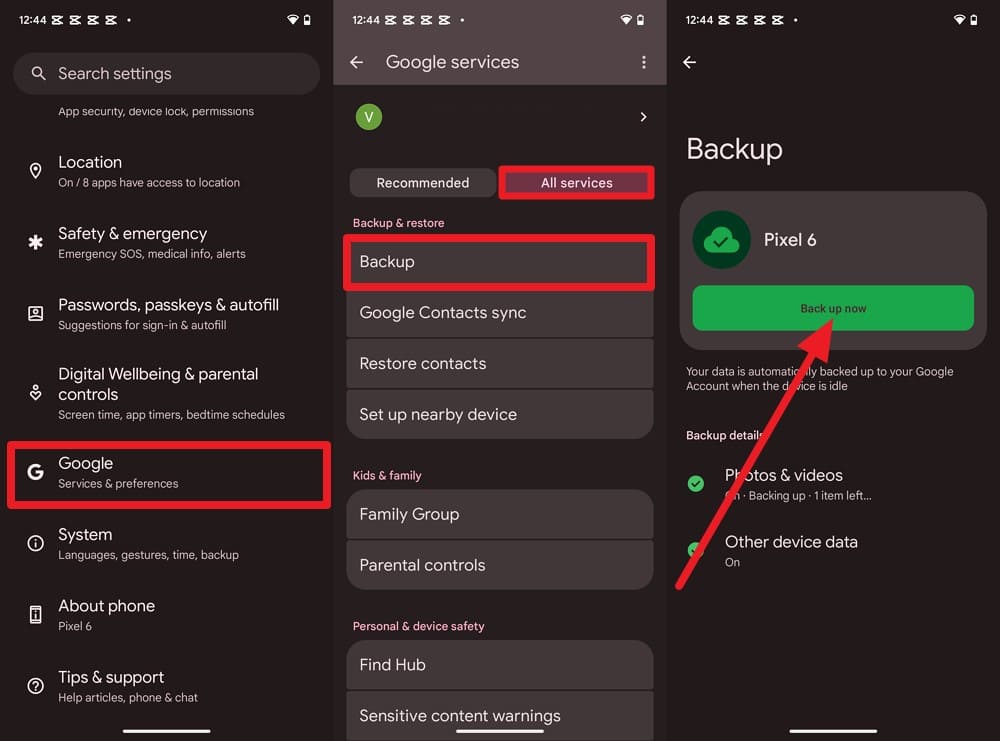
1. Use Google Backup
This method ensures your Android phone’s data is safely stored in the cloud and can be restored if anything goes wrong, as demonstrated:
Instructions. In Android Settings, access “Google > All Services > Backup” and tap “Back Up Now.”
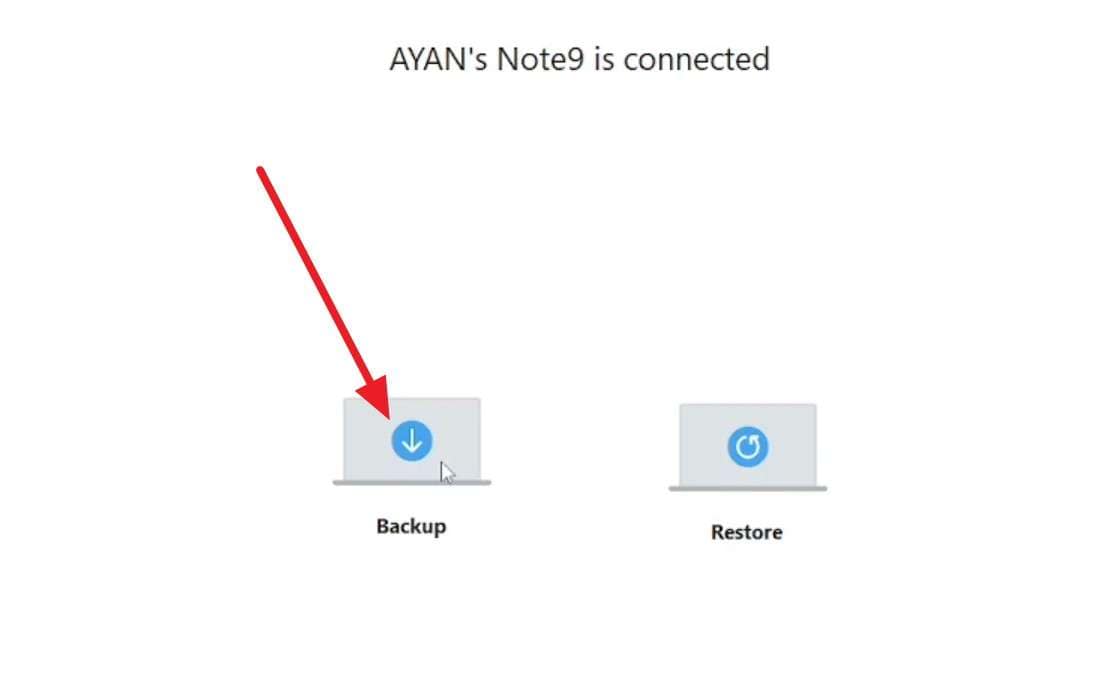
2. Create a Computer Backup Using Apps Like Smart Switch
To prepare your phone for a football trip, this creates an offline backup of your Galaxy phone on a PC, and is guided ahead:
-
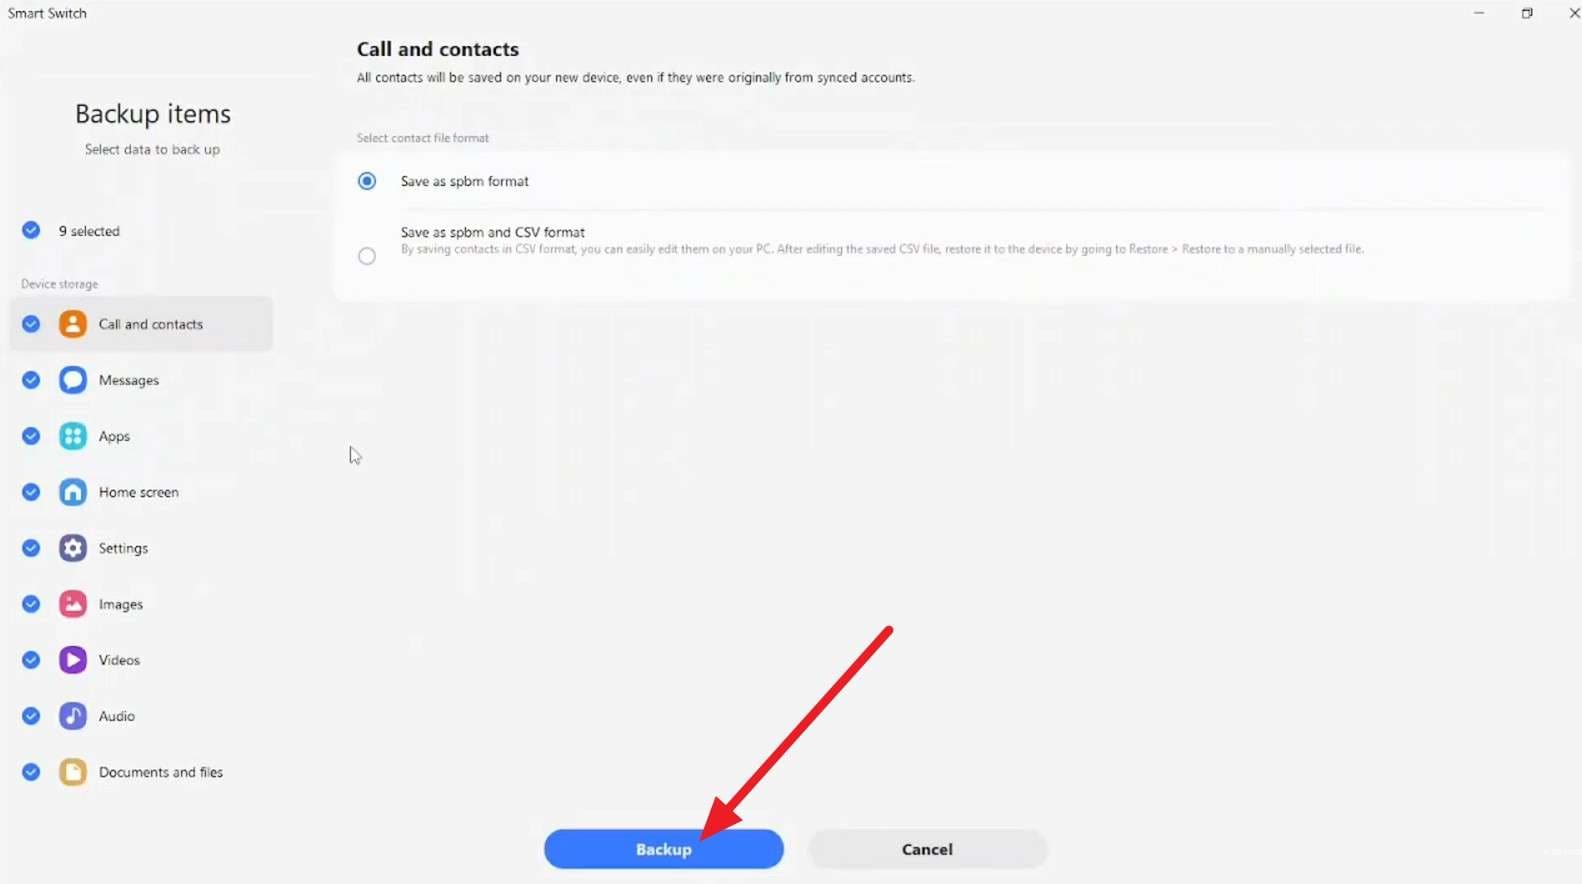
Step 1 Ensure you have the latest version of Smart Switch installed, connect devices, and choose “Backup” on PC.
-
Step 2 Confirm the required data types and click “Backup” to choose the backup location to proceed.
Method 3. Use a Universal Backup Solution for iPhone and Android
To back up your phone before international sports travel, you can use Dr.Fone - Phone Backup for Android and iOS. Instead of using separate manual tools, you can use this tool to save 26 iOS data types, as it is compatible with iOS 27 and 8,000 Android devices. iPhone users can choose to make a selective or incremental backup, and they can later preview the iCloud, iTunes, or Dr.Fone backups.
Android users can also select to back up general and app data, including WhatsApp, that they can restore to any device. In addition, you can restore Android data to iOS, even from iCloud or iTunes backups, in just 2-3 steps. With all these features, Dr.Fone is not just a versatile but also an intuitive solution for all types of users.
World Cup Guide to Create iOS Selective and Manual Backup
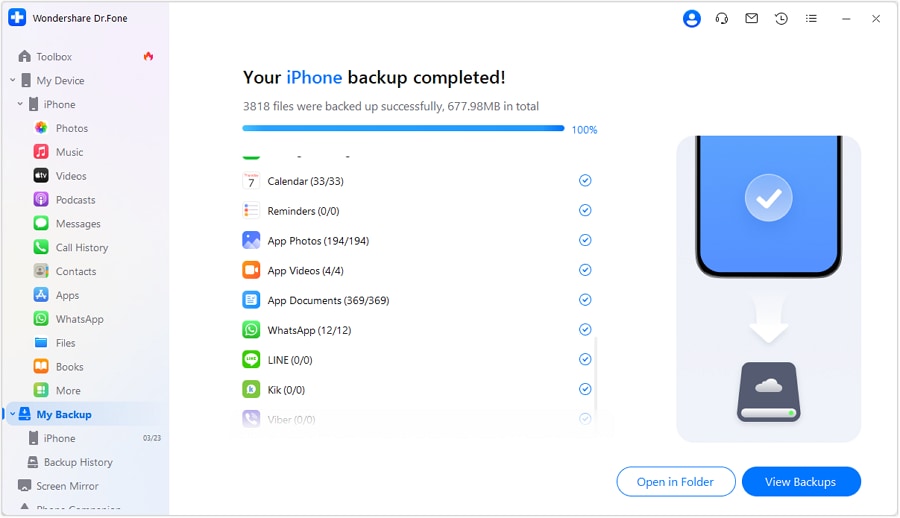
Step 1. Choose Data Types to Back Up
Access the “My Backup” tool, choose the data types, and tap the “Back Up Now” button to create a local backup at the chosen location.

Step 2. Preview the Created iOS Backup
Tap “Open in Folder” or “View Backups” once the backup progress bar ends.

Part 3. Transfer Everything to Your New Phone Before Traveling
If you want to manage phone storage before a trip, it's best to move data to secondary devices or a new phone with larger storage through these methods:
Method 1. Use Dr.Fone - Phone Transfer for a One-Click Data Transfer
On both iPhone and Android, you can use Dr.Fone - Phone Transfer to skip the setup or app-based methods. With this, you can migrate 13 data types from iOS to iOS and 12 from Android to Android, with no skills required. Since it also supports cross-platform transfer, you can share 12 types of files from iOS to Android and 8 from Android to iOS in 2-3 taps.
Regardless of the transfer direction, the tool is compatible with Android 16 and the latest iOS 27 version to make migration seamless. Since you only need a USB connection, you can choose which devices and data types you want to move to free up space for World Cup data.
 Move data between iOS to Android and vice versa.
- Transfer contacts, SMS, photos, videos, music, and more types.
- Available with all phones with Android and iOS versions.
- Simple, click-through process.
Quick Transfer Guide to Move iOS Data to Android Using Dr.Fone
Step 1. Determine Dr.Fone Source and Destination Phones
Connect devices, then select the “Source and Destination” phones via the “Flip” icon in the Phone Transfer tool.

Step 2. Choose to Move Data Before FIFA 2026
Pick the data types, then press the “Start Transfer” button to free up space before you travel to the World Cup.


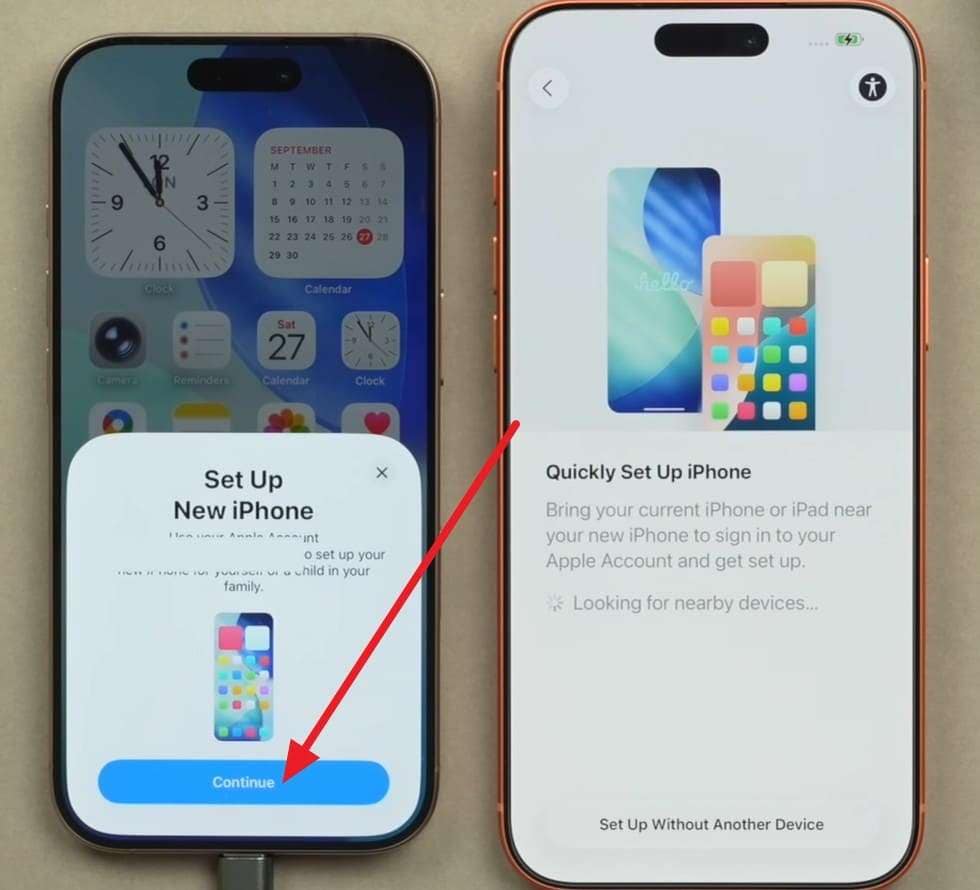
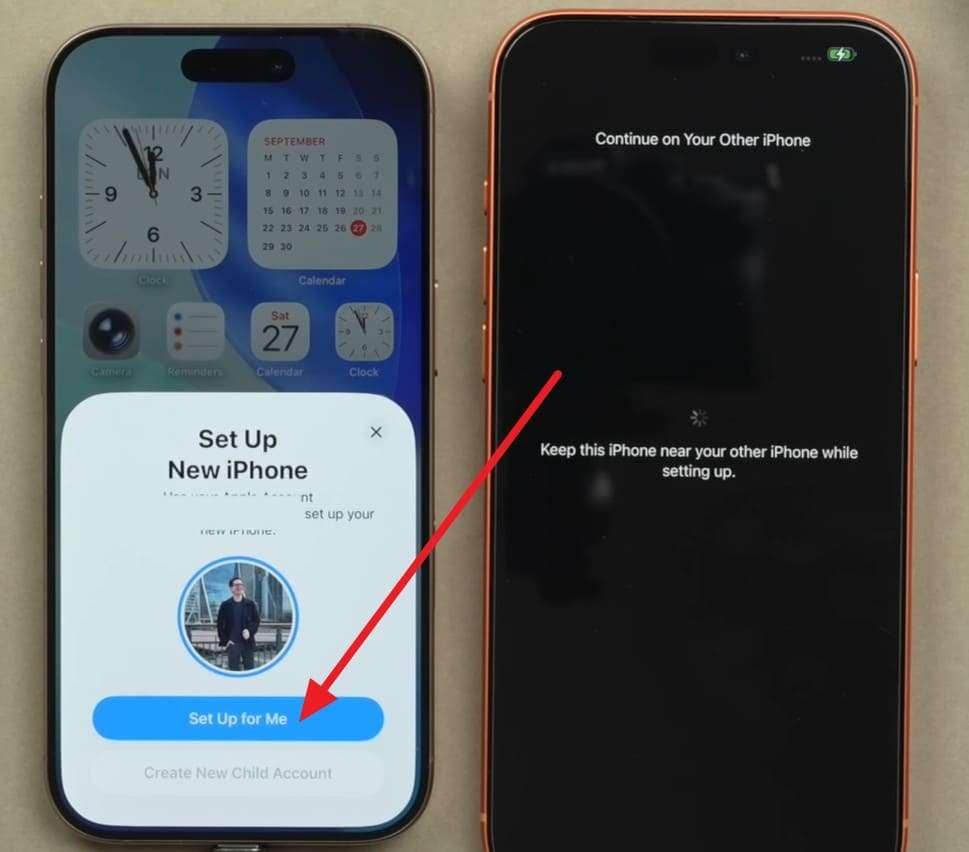
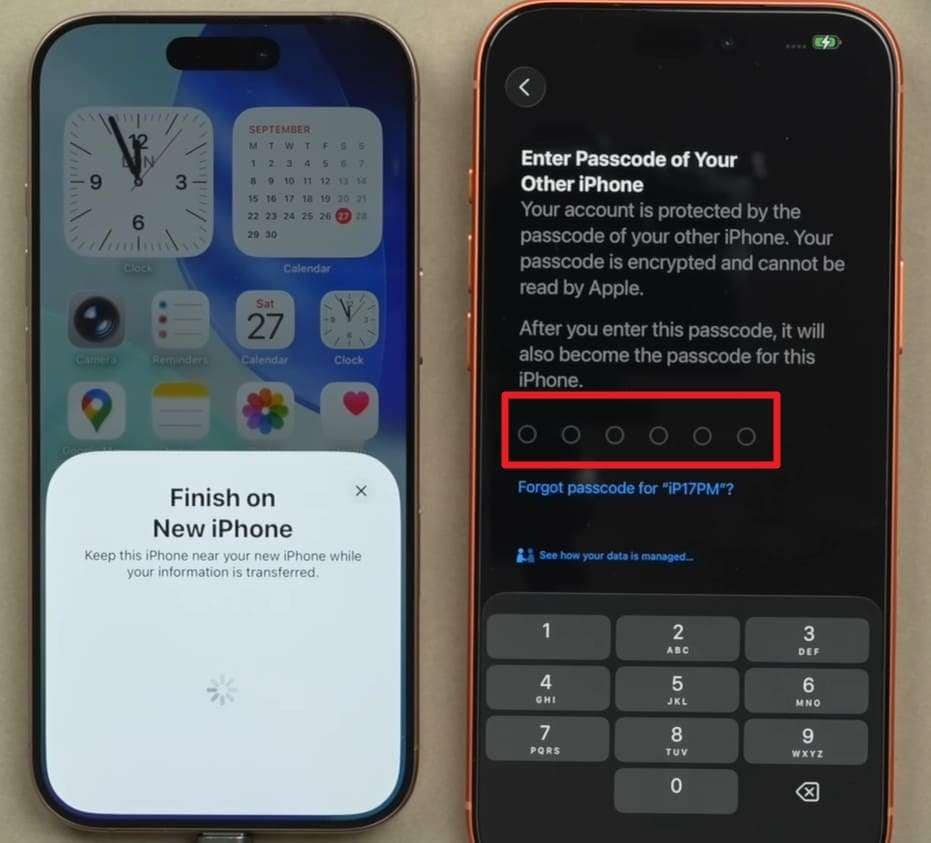
Method 2. iPhone to iPhone (Quick Start)
If you have a new or secondary iPhone, you can use this method while setting up the old phone for World Cup matches, as guided:
-
Step 1 After you have Wi-Fi and Bluetooth connected, place both phones together and tap “Continue” on the older iOS device to prepare the phone for football trip.
-
Step 2 Tap “Set It Up for Me” on the old one, then scan the blue animation on the new iPhone.
-
Step 3 Enter the passcode of the old device on the new iPhone, then set up Face ID and follow the instructions.
-
Step 4 Choose options, like “Download From iCloud” > Sign In > Customize or move everything > Press Continue.

Method 3. Android/iPhone to Android
To save data and backup phone before international sports travel, here are some transfer options for Android or iOS to Android:
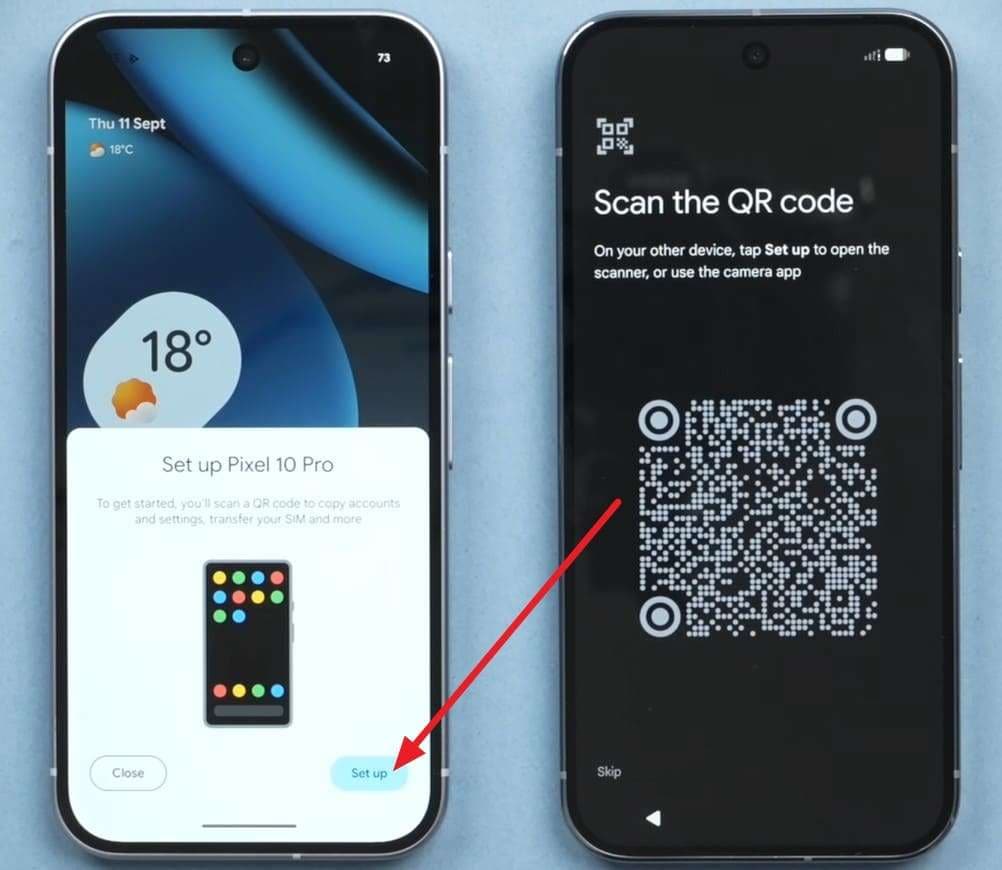
1. Android Switch
It's best if you want to move data from an iPhone to an Android 12 or later during the setup, as shown below:
-
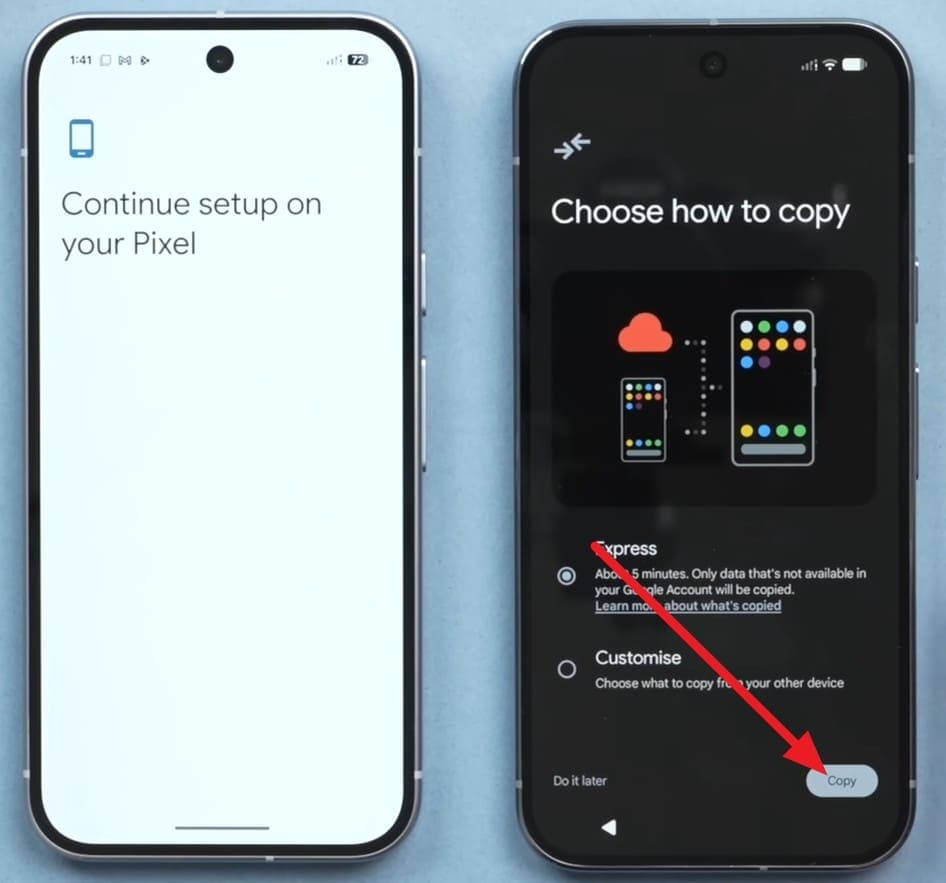
Step 1 Set up the new device, then select the “Pixel or Android Device > Set Up” option to access the QR code.
-
Step 2 Scan the code > Add passcode > Tap “Next” on the “Copy Apps & Data” interface.
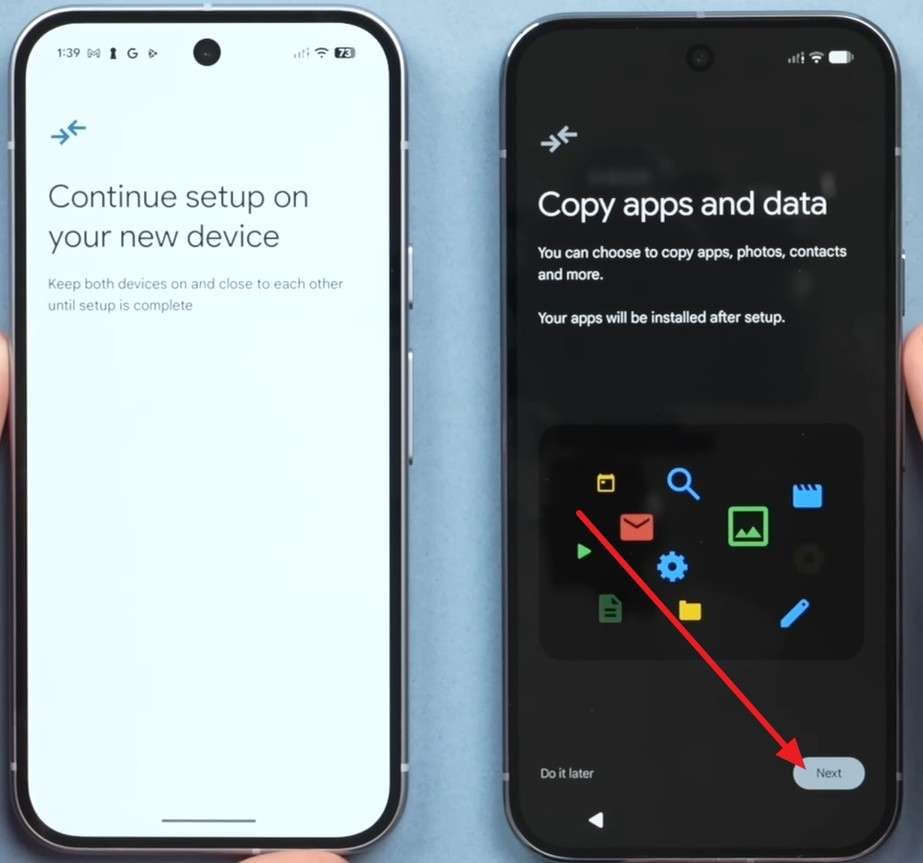
-
Step 3 Pick from the transfer options and press “Copy to move data and set up the new phone.
2. Samsung Smart Switch
When you want to upgrade to a new Samsung Galaxy phone or tablet, try this app to manage phone storage before a trip, as guided:
From Android to Android
-
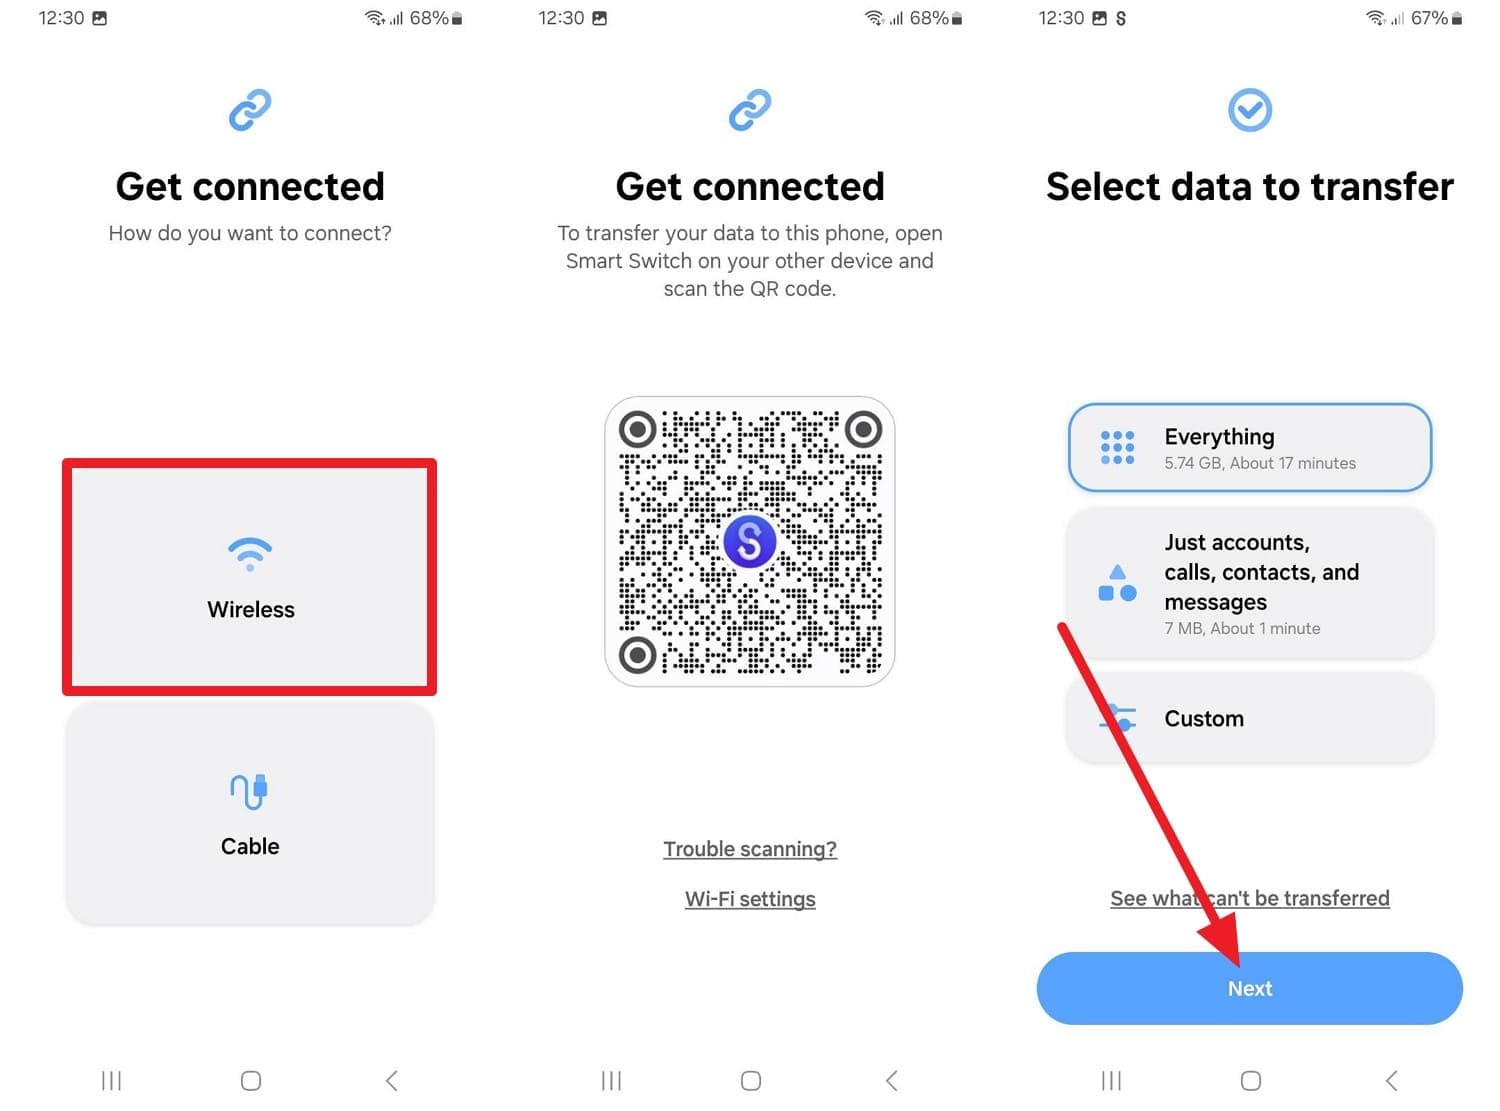
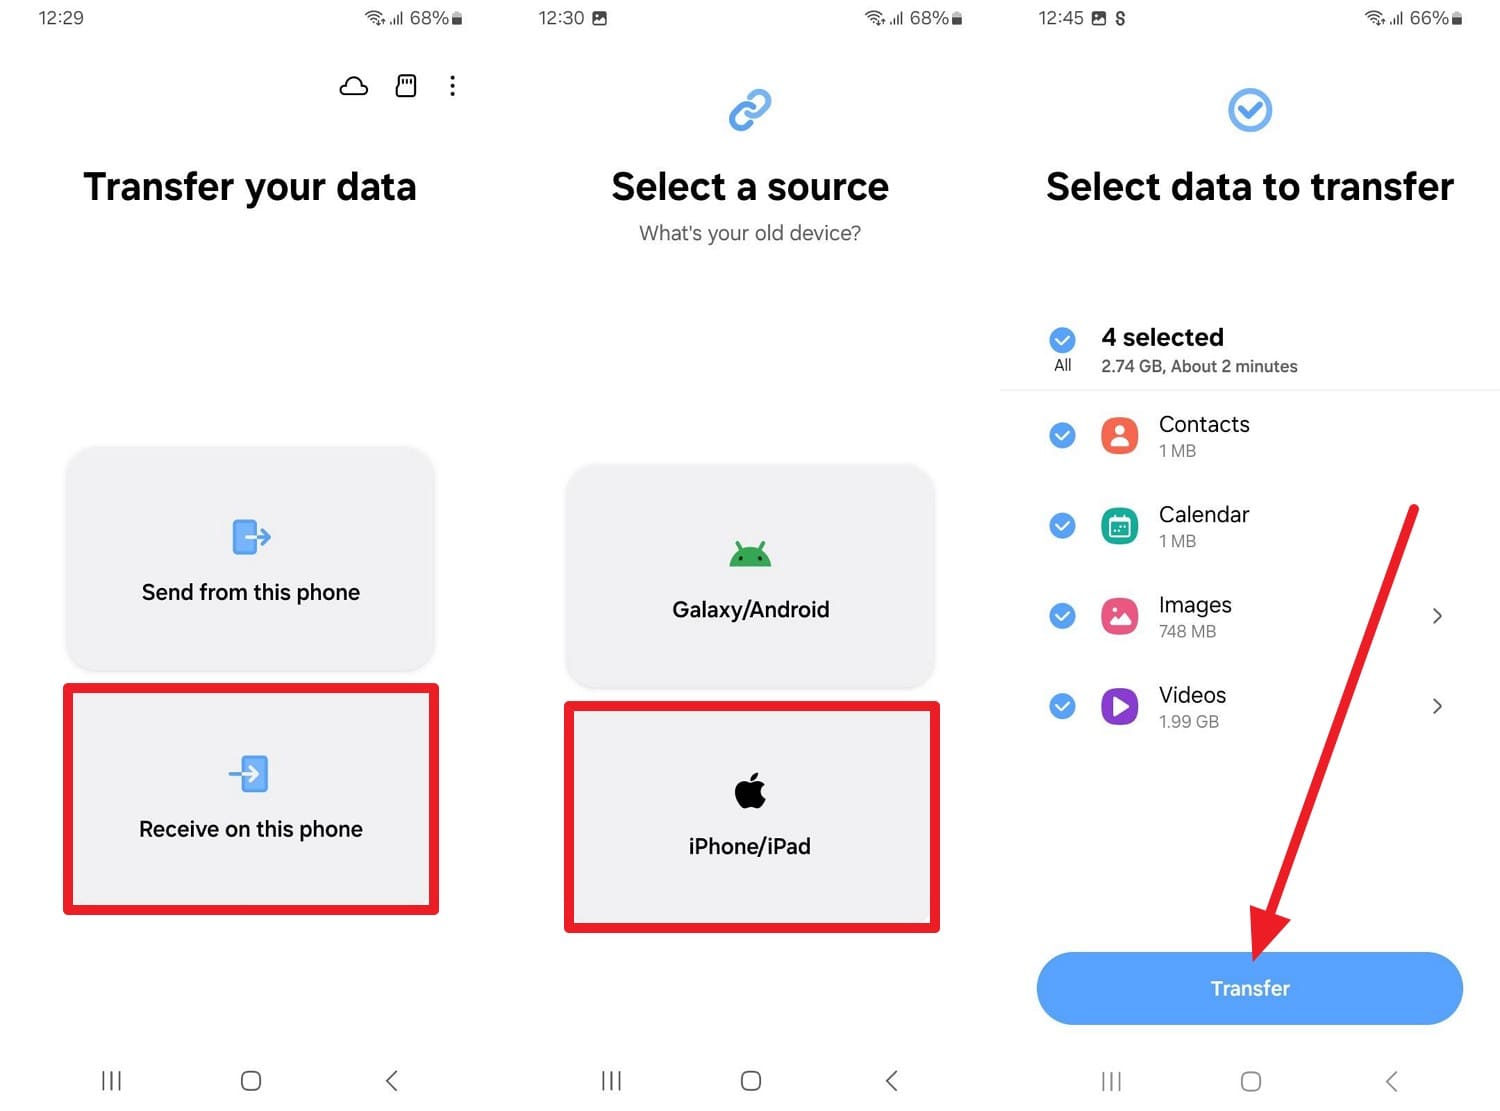
Step 1 Tap “Wireless” on the old phone, access the QR code scanner, and pick “Receive On This Phone > Galaxy/Android” on the new one.
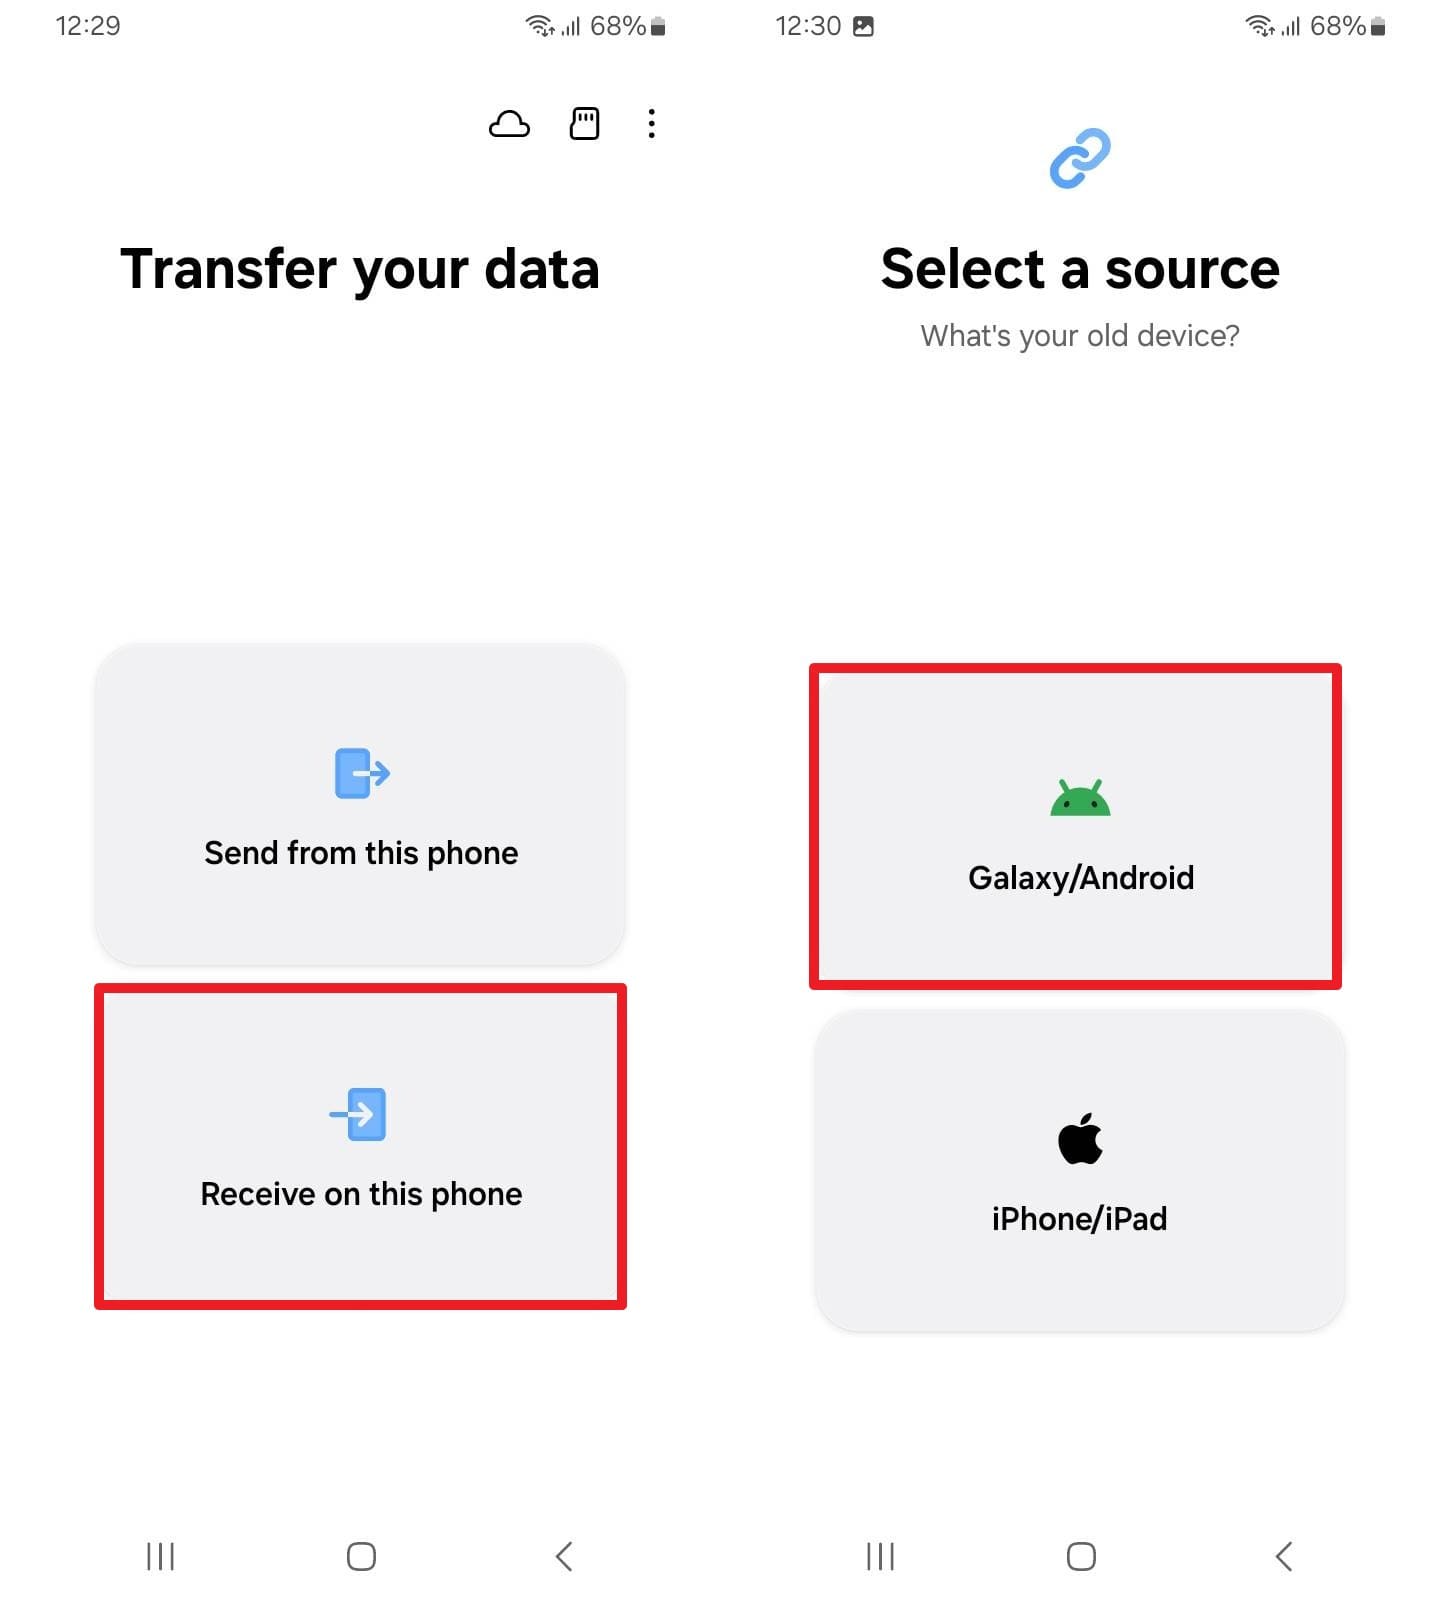
-
Step 2 Choose “Wireless” > Scan the code > Pick data types or select everything > Press “Next” to move data to Galaxy.
From iPhone to Android
Instructions. Tap “Wireless” on iPhone to fetch the scanner and press “Receive On This Phone > iPhone/iPad > Wireless > Choose data types > Tap Transfer on Android.”
Method 4. Android to iPhone (Move to iOS)
When you have a source device at least Android 5.0 and a new or reset iPhone, here is how you can prepare your phone for a football trip:
-
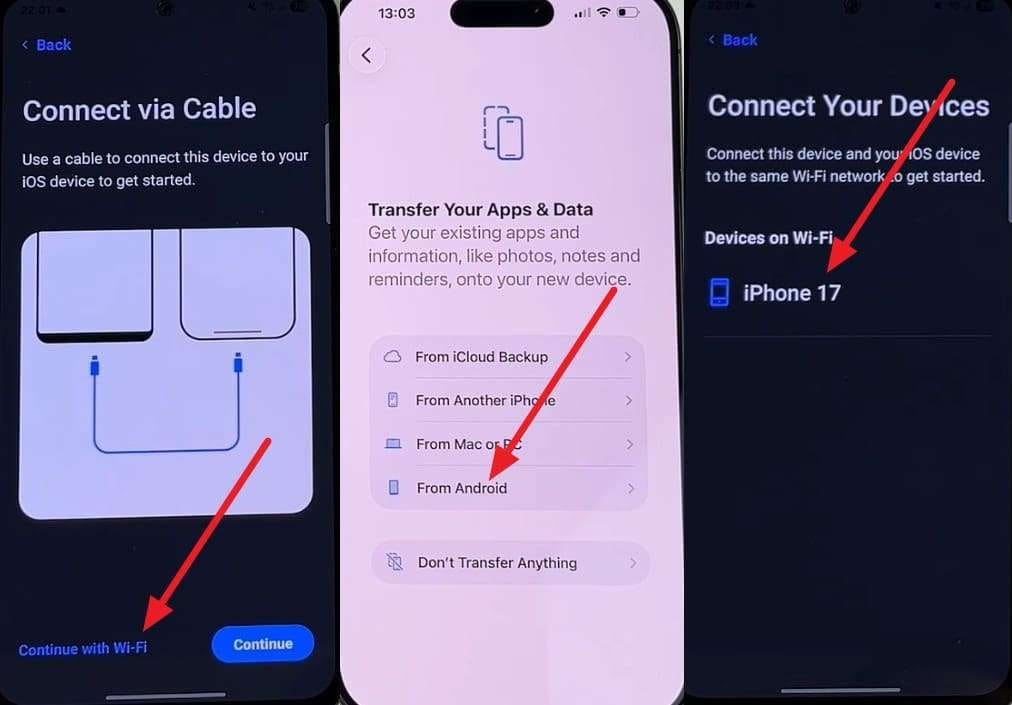
Step 1 Install Move to iOS on Android, choose “Continue with Wi-Fi” on Android > Pick “From Android” on iPhone setup screen, and select iPhone on Android to connect.
-
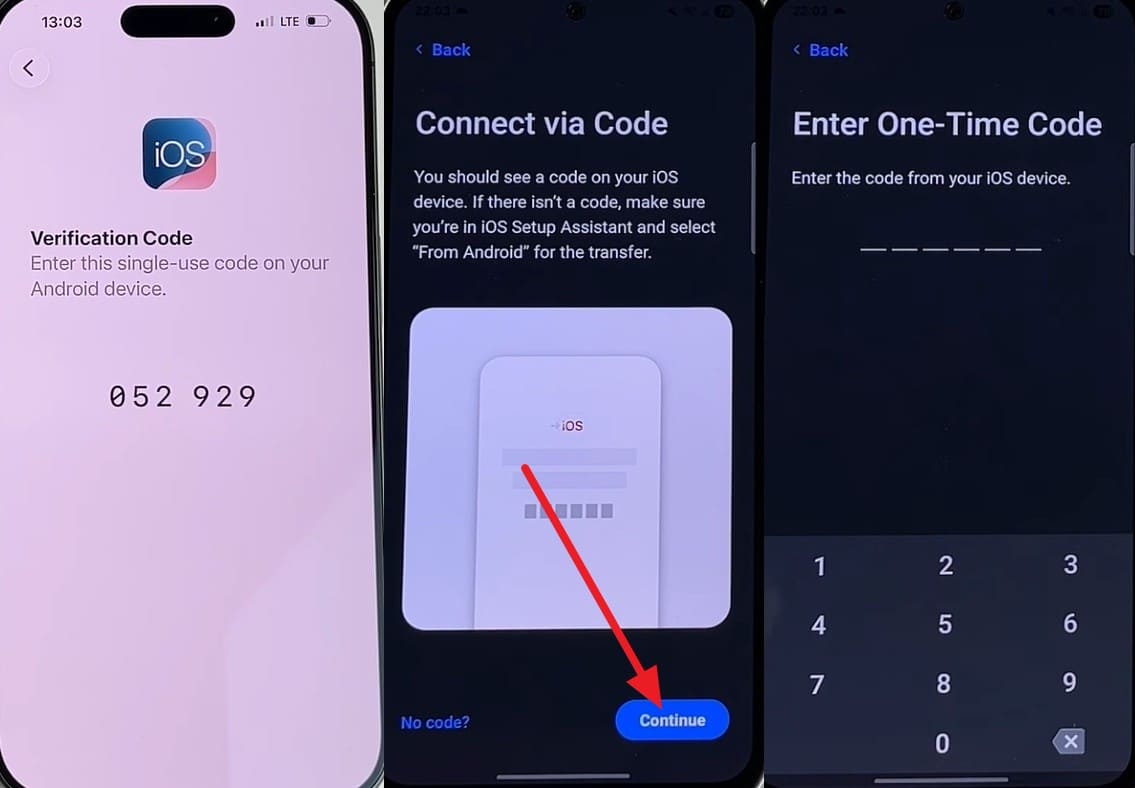
Step 2 Get code on iPhone > Tap "Continue" on the app > Add the code from the iPhone.
-
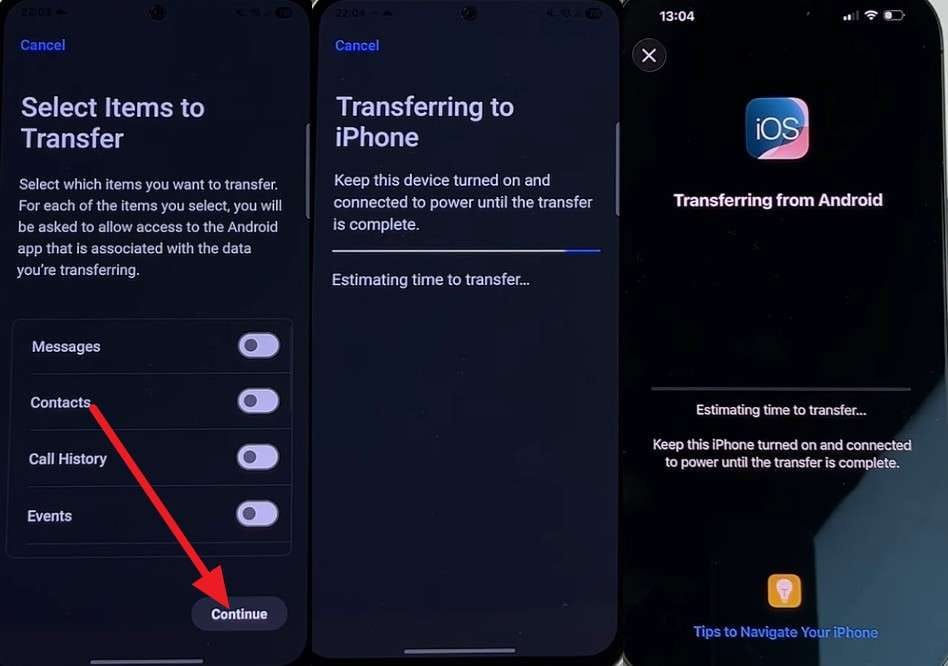
Step 3 Choose what to share > Press Continue > Wait until the progress bar ends to use the empty old phone in the World Cup.
Method 5. Restore From Cloud Backups
You can also use the mentioned ways for Android and iOS to manage phone storage before a trip when you set up a new device or reset it:
1. iCloud Backup Restore
If you have already created the backup, you can bring back the Home Screen layout and key data on a new iPhone, as demonstrated:
-
Step 1 Check or make a backup on an old phone via “Apple ID > iCloud > iCloud Backup > Back Up This Phone > Back Up Now.”

-
Step 2 Continue to set up the new iPhone, pick “From iCloud Backup” > Add Apple ID > Agree to Apple terms.
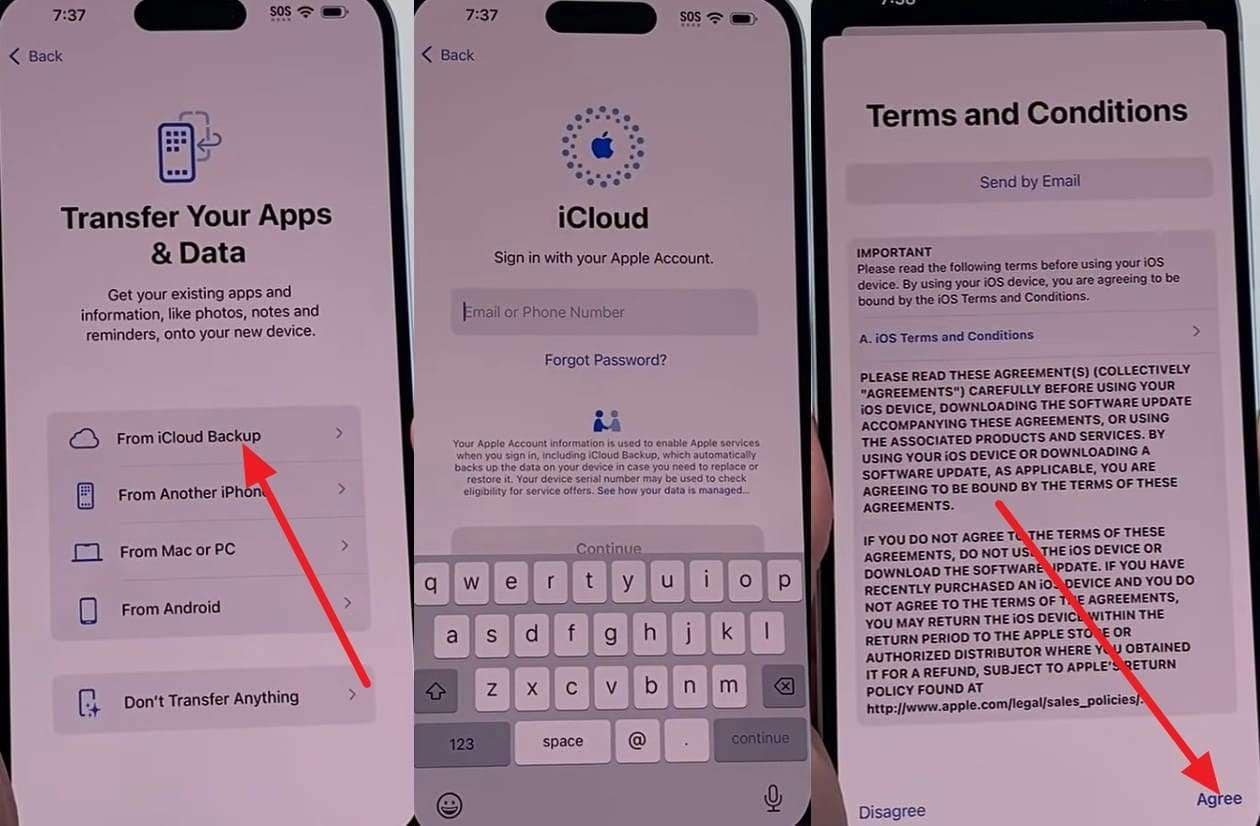
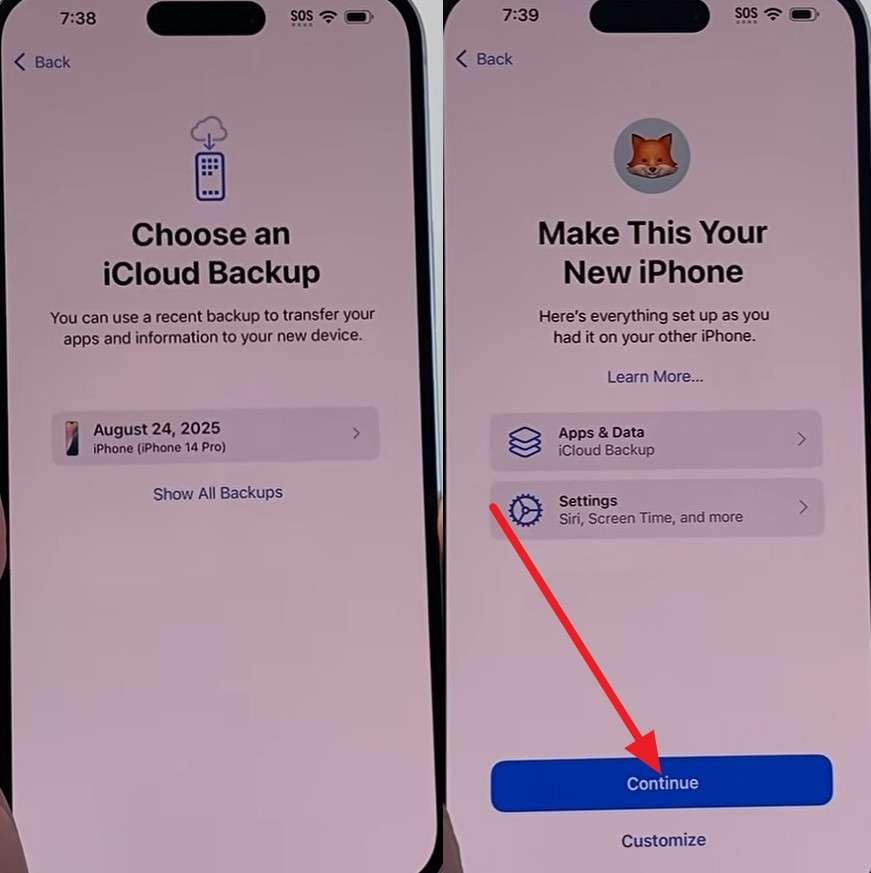
-
Step 3 Choose the backup you created before or during the World Cup, then tap “Continue” to restore.
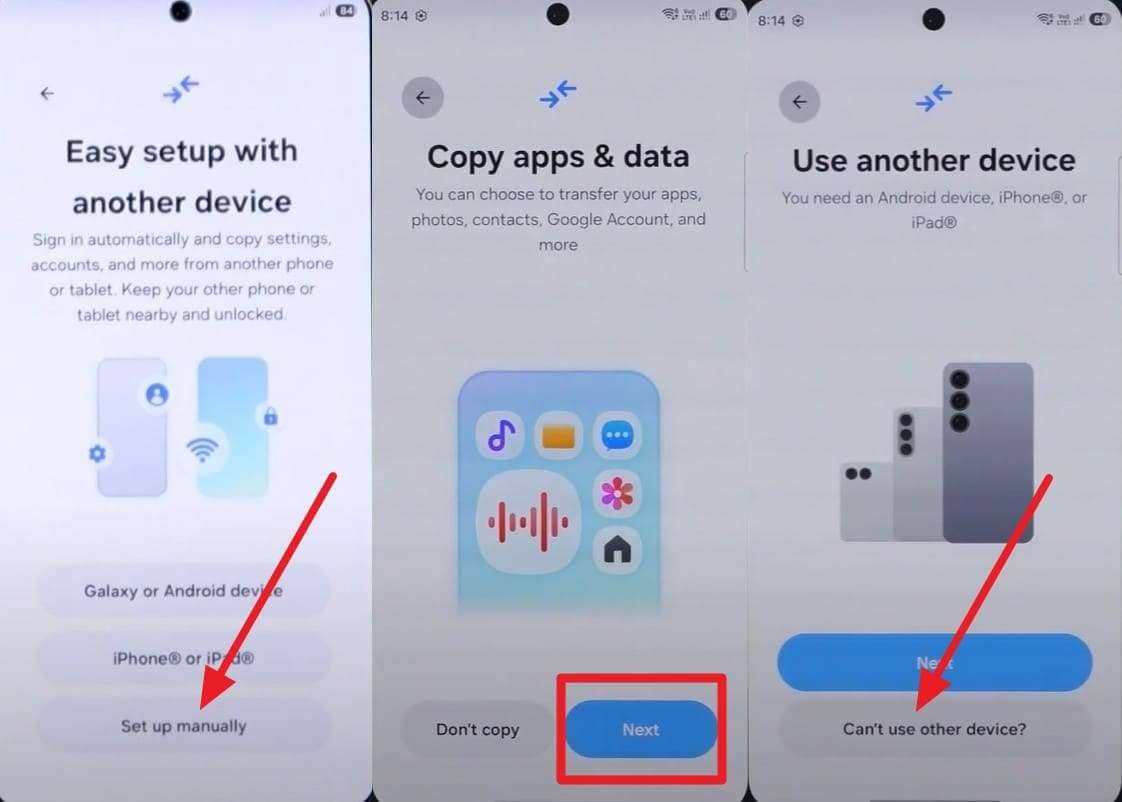
2. Google Backup Restore
To move apps, contacts, Wi-Fi networks, and media to a new Android, follow the guide provided below if you have the previous backup Google account details:
-
Step 1 Go to “Settings > Google > All Services > Backup > Back Up Now” to back up your phone before international sports travel.

-
Step 2 Pick “Can’t Set Up Manually > Next > Can’t Use Other Device?” as you continue to set up a new device.
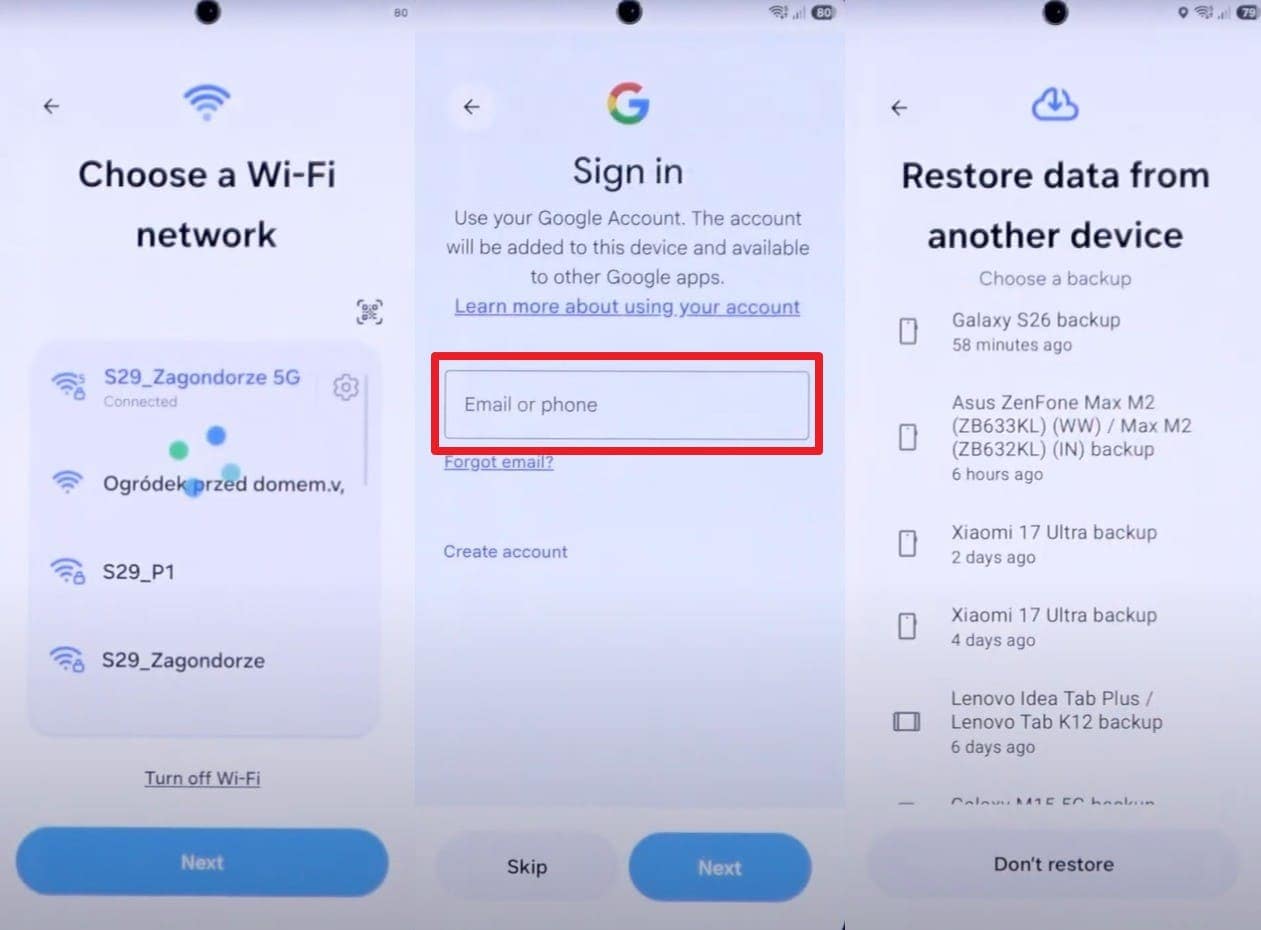
-
Step 3 Connect to “Wi-Fi > Add Google account > Choose backup > Restore” to use the old phone in the World Cup.
Part 4. Prepare SIM, eSIM, and Connectivity for Your Football Trip
As the third and last option in this World Cup travel phone checklist, learn how to bypass the network limitations before the World Cup.
1. Check Whether Your Phone is Carrier-Locked [Android & iPhone]
Since your local SIM cards will be locked in the United States, Mexico, or Canada, check if the phones are carrier-locked. To do so, you can swap the SIM to see if there is no “SIM Not Supported” or “Invalid SIM” alert or review the settings, as guided:
For Android
Instructions. Go to “Connection > More Connection Settings” and see if “Network Lock” says locked or unlocked.

For iPhone
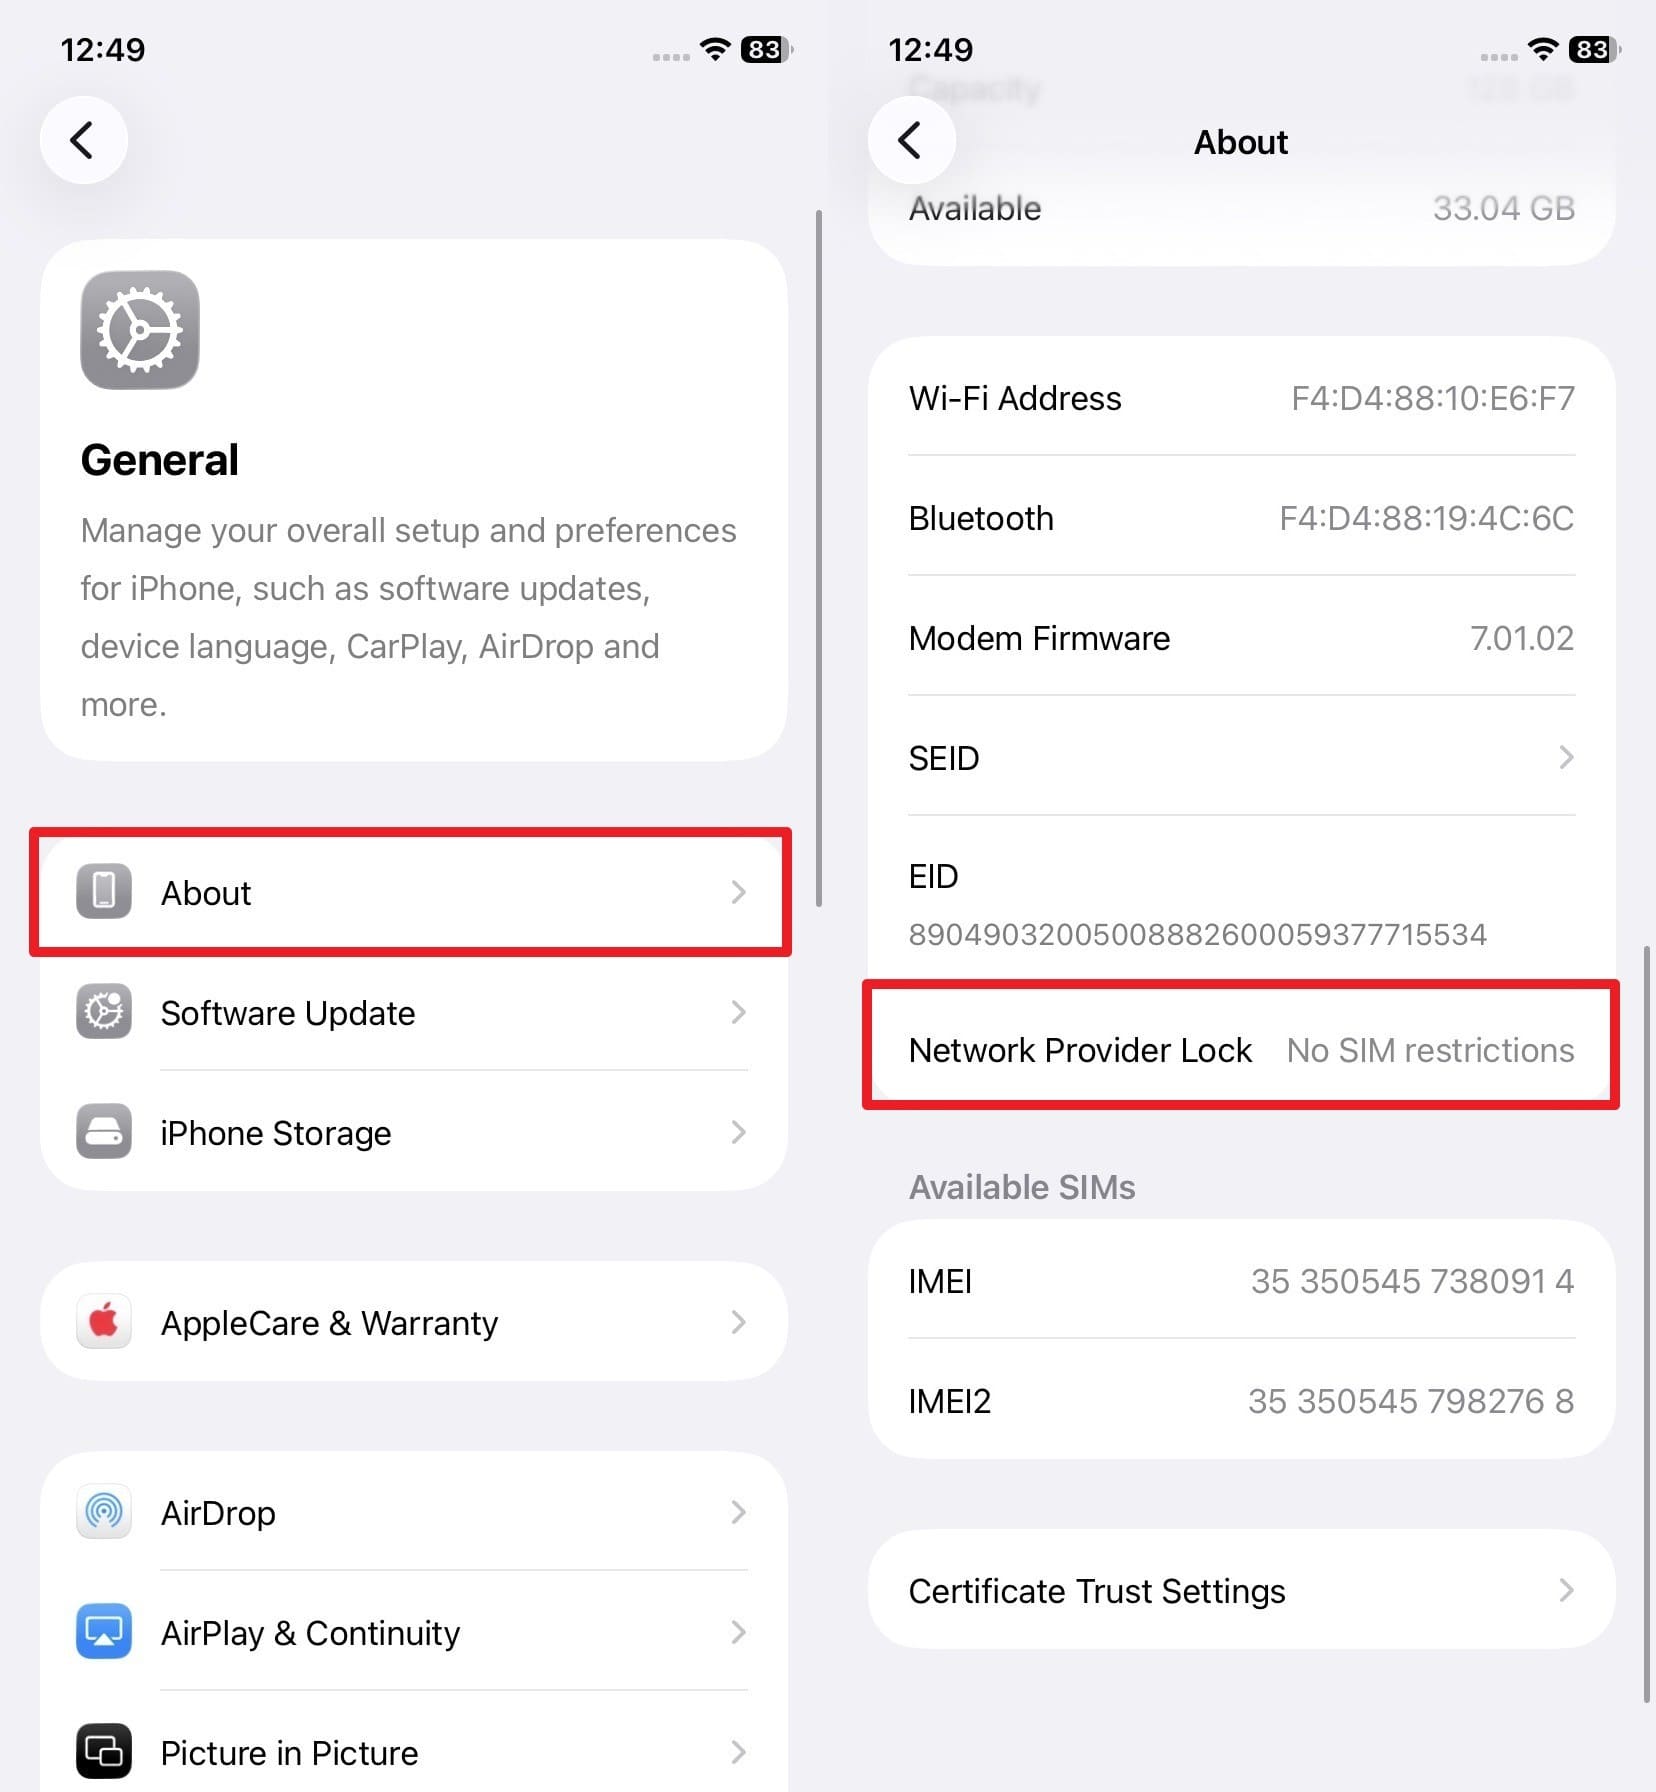
Instructions. In the “General > About” section, see if the “Network Provider Lock” option says “No SIM Restrictions.”
2. Confirm International Roaming Availability
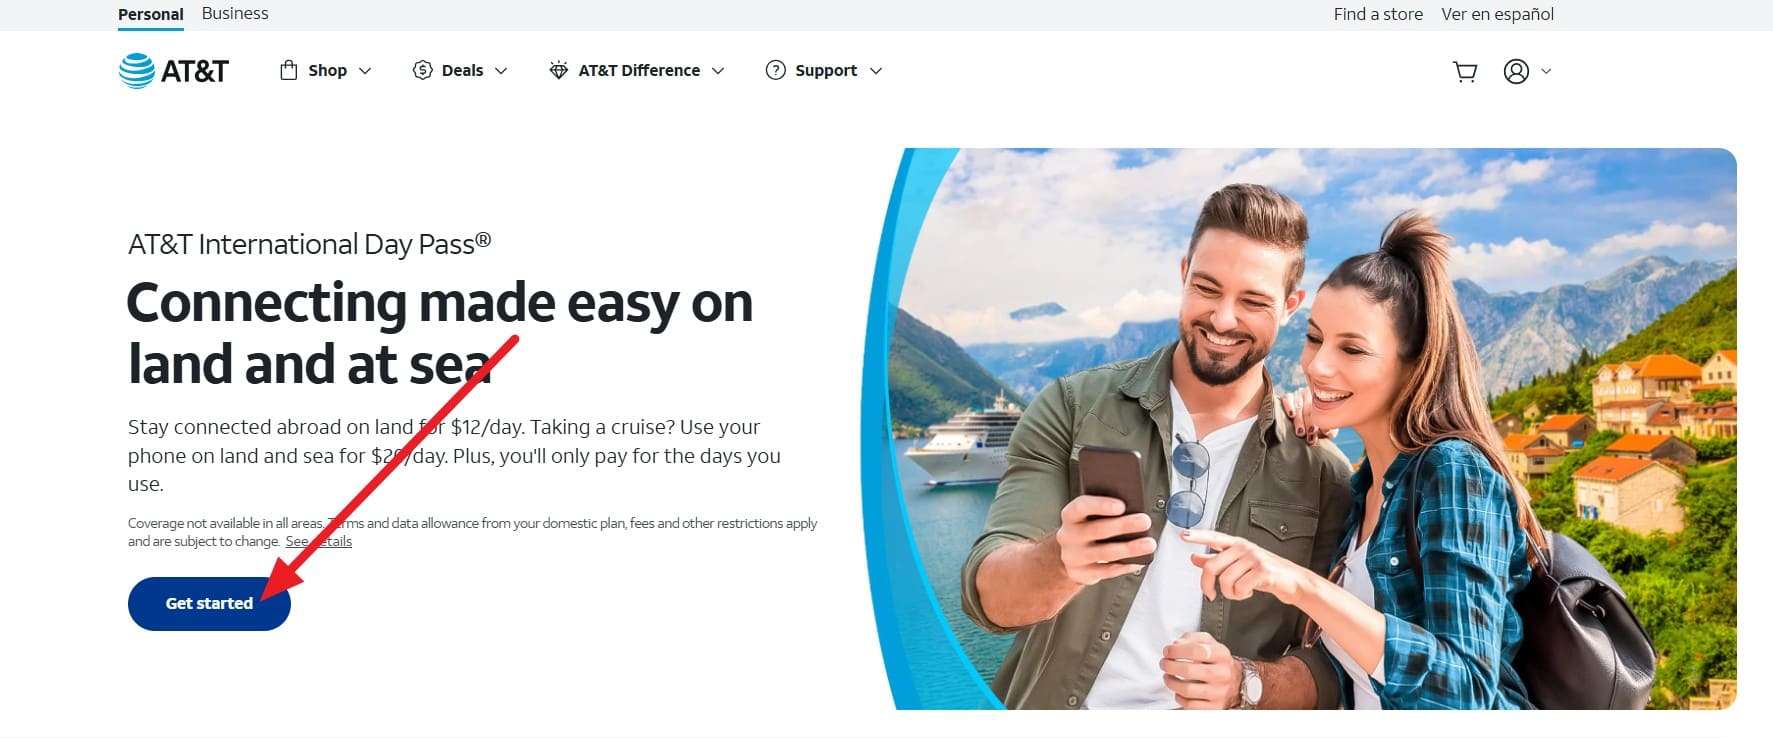
If the phone is unlocked, call your mobile carrier’s customer service to check destination coverage and activate the service. Take AT&T as an example: Go to the “AT&T International Travel Tool > Get Started > Login,” then choose the desired plan to activate.
3. Unlock a Carrier-Locked Device If Needed [One-Click Solution]
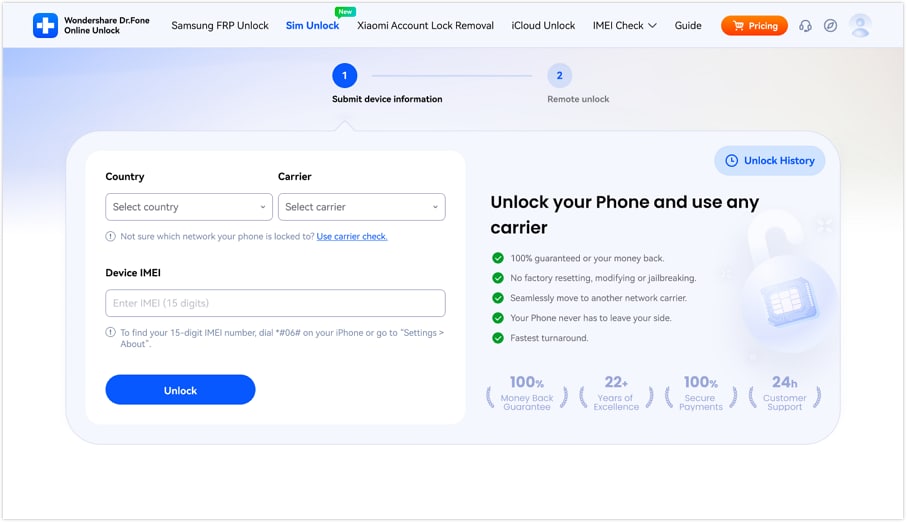
For situations where the carrier is locked, use Dr.Fone Online Unlock to submit the cloud request and remove the SIM lock within 24 hours. Since the tool supports major carriers in its weekly updates, the unlock will be permanent and will not require a jailbreak. With only IMEI and carrier details needed, here is how you can use this tool to prepare a phone for a football trip:
-
Step 1 Access Dr.Fone SIM Unlock Page
On the Dr.Fone SIM Unlock page, enter the requested details, then choose the “Unlock” button to confirm and submit the cloud request.
-
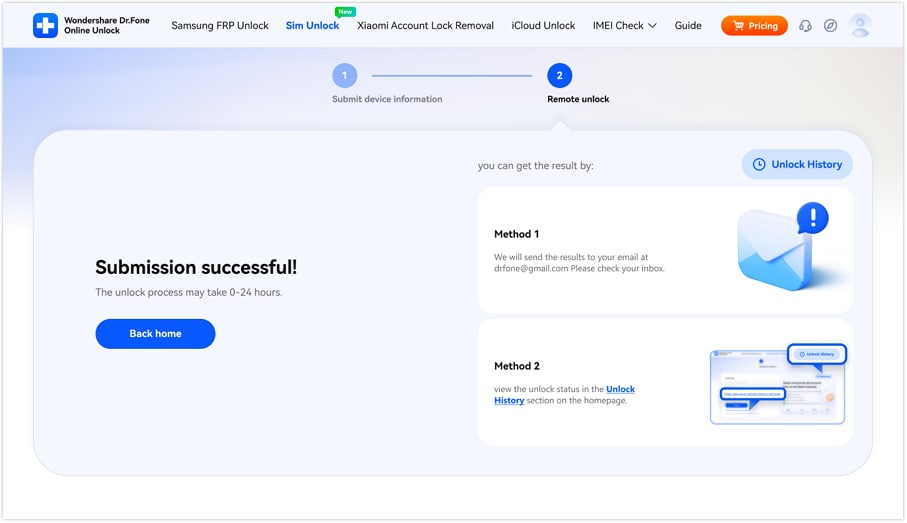
Step 2 Submit and Monitor the Unlock Request
The SIM unlock is often completed within 24 hours on supported devices, but timing varies by carrier. Use the provided methods to track the request status.
Conclusion
To sum up, this comprehensive guide has uncovered the World Cup travel phone checklist, which covers how to back up, move data, or deal with SIM locks. Since official methods are either all-or-nothing solutions tied to specific setups and require a 2-3 day wait, experts recommend Dr.Fone as the complete solution.
Frequently Asked Questions
-
1. When should I start preparing my phone before the World Cup trip?
It's best to prepare your phone 1 or 2 weeks before you travel to the World Cup. This way, you have enough time to back up, move data, or wait for the SIM to unlock via official or third-party methods. -
2. How do I know if my backup was successful?
If you use official methods, you can check that in iCloud, Google Backup, or Smart Switch settings. However, they come with certain limitations. You can use Dr.Fone - Phone Backup's View or Preview option to locate the backup file and save location. -
3. What should I delete before traveling to save space?
Remove the duplicate photos and videos, unused applications, and offline downloads to manage phone storage before the trip.
 Add Wondershare Dr.Fone as a preferred source on Google


