

 100% Security Verified | No Subscription Required | No Malware

 :
: 
 ChatGPT
 Perplexity
 Gemini
 Claude
 Grok
Grok
Are you worried about losing all your data during the iOS 27 update? Though major iOS 27 releases excite you, they can lead to failed installations or data loss if your phone is not prepared properly.
This is why a backup and basic checks are necessary before you press the “Update” button. So, this iOS 27 backup guide will help you protect your data and verify device compatibility. As you know, the importance of backups; learn to create selective or incremental backups with Dr.Fone - Phone Backup, and resolve update issues with Dr.Fone - System Repair (iOS).
In this article
- Part 1. Why Preparing for iOS 27 Is Important?
- Part 2. Check If Your iPhone Supports iOS 27
- Part 3. Back Up Your iPhone Before Updating to iOS 27
- Part 4. Free Up Space and Clean Your iPhone Before iOS 27
- Part 5. Essential Pre‑Update Checklist to Avoid Data Loss
- Part 6. What to Do If Something Goes Wrong During the iOS 27 Update
- Frequently Asked Questions
Part 1. Why Preparing for iOS 27 Is Important?
Before the iOS 27 update, learn why backups can be a lifesaver and what data you can lose when you don’t have any backup.
1. Major iOS Updates Can Cause Unexpected Problems
According to Notebook Check, users have experienced issues with all previous updates, such as lost messages and screen glitches. This also created app compatibility problems, and they were common enough to make preparations worthwhile. Hence, a backup helps protect the data and reduce the risk of performance or update-related problems.
2. What Users Usually Lose During Failed Updates
If you don’t ensure iOS 27 readiness, your iPhone can get stuck in Recovery mode, and you may lose data that hasn’t been synced or backed up. Hence, this includes game progress, images/videos, and custom settings. Most often, when you try to fix the update issue, it might require you to restore the device, which can erase everything stored on it.
3. Why Backups Matter Before iOS 27
Based on the mentioned pitfalls, CNET suggested in previous updates to create local or computer backups. Thus, this will give you a secure copy of your images, apps, and settings, making it easier to restore if the update is unplanned.
Part 2. Check If Your iPhone Supports iOS 27
To continue on this iOS 27 backup guide, it's important to know whether you can update.
Expected Compatible iPhone Models
In this regard, review Apple’s iOS 27 rumored compatibility table from MacRumors:
| iPhone Series | Expected iOS 27 Support |
|---|---|
| iPhone 17 Series | Yes |
| iPhone 16 Series | Yes |
| iPhone 15 Series | Yes |
| iPhone 14 Series | Yes |
| iPhone 13 Series | Yes |
| iPhone 12 Series | Yes |
| iPhone SE (3rd Gen, 2022) | Yes |
| iPhone 11 Series | No |
| iPhone SE (2nd Gen, 2020) | No |
| iPhone XS / XS Max / XR and Older | No |
What Happens if Your iPhone Is Unsupported?
If your phone is not on the list, it will continue working on its current iOS version, but you will miss new features and future improvements. Over time, some apps may stop getting updates or become incompatible with your device. Eventually, you will no longer get security updates, which can increase security risks and reduce overall app compatibility.
Part 3. Back Up Your iPhone Before Updating to iOS 27
Before the iOS 27 update, review this section and learn how to create cloud or computer backups.
1. Use iCloud Backup
iCloud Backup creates a secure copy of your device in Apple’s cloud that's easy to recover. Since it's stored online, you can restore it to your current or a new device with internet access. So, follow the steps mentioned ahead and learn to create a backup via Settings:
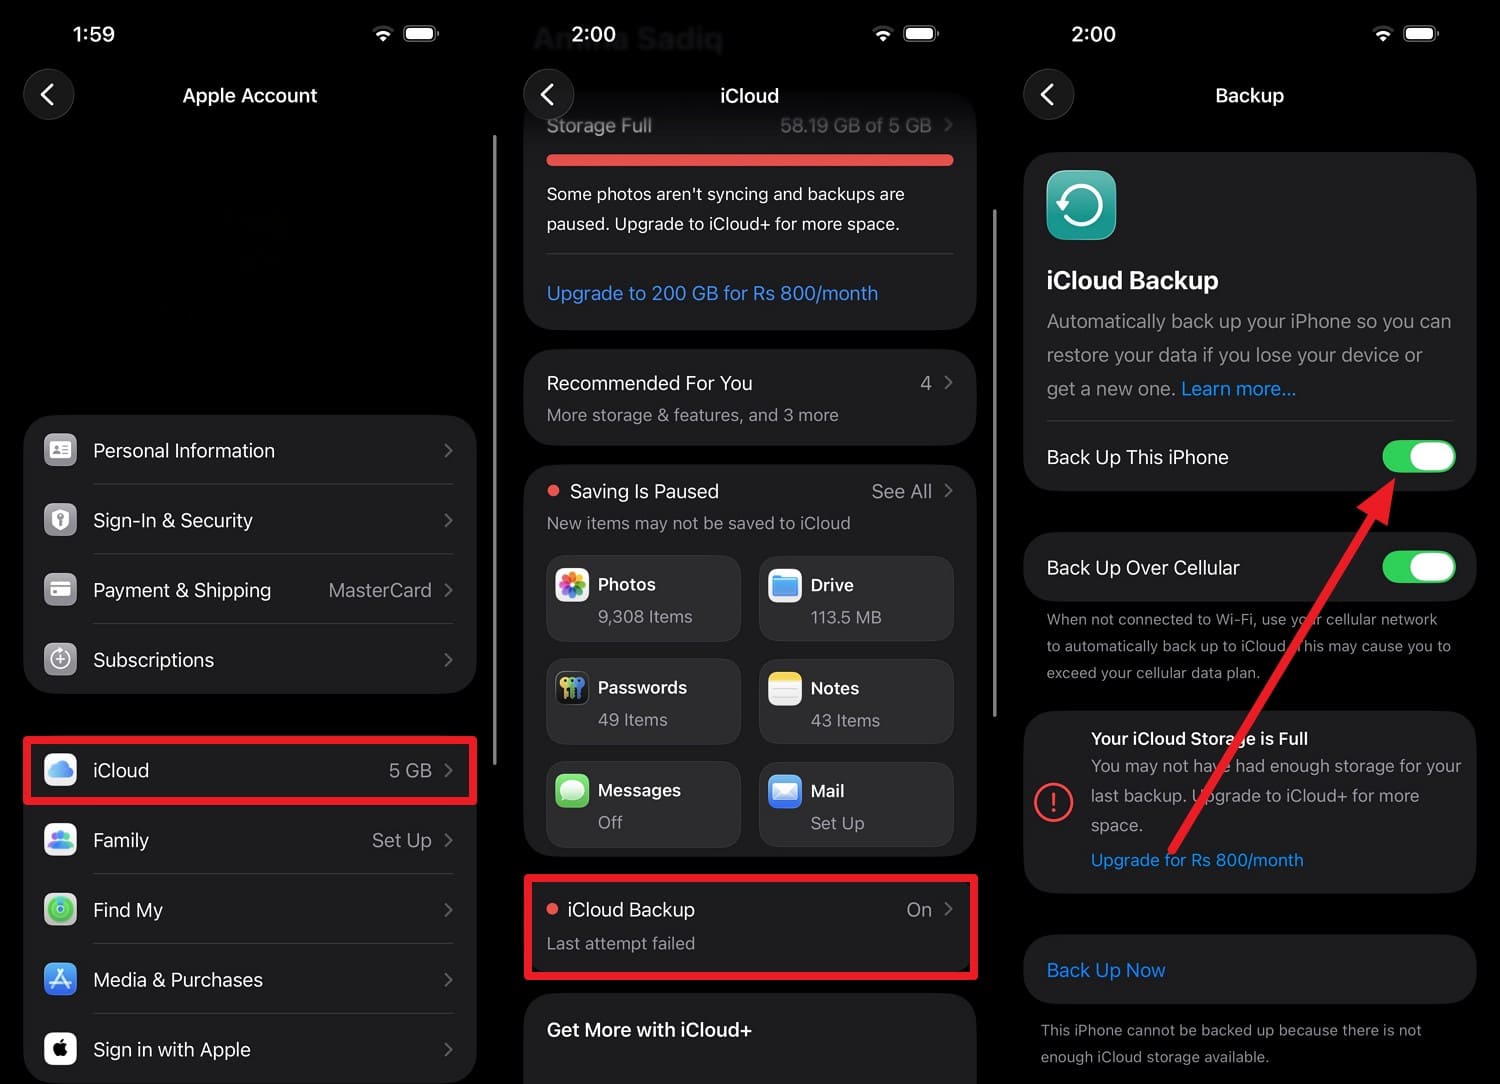
Instructions. Go to the “iCloud Backup,” as you pick the “iCloud” option and your Apple ID. Here, activate the “Back Up This iPhone” option, tap “Back Up Now” and wait for the progress bar to end.
2. Create a Full Backup on Mac or PC
As you meet iOS 27 readiness, you can create local backups on a computer using the 2 options listed in this section.
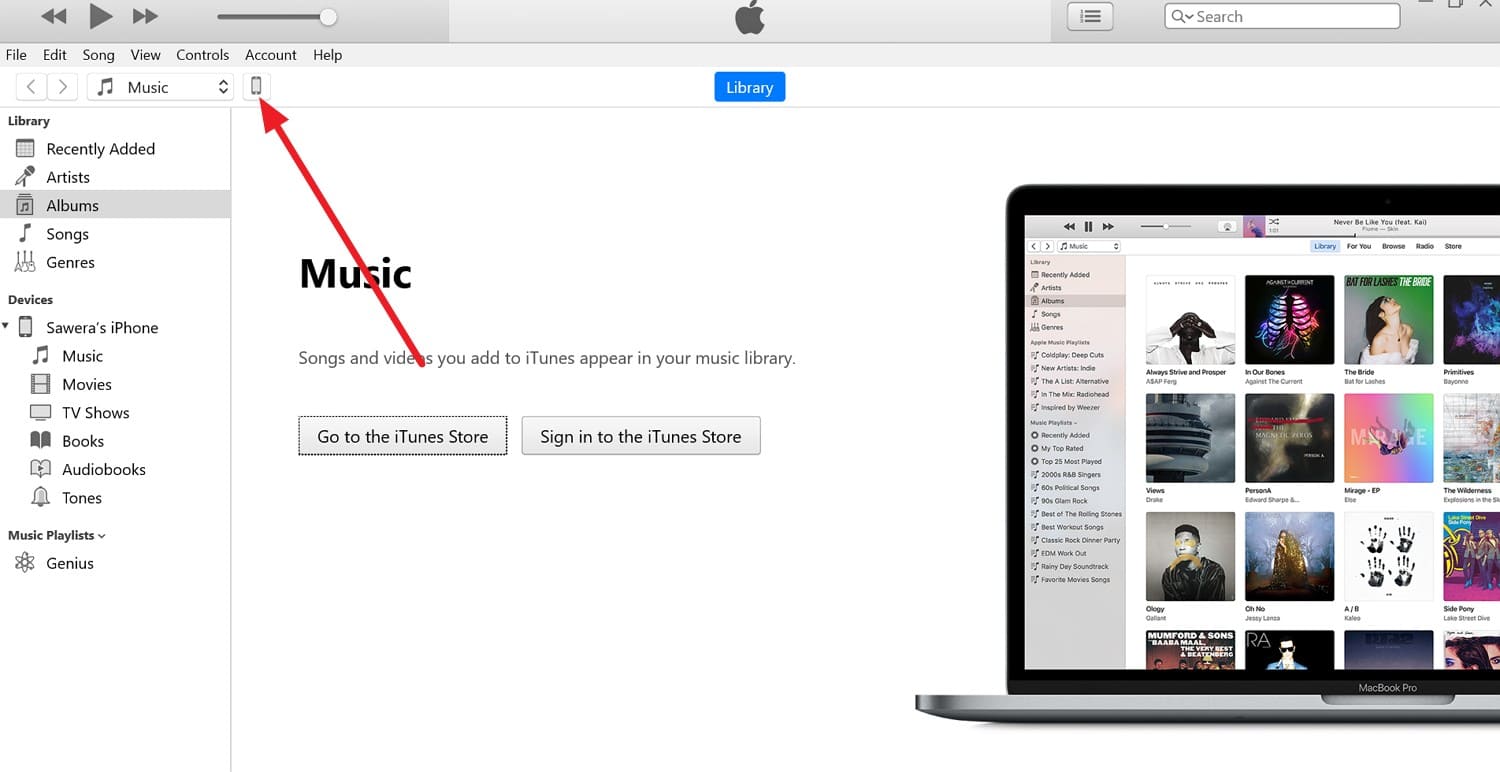
Option 1. iTunes or Finder
Unlike iCloud, this backup method doesn’t need a stable internet connection or cloud storage limits. Additionally, it can include sensitive data that you can later encrypt. This option is also suitable because archived backups can be preserved and used later if you need to restore the device, and is guided ahead:
-
Step 1 Press the “Trust” option on the iPhone and the “Phone” icon on iTunes as you connect the device with Windows iTunes.
-
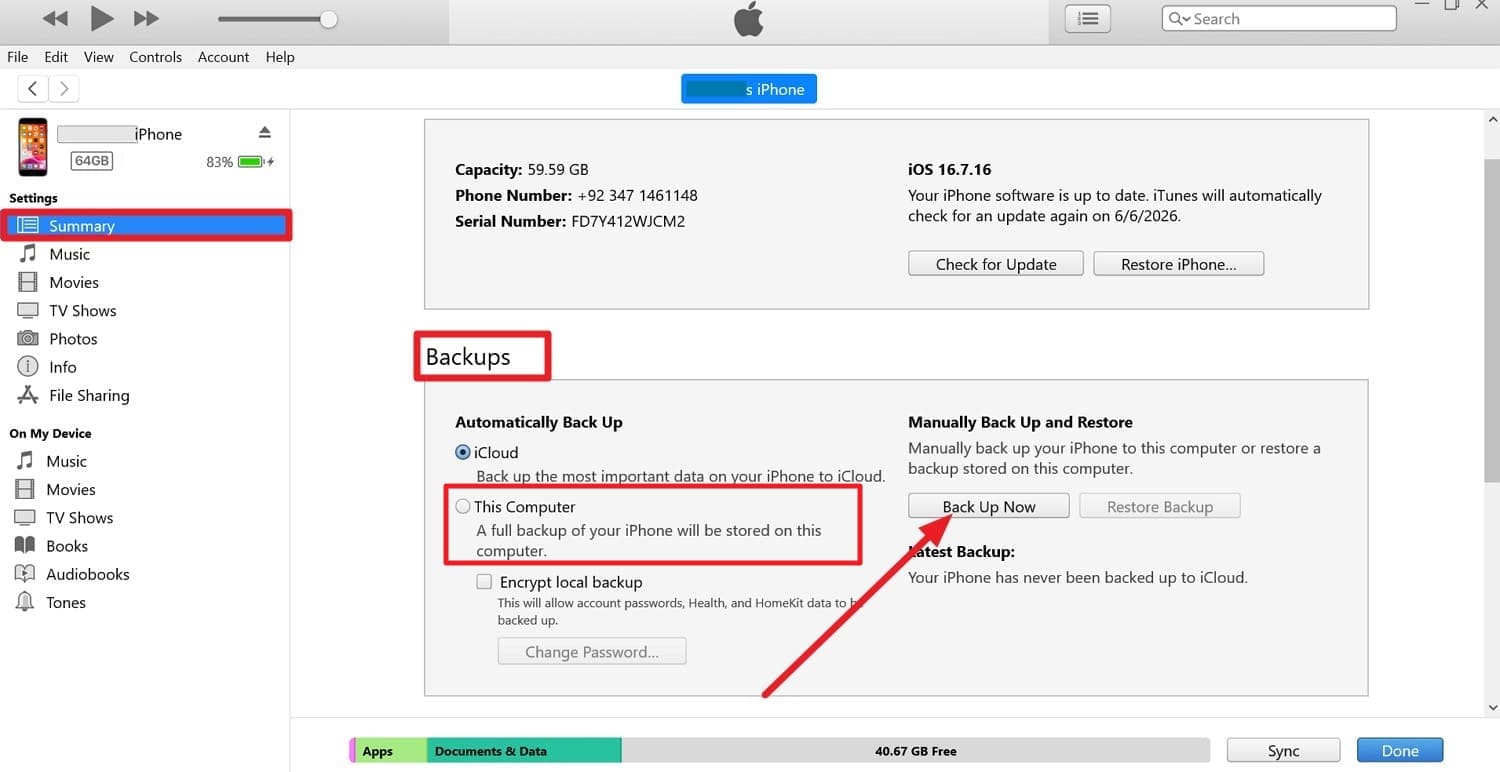
Step 2 In the “Summary” tab, go to Backups, pick the “This Computer” option, and tap the “Back Up Now” button.
Option 2. Dr.Fone - Phone Backup
This iOS 27 backup guide also suggests that you create a local backup using Wondershare Dr.Fone. This iPhone backup tool allows you to selectively or incrementally back up 20 data types while iTunes backs up the device as a whole. Furthermore, Dr.Fone states that it will not overwrite the present data, and you can view the backup files in detail.
Since the tool provides automatic Wi-Fi and incremental backups, you can set the backup date and location to eliminate manual hassle. It is said that iTunes backups are opaque files, whereas Dr.Fone lists proper data types and lets users browse and categorize the backed-up data. Most of all, users can restore data to Android and iOS devices, unlike iTunes, which is limited to Apple devices.
 Effortlessly manage data through preview, delete, export, etc.
- Transfer all data between devices.
- Robust backup solutions for reliable data protection.
- Mirror screens to PC for meetings, teaching, and control.

Guide to Create Local Backup Using Dr.Fone - Phone Backup
-
Step 1 Choose Data Types and Location to Backup Now
Tap the “Back Up Now” button as you choose the data types and backup location in the “My Backup” tab.

-
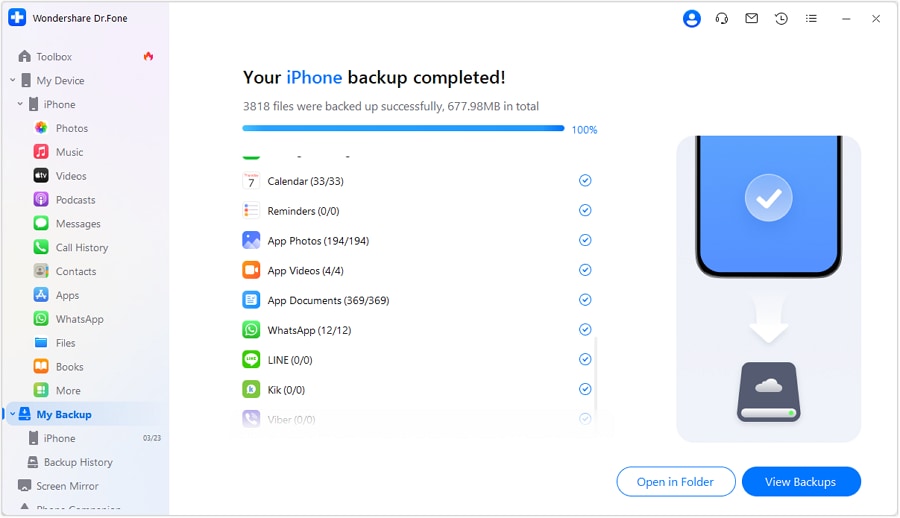
Step 2 Pick to View Backups After Completion
When the tool detects the device and data types, wait for it to complete the backup. Then, choose the “Open in Folder” or “View Backups” options to preview and browse the saved backup.


Why Are Local Backups Safer? Dr.Fone vs. iTunes/Finder
Regarding iOS 27 readiness, local backups are safer than iCloud because they create an offline copy that is not affected by internet or cloud sync issues. So, to know whether you should choose Dr.Fone - Phone Backup (iOS) or iTunes/Finder, review the mentioned table:
| Aspect | Dr.Fone - Phone Backup (iOS) | iTunes / Finder |
|---|---|---|
| Backup Control | Select which data types to back up | Always back up almost the entire device |
| Restore Control | Restore only the chosen items without wiping the phone | Restores the whole backup, can overwrite everything |
| Backup Visibility | Can browse and preview backup contents | Backup is a single opaque file |
| Incremental Backups | Supports incremental backups to save time/space | Typically creates larger, less flexible backups |
| Automation | Can schedule and run Wi‑Fi backups automatically | Manual and cable‑dependent |
| Cross‑device Flexibility | Can move certain data between different devices | Only restores to Apple devices |
| Extra Protection Tools | Adds recovery/repair tools alongside backup features | Limited mostly to sync + backup/restore |
| Overall Safety for Your Data | Strong: more copies, more control, easier recovery | Good, but less flexible and more “all‑or‑nothing” |
Part 4. Free Up Space and Clean Your iPhone Before iOS 27
Other than a backup, you need to free up space before the iOS 27 update to ensure it installs without interruption.
1. How Much Free Storage You Should Have for iOS 27
Although the update file itself might be smaller, you need 12-17 GB of free space on your iPhone. Note that insufficient storage can lead to installation errors, failed updates, and performance issues. Therefore, if you have enough space, you can make sure your apps and system are operational during the update process.
2. Delete Unused Apps, Photos, and Files Safely
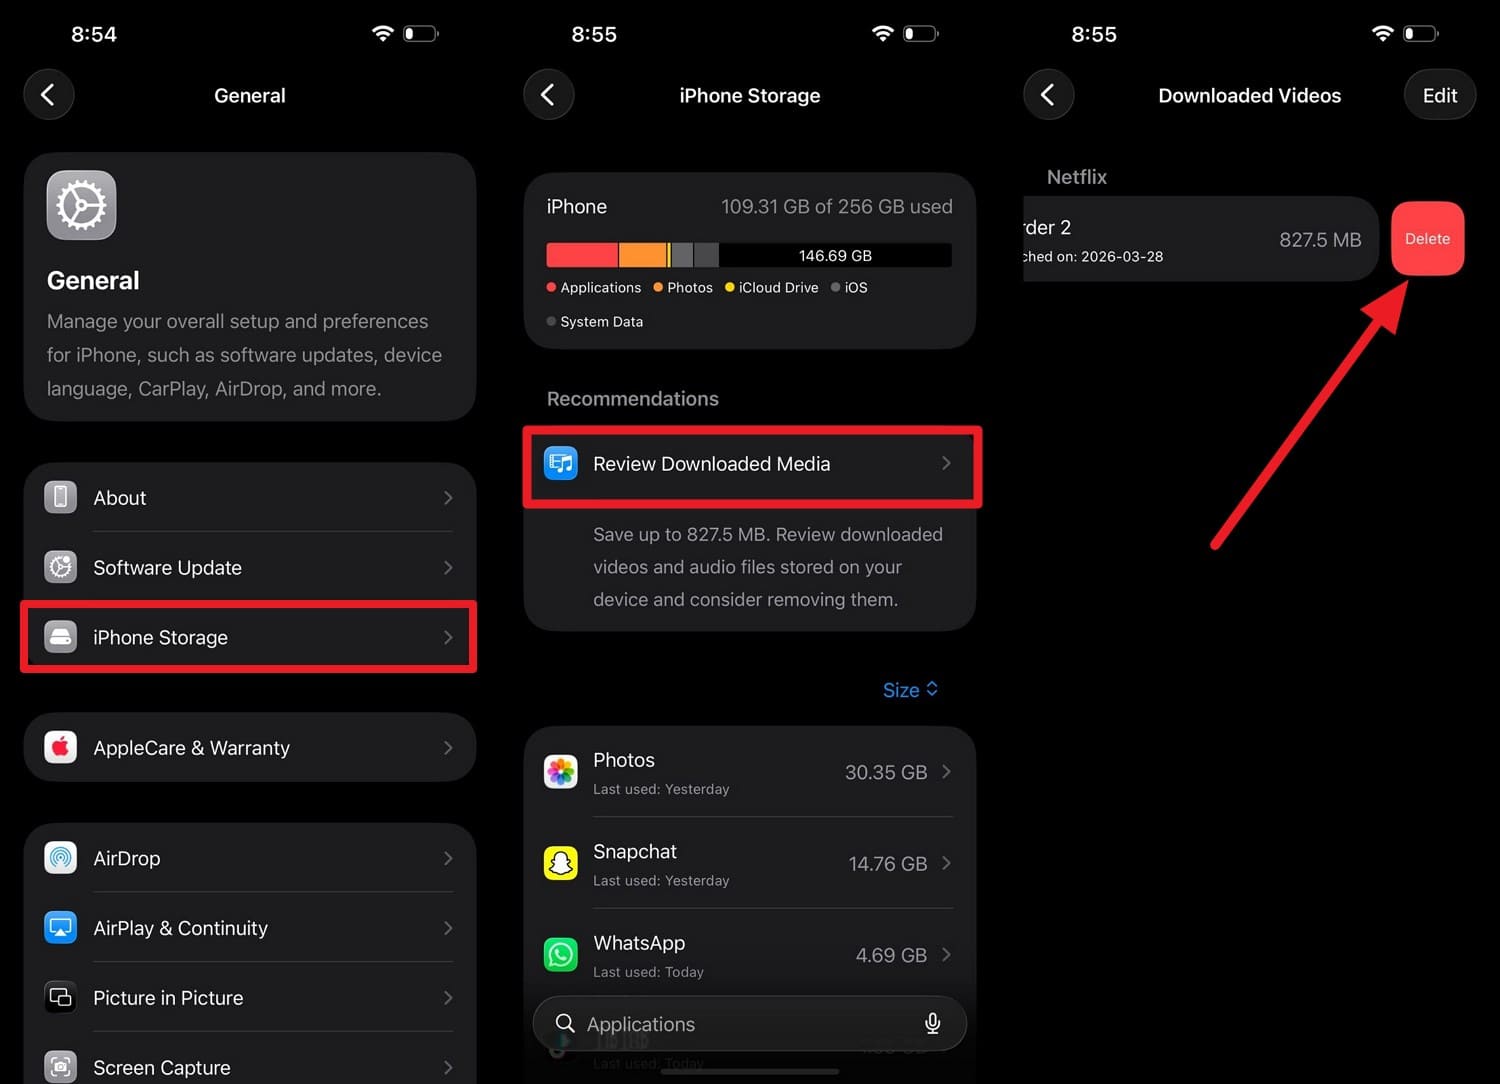
Review Downloaded Media in iPhone Storage lets you safely remove unnecessary content while keeping important data. Since this clean-up can improve overall device performance, here is how you can perform this action:
Instructions. Tap the “iPhone Storage” option in the General settings and pick the “Review Downloaded Media” option. Now, choose the file you want to delete, swipe left, then tap “Delete” to free up space.
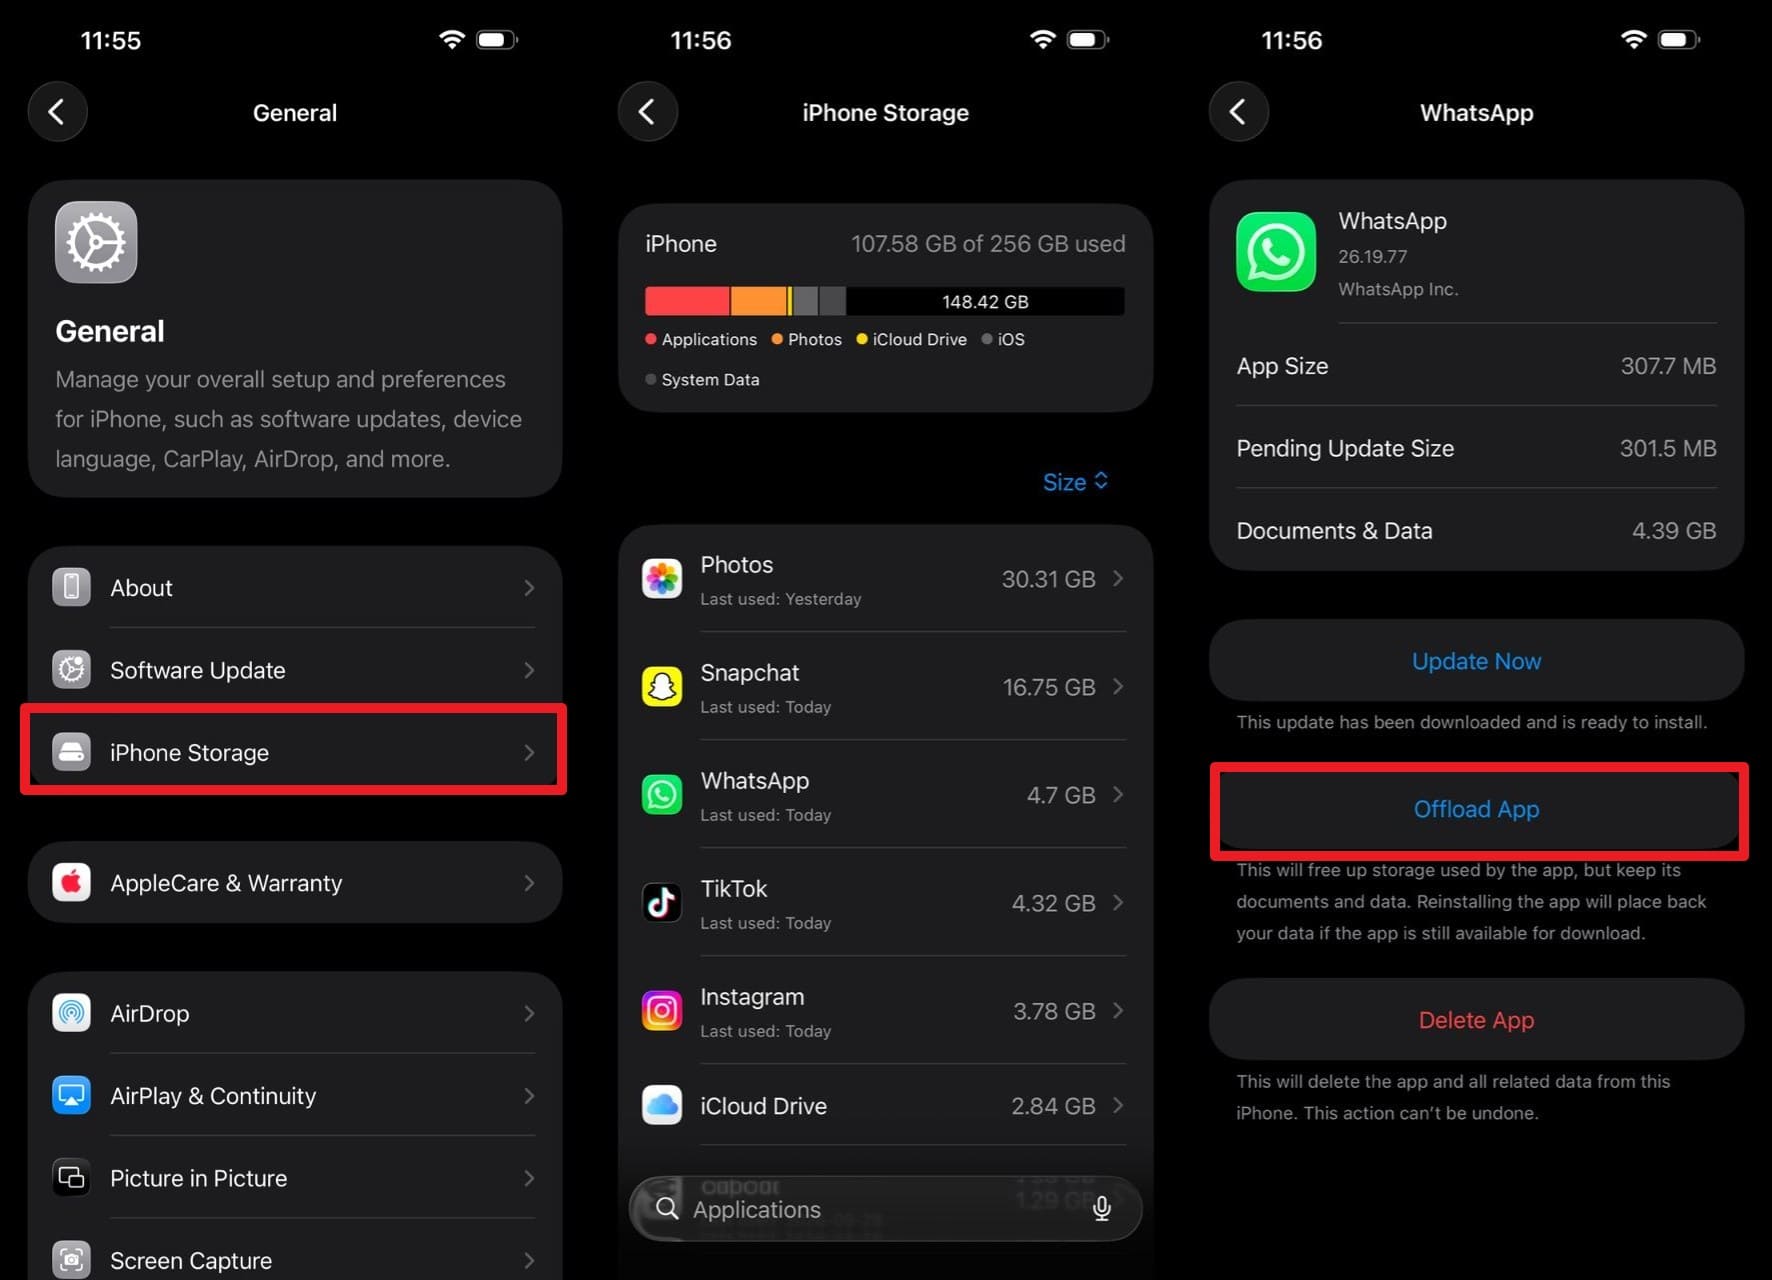
3. Offload Data to Cloud or Computer Without Losing Anything
To ensure iOS 27 readiness, you can offload data to iCloud, which can be restored when needed. Hence, this extra space made via the given steps can reduce update errors and improve installation success:
Instructions. In the “iPhone Storage” settings, locate the app you want to offload and tap the “Offload App” button.
Part 5. Essential Pre‑Update Checklist to Avoid Data Loss
Regarding the pre-checks before the iOS 27 update, perform the basic steps outlined in this section:
-
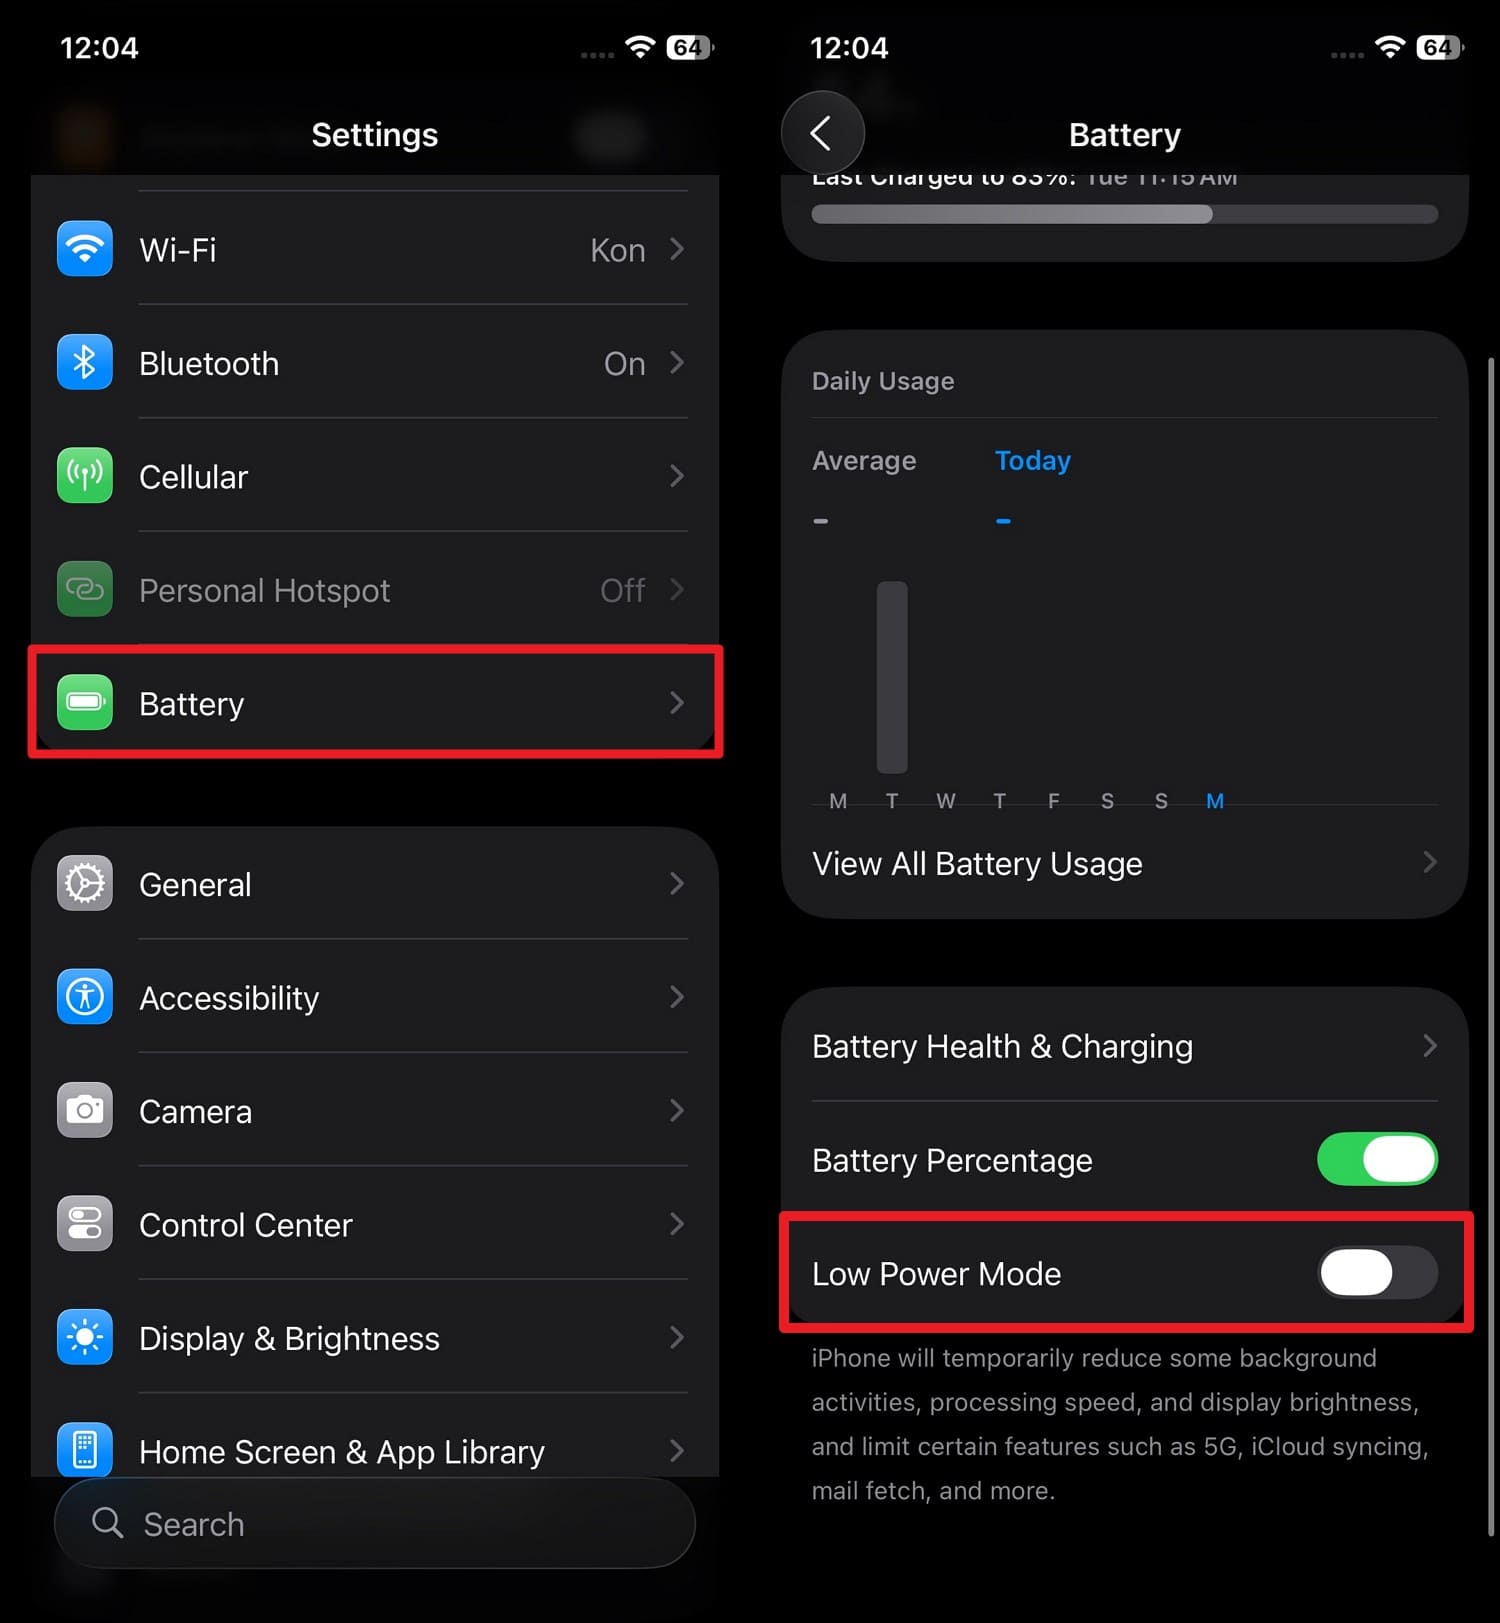
Step 1 Turn Off Low Power Mode and Connect to Stable Wi-Fi
Low Power Mode can limit certain background processes, while a strong Wi-Fi connection ensures the update downloads and installs without interruptions. Together, these steps can reduce the risk of update errors.
Instructions. Tap “Battery,” then toggle off “Low Power Mode” in the settings.
-
Step 2 Check Battery and Charge Level
Make sure you have enough battery, as it is likely to shut down during the update process. Hence, keep the phone plugged in during the update to ensure the installation completes without any problems and to limit the number of software issues.
-
Step 3 Take Screenshots of Important Settings (Optional, But Useful)
This is an optional but safe precaution in this iOS 27 backup guide, as it keeps settings intact and provides a quick visual reference. Since it takes only seconds to perform this action, it can serve as an additional security layer for data protection alongside backups.
-
Step 4 Update Apps and Check iCloud Sync Status
Updated apps are more compatible with the iOS 27 updates and reduce the risk of performance issues and crashes. At the same time, it's important to check that iCloud is syncing photos, contacts, and other important data to ensure information is stored in the cloud.
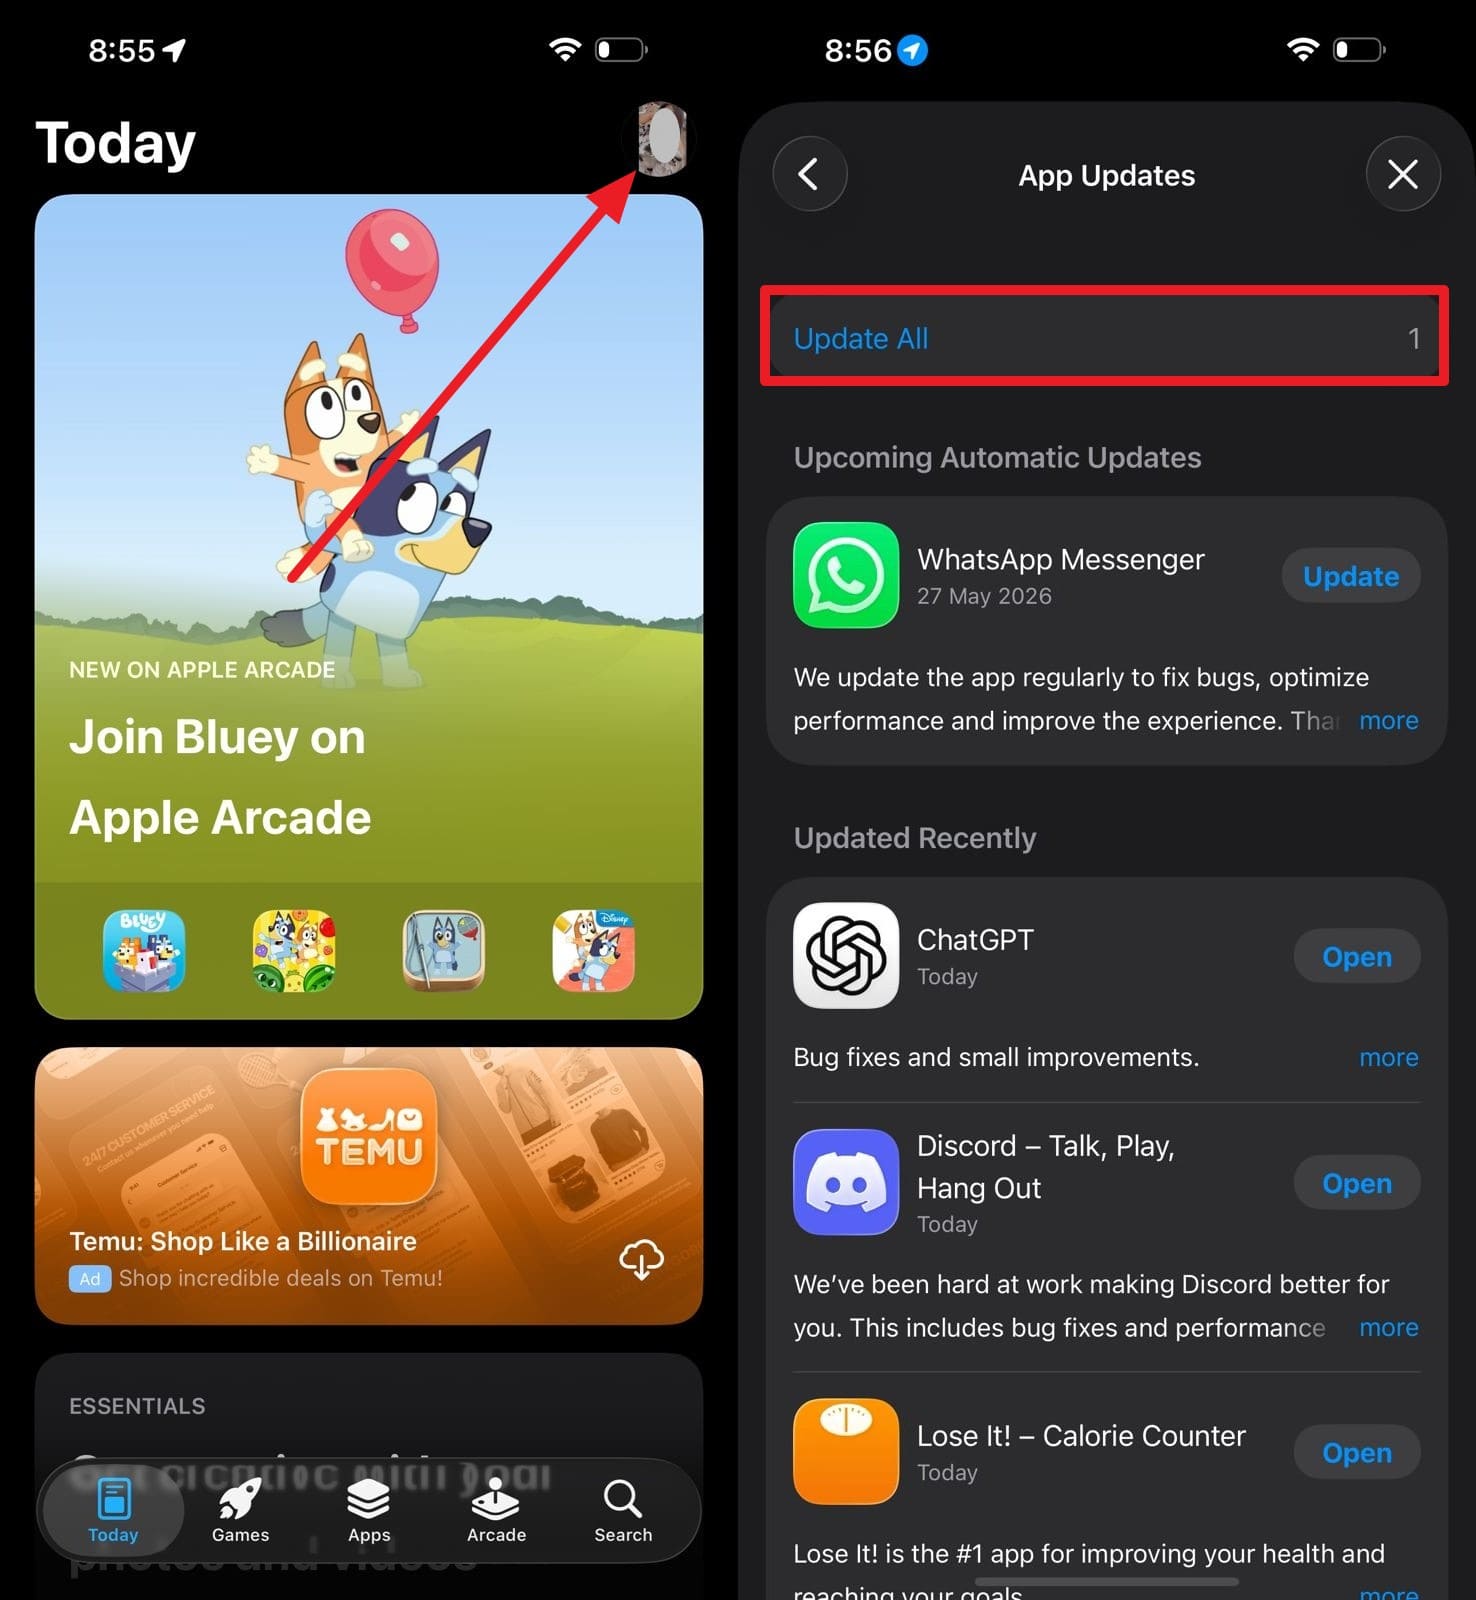
To Update Apps
Instructions. Tap the “Profile” icon in the App Store and choose the “Update All” button to make applications iOS 27 compatible.
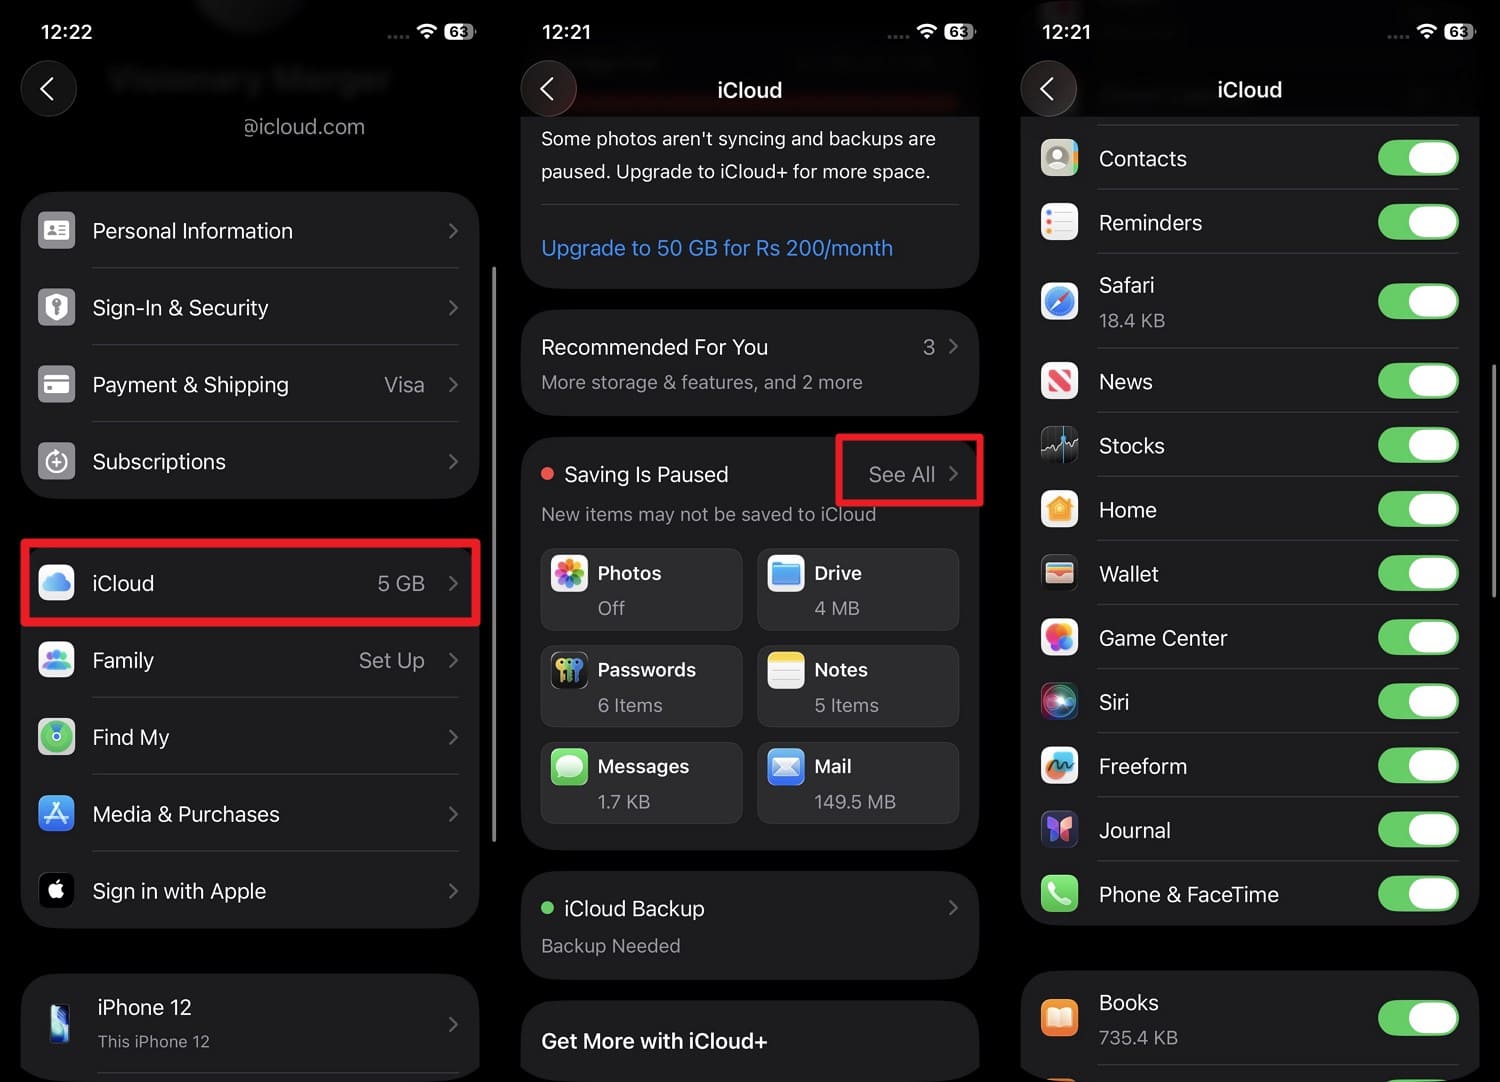
To Check Sync Status
Instructions. Choose “iCloud” settings as you press Apple ID and pick the “See All” option from the “Saved to iCloud/Saving is Paused” section and toggle the listed apps.
Part 6. What to Do If Something Goes Wrong During the iOS 27 Update
1. iPhone Stuck on Apple Logo or Recovery Screen
When the iPhone gets stuck on the Apple Logo or Recovery screen, force restart the iPhone. If this fails, update via iTunes/Finder as you download the update file. Regarding the steps, the detailed instructions for both actions are listed ahead:
iPhone Newer (Includes iPhone 12, 13, 14, 15, and 16 Series):
Instructions. Quickly press and release the “Volume Up” button, then the “Volume Down” button, and hold the “Power” button. Hold for 10-30 seconds until the Apple logo appears, then release the button to finish booting up.

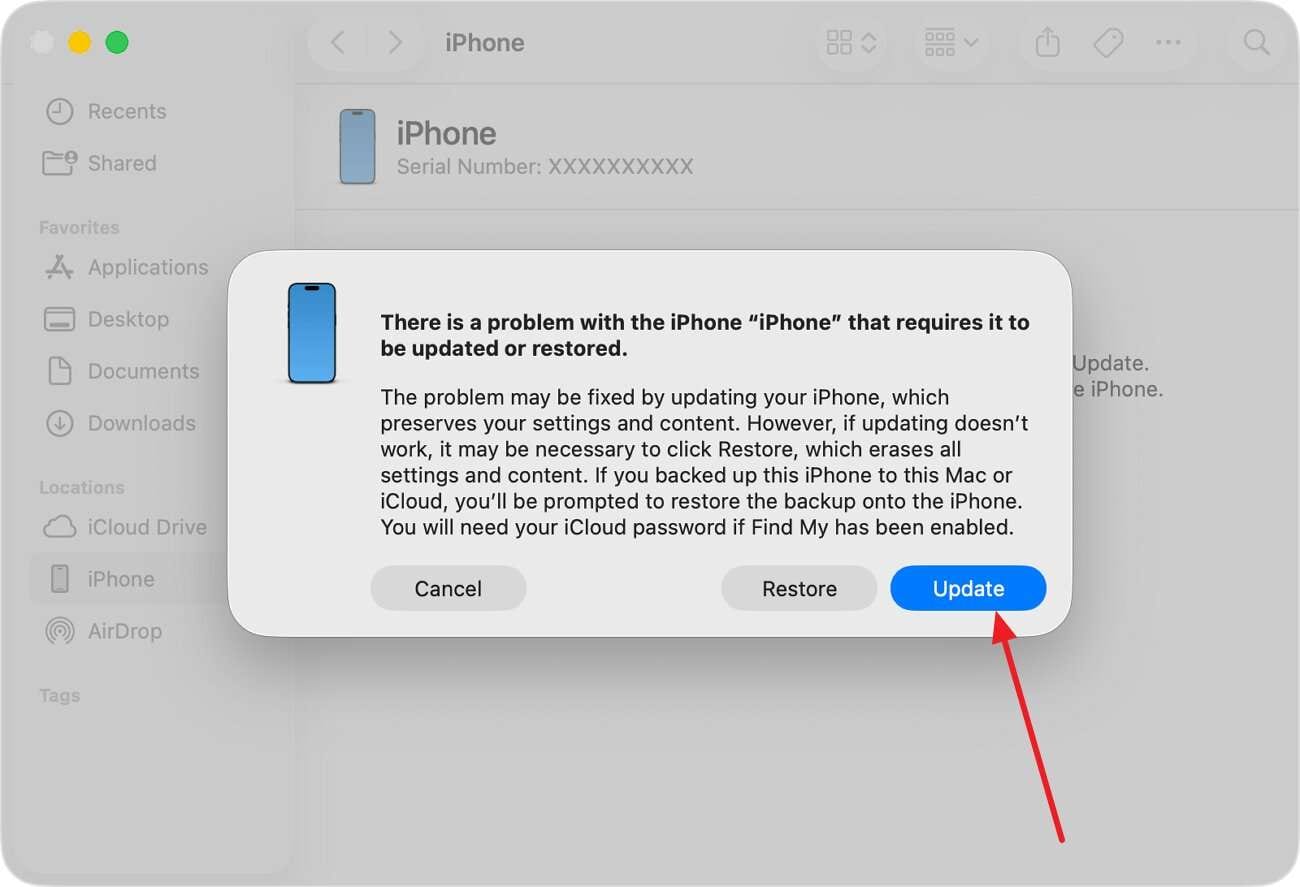
Use iTunes/Finder to Update
Instructions. Connect the phone to iTunes/Finder and repeat the button combinations mentioned above to pick the “Update” option from the pop-up. The computer will download and install the latest iOS 27, wait for it to conclude.
2. Restore Data from Your Backup (iCloud, iTunes/Finder, or Dr.Fone)
Restore iCloud Backup
-
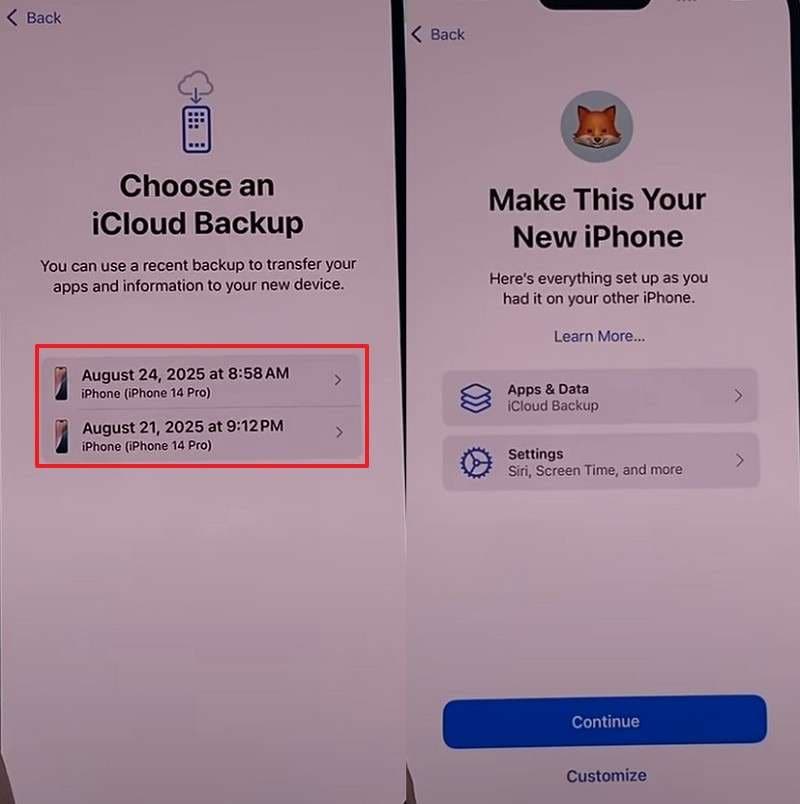
Step 1 On the setup screen, choose the “From iCloud Backup” option and add the Apple ID to “Agree” the listed terms.
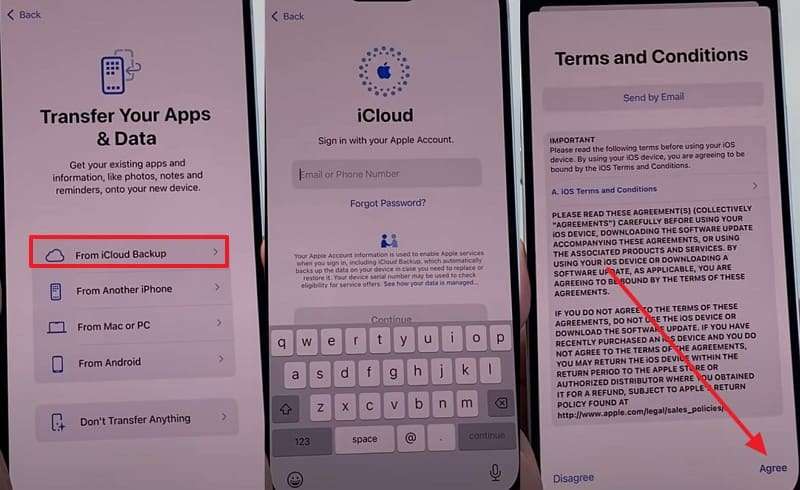
-
Step 2 While connected to Wi-Fi, select the backup from the “Choose an iCloud Backup” screen and tap “Continue” to restore.
Restore iTunes/Finder Backup
-
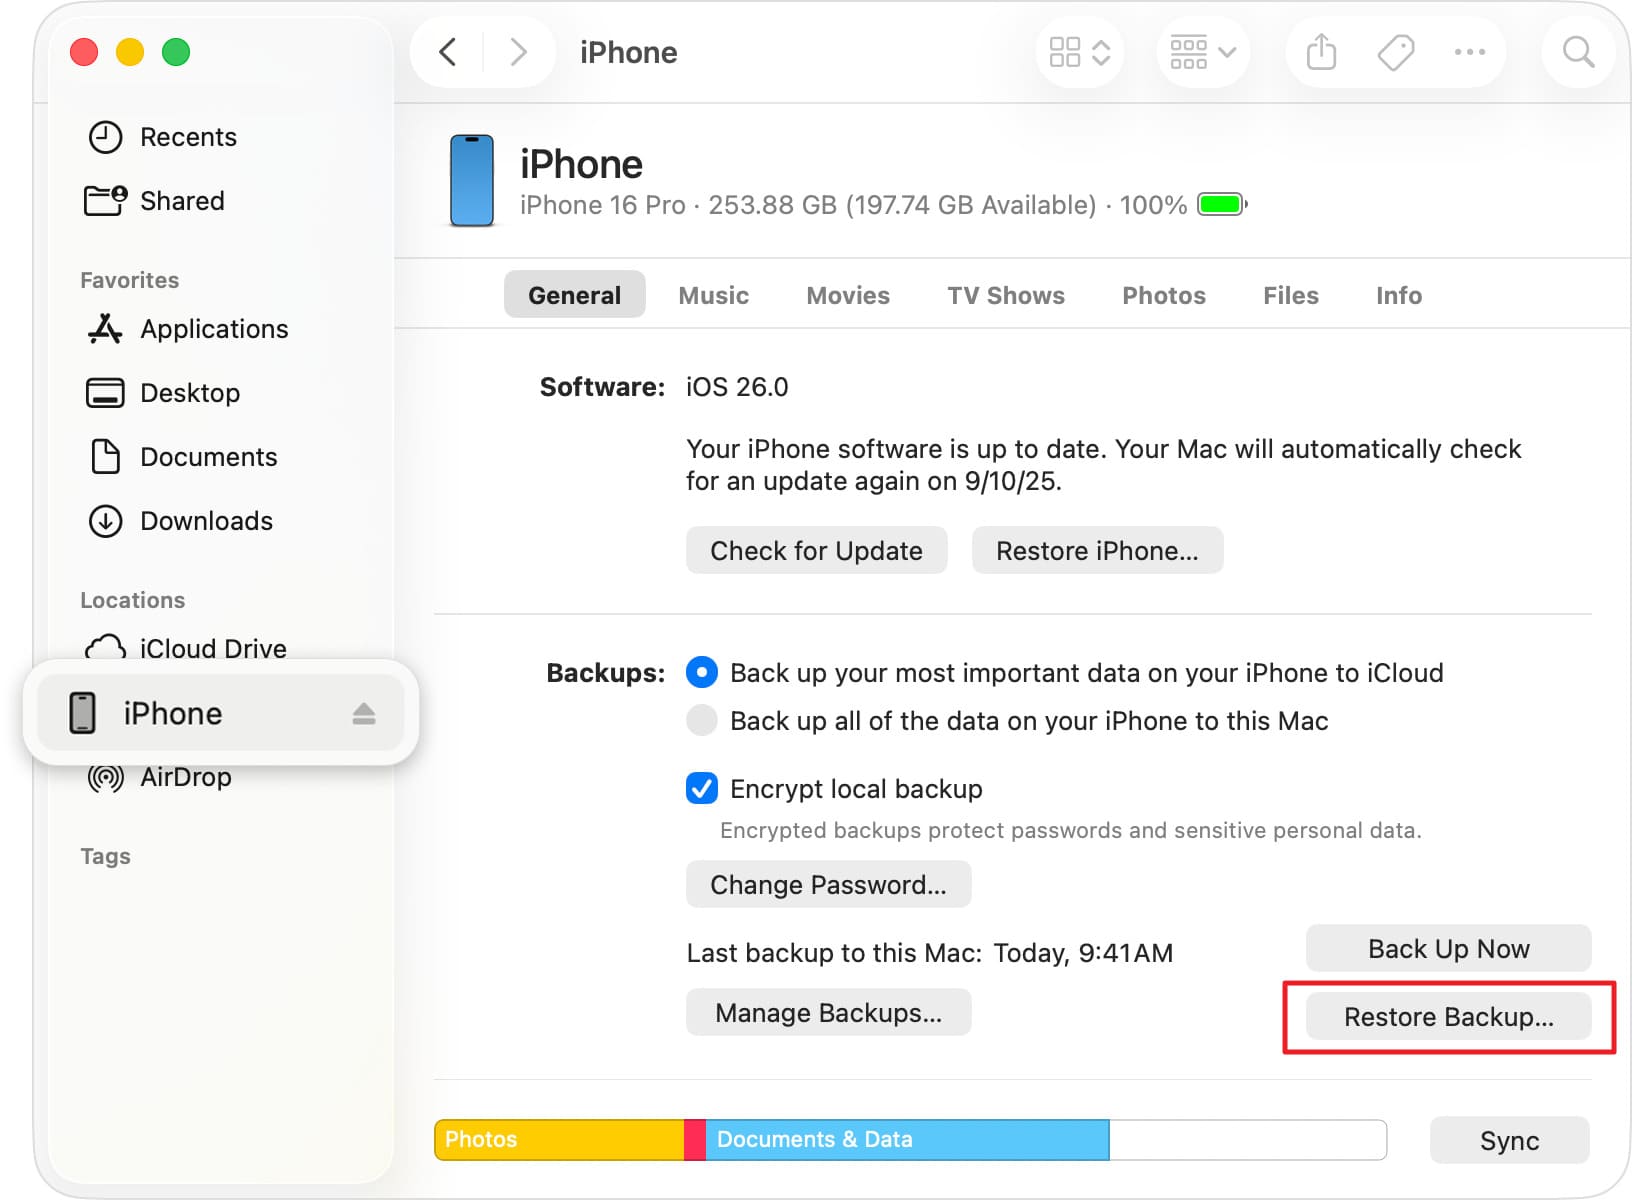
Step 1 On the iTunes “Summary” tab, click the “Restore Backup” option as you connect and tap “Trust” for your device. For Finder, access your iPhone from the “Locations” section in the left sidebar and press “Restore Backup.”
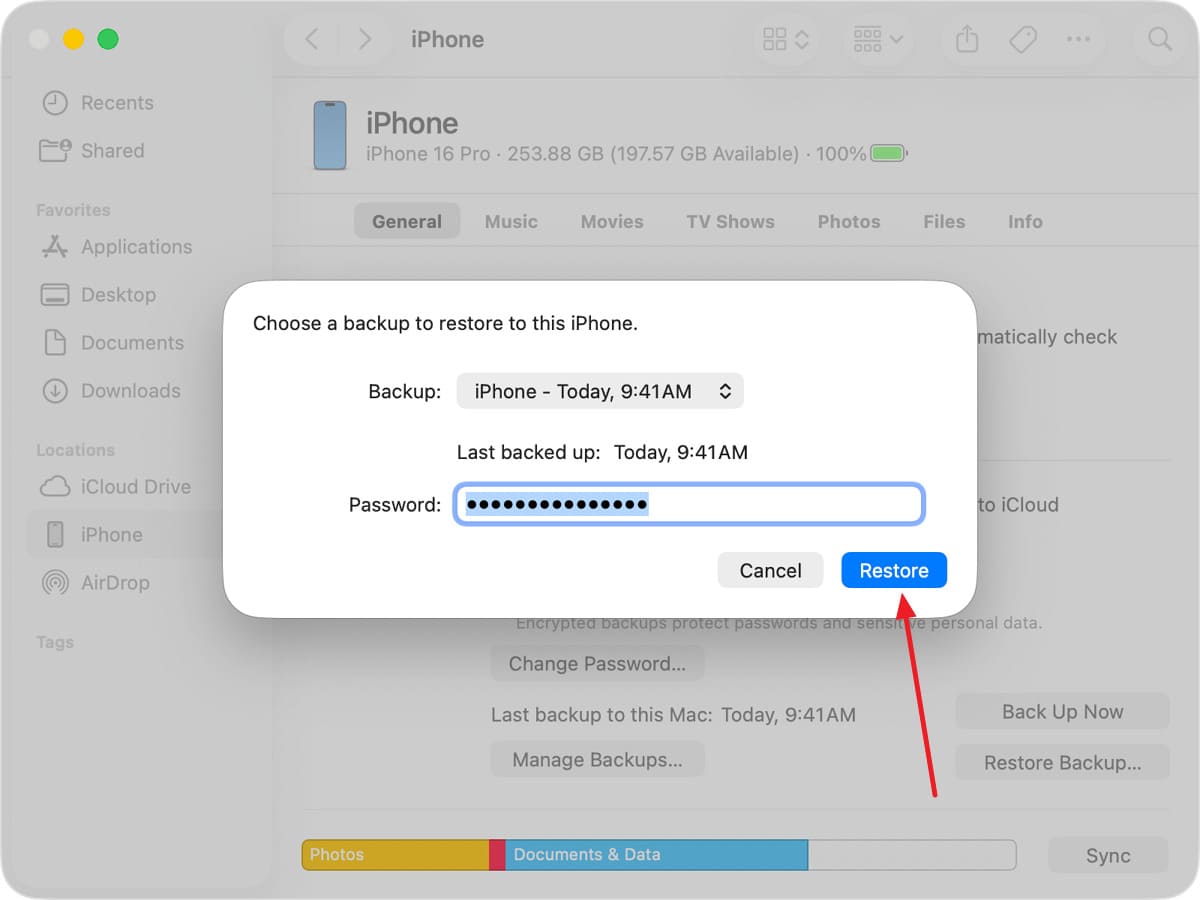
-
Step 2 Stretch the menu for “iPhone Name” and choose the backup to press the “Restore” button.
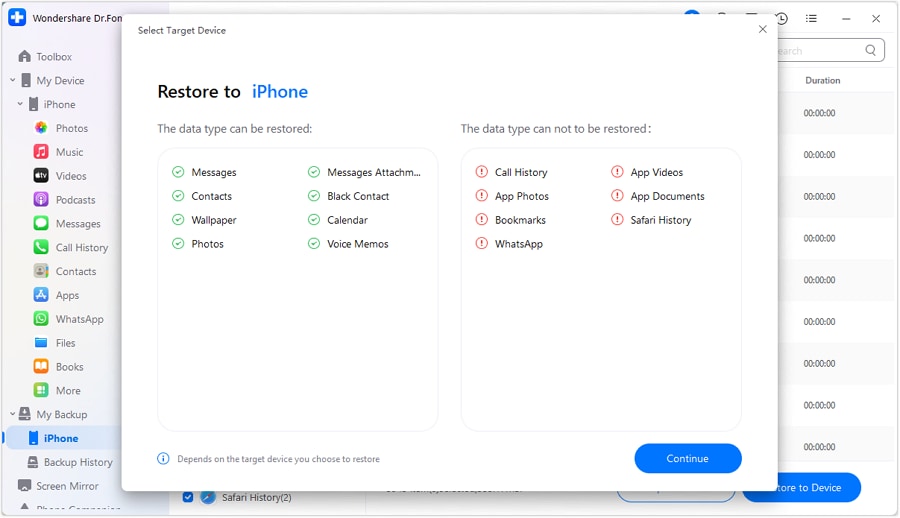
Restore Dr.Fone Backup
-
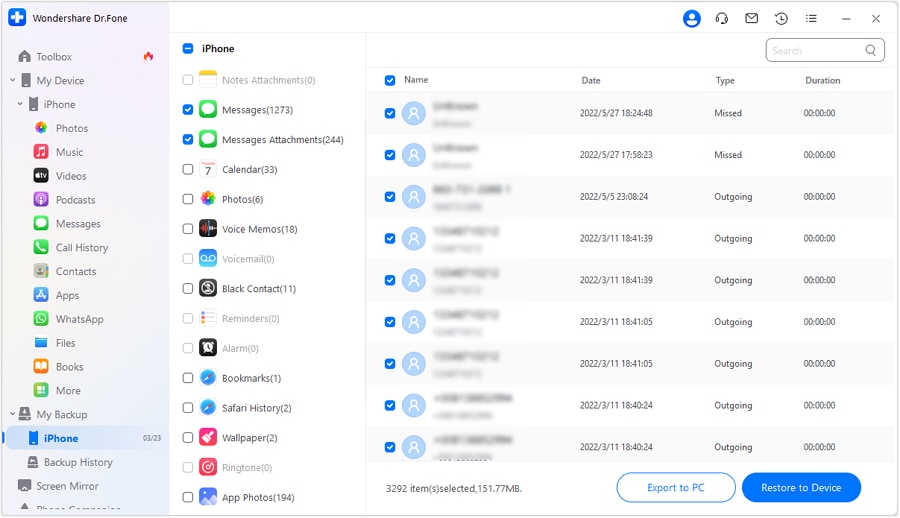
Step 1 Choose to Access Dr.Fone Backup History
In the “Backup History,” locate the backup you created and choose the data you want to restore by pressing the “Export to PC” or “Restore to Device” option.
-
Step 2 Continue to Restore Backup on PC or iPhone
When prompted, choose the “Continue” option, and the tool will restore data to the chosen device.
3. Fix System Issues Without Erasing Data (Dr.Fone – System Repair)
So far, you know what to do before the iOS 27 update. However, if the device is still stuck on the Apple Logo or keeps restarting, use Dr.Fone - System Repair (iOS). Using this, you can resolve 15+ iOS issues, including 200+ iTunes errors like 4013 and 1110, without any data loss. If the update issue persists, you can also use it to downgrade to iOS 26, with the option to access Recovery and DFU modes freely.

Conclusion
To sum up, this iOS 27 backup guide is a complete answer if you wonder how to keep the data secure and bypass update issues. From backups to basic checks, all the steps are highlighted in detail.
So, choose Wondershare Dr.Fone over iCloud and iTunes, as it gives selective and incremental options. In case of update issues, restore the data to the PC or another iPhone using this tool. Experts also suggest using the System Repair tool of Dr.Fone if the update creates a boot loop or gets stuck on the Apple logo.
Frequently Asked Questions
-
1. Can I use my iPhone while iOS 27 is downloading?
Yes, you can keep using the iPhone while the update downloads in the background. -
2. How long does an iOS 27 backup usually take?
Backup depends on your data size, but most backups finish within a few minutes to an hour. -
3. Will updating to iOS 27 delete my apps?
No, a normal iOS update should keep your apps installed unless a serious issue requires a device restore.
 Add Wondershare Dr.Fone as a preferred source on Google


