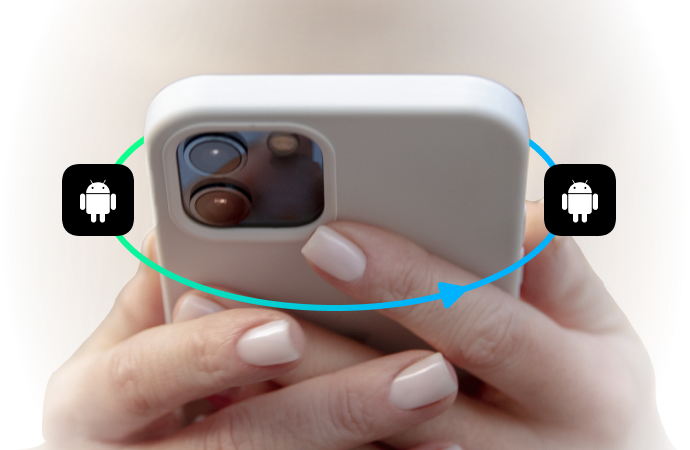
How To Migrate Google Authenticator to a New Phone [2026 Updated]

Jun 30, 2026 • Filed to: Data Transfer Solutions • Proven solutions
 TL;DR:
Migrate Google Authenticator to a new device by scanning a built-in export QR code from your old phone, restoring via Google Account sync, or logging in with service-specific backup codes if the original device is lost.
● The built-in export feature supports cross-platform transfers between iOS and Android, but you must never screenshot or share the generated QR code because it grants complete access to your 2FA accounts.
● If the old device is inaccessible or the export option is restricted by a managed device network, you must manually disable the old 2FA on each platform using one-time backup codes or service recovery before registering a new setup key.
● If the app displays incorrect codes after a successful migration, resolve the device time drift by navigating to "Time correction for codes" and selecting "Sync now" within the Authenticator settings.
Ask AI for a summary
 ChatGPT
 Perplexity
 Gemini
 Claude
 Grok
Grok
TL;DR
- Move Google Authenticator by scanning the QR code generated by the app or through Google Account synchronization.
- If a transfer is not done, use backup codes or SMS to log in, turn off old 2FA, and turn it back on on a new phone.
- If you are looking to move contacts, messages, photos, videos, and even apps from one phone to another, whether it's between iOS and Android or vice versa, Dr.Fone – Phone Transfer is certainly among the most dependable options you have. This software also ensures the safety of your data during the whole process.
Your new phone is already on and set up for use. But unfortunately, your Google Authenticator codes are not with you. Since Google Authenticator does not keep a backup of your 2FA codes automatically, merely reinstalling the app will not get you any code back.
In this guide, we show you the smart ways of moving Google Authenticator to a new phone, with or without old device. You will know the built-in export method, how to switch between iPhone and Android, and ways to migrate Google Authenticator to a new phone safely.
Moreover, if you want to do a rapid, thorough device-to-device transfer, this article will demonstrate how Dr.Fone – Phone Transfer assists in moving all your contacts, photos, messages, apps, and more across Android and iOS with just one click.
- Part 1. How to Migrate Google Authenticator to a New Phone (With Old Phone)
- Part 2. How to Transfer Google Authenticator Without the Old Phone
- Part 3. What If Some Accounts Didn't Transfer?
- Part 4. Transfer Everything with Dr.Fone - Phone Transfer

- Part 5. Troubleshooting Common Google Authenticator Migration Issues
Part 1. How to Migrate Google Authenticator to a New Phone (With Old Phone)
If you still possess your old phone, the whole process of Googling Authenticator migration will be very swift, secure, and the easiest one. Besides, Google has recently rolled out the Export accounts feature that facilitates moving several 2FA codes to the new device by a few clicks. Let's explore how to transfer Google Authenticator to new phone:
Before you start:
- Ensure that the Google Authenticator on your old phone is open and the phone itself is not locked.
- Install Google Authenticator on your new phone (Android or iPhone)
- Make sure that both phones are connected to Wi-Fi.
Method 1: Using Google Authenticator's Built-In Transfer Feature (Recommended)
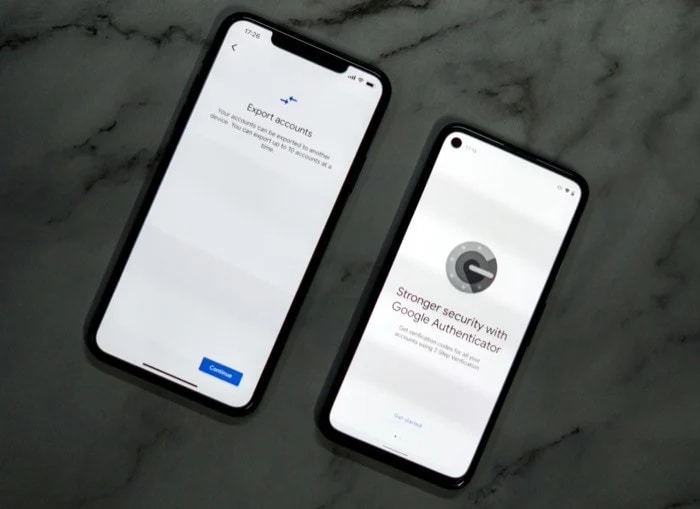
Carrying your old phone is not only the fastest but also the safest way to transfer all your 2FA codes to a new gadget. Google Authenticator currently has a new functionality through which users can export their account information in a secure and efficient manner. This way, there is no need to depend on cloud backup or re-key your accounts.
- Step 1. Get Google Authenticator on your new phone
- Step 2. Generate a transfer QR code on your old phone
- Step 3. Use your new phone to scan the code
- Step 4. Finalize the transfer
Download, open, tap Get Started, and sign in to your Google account.
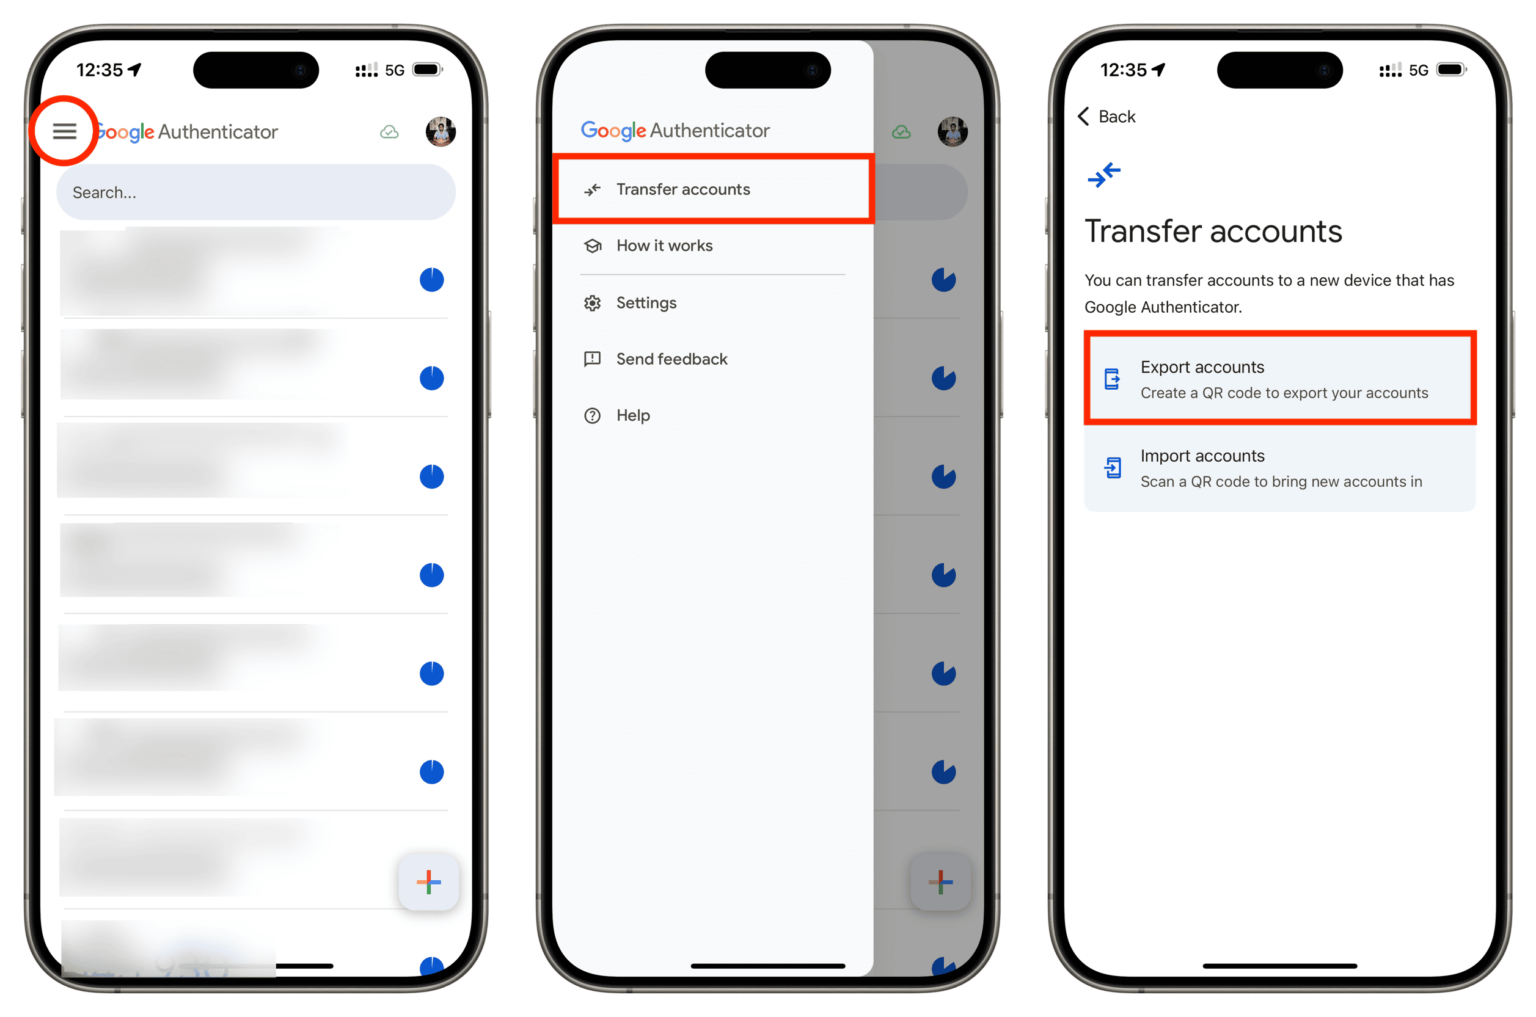
Launch the app on your old device, navigate to Menu > Transfer accounts > Export accounts. Select the accounts for transfer, and tap Next to get the QR code.
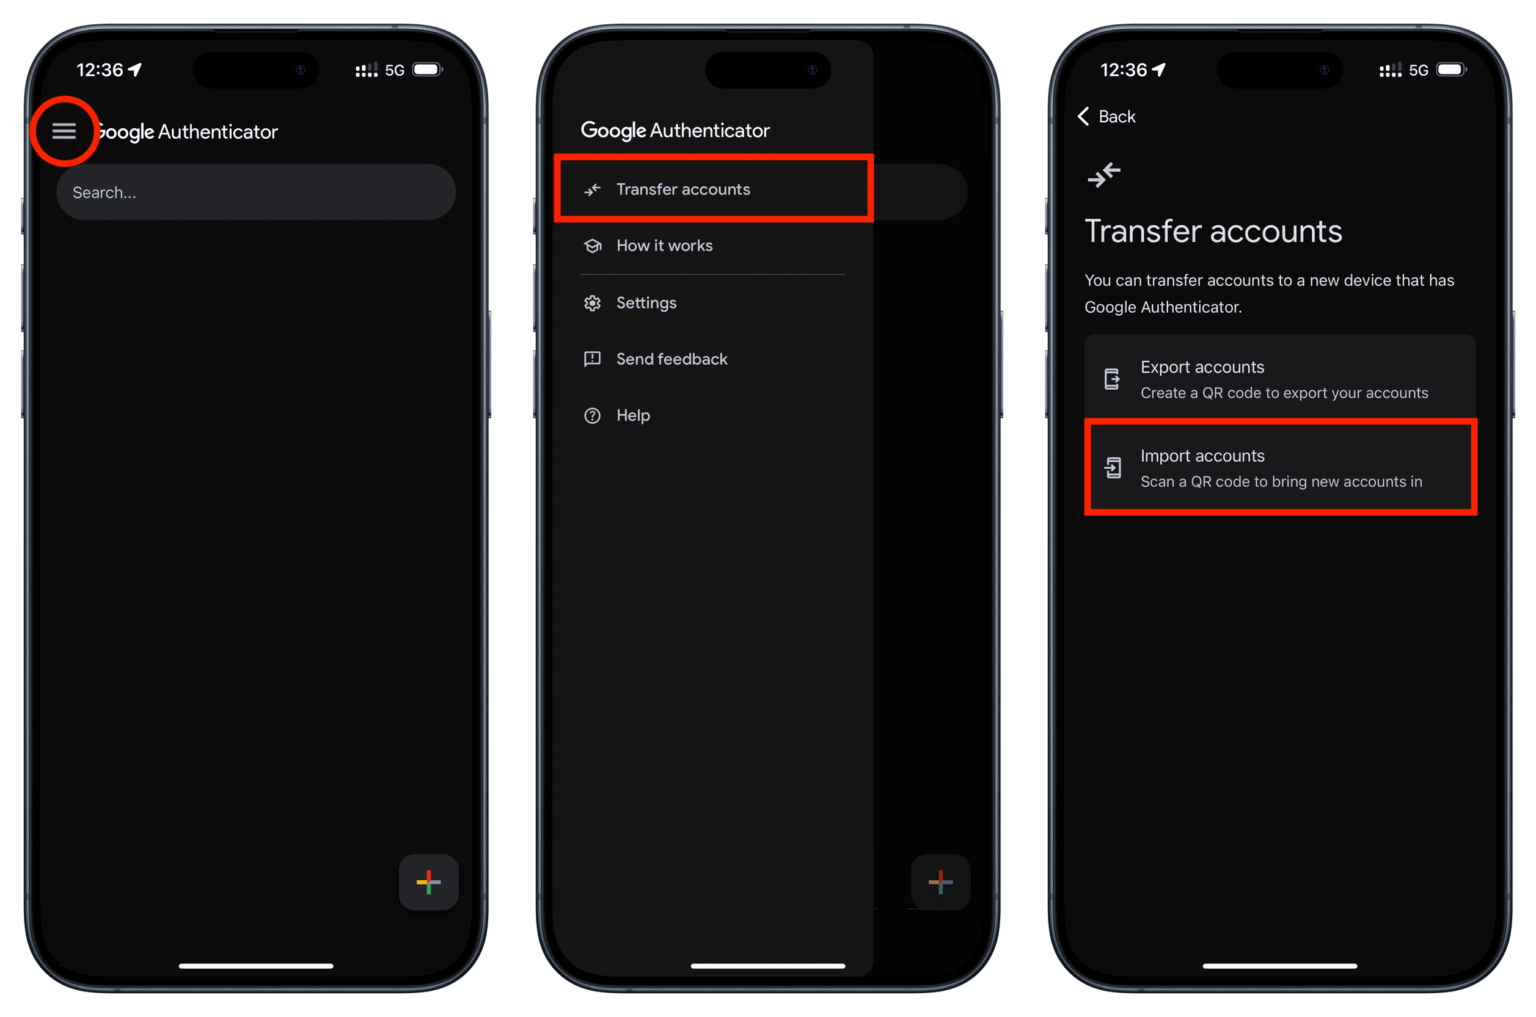
Menu (⋮) > Transfer accounts > Import accounts and then Tap Scan QR code. Then, Scan the code on your new device, from your old phone.
Your new phone will notify you that your Authenticator codes have been imported successfully right after you scan them.
Important: Do not take a screenshot of or share the export QR code under any circumstances. It allows complete access to your accounts and should be considered as your password.
Method 2: Using Google Account Sync (If Enabled on Your Device)
If you've ever linked your Google Authenticator to your Google account, then you can simply restore your 2FA code on your replacement phone without the necessity of a QR code. The basis of this technique is that account sync is turned on, and it not only makes the restoration possible but also keeps your codes updated automatically.
- Step 1. Install Google Authenticator on your new phone
- Step 2. Restore your accounts
- Step 3. Verify your codes
Download and open the Google Authenticator app, tap Get Started, and sign in to the same Google account used on your old device.
The app will automatically detect any accounts linked via Google account sync and display your 2FA codes on the new device.
Open one of your synced accounts (like Gmail) and enter the 2FA code from the new device to confirm it works correctly.
Verifying the Transfer Was Successful
- First check 2-3 accounts by logging into your emails, social media, or any other services to confirm the codes are working perfectly.
- Your old cell phone should be turned on for 24-48 hours as a backup in case trouble occurs.
- After confirming, delete the accounts from the old device by pressing the three-dot menu → Remove account.
Part 2. How to Transfer Google Authenticator Without the Old Phone
If your old phone was lost, stolen, or broken, then you won't be able to use the QR export method that Google Authenticator offers. Let's explore methods to move Google Authenticator to a new phone without the old phone.
Recovery Option 1: Use Backup Codes
Numerous services, such as Google, GitHub, and Dropbox, offer a set of one-time backup codes now that you initiate 2FA with them. Typically, these codes are made available in the Security Settings tab of your account. So, when you are locked out, use a backup code to sign in. After logging in, you can disable the old 2FA and activate Google Authenticator again on your new mobile.
Recovery Option 2: Account Recovery via Service
Not having backup codes is not the end of the world because there is a way for you to get back into your account by performing the account recovery process which they offer most services. Normally, to securely enable Google Authenticator on your new phone, you need to verify your identity with the platform.
- Step 1. Open the account recovery page of the service you want. If it's Google, go to accounts.google.com/signin/recovery.
- Step 2. Do what the prompts say and finish the identity verification step if needed.
Part 3. What If Some Accounts Didn't Transfer?
If some accounts don't make it across with the QR export, or if you're adding new ones, you'll have to reconnect the accounts manually. It's not a big deal, but it's better for you to have a recovery option ready for each account such as backup codes, SMS verification, or email login.
- Step 1. Sign into the platform using your password and one of your backup codes.
- Step 2. Locate the Security or Two-Factor Authentication tab for that account.
- Step 3. Turn off the current 2FA method (usually a prerequisite to adding a new Authenticator app).
- Step 4. Switch on 2FA again → select Authenticator App → point your new phone to the new QR code.
- Step 5. Store the newly created backup codes securely for later recovery.
Part 4. Transfer Everything with Dr.Fone - Phone Transfer
Transferring Google Authenticator accounts is just one aspect of getting a new phone up and running. After securing your 2FA, you'll still want your contacts, photos, messages, videos, apps, and settings to accompany you, without manually copying for hours. This is where Dr.Fone – Phone Transfer, becomes your complete solution.
Dr.Fone – Phone Transfer is a convenient, secure, and efficient tool whereby one can transfer entire data from one phone to another simply by a click. It could be used to do transfers across different platforms, such as Android to iPhone, iPhone to Android, Android to Android, and iPhone to iPhone, and is also compatible with the latest operating systems like Android 16 and iOS 26. It is feature-rich, allowing you to transfer 18 types of data (e.g., contacts, SMS, photos, videos, app data, call logs, calendars, music, etc.) without needing a factory reset, cloud backup, or facing data loss situation.
Dr.Fone - Phone Transfer
1 Click to Copy One Phone to Another
- Move data between devices with different OSs, i.e. iOS to Android.
- Transfer contacts, SMS, photos, videos, music, and more types.
- Simple, click-through process
- Compatible with Android 14 (Win) and the latest iOS 17.


Quick Navigation: How to Use Dr.Fone - Phone Transfer
- Step 1: Open Phone Transfer tool
- Step 2: Choose Source and Destination devices
- Step 3: Pick data and get transfer started
- Step 4: Finalize the transfer
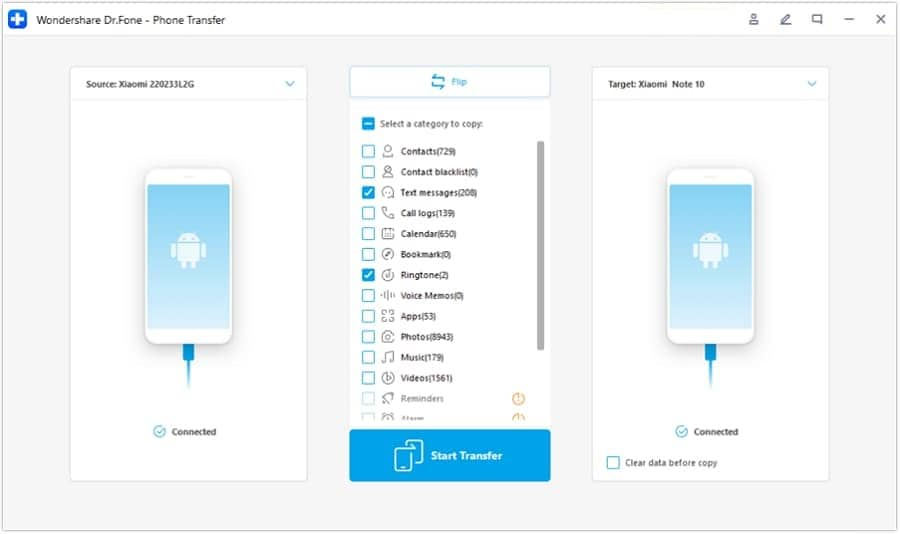
Open Wondershare Dr.Fone on your PC and select Toolbox. Then click Phone Transfer to start.

This time, set Android as the source and iOS as the destination on the screen. Press Flip button if you want to change the way. Dr.Fone will display the data that is free to transfer.

Supported data: photos, music, videos, contacts, text messages, calendar, ringtone, and voice memos.
Tick the data type boxes that you intend to transfer and tap Start Transfer to make the data copied from Android to iOS.
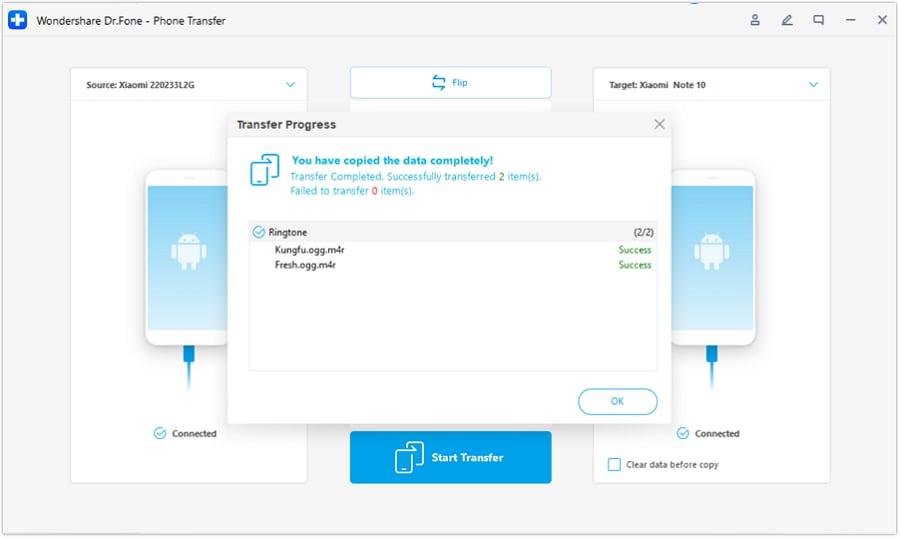
Once it is done, the system will notify you and you can click OK to close and finish the transfer.
Part 5. Troubleshooting Common Google Authenticator Migration Issues
Codes not working after transfer
If your codes stopped working after switching to a new device, it usually means the time on your device is not synchronized. You should set the date and time of your phone to Automatic and then navigate to Time correction for codes → Sync now in Authenticator. For accounts that don't cooperate, the best thing to do is to disable 2FA from that service and then set it up again with a new QR code.
Only a few accounts transferred
In case it is only a few accounts that appear after migration, you will have to use a backup code or SMS to log into the accounts/services that you do not have access to. Access the Security / 2FA settings, set the old Authenticator to be disabled, and by scanning the new QR code you reactivate the Authenticator. This is how you update the connection of your new phone.
Won't scan the QR code
In case the QR code scanning does not work, it is worth trying to raise the screen brightness, enlarge the QR code, or wipe the camera lens. Another thing you can do is that Enter, a setup key option in the Authenticator program, can be used to manually add the account.
Authenticator displays incorrect codes
Incorrect codes usually indicate time drift. You can rectify it by going to Time correction for codes → Sync now. If you still have one account showing the wrong code, then simply remove it and use the new QR code from that service to rescan.
Export feature is greyed out or missing
If you don't see the Export option, then update the app and make sure you're signed into your Google Account. Some work or managed devices disable exporting option, so in that case you will have to do 2FA reset manually using backup codes or account recovery.
Conclusion
You do not need to worry about moving Google Authenticator to a new phone if you just do it the right way. The three main ways of transferring your 2FA accounts safely and effectively are by using the mobile app's built-in transfer feature, Google Account sync, and backup codes. When it comes to an entire phone migration including contacts, messages, photos, videos, and app data, Dr.Fone – Phone Transfer is a fast, safe, and easy solution for both Android and iOS devices.
FAQs


Android Transfer
- Android to Android
- 1. Transfer Files to Android
- 3. Transfer Contacts to Android
- 4. Data Transfer Apps to Switch Phone
- 5. Transfer Data to Android
- 6. Transfer Text Messages to Android
- 7. Transfer Music to Android
- 8. Transfer Contacts Using Bluetooth
- 9. Transfer Apps to Another Android
- 10. Migrate Data to New Android
- 11. Best Clone Apps for Android
- Android to iPad/iPod
- Android to iPhone
- 1. Transfer Files to iPhone 13
- 2. Transfer Contacts to iPhone 13
- 3. Transfer Music to iPhone
- 4. Transfer Contacts to iPhone
- 5. Android to iPhone Transfer Apps
- 6. Transfer Text Messages to iPhone
- 7. Transfer Photos to iPhone
- 8. Transfer Messages to iPhone 13
- 9. Transfer Contacts to iPhone XS/11
- 10. Transfer Messages to iPhone 12
- 11. FaceTime for Android and iPhone
- 12. Move Data From Android to iPhone After Setup
- 13. Transfer Data from OnePlus to iPhone
- 14. Move Contacts From Android to iPhone
- 15. Transfer Data From Android To iPhone
- 16. Top Apps To Transfer Data From Android To iPhone
- Contacts Transfer
- 1. Sync Contacts to Gmail
- 2. Transfer Contacts from Outlook
- 3. Transfer Contacts to Outlook
- 4. Import Contacts from Excel
- 5. Import Contacts to Android
- 6. Export Contacts to Android Phones
- 7. Merge Contacts in Phones
- 8. Export CSV Contacts for Android
- iOS to Android
- 1. Transfer Files from iPad
- 2. Move Custom Ringtones from iPhone
- 3. Transfer Data from iPhone
- 4. Transfer Music from iPhone
- 5. Transfer Contacts from iPhone
- WhatsApp Transfer
- 1. Transfer WhatsApp from Android
- 2. Transfer WhatsApp Messages
- 3. Transfer WhatsApp Messages to PC
- 4. Transfer Messages to Android
- 5. Transfer WhatsApp Data to Android
- Transfer Tips
- 1. Android USB File Transfer Software
- 2. Android Apps to Transfer Files
- 3. Android Sync Managers
- 4. Android File Transfer Apps
- 5. Fix Transfer Files Not Working
- 6. Simplify Android File Transfer
- 7. Transfer Photos to USB
- 8. Transfer Data to BlackBerry
- 9. Transfer Data From ZTE
- 10. Transfer Data From Windows phone
- 11. Clone Phone and Copy Data
- 11. 12 Best Phone Clone Apps
- 12. Transfer Torrents from PC to Phone
- 13. Send Large Files Through Outlook
- ● Manage/transfer/recover data
- ● Unlock screen/activate/FRP lock
- ● Fix most iOS and Android issues
- Free Download Free Download

Ahmed Absal
contributor Editor