100% Security Verified | No Subscription Required | No Malware

 :
: 
 ChatGPT
 Perplexity
 Gemini
 Claude
 Grok
Grok
Imagine you've accidentally deleted a crucial thread of messages or lost a few precious photos, but your last backup was weeks ago. Now, you want those files back, but the thought of wiping your entire iPhone and waiting hours for a full iTunes restore feels like forever. It's a tough choice between wiping your entire drive to get a few files back or simply giving up.
To make this choice simpler, this detailed guide explains the all-or-nothing iTunes method or selective, fast recovery solutions. Whether you are setting up a brand-new device or just hunting for a few images, learn how to restore iPhone from iTunes backup. In addition, understand how tools like Dr.Fone - Data Recovery (iOS) play a role in this situation.
In this article
Part 1. Restore iPhone from iTunes Backup – How It Works
Those who want to selectively restore iPhone backup might think iTunes supports this. In fact, many users have shared their concerns on the Reddit platform, saying that:
I'm planning to factory reset my iPhone and want to know if I can restore only selected data from iTunes instead of everything. I mainly want to bring back my 4,000+ songs without having to manually find and add them again. - r/iphone
To know whether it's possible or what the key requirements are to restore the iTunes backup, this section has you covered.
What Happens During the Restore Process?
When you connect the iPhone and choose the "Restore Backup" option, the iPhone starts pulling data from the stored backup files. Without first erasing the device, it simply overwrites existing data. If the backup is protected, a password is required before the process continues. Later, the iPhone copies data, such as settings, photos, and purchased content, then restarts and shows the setup screen to sign in with an Apple ID.
Some data, such as apps and media, may still appear later as the system finishes the restore in the background. In short, the iTunes restore process erases existing data on your iPhone and replaces it with a previous backup, reloading settings, apps, and media.

Requirements Before You Begin
To further learn whether the selective restore iTunes backup is possible, make sure you meet the given requirements to restore the backup:
- Ensure you are running the latest version of iTunes on your PC or macOS Mojave/earlier.
- For macOS Catalina or later, use Finder instead of iTunes.
- You must turn off "Find My iPhone" in Settings > [Your Name] > Find My before restoring.
- Use a reliable Lightning or USB-C cable to connect your device.
- If you encrypted your backup, you must have that password available.
- The computer must have enough space to hold the temporary files during the transfer.
- The target device must have an iOS version equal to or newer than the backup.
How to Restore iPhone from iTunes Backup Step-by-Step?
It is said that iTunes backup restores bring back everything at once, but the need for selective restoration remains unclear. Nevertheless, this process works without the internet, and since the backup stays on the computer, it becomes faster than cloud restore. To know how to restore iPhone from iTunes backup, follow the simple guide mentioned ahead:
-
Step 1
Launch iTunes on Windows or Finder on Mac (macOS Catalina or later) and connect the iPhone to the computer with a USB cable. After that, press the "Trust" button on the iPhone when prompted. Then, tap the small phone icon to open the "Summary" tab in iTunes or select it from the "Location" section in Finder.
-
Step 2
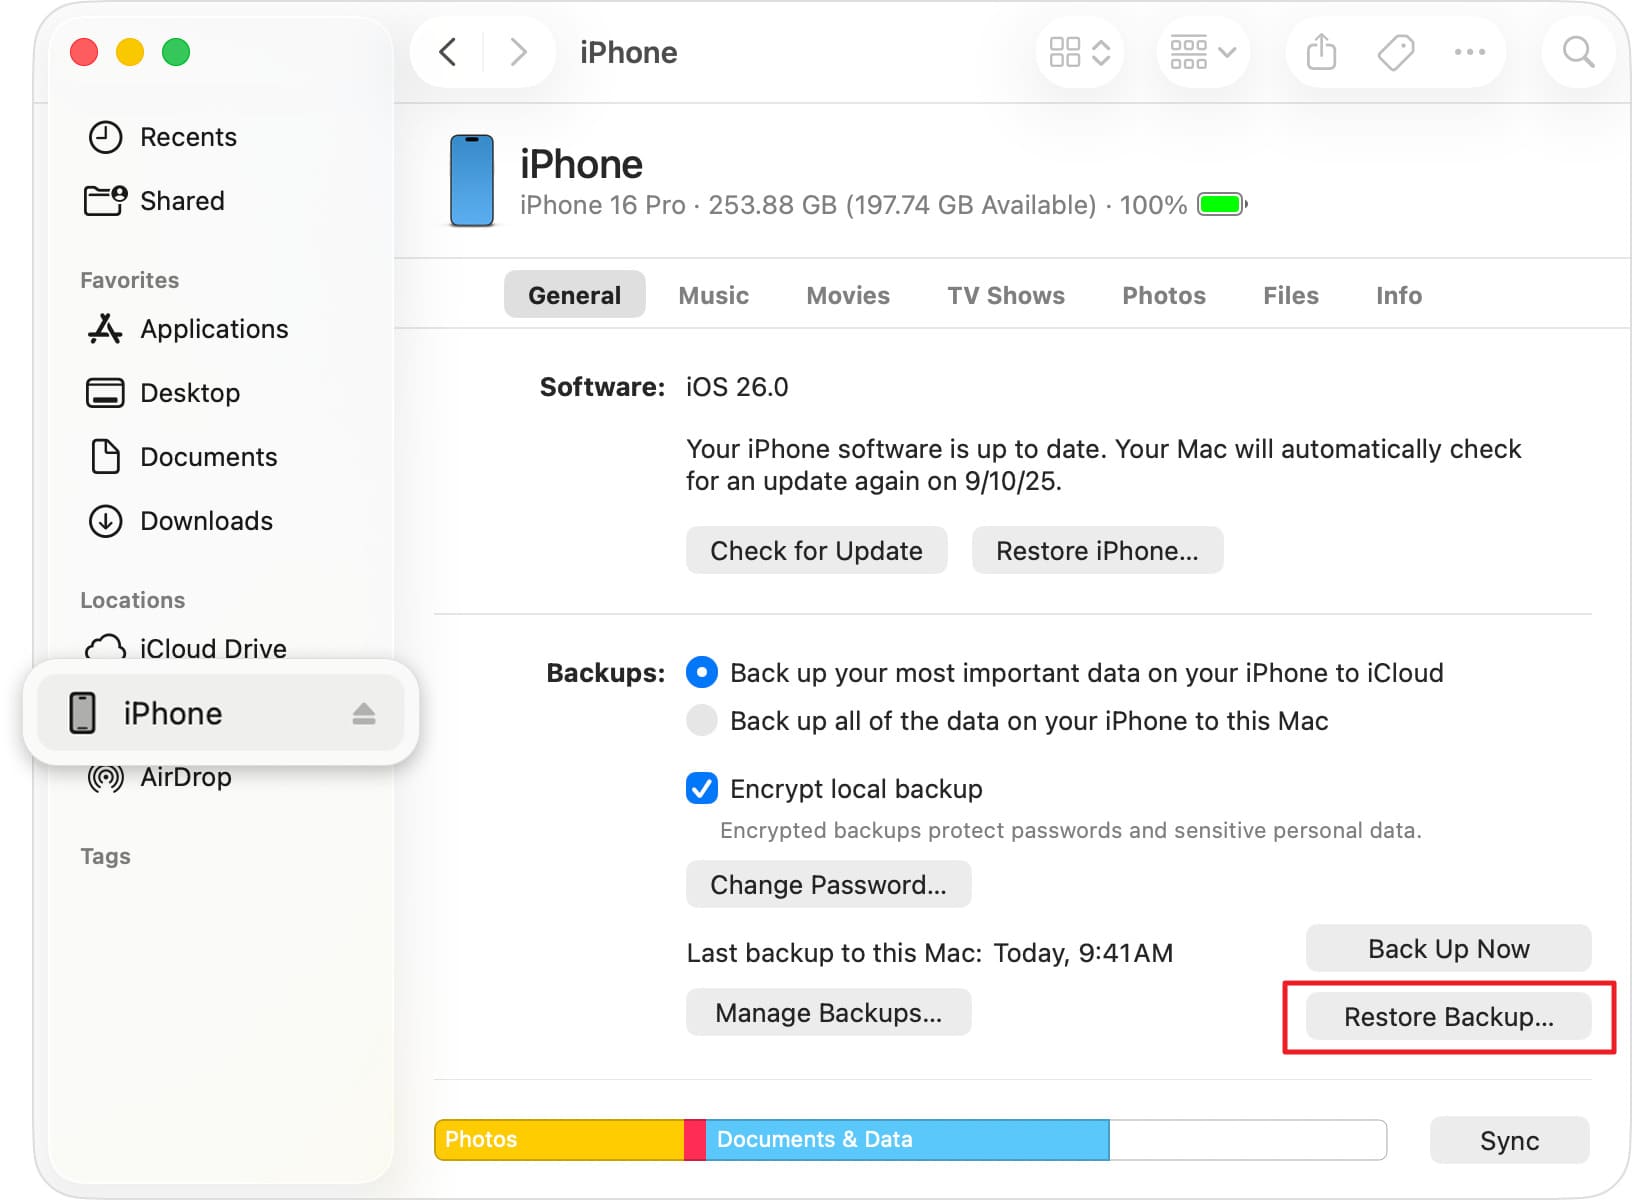
There, locate the "Backups" section and select the "Restore Backup" option.
-
Step 3
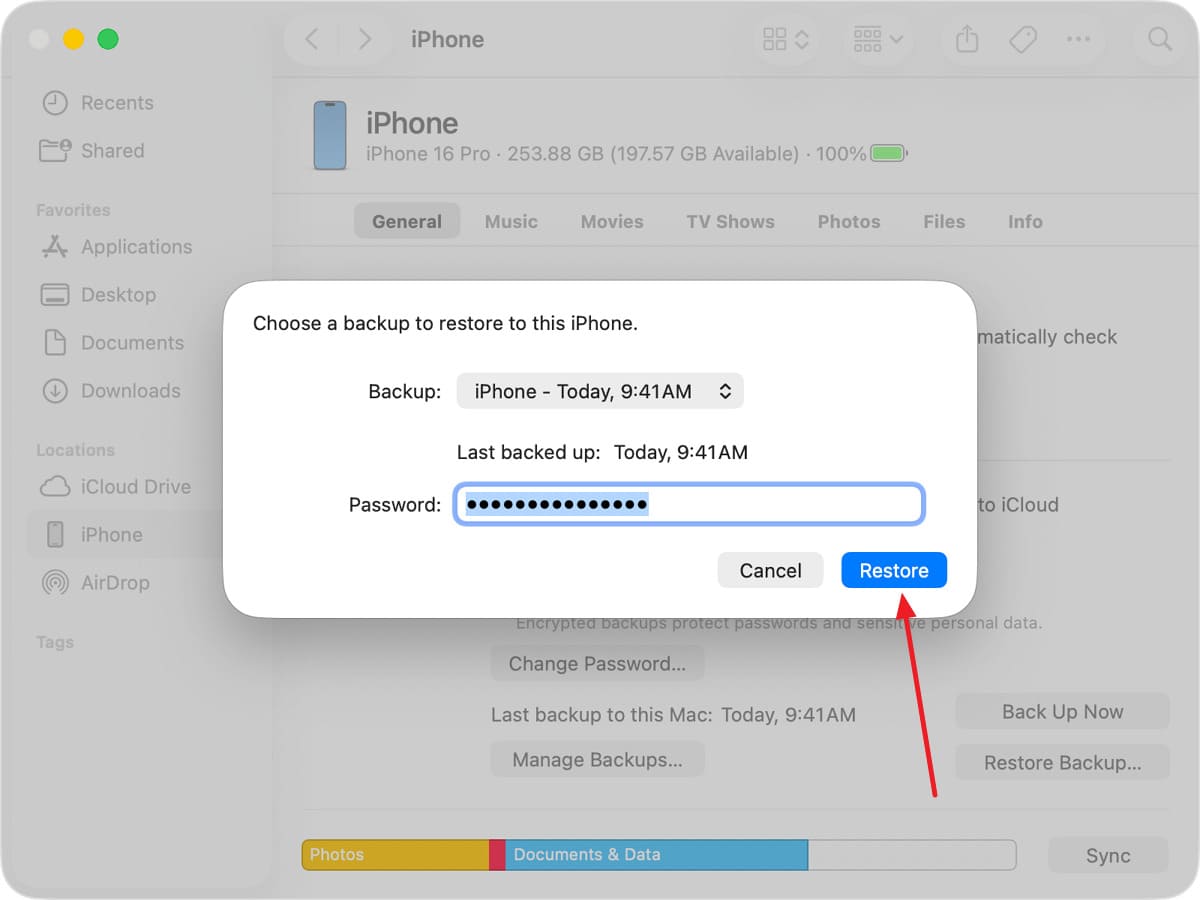
Add the passcode if the backup is encrypted, and stretch the "iPhone Name" menu to choose the backup you want to restore. Then, press the "Restore" button and keep your iPhone connected even after it restarts. Now, wait for it to sync with your computer before disconnecting.
Part 2. Can You Restore Only Complete iTunes Backup Data?
Those seeking selective recovery from iTunes backup know that it's not possible. Even from the steps, it's evident that with Apple's iTunes or Finder restore, you cannot pick single items like photos or contacts. In fact, the backup restores as a single full package, so everything saved in that backup comes back together.
Before the restore, the phone is erased, and then the backup replaces all the data on the device. Additionally, you also cannot mix old backups with the new data or restore only selected parts using Apple's built-in method.
Part 3. Recover Specific Data from iTunes Backup Using Dr.Fone - Data Recovery (iOS)
Since you cannot recover specific data from iTunes backup, the only option left is to use a recovery tool that lets you selectively restore the data. In this case, you can use tools like Dr.Fone - Data Recovery, which is compatible with iOS 26 & iPhone 17 Series and claims to offer 100% local recovery. While keeping the data safe, users can retrieve photos, videos, and WhatsApp data in 2-3 simple steps.
Along with iTunes backups, you can also use this tool to recover iCloud-synced data and iCloud Drive files, which makes it a versatile option. Recovery tools like this also include a preview option that lets users decide what to keep or remove during the restoration. Unlike the non-selective, official method, users just have to press the "Trust" option and can choose from 2 export options to save their selectively restored data.
It feels simple and easy to use, and it gives me peace of mind even though I was a bit unsure about giving access through Malwarebytes. - Shap
 Recovers data after deletion, crashes, or device damage.
- Supports photos, messages, contacts, WhatsApp, and more.
- Supports all major iPhone, iPad, and iPod models.
- Preview and recover only what you need.

Guide to Recover Selected Data from iTunes via Dr.Fone
To selectively restore iPhone backup from iTunes, this recovery tool is tested in detail in this section. To determine its success rate and ease of use, review the mentioned guide:
-
Step 1Locate the Recovery Tool and Start the Scan
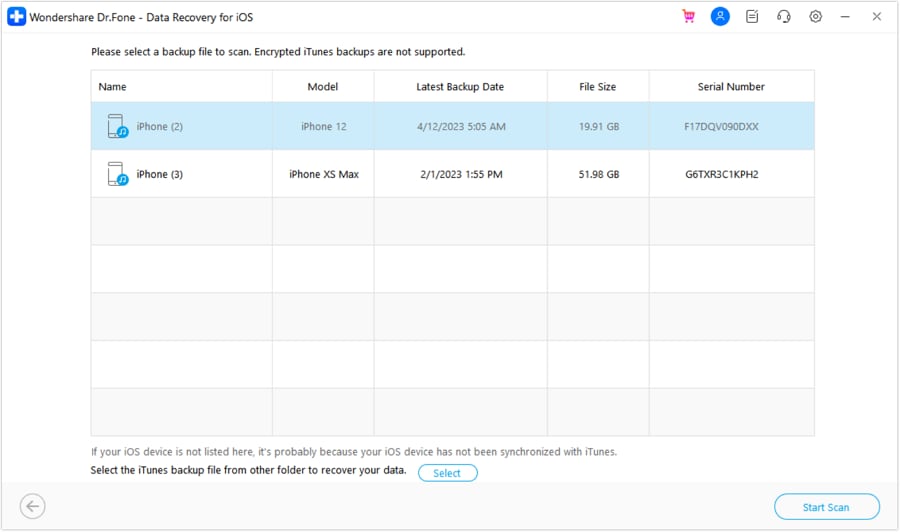
Access the Data Recovery tool for iOS on Dr.Fone and choose the "Recover Data from iTunes" option. With the device connected, the tool will display the iTunes backup, choose the desired one, and press the "Start Scan" button.
-
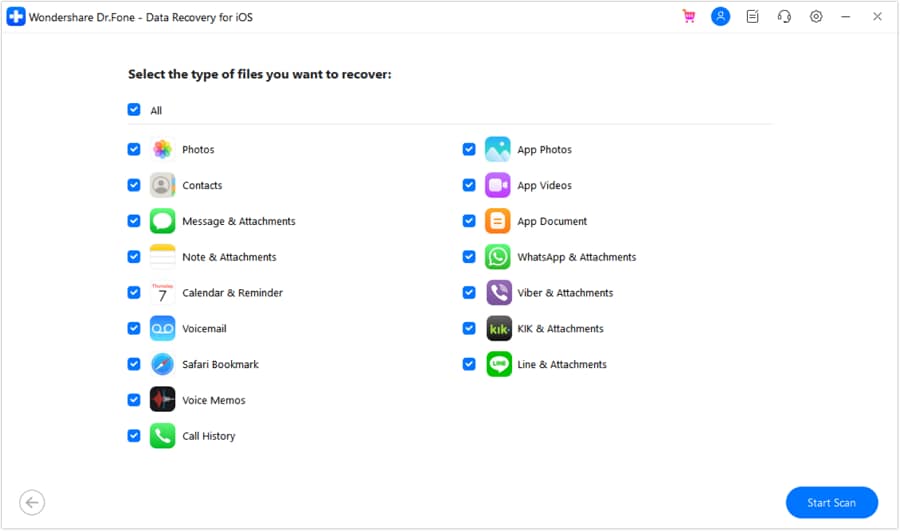
Step 2Choose the Data Type and Start the Scan Again
Here, select the data types you want to recover, then click the "Start Scan" button again.
-
Step 3Press the Recover Button to Save the Restored Data
When the scanning file progress bar ends, pick between the "Restore to Device" or "Restore to Computer" options. Choose the "Restore To" location and press the "Continue" button to select the "Trust" option on iPhone if you are saving to the device. The tool will restore the selected data to the chosen folder; press "Recover" to complete the process.


Part 4. When to Use Full vs Selective iTunes Restore
To know when to use full or when to recover specific data from iTunes backup, review the given comparison table for decision-making:
| Criteria | Full iTunes Restore (Official) | Selective Restore with Dr.Fone - Data Recovery (iOS) |
|---|---|---|
| Data Selection | All-or-nothing (entire backup) | Choose specific photos, messages, contacts, videos, etc. |
| Preview Before Restore | No preview available | View all backup contents before restoring |
| Current Da | Completely erased before restoration | Preserved - No data overwriting |
| Device Reset Required | Yes - Must factory reset first | No - Restore without resetting the device |
| Restore Speed | Slow (entire backup, 30-90 min+) | Fast (only selected items, 2-10 min) |
| Data Types Supported | All standard iOS data | 26+ iOS data types, including third-party apps |
| Merge with Existing Data | Cannot merge (overwrites all) | Merges selected items with current data |
| iTunes/iCloud Backup Source | iTunes backups only | Both iTunes and iCloud backups |
| Incremental Restore | Not supported | Add only new/changed items |
| Search Backup Content | Cannot search | Search and filter backup files |
| Best For | Switching to a new iPhone, a complete device refresh, fixing major software issues | Recovering specific deleted files; Accessing only certain data types; Keeping current data intact |
Conclusion
For most of the iOS users, the restore iPhone from iTunes backup process doesn't have to be an all-or-nothing hassle. While the traditional, non-selective method forces a full overwrite, this guide has explained how it works and why selective restoration options are better. In these cases, tools like Dr.Fone - Data Recovery help restore the data needed from iTunes backup, with the option to preview it.
FAQs
-
What should I do if iTunes asks for a password I never set?
If iTunes asks for a password to unlock a backup, it means the "Encrypt Local Backup" option was enabled. If you don't know the passcode, you cannot restore that encrypted backup using iTunes. In this case, tools like Dr.Fone - Screen Unlock can help remove the iTunes backup password, so you can proceed with restoring your iPhone. -
Will restoring from the iTunes backup log me out of all my apps?
Yes, for security reasons, most apps like Facebook or Gmail will ask you to log in again after a full restore. This is because login tokens are stored in the backup to protect your account security. -
How much free computer space do I need to restore an iPhone from an iTunes backup?
You need enough free disk space to unpack the backup files before sending them to your phone. Generally, you have at least 5-10GB of free space on your PC or Mac beyond the actual size of the backup file.
 Add Wondershare Dr.Fone as a preferred source on Google