 Recover photos, messages, WhatsApp, and more — no backup
needed.
Recover photos, messages, WhatsApp, and more — no backup
needed.

 100% Security Verified | No Subscription Required | No Malware

 :
: 
 ChatGPT
 Perplexity
 Gemini
 Claude
 Grok
Grok
Google Contacts stands out as a highly reliable and universally popular contact management tool designed to securely organize and store both professional and personal networking information. One of the main advantages of this ecosystem is that you can effortlessly safeguard your address book even if your smartphone gets damaged, experiences a fatal system crash, or when you are simply switching to a brand-new device. It is entirely free to use, integrates seamlessly with a multitude of other Google ecosystem applications, and remains the top choice for modern contact management.

Despite its secure cloud backup, a pressing question arises for many users who accidentally delete their data: how to restore Google contacts quickly and effectively? Whether due to a syncing error, accidental deletion, or a hardware upgrade gone wrong, losing vital numbers can be stressful. In this comprehensive 2026 guide, you will learn the precise steps on how to recover contacts from Google account seamlessly, how to add contacts to Google account, and how to utilize advanced tools to recover deeply lost data on your Android devices.
In this article
Part 1. How to Restore Google Contacts
If you have accidentally or deliberately deleted some of your Google contacts and later realized the mistake, there is absolutely no need to panic. The Google ecosystem includes a robust failsafe to reverse these actions, provided you initiate the recovery within a 30-day window. Irrespective of how many contacts you deleted during a massive digital cleanup, Google securely keeps a 30-day rolling history of every single contact change in your address book. This means that if you mistakenly purged vital numbers, getting them back requires just a few clicks.
While the procedure is remarkably simple, it operates on a rollback principle rather than selective retrieval. You cannot restore contacts individually; instead, the system reverts your entire contact list to its exact state at a prior date and time. Unless you frequently make massive adjustments to your address book daily, retrieving your desired contacts using this method is highly effective.
So, exactly how to retrieve contacts from google account? Follow these straightforward steps using a web browser on your computer or smartphone:
-
Step 1 Access the Google Contacts Web Interface
Open "Google Contacts" on your preferred web browser and log in with your primary user credentials. If you are already logged in, the dashboard will immediately display all the contacts currently saved on your Google cloud.

-
Step 2 Navigate to the Settings Menu
Tap the gear icon or "Settings" located in the top right corner of the screen, followed by clicking on the "Undo Changes" option from the drop-down menu.

-
Step 3 Select the Recovery Timeframe
A mini-window will pop up asking you to choose the precise timeframe you want to restore the contacts from. You can select anywhere between 10 minutes up to the maximum limit of 30 days. Once you have pinpointed the rollback period, click on "Undo".

-
Step 4 Wait for the Sync to Complete
Google will automatically process the request and restore the contacts you deleted within the given timeframe. Please note that it might take a few moments for the recovered contacts to sync and reflect on your smartphone's native contact application.

Part 2. How to Add Contacts to Google Account
Manually transferring contacts every time you upgrade to a newer phone model can quickly become a messy and frustrating endeavor. It often introduces unnecessary complications, such as dealing with incompatible data formats, configuring complex settings, or encountering software glitches mid-transfer that could wipe your data permanently. Moreover, relying solely on local device storage puts your contacts at extreme risk if the device is lost, stolen, or physically destroyed.
These risks are entirely eliminated when you directly link and save your contacts to your Google ecosystem. By establishing this habit, whenever you purchase a new Android or iOS smartphone, all you need to do is log in, and your entire address book populates instantly. Read on to discover exactly how to add contacts to google account seamlessly:
-
Step 1 Authenticate Your Google Account
Navigate to the "Google app" or your device's primary settings and ensure you are logged into your preferred account. You can bypass this step if your primary email is already synced with your smartphone.
-
Step 2 Launch the Native Contacts Application
On your Android smartphone's home screen or app drawer, open the native "Contacts" app.

-
Step 3 Initiate New Contact Creation
Look for a prominent "+" symbol or an "Add" icon typically located at the bottom right corner of the display. Tapping this will open a new creation page where you can input the individual's name, phone number, email address, and other identifying details.

-
Step 4 Assign the Storage Destination
To explicitly pick the Google account where you want this specific contact saved, tap the "down arrow" or the account banner at the very top of the page. Select your desired Google email from the dropdown list instead of "Phone" or "SIM".

-
Step 5 Finalize and Save
Finally, tap the "Save" button. The contact is now permanently backed up to your selected Google account in the cloud.
Part 3. How to Transfer Contacts from Google Account to Android Devices
Once you have securely added and backed up your contacts to the Google cloud, knowing how to actively transfer or sync them across various Android devices is the next logical step. This automated synchronization is incredibly handy when migrating to a new smartphone, restoring a factory-reset device, or managing a secondary work phone. To initiate this seamless transfer, you simply need to authorize automatic syncing within your device's core settings.
Here is the standard procedure to ensure your Google contacts are consistently transferred to your Android device:
-
Step 1 Open Device Synchronization Settings
Unlock your smartphone, browse through the app drawer, and open the "Settings" menu. Scroll down and tap on "Accounts and Backup" (or "Users & Accounts" depending on your Android version).

-
Step 2 Access Account Management
Tap on the "Manage accounts" tab to view a comprehensive list of all social media, email, and Google accounts currently logged into your Android smartphone.

-
Step 3 Enable Contact Synchronization
If you maintain multiple Google profiles, choose the specific one you want to pull contacts from. After selecting the account, tap on "Sync Account" and ensure that the toggle switch next to "Contacts" is flipped to the 'ON' position.

-
Step 4 Verify the Transfer
Exit the settings menu and access the "Contacts" app on your Android smartphone. Give it a few seconds, and you will see all your Google contacts populated directly on your device.
Part 4. How to Restore Lost Contacts on Android
Relying on Google synchronization works flawlessly for the vast majority of users; generally, you will never lose a contact as long as you retain access to your login credentials. But what happens if you deleted the contacts more than 30 days ago, making Google's "Undo Changes" feature useless? What if your phone suffered severe physical damage, or your recent contacts failed to sync due to a persistent network interruption?
When native methods hit a wall, you require a specialized, military-grade data recovery tool capable of extracting deeply buried files directly from the device's storage, regardless of the time elapsed or the extent of the phone's software damage. Among the premium tools available today, Dr.Fone - Data Recovery (Android) stands out as an industry-leading, exceptionally secure, and highly efficient solution to solve the puzzle of how to restore lost contacts on android.
 Scan Android phones and tablets directly.
- Preview and recover only what you want.
- Supports WhatsApp, photos, videos, contacts, and more.
- Works with 6000+ Android devices.

By leveraging advanced scanning algorithms, this software bypasses standard OS limitations to retrieve deleted bits of information before they are permanently overwritten. Here are some of its standout capabilities:
- The application supports an expansive array of data types, seamlessly recovering deleted photos, videos, audio files, critical text messages, comprehensive call logs, missing contacts, browser data, and even encrypted WhatsApp chats and attachments.
- Regardless of how dire the condition of your device is (be it water damage, a black screen of death, or a broken display), the software conducts an intensive deep-dive data recovery to rescue your contacts and essential files easily.
- It boasts unmatched compatibility, supporting over 6,000 distinct Android devices available on the market, while also offering dedicated versions for iOS, Windows, and macOS ecosystems.
- Beyond simply extracting information from the Android's internal storage drive, it can simultaneously scan inserted, corrupted SD cards to extract fragmented data without triggering further corruption.
- Dr.Fone provides a highly detailed preview interface, allowing you to selectively inspect your contacts and selectively recover only the necessary files to save storage space.
Steps to Restore Lost Contacts on Android via Dr.Fone




-
Step 1 Install the Recovery Software
Navigate to the official Wondershare website, download the latest version of Dr.Fone - Data Recovery (Android), and securely install it onto your personal computer.
-
Step 2 Launch the Data Recovery Tool
Run the newly installed program. From the primary left panel of the interface dashboard, click on "Toolbox", followed by selecting "Data Recovery" to initiate the specific module.

-
Step 3 Select Your OS Environment
To explicitly restore lost contacts on an Android framework, click and select "Android" from the multi-platform display window.
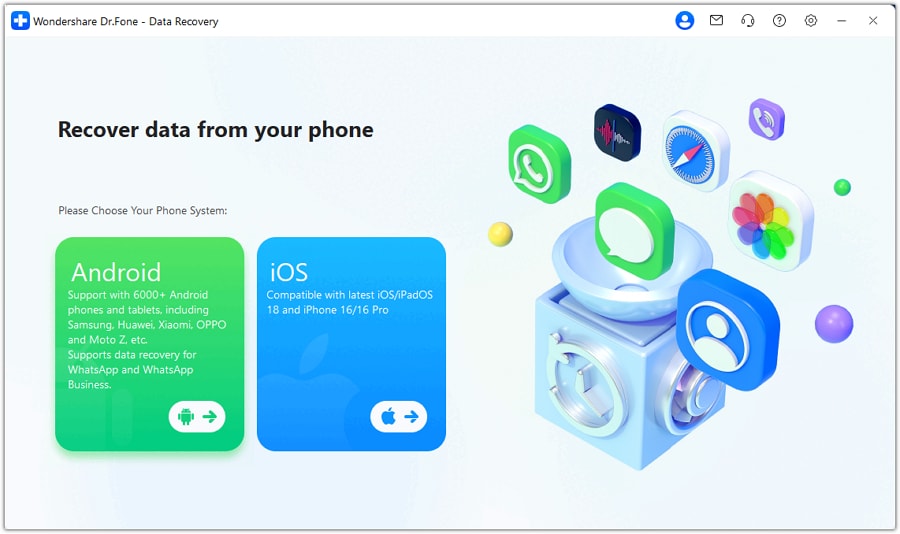
-
Step 4 Proceed with Android Data Recovery
On the subsequent display screen, click squarely on "Recover Android Data" to move forward with the deep scanning parameters.
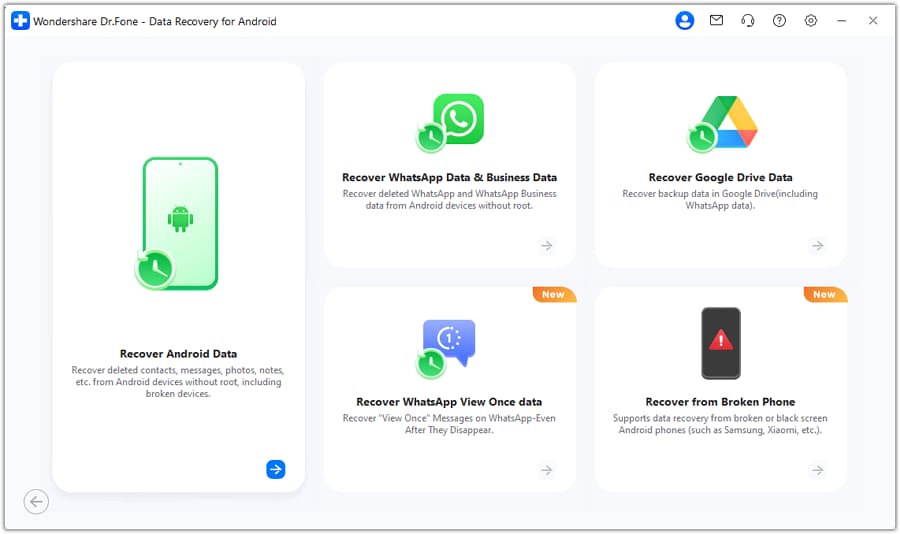
-
Step 5 Connect the Smartphone to the PC
The program will now prompt you to link your Android smartphone to the computer. Securely plug it in using an original or high-quality USB cable, ensuring USB debugging is enabled on the device.
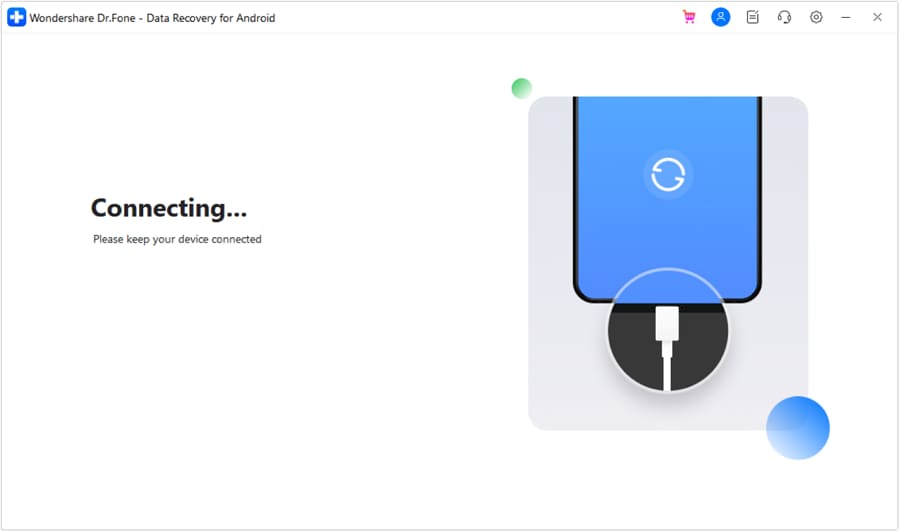
-
Step 6 Select Contacts for Scanning
From the extensively categorized data options presented for recovery, check the box immediately beside "Contacts" and click the "Start Scan" button at the bottom right.
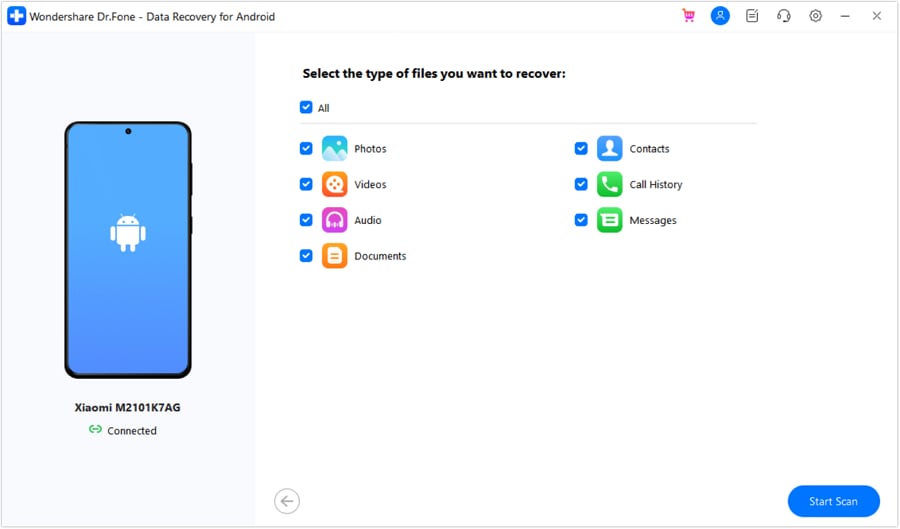
-
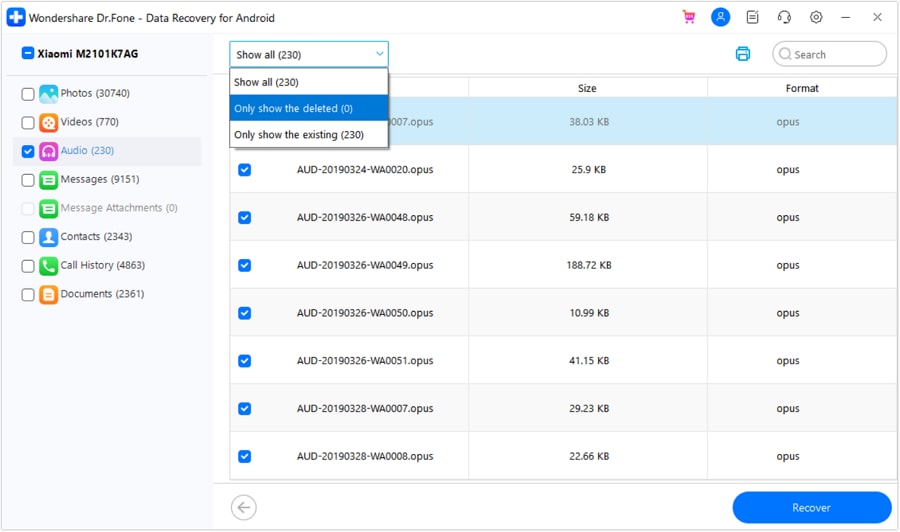
Step 7 Preview and Isolate Lost Contacts
The duration of the deep scan varies from a few seconds to several minutes, directly corresponding to your device's storage capacity. Once complete, Dr.Fone intelligently categorizes all files found. Carefully scroll through the list, select the individual contacts you actually want to extract, and confidently click on "Recover".
-
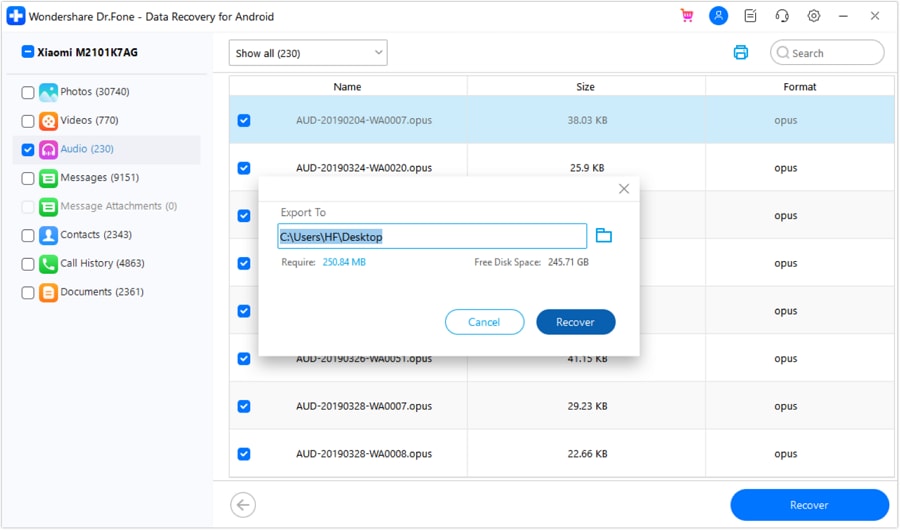
Step 8 Save Data to Your PC
Confirm the exact destination folder on your computer's hard drive where you wish to temporarily store your recovered contacts in formats like HTML, CSV, or vCard, and confirm by clicking "Recover".
Conclusion
Losing access to your most prioritized personal or business contacts can be intensely stressful, whether it stems from a careless accidental deletion, a corrupted syncing process, or a physically damaged smartphone. Thankfully, the architecture of Google Contacts acts as an exceptional first line of defense, ensuring your address book remains secure and isolated from hardware failures. You should now clearly understand how to recover contacts from google account using native rollback features, ensuring you never have to panic over a minor digital mistake again.
However, if your numbers weren't properly synced or the crucial 30-day Google safety net has completely expired, utilizing a professional tool like Wondershare Dr.Fone - Data Recovery (Android) is your absolute best alternative. By simply linking your smartphone and initiating a comprehensive deep scan, you can definitively restore your crucial lost contacts directly from the phone's internal storage, regaining full control of your digital communications.
FAQ
-
1. Can I restore Google contacts selectively using the "Undo Changes" feature?
No. Google's native "Undo Changes" operates strictly as a mass rollback system. When you execute it, your entire contact list reverts exactly to its state at the specific time you chose. It cannot selectively recover individual contacts without affecting others added after that chosen timeframe. -
2. How far back can I recover deleted contacts from my Google account?
Google Contacts permanently retains your deletion history and account alterations for a maximum of exactly 30 days. Once a deleted contact crosses this 30-day threshold, it is permanently erased from the Google cloud servers and can only be recovered using third-party data recovery software scanning your device's local memory. -
3. Why are my Google contacts not syncing properly to my Android device?
Synchronization failures typically occur due to an unstable internet connection, disabled auto-sync settings in the 'Accounts and Backup' menu, or outdated Google Play Services. Navigate to Settings > Accounts, ensure contact syncing is toggled ON, and confirm you have active internet bandwidth. -
4. Does Dr.Fone - Data Recovery require rooting my Android to restore lost contacts?
While Dr.Fone is powerful enough to extract standard deleted files like contacts and text messages on unrooted devices, a rooted environment generally yields a significantly higher success rate for deeply overwritten files.• Rooted Devices: Greater likelihood of success, granting deep-level storage sector access.• Non-rooted Devices: Limited to simple surface scanning and may not be capable of retrieving deeply deleted database fragments.
 Add Wondershare Dr.Fone as a preferred source on Google


