 Recover photos, messages, WhatsApp, and more — no backup
needed.
Recover photos, messages, WhatsApp, and more — no backup
needed.

 100% Security Verified | No Subscription Required | No Malware

 :
: 
 ChatGPT
 Perplexity
 Gemini
 Claude
 Grok
Grok
Experiencing that sudden, heart-sinking realization that your cherished photos, vital contacts, or crucial work files have abruptly vanished from your smartphone is a nightmare no one wants to face. However, before you panic and assume the absolute worst, take a moment to breathe. The good news for users in 2026 is that digital information isn't always gone the second it disappears from your display.
The right vivo phone data recovery method depends on where the file was stored, whether a copy was synced, and whether the phone can still be unlocked. This guide explains how to recover data from your vivo phone in a safer order: check the Albums Recently Deleted folder, Google Photos and available vivo or Google backups before trying a computer-based scan. A Funtouch OS update, accidental deletion or broken display can each require a different route; none guarantees retrieval of data that was never backed up.

In this article
- Method 1. The First Step: Check the "Recently Deleted" Folder
- Method 2. Restore via Vivo Cloud or Google Backup
- Method 3. Assess Vivo Recovery Options Without a Backup
- Method 4. How to Recover Data from a Broken Vivo Phone
- Comparison: Which Vivo Recovery Method is Right for You?
- Proactive Tips: How to Prevent Data Loss on Your Vivo Phone
Method 1. The First Step: Check the "Recently Deleted" Folder
Before downloading recovery software or paying a specialist, check the original app and account that held the missing data. Albums, Google Photos, contacts sync and other backups may still retain an accessible copy. This first check is usually less disruptive than granting software new device permissions or installing an app on a phone that may still contain deleted files.
When a photo or video is deleted in the vivo Albums or Gallery app, it may move to a Recently Deleted folder rather than disappear at once. This is an app-level temporary copy, not a promise that deleted bytes remain readable in internal flash storage. Folder names and retention depend on your Funtouch OS version, the app and whether that folder was emptied.
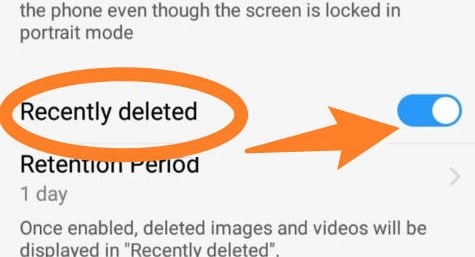
How to recover deleted photos on Vivo Gallery:
-
Step 1 Launch the App
Unlock your device and open the built-in Albums or Gallery application on your Vivo smartphone.
-
Step 2 Locate the Trash Folder
Look under the Albums or Gallery app’s album list or menu for Recently Deleted (sometimes called Trash or Recycle Bin). If it is missing, check the exact model and app version; also inspect Google Photos Trash separately rather than assuming both apps share one folder.
-
Step 3 Identify Your Files
Browse the items still present in that folder and check the deletion date. Many versions retain eligible items for a limited period, often around 30 days, but a specific retention window and the availability of this folder are not guaranteed for every vivo model or app version.
-
Step 4 Execute the Restoration
Select the missing photos or videos, tap Restore, and check the album and the main photo timeline again. If the files are not there, confirm that you are viewing the right account and storage location before trying the next method.

Method 2. Restore via Vivo Cloud or Google Backup
If nothing is available in the local folder, check the accounts that were actually signed in and syncing before the deletion. Cloud restoration is possible only when an eligible copy exists and may vary by region, data type and service settings. Check Google Photos for media and vivo/Google account sync for contacts or other supported categories without resetting the phone.
Option A: Vivo Cloud Data Recovery
On some vivo phones and in some markets, vivoCloud or a vivo account can sync selected categories such as contacts or messages. It is not safe to assume every vivo phone has the service, that it backed up every category, or that media files were included. Sign in to the account previously used on this phone and inspect the last sync or backup date before restoring anything.

- Navigate to your smartphone's primary Settings menu and locate the Accounts & Sync section.
- Tap directly on your registered Vivo Account profile.
- Select the Vivo Cloud management portal.
- Check which categories, such as Contacts or SMS, actually have an earlier synced copy. If the interface offers Restore, review the source and date before importing it; the available choices and menu names vary by device and region.
Option B: Google Photos (Best for Rich Media)
For photos and videos, Google Photos is worth checking if backup was enabled or if the media was managed there. The same Google account and the original upload or deletion history matter more than whether a Google Photos icon is installed today. Restoring from Trash or a retained cloud copy does not require a third-party recovery scan.
- Open the Google Photos application on your device.
- Check the main timeline first; then open Collections > Trash (or Library > Trash in older app versions). Make sure the selected Google account is the one used before deletion; photos found in the main timeline may simply need to be downloaded again.
- Under the current Google Photos help guidance, backed-up items stay in Trash for 30 days; unbacked-up items deleted from Android 11 or later devices also stay for 30 days. Check the current help information and Trash status for your account. Select a file still shown there and tap Restore. Items already permanently removed from Trash cannot be restored through that folder.
Method 3. Assess Vivo Recovery Options Without a Backup
 Scan Android phones and tablets directly.
- Preview and recover only what you want.
- Supports WhatsApp, photos, videos, contacts, and more.
- Works with 6000+ Android devices.

Scope of the product box above: Its Android device-count and no-backup claims do not confirm that your exact vivo model, file type or broken-screen condition is supported. The “Try It Free” download allows you to check a supported scan and preview; exporting available files may require payment. No software can promise recovery of data that is already inaccessible or erased.
If the file is absent from Recently Deleted and all available backups, the remaining options are more uncertain. First stop unnecessary writes to the phone and check whether a separate copy exists on a computer, SD card, chat attachment or another signed-in account. “Permanently deleted” is not a diagnostic result: the feasibility of a phone-storage scan depends on encryption, access permissions, storage behavior and the exact device.
On current Android devices, deletion, encryption and storage cleanup can make the original file unavailable to consumer software; there is no dependable interval during which raw data must remain recoverable. A desktop vivo data recovery tool is a conditional next step when the phone can connect and the exact model, Android version and requested file type are supported. Never equate a scan starting with proof that the deleted item can be exported.
One option to assess is Dr.Fone - Data Recovery (Android). Its documented flow lets a compatible, accessible Android device connect by USB, choose file types, scan and preview items the program can detect, then select available files for recovery to a computer. Verify your precise vivo model, Android version and permission requirements in the current product workflow; the product’s general device count does not establish support for every vivo X, V or Y variant. A free download or scan/preview is not a promise of free export, and a preview is not a guarantee of successful recovery.
Core Advantages of Utilizing Dr.Fone:
- Conditional scanning: The desktop workflow checks supported file types on a connected device and displays items it can find; it does not promise forensic access to fragmented or encrypted deleted data.
- Model check first: Confirm the exact vivo model, Android version and relevant recovery mode before installing or paying. General Android-device support figures do not verify your handset or a specific file type.
- Preview before deciding: Check whether the specific files you need appear and open as expected. Scanning and preview may be free, but saving recovered data to a computer can require a paid license.
Step-by-Step Data Recovery Guide:
-
Step 1 Launch the Recovery Module
After installing Wondershare Dr.Fone on your computer, open Toolbox > Data Recovery and select Android. Before continuing, compare your exact vivo device, OS version and requested data category against the current supported workflow. Avoid installing a new recovery app directly on the affected phone, since additional writes can complicate an already uncertain case.
-
Step 2 Choose the Operational Mode
Choose Recover Android Data for the documented direct-device flow if the phone is accessible and recognized. This route is distinct from restoring an existing Google Drive backup and from any supported broken-device route; choosing it alone does not bypass USB authorization, a screen lock or Android storage protections.
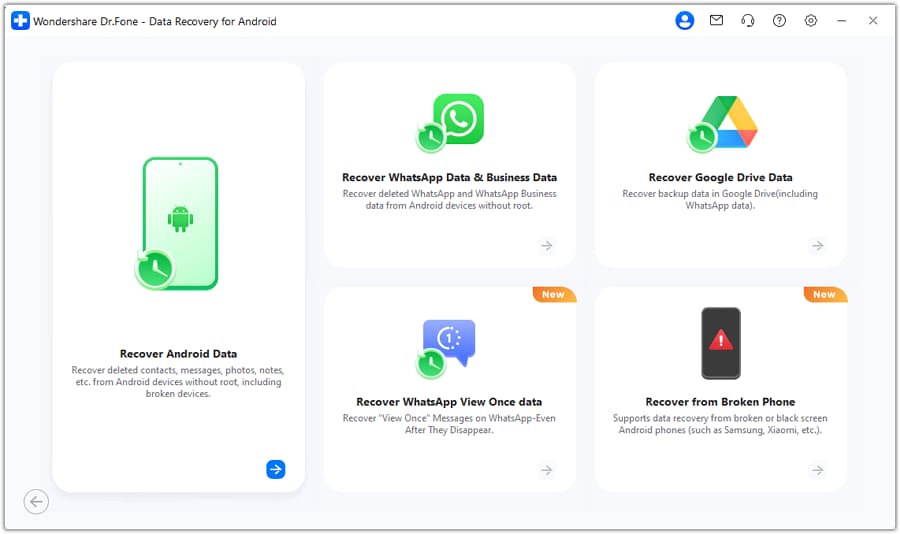
-
Step 3 Select the Target File Types
Connect the vivo phone using a working USB data cable and follow the device’s authorization prompts if they appear. Once the device is recognized, select the relevant file types and click Start Scan. If the phone cannot be unlocked or authorized, do not assume the computer can access its storage; return to your account backups or seek device-specific support.
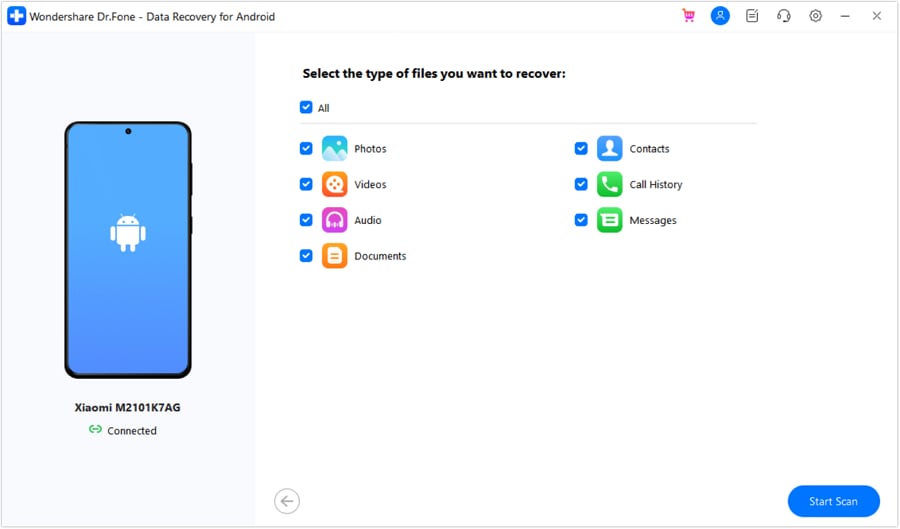
-
Step 4 Preview the Extracted Data
Wait for scanning to finish, then use the filters and preview to inspect the specific photos, contacts or other files displayed. A category being listed is not evidence that your permanently deleted file survived. If the desired item is absent or its preview is unreadable, do not buy a license solely on the expectation that a later step will reconstruct it.
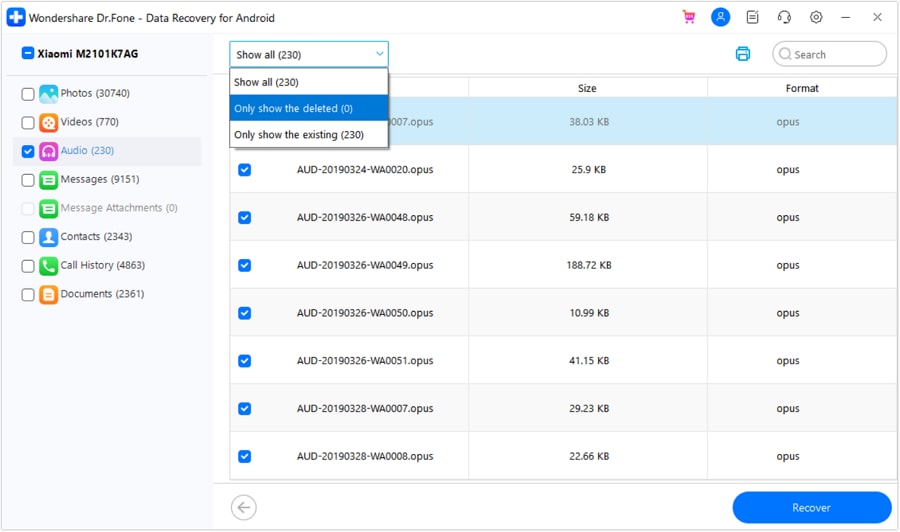
-
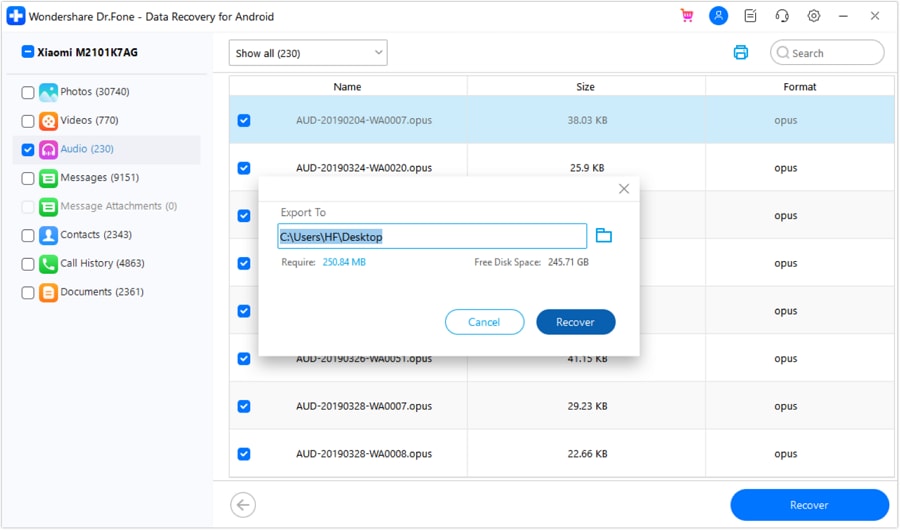
Step 5 Export to Safety
Select only files that are actually available, click Recover, and choose a destination on the computer rather than on the affected phone. Review any license requirement before paying or exporting. Open the saved copies to verify them and make a separate backup; a completed scan and a successful export are different outcomes.




Method 4. How to Recover Data from a Broken Vivo Phone
A broken display can prevent normal interaction even when the vivo phone is powered on and data remains on it. Distinguish a cracked but usable screen from a completely black display, an unresponsive touch panel, and a device that will not boot. USB access can still require that you unlock the device and approve a prompt; knowing your PIN does not make a software bypass possible.
If the phone was already syncing photos, contacts or other data, check those accounts from another trusted device first. If it powers on but the screen is unusable, a repair that preserves existing data or a supported external-display/OTG option may help you authenticate and create a backup. Avoid a factory reset or a repair procedure that replaces or wipes the main board before confirming its effect on data.
Dr.Fone describes a broken-Android recovery route, but the applicability of its specific remote-control or extraction steps to a particular vivo model has not been verified here. Check the current compatibility information and available mode for your exact phone before proceeding; the screenshots below illustrate a product workflow, not guaranteed vivo, black-screen or PIN-bypass support.
How the extraction process securely functions:
-
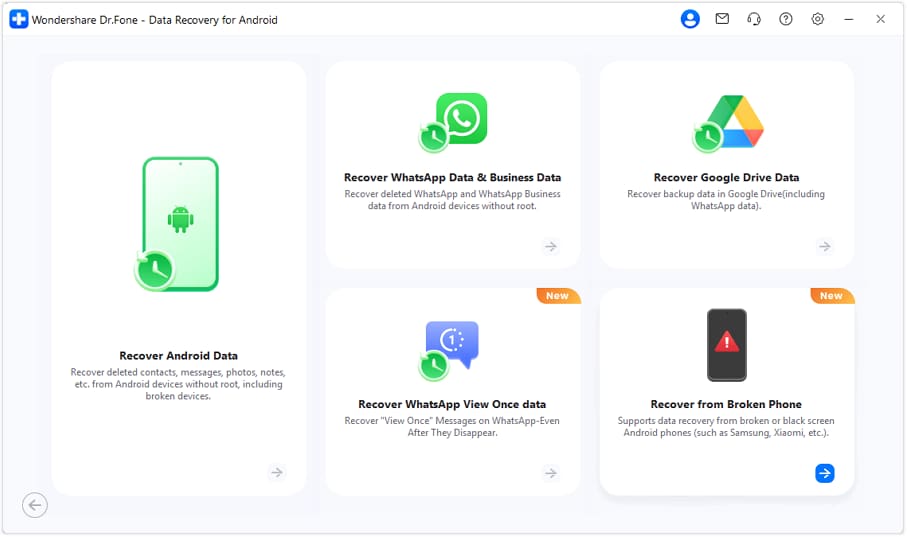
Step 1 Launch Dr.Fone and Select the Mode
On the computer, open Toolbox > Data Recovery > Android. Choose Recover from Broken Phone only if that function is offered for your exact device and the product documentation confirms the relevant condition. If no supported path appears, do not interpret a missing option as a reason to force recovery or reset the phone; pursue cloud copies or data-preserving repair instead.
-
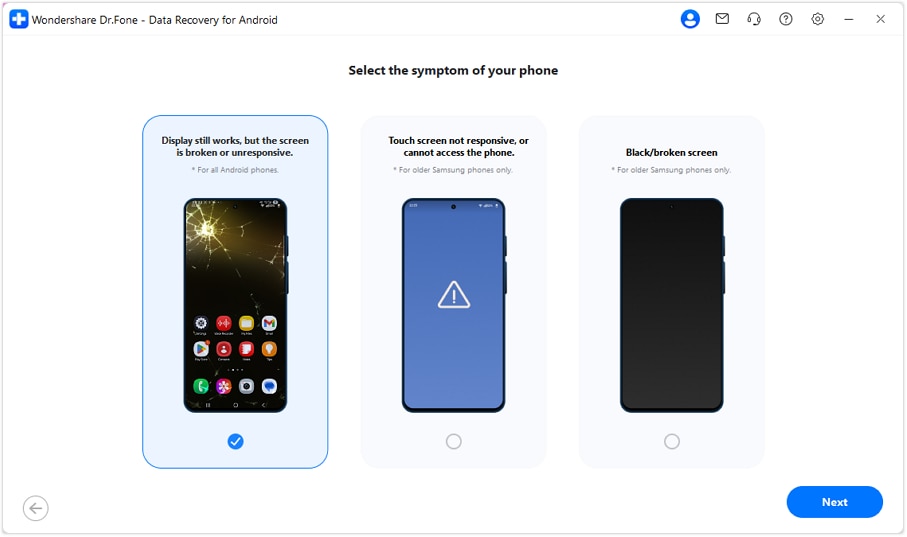
Step 2 Specify the Phone's Condition
If the application presents a device-condition choice such as Screen On but Unresponsive, select only the condition that actually matches your phone, then connect it with a reliable USB data cable. A completely black or non-booting vivo phone is a different case. Follow any on-screen prerequisites and stop if your exact model or condition is not supported.
-
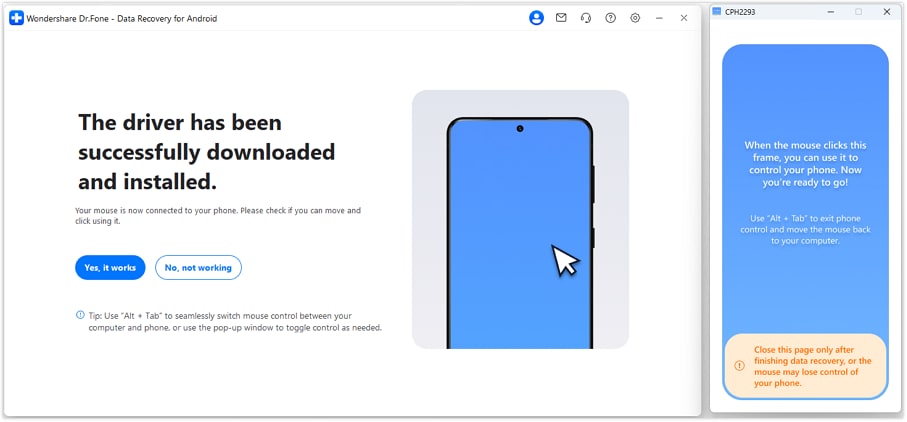
Step 3 Gain Remote Mouse Control
Some illustrated workflows offer remote mouse control after supported device checks. Do not assume this will automatically appear for a vivo phone or that software can install drivers that override a locked, unauthorized device. If the supported interface offers a control test, use it to check whether the screen can be operated, and proceed only if you can authenticate with your own credentials.
-
Step 4 Unlock and Execute Recovery
If a verified, supported method gives you control of the phone, unlock it yourself with the correct PIN or pattern, approve any required access and back up the most important files. Use the available export options shown by the software and verify the resulting copies on your computer or chosen account. This procedure is not a PIN bypass, and no cloud or social-app transfer is guaranteed for all vivo devices.
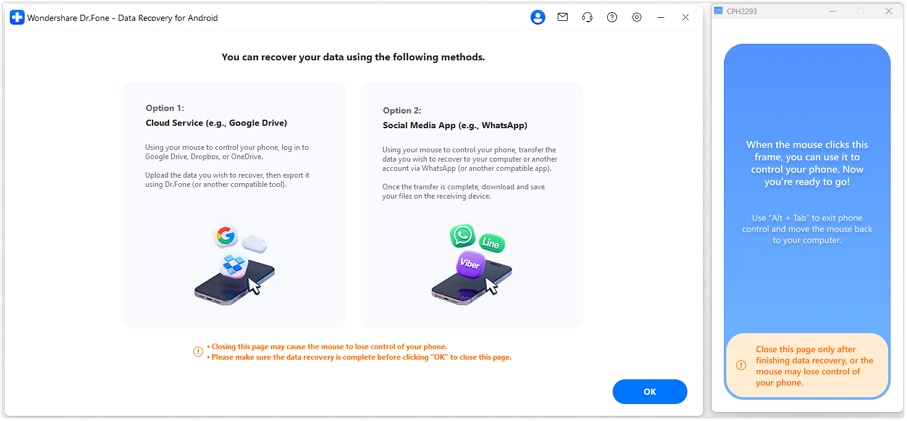
If the phone powers on and its USB/OTG settings allow it, a compatible USB mouse and OTG adapter may let you enter your own unlock credentials and initiate an ordinary backup. Display visibility, hardware support and existing permissions still matter; a mouse cannot fix a dead device, defeat encryption or retrieve files already erased. Consult a data-preserving repair specialist when authentication is not possible.
Comparison: Which Vivo Recovery Method is Right for You?
Choosing the correct recovery trajectory largely depends on precisely how you lost your data and what exact state your physical hardware is currently in. Refer to this straightforward decision matrix below:
| Feature Overview | System Trash Bin | Cloud Backups | Dr.Fone Data Recovery |
|---|---|---|---|
| Cost Aspect | Usually free while the item is retained | Account access may be free; storage or service terms vary | Free scan/preview where supported; check license before export |
| Operational Difficulty | Check the correct Albums folder; select Restore | Sign into the original account; inspect backup date and data type | Check compatibility and permissions; scan, preview and verify export |
| Backup Independent? | No: item must remain in Recently Deleted | No: an earlier synced copy must exist | Direct-device scan may work without a backup on supported, accessible devices; not guaranteed |
| Broken Screen Support? | Only if you can access the phone or repair it safely | Often accessible on another signed-in device if synced | Broken-device route is model/condition dependent; vivo support unverified |
| Expected Success Rate | Possible only while the item remains in the folder | Possible only if the right file and backup version exist | Unknown for any given vivo phone; no deep-scan success rate is established |
Proactive Tips: How to Prevent Data Loss on Your Vivo Phone
While mastering Vivo data recovery mechanics is remarkably empowering, proactive digital hygiene and prevention are infinitely more efficient than enduring the stress of post-loss repair. One of the single most globally recommended methodologies to insulate yourself against sudden catastrophic data evaporation is to definitively enable automatic backups.
In your device settings, verify whether vivo account synchronization is available in your region and which categories, such as contacts or messages, are actually included. For media, confirm that Google Photos has uploaded the files under the right account, rather than assuming the app’s presence means backup was enabled. Periodically open a copy from another device so you know the backup is usable before a loss occurs.
After a suspected deletion, pause avoidable new writes and inspect Recently Deleted, Google Photos and earlier backups first. Avoid new apps, camera captures and system updates until you have identified the data source and made a plan. Caution is sensible, but an encrypted modern phone does not offer a predictable “raw fragments” window, and software cannot guarantee recovery simply because you acted quickly.
Protecting the handset with a sturdy case and screen protector can lower the chance of physical damage, but hardware protection alone is not a backup. Keep the OS patched for security, save a separate copy of important contacts, photos and files, and verify the copies occasionally. If the screen fails, the practical priority is preserving the device and access credentials, not trying an unverified unlock or reset utility.
A useful contingency plan is to know which accounts contain your copies and how to reach a trusted, data-preserving repair provider. A PC-based tool such as Dr.Fone can be evaluated if the device, data category and route are supported; having it preinstalled does not ensure a no-backup extraction. Compare its free scan/preview result, actual export terms and your phone’s access requirements before deciding whether to pay.
Conclusion
Losing data on a vivo phone is stressful, but the safest first response is to identify where the item lived. Check the Funtouch OS Recently Deleted folder for local photos, Google Photos for media synced to the right account, and available vivo or Google account backups for contacts and supported records. Verify the source and date before any restore that could replace newer data.
If no retained copy exists, a compatible and accessible phone may be assessed with Dr.Fone - Data Recovery (Android). Its documented direct-device route can scan supported file categories and preview what is detectable; it cannot promise to reconstruct a permanently removed file or support every vivo model. For a broken display, verify exact-model and condition support before attempting the separate broken-phone workflow; if the phone cannot be authenticated, prioritize existing cloud copies and data-preserving repair.
Check the low-risk sources promptly, avoid writing new data unnecessarily and keep the original device unchanged while you evaluate options. A free software download is not necessarily free file export; inspect the actual scan result and pricing before purchase. Neither the age of a deletion nor the presence of a “deep scan” button establishes recoverability on encrypted Android storage.
FAQ
-
1. Is it safe to use a "free full version" Vivo data recovery software download from unofficial forums?
Be wary of “cracked” or unofficial full-version downloads: they may be unsafe and can put remaining personal data at risk. Use the official distribution channel and check the license terms. Dr.Fone advertises free scanning and preview on supported routes, but a free preview does not mean the missing file is recoverable or that exporting it is free; verify the actual item and current price before buying. -
2. Does operating Dr.Fone inherently require risky root access for Vivo smartphones?
Do not assume a direct vivo phone-storage scan is root-free, or that any rooting step is automatic, temporary or risk-free. The product’s explicit No Root Needed wording applies to recovery via Google Drive and supported broken-phone routes, not every Android internal-storage workflow. Check your exact model, chosen route, Android permissions and any on-screen request before proceeding. Rooting or unlocking changes can affect security or data and must not be presented as a universal solution. -
3. What is the technical procedure to recover lost photos directly from my encrypted Vivo Private Safe?
If the files are still inside vivo’s encrypted File Safe or Private Safe, use the account and authentication method supported by that feature and check any available backup. Without the credentials, consumer recovery software cannot be assumed to decrypt it. If files were deleted from the safe, inspect any safe-specific trash or previously exported copy first; a “deep scan” is not a validated way to reconstruct encrypted private data or raw fragments. -
4. If my Vivo phone refuses to power on at all, can data recovery software still extract my files?
A phone that will not power on cannot normally grant USB access to a desktop recovery application. First check Google Photos and any vivo/Google backups from another signed-in device, then ask a qualified repair provider about a data-preserving diagnosis. Modern Android encryption can make chip removal or direct flash reading useless without the original functioning hardware and keys, so neither microsoldering nor a broken-phone software mode guarantees recovery.
 Add Wondershare Dr.Fone as a preferred source on Google



