 Recover photos, messages, WhatsApp, and more — no backup
needed.
Recover photos, messages, WhatsApp, and more — no backup
needed.

 100% Security Verified | No Subscription Required | No Malware

 :
: 
 ChatGPT
 Perplexity
 Gemini
 Claude
 Grok
Grok
Losing access to your primary email address is a frustrating experience, especially if you need to recover a Gmail account without a phone number or a designated recovery email. Whether you have recently changed your mobile carrier, lost your device, or simply forgot to update your security settings, being locked out does not necessarily mean your data is gone forever.
While Google relies heavily on two-factor authentication (2FA) and text messages to verify identities, there are alternative bypass methods designed for these exact emergencies. In this comprehensive guide, we will walk you through proven techniques to regain access to your inbox, explore how to recover your Google password effortlessly, and ensure your important emails are secured.

Even after successfully recovering your account, you might realize that crucial messages were accidentally deleted alongside spam. Do not panic; we will also detail how to retrieve permanently lost emails. Let's dive straight into the recovery process!
In this article
Part 1. How to recover a Gmail Account Without a Phone number?
Under normal circumstances, Google prefers verifying user identity through an SMS verification code or an alternate recovery email. Missing both of these makes the standard protocol considerably more challenging. However, if you are actively looking to recover my Gmail password without these tools, Google's device recognition algorithms can act as a lifesaver. Here is how you can bypass the phone number requirement using a trusted device:
-
Step 1 Access the Recovery Page
To initiate the protocol, open your preferred web browser—ideally one you have used to log in before—and navigate to the official Google Account Recovery page.
-
Step 2 Input Your Email Address
Enter the email ID you are attempting to recover. Once entered, click on "Next." When prompted for a password or phone verification, immediately select the "Try another way" option located at the bottom of the window.
-
Step 3 Leverage Trusted Devices
Google's system will automatically check if your Gmail ID is currently logged into another smart device, like an old tablet or a secondary smartphone. If a trusted device is detected, Google will push a notification to it. Confirm your identity by tapping "Yes, it's me" on that secondary device.
-
Step 4 Wait for the Reset Link
After successful device verification, Google evaluates the request and sends a password reset link to your email within 48 to 72 hours. Continuously check your secondary device for this crucial email. Be sure to inspect the spam or trash folders, as strict filters can sometimes misroute official correspondence.
-
Step 5 Create a New Password
Once you receive the security email, click on the provided reset link. Follow the on-screen prompts to establish a strong, brand-new password for your account.

Part 2. How to Recover a Gmail Account with Date of Birth?
In addition to standard backup emails and smart device prompts, Google occasionally permits users to regain access by verifying deeply personal account information, such as the exact date of birth registered upon creation. While this is considered a legacy fallback method, it remains viable under specific conditions. Follow these steps:
-
Step 1 Launch the Recovery Portal
Just like the previous method, begin by visiting the Google Account Recovery page. Using a familiar Wi-Fi network or IP address significantly increases the chances of this option appearing.
-
Step 2 Enter Account Credentials
Input your target Google ID into the prompt. When asked for the secret key, click on the "Forgot Password" link. If you are managing multiple accounts, Google may present a customized list for you to choose from.
-
Step 3 Cycle Through Recovery Options
Continue to click "Try another way" on each subsequent screen to bypass phone and email prompts. Keep doing this until the system presents the "recover with the date of birth" security questionnaire. Carefully enter the correct date and hit "Next."
-
Step 4 Establish New Credentials
Once Google validates the inputted date of birth against its database, you will be granted permission to formulate a new password. Complete the setup and log into your dashboard using these newly updated credentials.
Part 3. How to Recover Deleted Emails from Gmail Within/Beyond 30 Days?
Gaining entry back into your account is a massive relief, but discovering that you accidentally wiped out critical correspondence during the process can induce panic. Fortunately, Google's ecosystem provides robust safety nets. Restoring data deleted within a 30-day window is incredibly straightforward. However, retrieving messages purged beyond that timeframe requires navigating administrative loopholes. Read through the following strategies to salvage your missing inbox data.
For steps tailored to Apple devices, see the complete guide on how to recover deleted Gmail emails on iPhone using Trash, account recovery, backups, and recovery tools.
Recover Deleted Emails Within 30 Days
Whenever you delete a message in Gmail, the platform does not erase it instantly. Instead, it moves the data into a hidden "Trash" directory, holding it in limbo for precisely 30 days before executing a permanent wipe. You can seamlessly restore them by following these steps:
- Step 1: Log into your Gmail interface. Navigate to the left-hand sidebar menu, expand the categories if necessary, and click on the "Trash" folder. Scroll through to locate the mistakenly deleted email.

- Step 2: If the trash bin is overflowing and manual searching is tedious, click the "Show search options" icon located directly on the right side of the main search bar to run an "Advanced Search."

- Step 3: Populate the fields with known keywords. You can input the sender's address, specific phrasing from the email body, or the exact subject line. After filling out the parameters, click "Search."
- Step 4: Once your missing message appears in the results, check the selection box on the left-hand side. Finally, click the Move to icon at the top menu and select Inbox to fully recover your lost email.

Recover Deleted Emails Beyond 30 Days
If you bypassed the trash bin by permanently deleting an email, or if the standard 30-day grace period has already expired, traditional recovery methods will fail. However, server-side data often lingers for up to 25 additional days before being overwritten completely. Here is how you can submit specialized retrieval requests:
Method 1: Via Gmail Support Team
For standard consumer accounts, your best recourse is pleading your case to the Google Help administration. Occasionally, the Google support team possesses backend tools capable of unearthing emails purged well past the 30-day mark. Head over to the official Gmail Help Community Page or the Google Support center to submit a specialized recovery ticket to their team of experts.
Crucial Tip: Be prepared to provide the support staff with highly specific contextual data about the lost emails, including exact timestamps, sender domains, and specific subject lines, mimicking the information required in an advanced search query.
Method 2: From the Admin Console
If you operate within a corporate or educational environment, your data recovery capabilities are vastly superior. Administrators have extensive override powers to restore purged data directly from the backend console.
- Step 1: Access the Google Admin Console interface and log in using an account with overarching administrator privileges.
- Step 2: Navigate to the primary Menu, drop down to Directory, and select Users.
- Step 3: From the generated "Users List," locate the specific individual whose emails are missing. Click on their profile, proceed to More Options, and select Restore Data. Define the specific date range, and the server will repopulate the missing emails into the user's inbox.
Note: This powerful feature is strictly limited to "Google Workspace" accounts. Personal @gmail.com addresses do not have an admin console. If you are part of an organization, immediately contact your IT administrator to initiate this process.
Part 4. Use Dr. Fone to Recover Gmail Data
Relying solely on Google's cloud servers or a 30-day trash folder leaves your critical correspondence vulnerable to permanent loss. Accidental deletions are inevitable, and scrambling to find workarounds after the fact is highly stressful. The most intelligent, proactive approach is to preemptively back up your Gmail application data locally.
Among the myriad of third-party utility applications available, Wondershare Dr.Fone stands out as a premier solution for securing and retrieving your digital footprint. This software empowers you to seamlessly back up application data and restore specific files precisely when emergencies strike. It eliminates the need for complex technical knowledge and works flawlessly across diverse operating systems.
 Recovers data after deletion, crashes, or device damage.
- Supports photos, messages, contacts, WhatsApp, and more.
- Supports all major iPhone, iPad, and iPod models.
- Preview and recover only what you need.

Safeguarding your device with Dr.Fone guarantees that a locked Gmail account or an accidental purge will never permanently destroy your most valuable attachments and correspondence.
Solution 1: Manually Back Up the Data
Taking direct control over your digital archiving ensures your files are secured exactly when you want them to be. Follow these steps to initiate a manual, offline backup of your critical data:
-
Step 1 Launch the Backup Tool
Connect your smartphone to your computer. On the primary Dr.Fone dashboard, navigate to the “My Backup” tab and click on “Back Up Now.” This powerful feature systematically compiles all available data on your Android or iOS device, including crucial application data such as cached emails, downloaded photos, and critical documents.
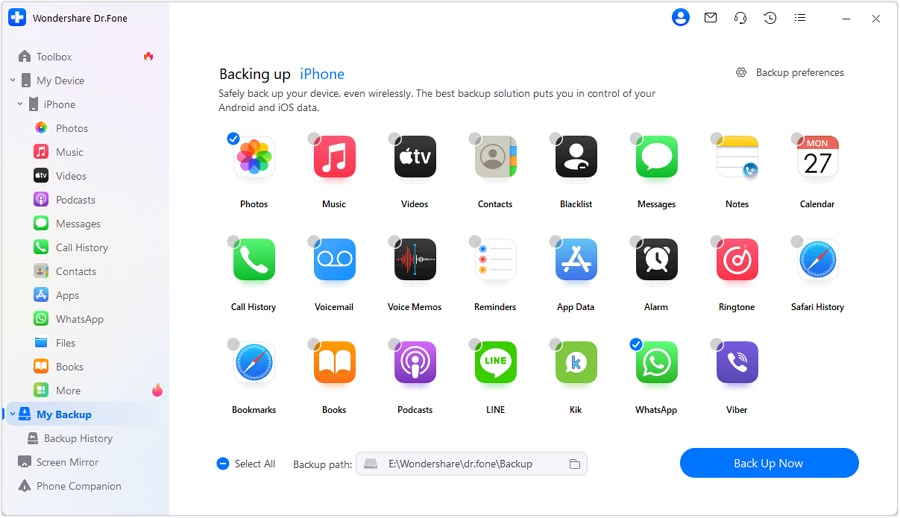
-
Step 2 Allow the System to Process
The software requires a few moments to thoroughly detect and organize the available files. Please be patient and allow the progress bar to reach a complete 100% without unplugging your device.

-
Step 3 Verify Your Stored Archives
Once the system finalizes the backup, click on the “view backups” button or select “open in folder” to browse the secure archive created by Dr.Fone locally on your machine.
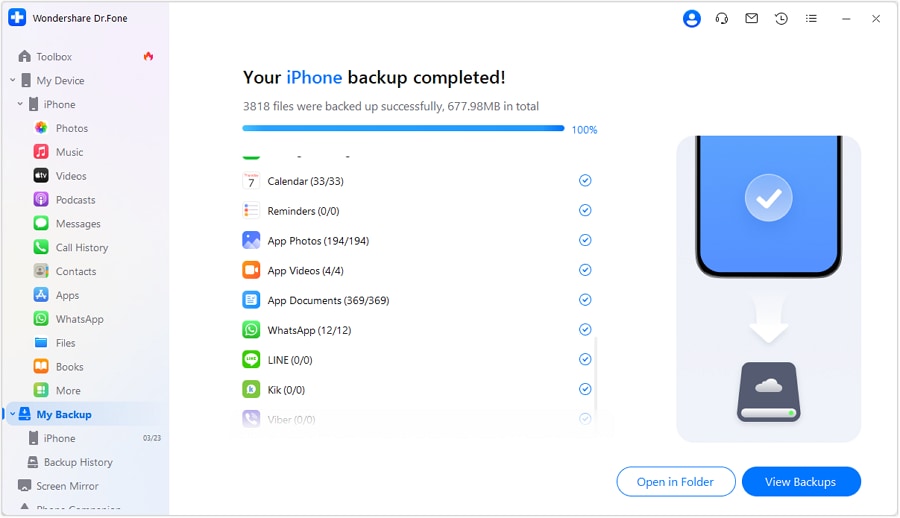
That is entirely it. Whenever you suffer data loss, simply navigate to “my backups,” handpick the specific files you need to recover, and click “restore to device” to inject your deleted emails and attachments back into your smartphone.
Solution 2: Configure Auto-Backup Scheduling
If manually plugging in your smartphone feels like a tedious chore, Dr.Fone offers an incredibly convenient wireless auto-backup function. This guarantees your data is preserved silently in the background.
-
Step 1 Access the Auto-Backup Preferences
Ensure that both your smartphone and the computer running Dr.Fone are connected to the exact same Wi-Fi network. From the main interface, navigate directly to “My backup > Backup preferences.”
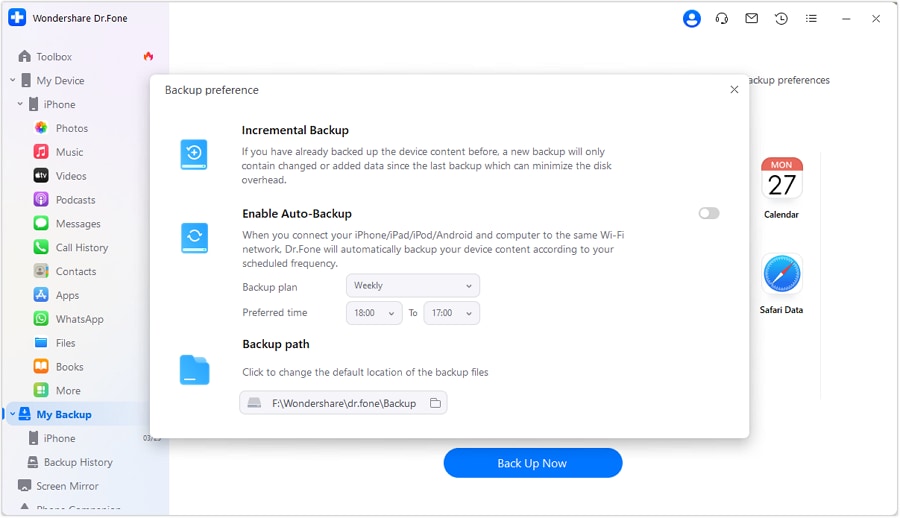
-
Step 2 Define Your Backup Parameters
In the newly generated settings window, toggle the auto-backup switch to the "On" position. Proceed to define your specific backup plan, establishing a preferred frequency and time block for the software to securely sync your data over the air.
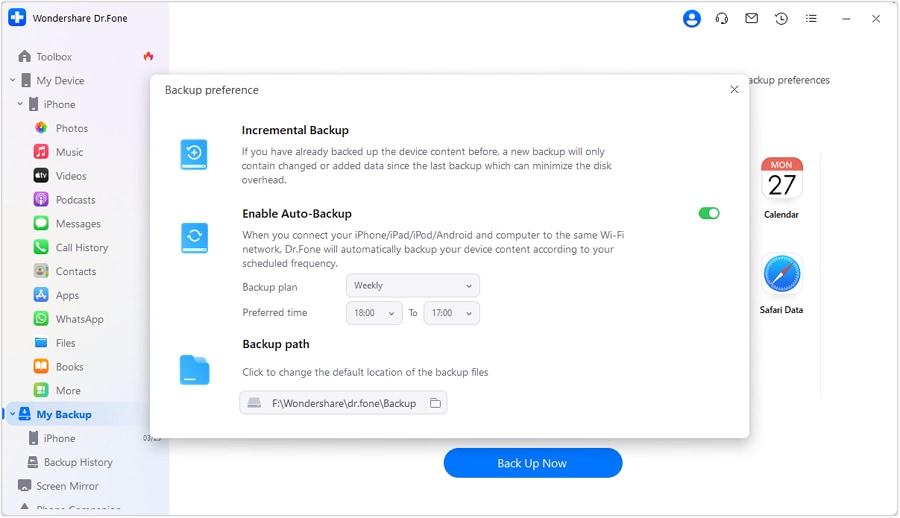
-
Step 3 Restore at Your Convenience
With an automated safety net established, you can comfortably clear out your inbox without fear of permanent loss. Should an emergency arise, open the “Backup history” log on the main dashboard to seamlessly review and restore your archived attachments on demand.
Conclusion
We hope this comprehensive manual empowers you to effectively recover your Gmail account without a phone number and effortlessly retrieve mistakenly deleted correspondence. Over the past few years, Google has significantly strengthened its backend security algorithms, meaning that many users utilizing trusted devices might bypass detailed verification hurdles entirely.
However, because there remains no guaranteed safety net for recovering emails purged permanently from Google's servers, adopting a proactive stance is highly recommended. Establishing a localized digital vault using robust software like Wondershare Dr.Fone is the smartest decision you can make to protect your sensitive attachments and restore them seamlessly whenever catastrophe strikes.




FAQ
-
1. Can I recover a Gmail account if I lost my phone and backup codes?
Yes, you can still recover your Gmail account without a phone number or backup codes by using a recognized device. If you try to log in from a computer or tablet where your account is already active, Google can send a prompt to that device asking you to verify your identity. -
2. How long does Google take to review account recovery requests?
If you lack standard verification methods and must rely on manual recovery options, Google generally takes anywhere from 48 to 72 hours to review your request. During this period, they evaluate the device history, IP addresses, and other background metrics to verify your ownership. -
3. Why is Google not giving me the 'Date of Birth' recovery option?
The 'Date of Birth' verification is considered a legacy fallback method. Google's modern security protocols prioritize two-factor authentication, trusted devices, and backup emails. If your account has advanced security enabled, the system bypasses the birthdate option entirely to prevent unauthorized access. -
4. Are permanently deleted Gmail emails truly gone forever?
For standard personal accounts, emails deleted from the Trash folder are generally wiped permanently and cannot be restored. However, if your address is part of a Google Workspace, your IT administrator has a brief 25-day window to use the Admin Console and retrieve the purged data from the backend servers.
 Add Wondershare Dr.Fone as a preferred source on Google


