 Recover photos, messages, WhatsApp, and more — no backup
needed.
Recover photos, messages, WhatsApp, and more — no backup
needed.

 100% Security Verified | No Subscription Required | No Malware

 :
: 
 ChatGPT
 Perplexity
 Gemini
 Claude
 Grok
Grok

I was cleaning up my gallery and accidentally wiped out my entire vacation album. The recently deleted folder is empty. How to recover deleted photos after deleting from recently deleted?
Anonymous User
Imagine opening your device's photo gallery only to discover that your most cherished memories—irreplaceable vacation snapshots, family milestones, or critical work documents—have been accidentally wiped out. It is undoubtedly a moment of panic. However, there is no need to lose hope. In the vast majority of cases, it is entirely possible to learn how to recover deleted photos, even if your phone's 'Recently Deleted' folder has already been emptied.
The key to a successful recovery is time. You must initiate the restoration procedure before any new data overwrites the deleted digital files on your device's storage. Act fast! This comprehensive, step-by-step guide explores reliable, proven methods to help you understand how to restore photos on both iPhone and Android seamlessly, preventing permanent data loss.
In this article
Part 1: What To Do Immediately After Deleting Photos
Before attempting any technical fixes, you need to secure your device's current state. The data still exists on your phone's storage drive, but the space it occupies has been marked as 'available'. Here is exactly what you must do:
1. Stop All Phone Usage Immediately
The cardinal rule of data recovery is to prevent data overwriting. Stop using your phone for anything new. Do not take new photos, record videos, download apps, or install system updates. Every new byte of data introduced to the system increases the likelihood of permanently corrupting the deleted photos.
2. Check the 'Recently Deleted' or Trash Folders
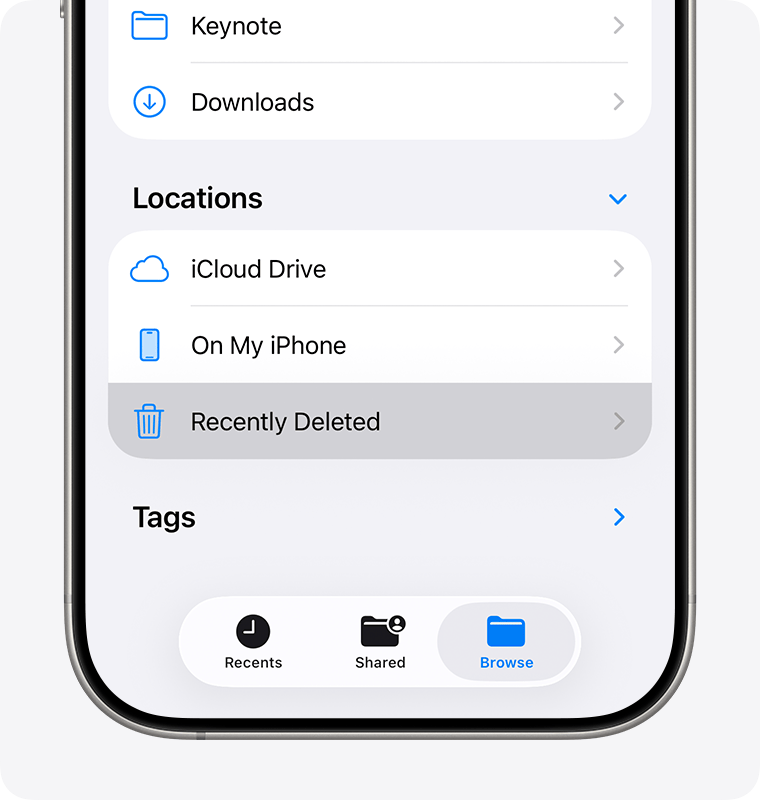
If you are wondering how to recover deleted photos after deleting from recently deleted, you first need to confirm they are actually gone from the native fallback folders. Both major mobile operating systems feature a built-in safety net.
- On iPhone: Launch the Photos app, tap on Albums, and scroll down to Recently Deleted. Apple typically retains deleted media here for exactly 30 days before permanently purging them.
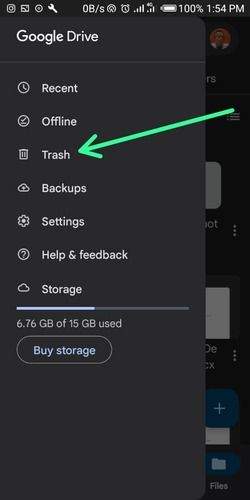
- On Android: Open the Google Photos application, navigate to Library, and select Trash (or Bin). Similarly, items backed up to the cloud remain here for 60 days, while unbacked-up items stay for 30 days.
3. Restore the Located Photos
If fortune is on your side and the deleted photos remain in these protective folders, simply select the desired images and tap the "Recover" or "Restore" button. They will instantly return to your main gallery.
4. What If They Are Missing?
If the pictures are completely missing from the Recently Deleted/Trash folder—or if you manually emptied the folder—do not panic. Crucially, do not factory reset your device in a desperate attempt to fix it, as this will encrypt and permanently obliterate the recoverable data. Move straight to the recovery methods in the subsequent sections.
Part 2: How to Recover Deleted Photos from Built-in & Cloud Backups
Often, the simplest answer to how to restore deleted photos lies in the cloud. Most modern smartphones automatically synchronize your media to a cloud service in the background.
A. For iPhone/iPad Users: Recover Deleted Photos Using iCloud
If you had iCloud Photos enabled prior to the data loss, there is a strong possibility you can recover your deleted photographs by restoring an iCloud backup. Here's how to retrieve deleted photos from Apple's ecosystem:
-
Step 1 Verify the Backup Status
Ensure you have a recent iCloud backup available by checking Settings > [Your Name] > iCloud > iCloud Backup.
-
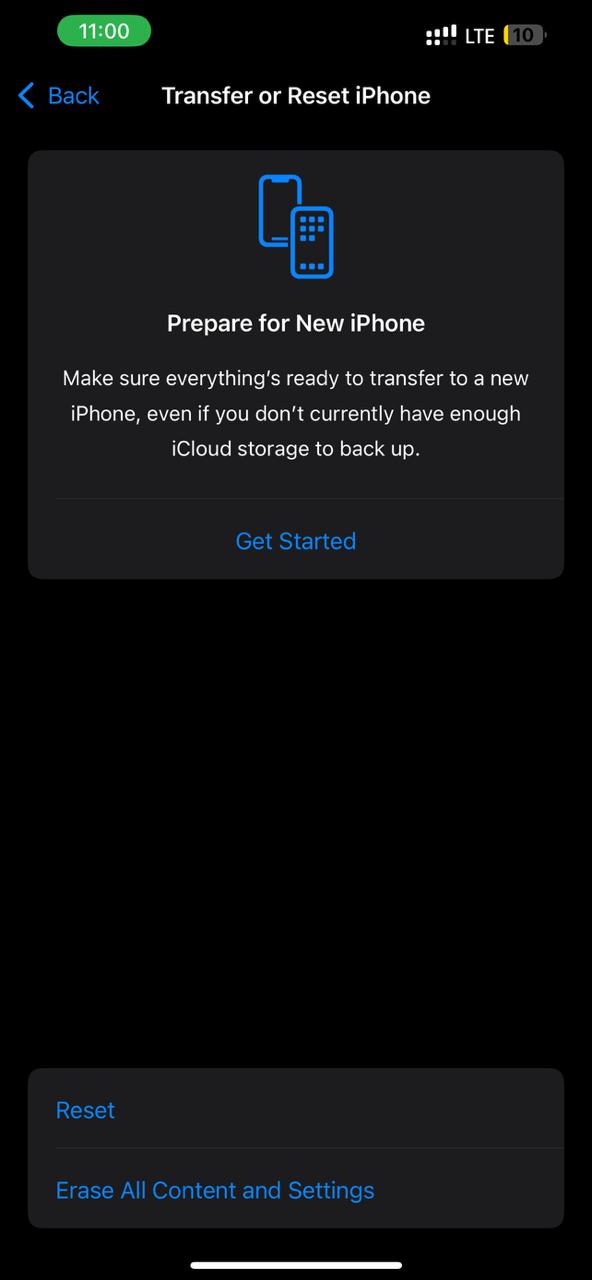
Step 2 Erase the Device
Go to Settings > General > Transfer or Reset iPhone > Erase All Content and Settings. Note: This will wipe your current data, so only proceed if you are certain the backup contains your photos.
-
Step 3 Restore from iCloud
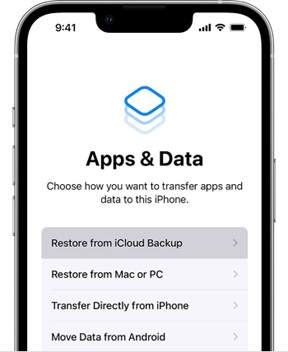
Follow the on-screen setup prompts until you reach the Apps & Data screen. Select "Restore from iCloud Backup" and log in with your Apple ID.
B. For Android Users: Recover Deleted Photos Using Google Backups
Google Photos is the default cloud recovery method for Android users. If your device was connected to Wi-Fi, your pictures were likely backed up automatically. Alternatively, proprietary cloud storage services like Samsung Cloud or Mi Cloud offer excellent lifelines. Here is how to restore photos effortlessly:
-
Step 1 Launch Google Photos
Open the Google Photos application on your Android smartphone or tablet.
-
Step 2 Search the Trash
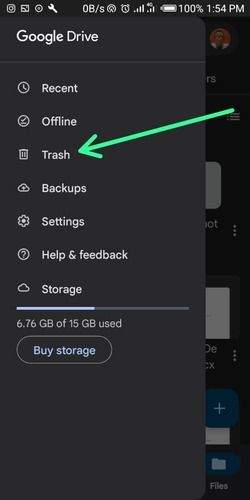
Navigate to Library > Trash to check if the synchronized copies are resting there. Remember, Google Photos retains these for 30 to 60 days.
-
Step 3 Restore to Gallery
If you spot the missing media, long-press the photos to select them and tap the "Restore" button at the bottom.
-
Step 4 Check Manufacturer Clouds
If they aren't in Google Photos, open your device's built-in cloud service (like Samsung Cloud) and inspect the synced galleries or recycle bins there.
-
Step 5 Utilize Google One
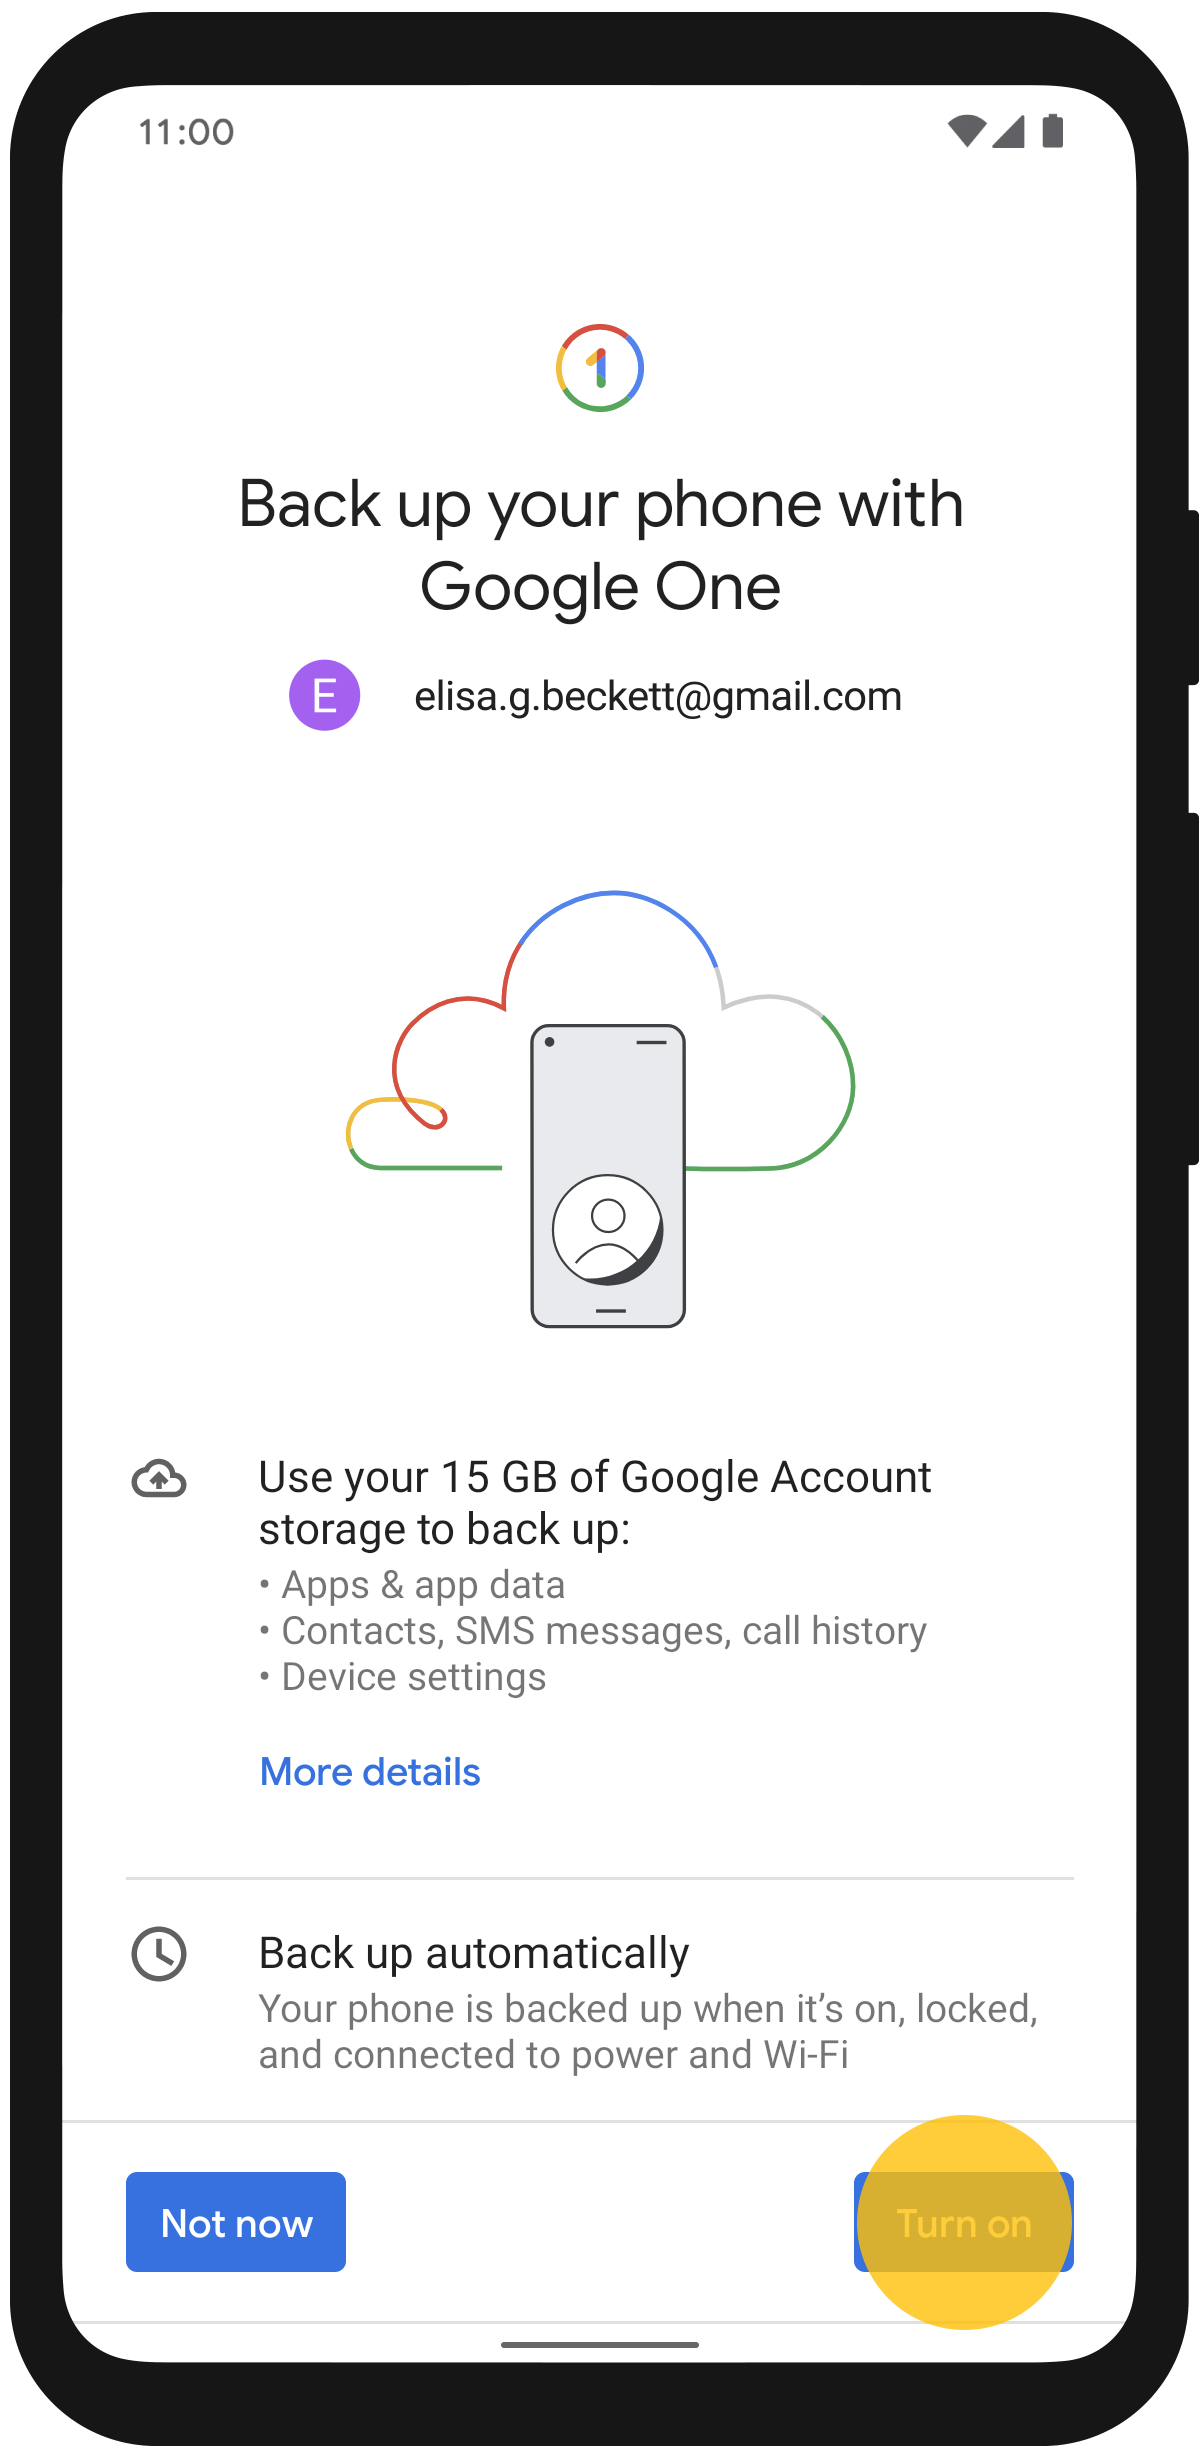
If you have a comprehensive Google One device backup, you might be able to restore your device to a previous state containing the deleted files via the Google One app.
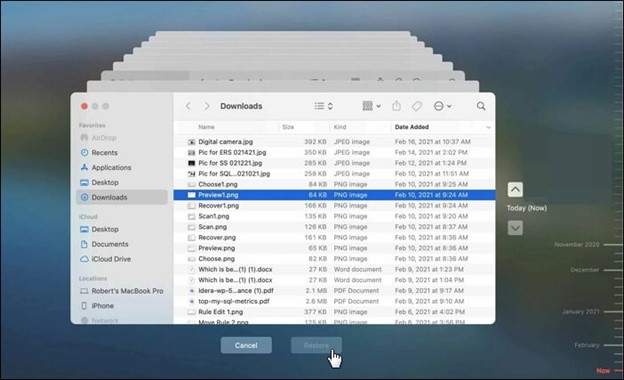
C. For Both Platforms: Restore Deleted Photos from Computer Backups
If you routinely connect your smartphone to a PC or Mac, you might have local backups of your photo libraries. Here is how to recover deleted photos from desktop environments.
Windows File History
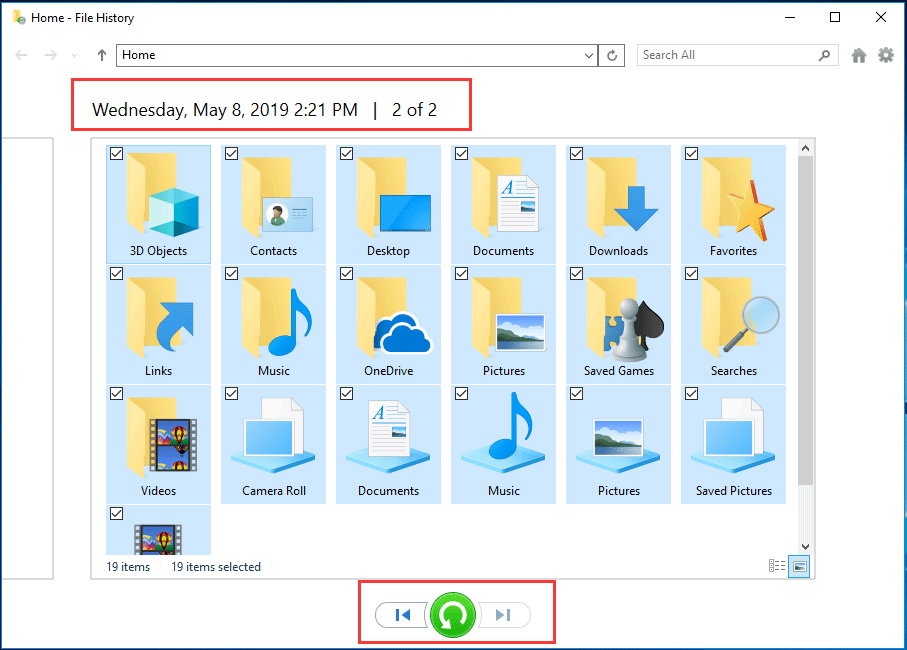
For those utilizing a Windows PC to organize smartphone media, the native File History feature is incredibly useful.
- Step 1: Connect your external backup drive. Launch File History from the Windows Search bar.
- Step 2: Navigate to the specific directory where your mobile photos were previously synced or stored.
- Step 3: Utilize the timeline slider at the bottom to travel back to a date prior to the deletion incident.
- Step 4: Select the missing image files or entire photo folders.
- Step 5: Click the green Restore button to push them back to their original location.
macOS Time Machine
For Mac users who back up their iPhone via Finder or iTunes, Time Machine serves as the ultimate local safety net.
- Step 1: Connect your dedicated Time Machine backup drive to your Mac.
- Step 2: Open Time Machine and use the right-side timeline to pinpoint the exact date before the photos were lost.
- Step 3: Locate your photo library or specific backup folders.
- Step 4: Highlight the needed items and click Restore to retrieve them immediately.
Part 3: How to Retrieve Permanently Deleted Photos Without Backup
Losing photographs of great personal value without any cloud or local backup to fall back on can be incredibly stressful. When native options fail, specialized data recovery software becomes necessary to dig into the device's internal memory architecture.
A. Recovering iOS Photos
 Recovers data after deletion, crashes, or device damage.
- Supports photos, messages, contacts, WhatsApp, and more.
- Supports all major iPhone, iPad, and iPod models.
- Preview and recover only what you need.

For iPhone and iPad users, Dr.Fone – Data Recovery (iOS) provides a highly dependable and secure way to bring back lost data at an industry-leading success rate. It thoroughly scans your device's internal storage, bypassing the need for an iCloud backup.
This powerful application supports over 35 file types, meaning it does not just help with how to recover photos—it also retrieves messages, contacts, WhatsApp chats, and iWork files. Whether your iOS device suffered water damage, a system crash, or accidental formatting, it allows you to selectively preview and extract data without overwriting your existing files.




B. Recovering Android Photos
- Scan Android phones and tablets directly.
- Preview and recover only what you want.
- Supports WhatsApp, photos, videos, contacts, and more.
- Works with 6000+ Android devices.
When an Android phone lacks a backup, Dr.Fone – Data Recovery (Android) emerges as a robust solution. With compatibility across more than 6,000 distinct Android models and support for 14+ file categories, it dives deep into the system blocks to rescue your assets.
It uniquely grants users the power to extract media from complex scenarios—including charred phones, completely black screens, or devices that lack root access. The real-time preview interface ensures you only restore exactly what you need. Here is how to retrieve permanently deleted photos utilizing this advanced software:
-
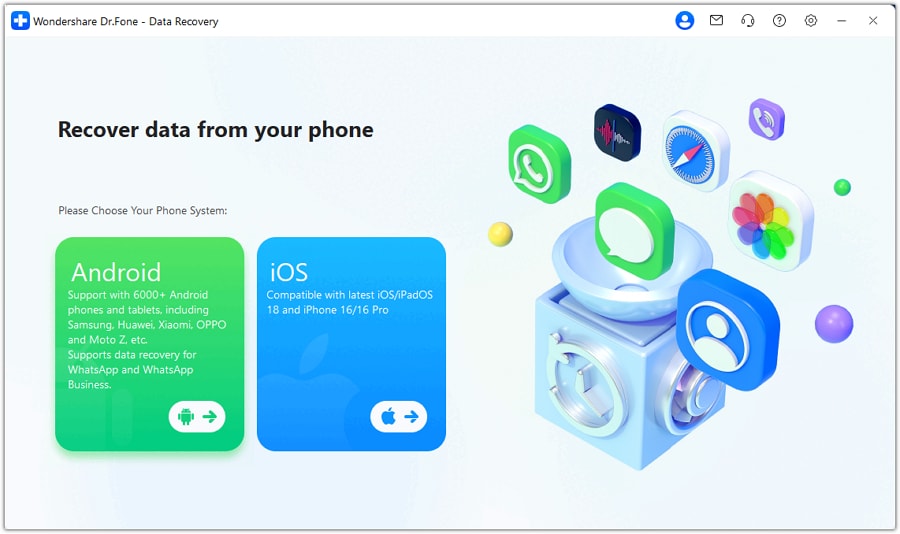
Step 1 Launch Dr.Fone and Select Android
Start the Wondershare Dr.Fone software suite on your desktop PC. From the main interface, navigate to Toolbox > Data Recovery > Android.
-
Step 2 Decide on the Recovery Option
From the presented list of functional modules, explicitly choose the "Recover Android Data" option to scan the internal drive.

-
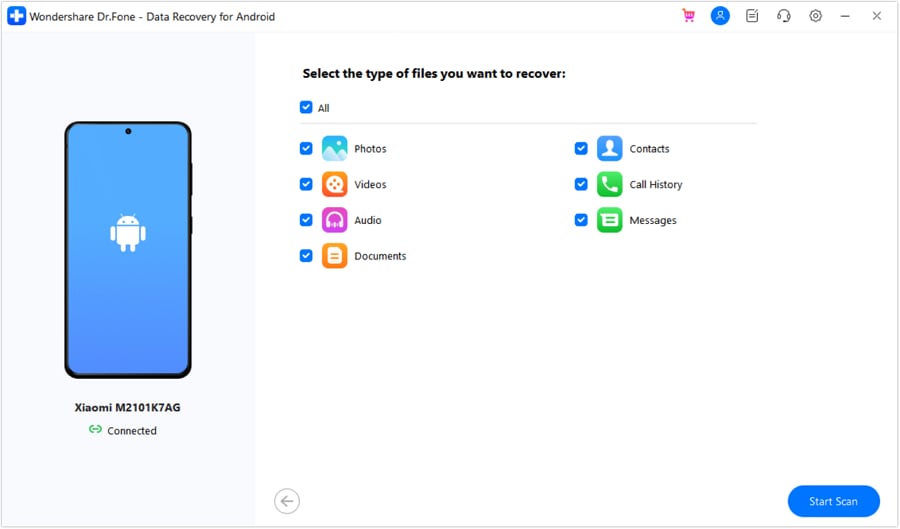
Step 3 Hook Up Your Android Device
Securely connect your Android smartphone or tablet to the computer via a high-quality USB cable. Allow Dr.Fone a moment to recognize and authenticate the device autonomously. Afterward, choose "Photos" (and any other file types you wish to recover) and press "Start Scan".
-
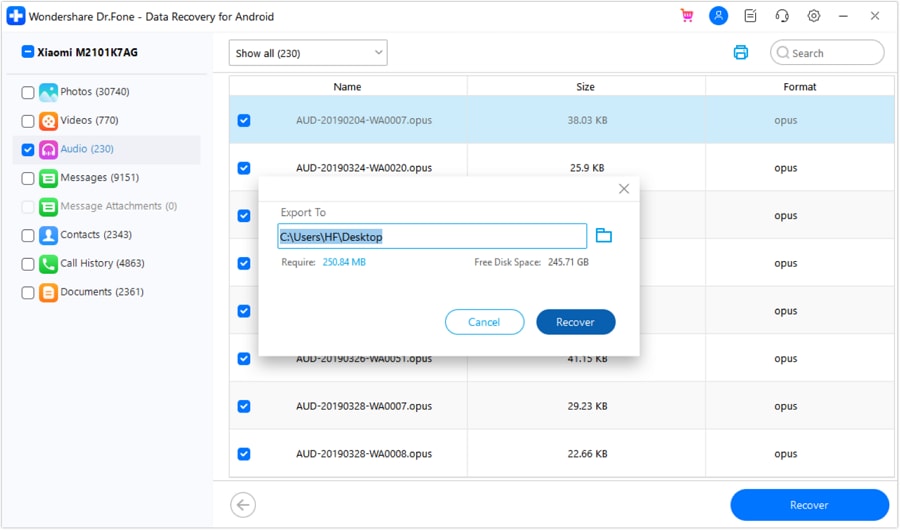
Step 4 Preview and Restore Data
Once the intensive deep scan concludes, you can visually preview all the retrievable images. Tick the specific checkboxes next to the photos you want back and tap the "Recover" button. Finally, specify a secure folder on your PC to export and save the recovered files safely.
Part 4: Advanced Ways to Recover Deleted Photos
If standard recovery protocols have yielded no results, it is time to explore advanced, lesser-known techniques. Often, files leave digital footprints across the system that can be capitalized upon.
A. Recovering Photos via Hidden or Cached Files
Particularly on Android OS architectures, prominent gallery and messaging applications—such as WhatsApp, Telegram, Viber, and Instagram—routinely generate localized caches or hidden thumbnail folders. These caches preserve images for a short transitional period. This is highly effective immediately following a deletion and requires no third-party software.
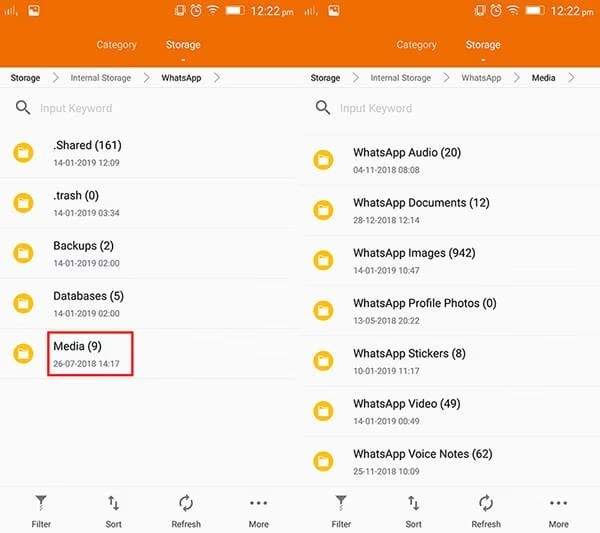
- Step 1: Launch your preferred native File Manager app on Android. Navigate sequentially to Internal Storage > Android > data > com.whatsapp > files > WhatsApp > Media.
- Step 2: Thoroughly examine sub-folders designated as Images, Sent, or Private.
- Step 3: If you discover cached versions of your lost photos, promptly copy them to a completely safe, independent folder outside the app directory to halt future automatic cache-clearing mechanisms.
B. Checking Cloud Synced Apps Other Than Photos
Modern productivity and social apps frequently operate with broad permissions, meaning they might automatically sync or duplicate photos to cloud repositories without explicit user awareness.
- Step 1: Access alternative cloud services you might have installed, such as Dropbox, Microsoft OneDrive, Amazon Photos, or Box, by logging into the account tethered to your smartphone.
- Step 2: Systematically search for directories conventionally named Uploads, Camera Uploads, Media, or dedicated app-specific folders.
- Step 3: Investigate the app's internal Trash, Recycle Bin, or Recently Deleted sector. Deleted cloud files are typically quarantined here temporarily before total eradication.
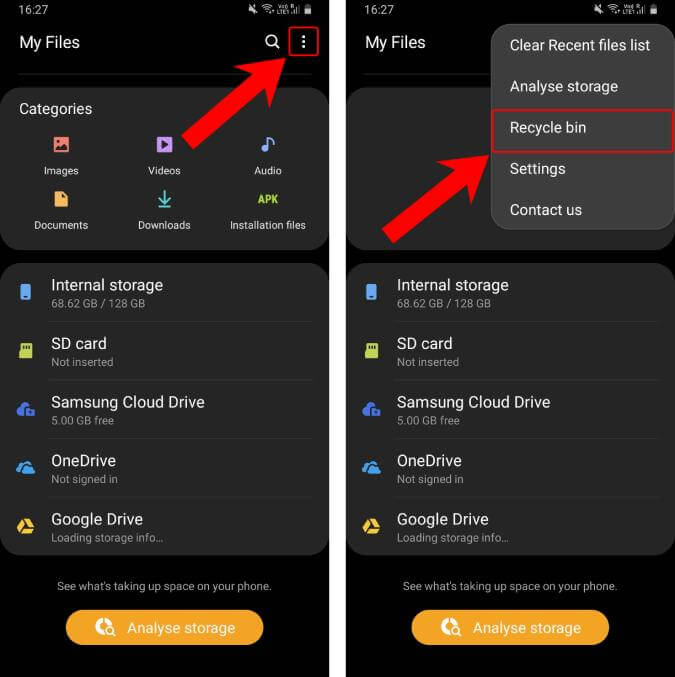
- Step 4: Once identified, select the misplaced photos and deploy the Restore or Download function to export them back to your local drive.
C. Recovering Photos from SD Cards and External Storage
If your Android device relies on external MicroSD expansion for photo storage, the recovery paradigm shifts. First, switch off your phone immediately to strictly stop data overwriting. Remove the SD card meticulously.
Next, insert the SD card into a dedicated card reader connected to a PC or Mac. Boot up a trusted desktop-grade photo recovery software suite—such as Disk Drill or PhotoRec. Instruct the software to scan the external SD drive letter. Preview the recovered blocks, and crucially, save the restored image files directly to your computer's hard drive, never back to the compromised SD card to avoid corruption.
Part 5: Prevention: How to Never Lose a Photo Again
While mastering how to recover photos is a valuable skill, avoiding the crisis altogether is infinitely better. Establishing a few simple, automated habits can permanently safeguard your visual memories from accidental deletion or hardware failure.
- Enable Automatic Cloud Backups: This single step is paramount. Ensure iCloud Photos or Google Photos is toggled 'On'. Your pictures will sync continuously, ensuring recovery remains trivial even if your smartphone is stolen, mechanically destroyed, or subjected to an unexpected factory reset.
- Utilize the 'Archive' Feature Properly: Instead of deleting photos to declutter your primary gallery timeline, use the native 'Archive' function. Archived photos are hidden from everyday view but remain securely stored and fully intact, easily retrievable when needed.
- Execute Regular Local Backups: Cloud services can suffer from account lockouts or payment lapses. Periodically connect your device to a PC and physically transfer your photo library to an external hard drive. This 3-2-1 backup strategy serves as an impenetrable double safety layer.
- Pause Before Purging Trash Bins: Cultivate a disciplined habit of manually reviewing the contents of the Recently Deleted, Trash, or Bin folders before hitting the "Empty All" button. That final, deliberate glance is often the only thing preventing permanent erasure.
Conclusion
Understanding how to recover deleted photos effectively hinges on taking immediate action and leveraging the right methodology for your situation. By carefully utilizing your device's built-in safeguards—like the native Recently Deleted folders, background cloud synchronization, and thorough computer backups—you can reverse most accidental deletions effortlessly.
In scenarios where a safety net is entirely absent and files are permanently purged, deploying a highly dependable, professional-grade utility like Dr.Fone – Data Recovery remains the optimal strategy to safely bypass OS limitations and restore your valuable digital memories.
Ultimately, the best recovery tool is preparation. Establishing robust, automated cloud syncing habits and executing periodic local backups ensures that your precious memories remain completely secure, not just in 2026, but indefinitely.
FAQ
-
1. Can I recover permanently deleted photos from my iPhone without a computer?
Yes, you can recover them without a computer if you have an existing iCloud backup. You will need to erase your iPhone's current data and choose "Restore from iCloud Backup" during the initial setup process. If you don't have a backup, you will definitively need to use desktop-based recovery software like Dr.Fone. -
2. How long do photos stay in the Recently Deleted folder on Android?
On Android devices using Google Photos, deleted items remain in the Trash for 60 days if the photos were previously backed up to the cloud. If the photos were not backed up and only stored locally on the device, they will be permanently deleted after 30 days. -
3. Why is it important to stop using my phone immediately after deleting photos?
When you delete a photo, the operating system doesn't immediately destroy the file; it simply marks the storage space it occupies as "available." If you continue using your phone (taking new photos, receiving messages, downloading apps), new data may be written over that available space, permanently corrupting and destroying the deleted photos. -
4. Are third-party photo recovery apps safe to use?
Reputable third-party recovery applications from established developers (like Wondershare Dr.Fone) are highly safe. They utilize "read-only" scanning algorithms to examine your device's storage, ensuring they do not alter, overwrite, or maliciously collect your existing personal data during the extraction process.
 Add Wondershare Dr.Fone as a preferred source on Google



