 Recover photos, messages, WhatsApp, and more — no backup
needed.
Recover photos, messages, WhatsApp, and more — no backup
needed.

 100% Security Verified | No Subscription Required | No Malware

 :
: 
 ChatGPT
 Perplexity
 Gemini
 Claude
 Grok
Grok

I accidentally deleted several crucial business contacts from my Galaxy S23. Is there a reliable way to restore contacts from my Samsung account before they are gone forever?
A concerned Samsung User
Losing essential contacts on your mobile device can quickly turn into a highly stressful ordeal. Even if you handle your smartphone with the utmost care, unexpected data loss can still strike due to various reasons, such as a corrupted Android operating system update, aggressive malware, or simply an accidental swipe that erases vital data. Fortunately, the situation is rarely permanent. There are highly effective strategies to restore contacts from Samsung accounts in 2026, even in worst-case scenarios where your smartphone suffers physical damage or the screen becomes completely unresponsive.

This comprehensive guide delves into the most reliable and efficient methods to help you achieve seamless Samsung contact recovery. Whether you have a recent cloud backup or need an advanced data extraction tool, we will cover exactly what you need to do. Let’s dive straight into the solutions!
In this article
Part 1. How to Restore Contacts From Samsung Account via Smart Switch
Realizing that you have lost phone numbers, call histories, or important business details is certainly distressing. However, if you have been proactive about preserving your data, the recovery process is incredibly straightforward. By utilizing the official Samsung Smart Switch application, users who have previously backed up their devices can seamlessly retrieve contacts from a Samsung account in a matter of minutes.

Follow these precise steps to restore your deleted or lost contacts using the Smart Switch desktop client:
-
Step 1 Download and Install Smart Switch
First, navigate to the official samsung.com website using your preferred web browser. Search for the "Smart Switch" desktop application tailored for your PC or Mac. Download the installer package and follow the on-screen instructions to set it up. Once the installation finishes, launch the application to begin.

-
Step 2 Establish a Connection with Your Computer
Next, you need to link your Samsung smartphone to your computer. You can do this securely using a compatible, high-quality USB cable, or opt for a wireless connection if both devices are on the same network. Wait a few moments for the software interface to successfully recognize and display your mobile device.

-
Step 3 Initiate the Restore Process
Once the Smart Switch dashboard confirms the connection, locate the primary menu options on the screen. Click on the large “Restore” module. This assumes that you have previously created and saved a backup file containing your address book on this specific computer.

-
Step 4 Select the Contact Data to Retrieve
The system will prompt you to choose the exact backup file you wish to use. Browse through the available historical backups and selectively check the box next to "Contacts" (or any other data type you wish to retrieve). After making your selection, click the “Restore” button at the bottom of the screen to authorize the transfer.

-
Step 5 Monitor the Restoration Progress
The duration of this process varies based on the volume of data being moved. Be patient and wait for a few minutes. You can easily track the current status via the progress bar displayed on the pop-up window. Do not disconnect the phone during this phase.

-
Step 6 Finalize the Setup
Upon completion, a success message will appear on your screen. Click “OK” to close the dialog and finalize the session. You have now successfully managed to download contacts from the Samsung account backup straight into your mobile device.

Part 2. The Best Way to Recover Contacts from Samsung Phones Without Backup
While Samsung Smart Switch offers an incredibly convenient pathway to reclaim lost information, it has one major limitation: it is practically useless if you failed to create a backup file prior to losing your contacts. However, this does not mean your valuable phone numbers are gone forever. Wondershare Dr.Fone - Data Recovery (Android) emerges as the most powerful third-party utility designed to thoroughly recover contacts from a Samsung account and local device storage directly.
Beyond merely recovering contact lists, Dr.Fone is an all-in-one rescue toolkit. It fully supports the retrieval of diverse file formats, whether you need to bring back deleted text messages, important audio files, cherished photographs, or high-definition videos. If data goes missing, Dr.Fone is your ultimate safety net.
 Scan Android phones and tablets directly.
- Preview and recover only what you want.
- Supports WhatsApp, photos, videos, contacts, and more.
- Works with 6000+ Android devices.

The technical logic that makes this possible is fascinating yet simple. When you delete a file (such as a contact) from your smartphone's internal storage, the system does not destroy the file immediately. Instead, it marks that specific storage block as "available" for new data. As long as you have not downloaded new apps or taken new photos that overwrite this hidden space, specialized software can still pull the deleted files from the depths of the memory. It functions much like erasing a chalkboard—the faint outline remains visible until new chalk covers it entirely.
Furthermore, Dr.Fone's broad compatibility across multiple operating environments (Android, Windows, iOS, Mac) easily outshines conventional recovery solutions. Here is the definitive step-by-step procedure to leverage this tool and successfully retrieve contacts from a Samsung account:




-
Step 1 Launch Dr.Fone and Connect Your Device
Open your browser and navigate to the official Wondershare Dr.Fone website. Download and install the Data Recovery (Android) module onto your computer system. Upon launching the primary dashboard, connect your Samsung smartphone using a stable USB cable. From the main interface options, click on the “Recover Android Data” feature.

-
Step 2 Allow Device Detection and Enable Debugging
If Smart Switch or other default mobile managers launch autonomously upon connection, please close them to avoid interference. Give Dr.Fone a moment to properly detect your hardware. If you have not yet enabled USB debugging on your Samsung phone, the software interface will present a helpful guide showing you exactly how to toggle it on within your phone's settings.

-
Step 3 Select the 'Contacts' File Type to Scan
Once the device is successfully paired, a new window will display a comprehensive list of recoverable data types. This includes Photos, Videos, Audio, Documents, Call History, and Messages. To focus specifically on your address book, tick the checkbox exclusively for “Contacts” and hit the “Start Scan” button. Dr.Fone will immediately initiate a deep scan to download contacts from the Samsung account memory.

-
Step 4 Preview the Recoverable Address Book
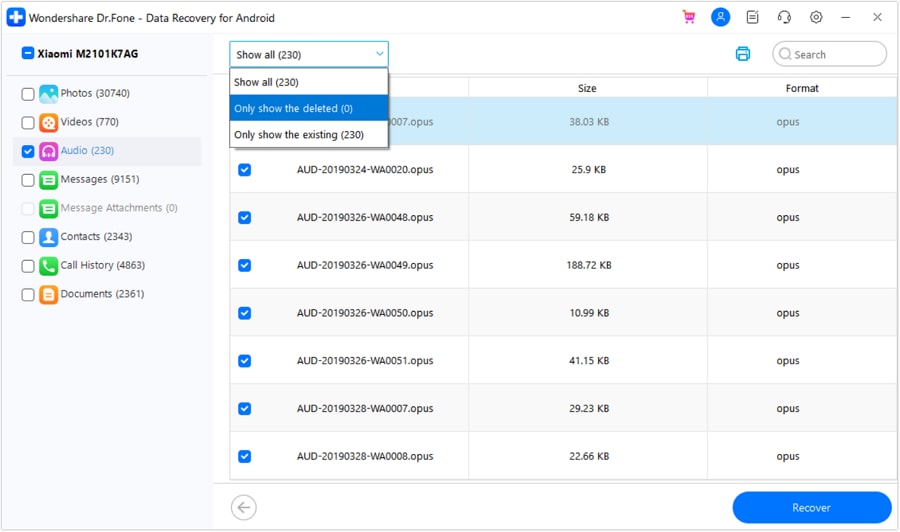
When the internal scan reaches 100%, the interface will populate with all the readable data it found. Navigate to the left pane and view your list. You can utilize the “Filter” dropdown at the top to display only the deleted items, making it much easier to pinpoint exactly who you are looking for. Check the individual boxes next to the names you need.
-
Step 5 Execute the Final Recovery Command
After meticulously selecting your missing contacts, direct your attention to the bottom right corner and click the “Recover” button. The program will prompt you to define a secure output location on your PC. Confirm the designated folder on the pop-up menu and click “Recover” one last time to save the files safely.
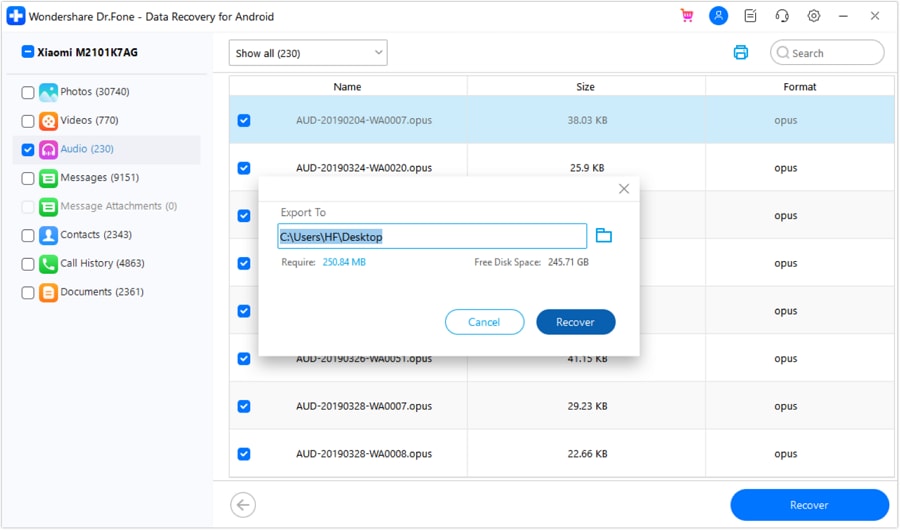 Note: You can click the “Browse” tab during the final step if you wish to create a brand new desktop folder specifically dedicated to your newly recovered Samsung contacts.
Conclusion
Experiencing the sudden disappearance of your digital address book can induce a panic, causing you to stress about losing vital connections forever. However, as outlined in this guide, there are multiple proven methodologies to restore your data safely. While the official Samsung Smart Switch application provides an incredibly user-friendly solution, its success is completely dependent on having a pre-existing backup file. If you find yourself caught without a backup, your best course of action is to deploy Wondershare Dr.Fone - Data Recovery (Android). This robust program scans the deepest sectors of your device’s memory, allowing you to effectively recover contacts from Samsung accounts and internal storage in just a few clicks. Whether you need to extract a handful of specific numbers or resurrect your entire contact list, Dr.Fone empowers you to execute a full recovery without requiring any advanced technical expertise.
FAQ
-
1. Can I retrieve contacts from a Samsung account if I forgot my login credentials?
If you have forgotten your Samsung account password, you cannot directly restore a cloud backup via Smart Switch. You will first need to visit the Samsung account login page and use the "Forgot Password" feature to reset your credentials. Alternatively, you can bypass the account entirely by using a third-party tool like Dr.Fone - Data Recovery to extract contacts directly from the device's internal storage. -
2. How long are deleted contacts stored in the Samsung Cloud recycle bin?
If you had synchronization turned on, deleted contacts are typically moved to the Samsung Cloud Trash or Recycle Bin, where they are retained for 15 days. If you attempt to restore contacts from a Samsung account within this window, you can easily recover them from the phone's Contact app settings. After 15 days, they are permanently wiped from the cloud. -
3. Will restoring a contact backup overwrite my current device data?
Using standard restoration features through Smart Switch usually merges your backed-up contacts with your existing ones, minimizing the risk of data loss. However, full device restores might overwrite current settings. Utilizing dedicated software like Dr.Fone allows you to securely preview and export contacts directly to your computer without interfering with or overwriting your mobile device's current data. -
4. Can I download contacts from a Samsung account directly to a PC as a CSV or vCard?
Yes, you can visit the Samsung Cloud website on your computer, log in, navigate to the contacts section, and manually export your address book as a vCard (VCF) file. Additionally, third-party recovery applications give you advanced options to export retrieved contacts as CSV, HTML, or VCF formats, making it highly convenient for PC storage and management.
 Add Wondershare Dr.Fone as a preferred source on Google



