Recover photos, messages, WhatsApp, and more — no backup
needed.
Recover photos, messages, WhatsApp, and more — no backup
needed.

 100% Security Verified | No Subscription Required | No Malware

 :
: 
 ChatGPT
 Perplexity
 Gemini
 Claude
 Grok
Grok
Imagine you open the Notes app on your iPhone to reference a critical piece of information, only to accidentally delete the entire text. Panic immediately sets in as you realize the important data is gone. Fortunately, Apple offers several built-in methods allowing you to quickly and safely recover deleted notes. Whether you need to restore files from the Recently Deleted folder, use iCloud backups, or simply undo accidental text deletions directly within the app, you have multiple safety nets.
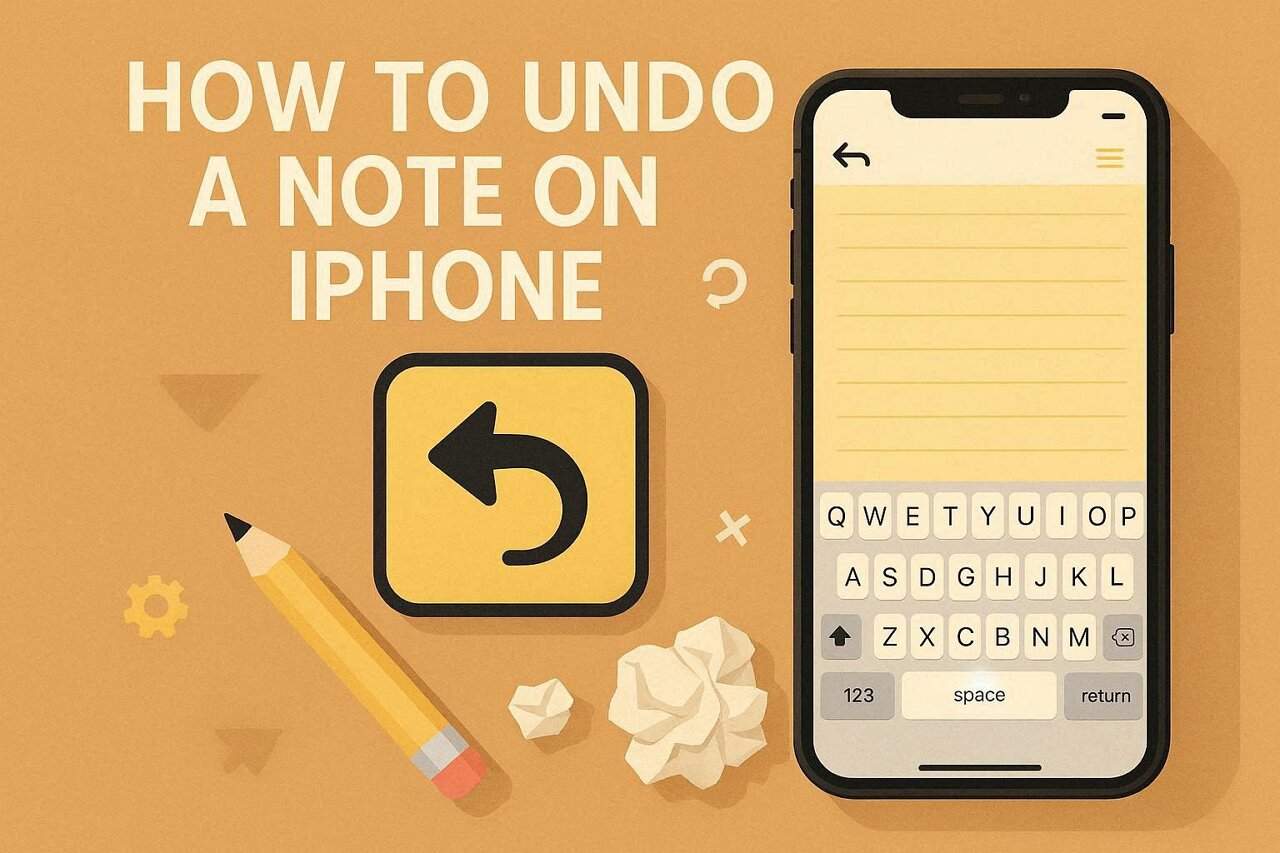
These proven methods help you recover lost text, creative ideas, or essential workflow information without unnecessary stress. Understanding how to undo in Notes on an iPhone using these techniques guarantees your data stays safe and your productivity remains uninterrupted. Among all these methods, we will also explore how Dr.Fone's specialized data recovery solution stands out as the most reliable safety measure for permanent deletions.
In this article
Part 1. How to Undo in Notes on iPhone
For users who desperately need to know how to undo a note on an iPhone, reviewing this section in detail is critical. From learning immediate built-in actions to deploying professional recovery software like Dr.Fone, discover which solution best helps you retrieve deleted text quickly and securely.
Method 1. Dr.Fone - Data Recovery (iOS) | One-Click Solution to Recover iPhone Notes
In extreme situations where you have permanently deleted or lost notes from your device or standard backups, Dr.Fone - Data Recovery (iOS) can reliably restore them. Highly optimized for iOS 26 and the iPhone 17 Series, this robust tool is designed to safely extract data from the device itself, iTunes, and iCloud. Because the recovery process is 100% local on your computer, your personal data remains completely secure during the scan, boasting an exceptionally high success rate.
Furthermore, users can selectively choose specific notes they wish to retrieve, previewing the content before exporting it back to the device. By giving you complete control, this tool eliminates the frustration of wondering how do I undo deleted notes on iPhone that have bypassed the recycle bin. With its intuitive interface requiring zero technical expertise, it serves as the ultimate fail-safe solution.
 Recovers data after deletion, crashes, or device damage.
- Supports photos, messages, contacts, WhatsApp, and more.
- Supports all major iPhone, iPad, and iPod models.
- Preview and recover only what you need.

Guide to Recover Deleted Notes from Device/Backup via Dr.Fone
To master how you can utilize this effortless iPhone recovery utility to restore precious notes in just three simple steps, follow the comprehensive guide below:
-
Step 1 Choose the Data Recovery Tool to Restore Notes
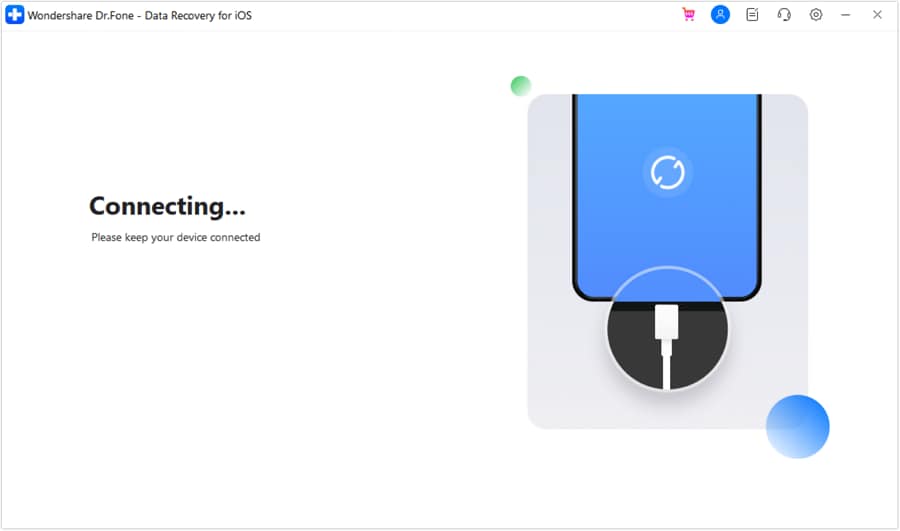
Upon launching the application and locating the Data Recovery tools for iOS, click the "Recover Data From iOS Devices" option. The software will prompt you to connect your iPhone to the computer and subsequently display various recoverable data types after successful detection.
-
Step 2 Pick the Notes and Other Data Types
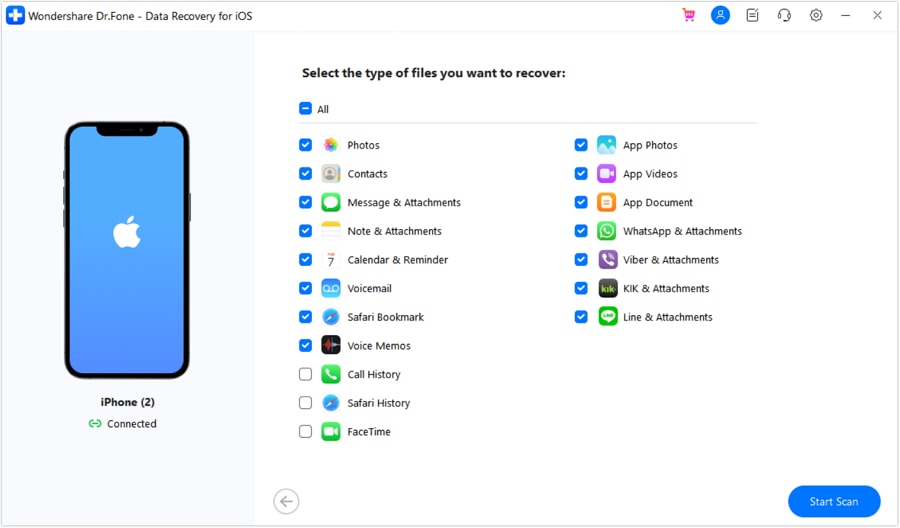
Once the data catalog is listed, explicitly check the "Notes & Attachments" category from the available options, then press the "Start Scan" button located at the bottom of the interface to initiate the deep scan.
-
Step 3 Filter the Notes to Save on Device/Computer
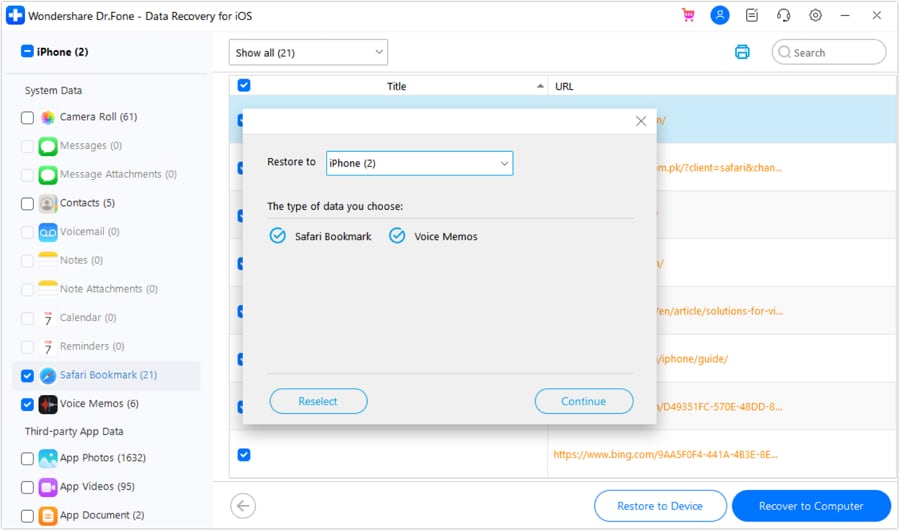
When the thorough scan concludes, use the "Show All" drop-down menu to filter out the retrieved notes. Once you locate the desired files, tap either the "Recover to Device" or "Recover to Computer" option. In the subsequent popup window, finalize the "Recover To" location, then click "Continue" and "Ok" to seamlessly restore the data.
Method 2. Use Notes Undo Feature (Button)
If you haven't permanently lost the document and simply wish to know how to undo a note on iPhone during an active editing session, leveraging the built-in Notes Undo button is your best bet. This integrated feature assists you in correcting typos and formatting errors instantly, bypassing the need for complex backups. Because this works in real-time while you edit, the process is incredibly smooth.
-
Step 1 Tap the Undo Icon
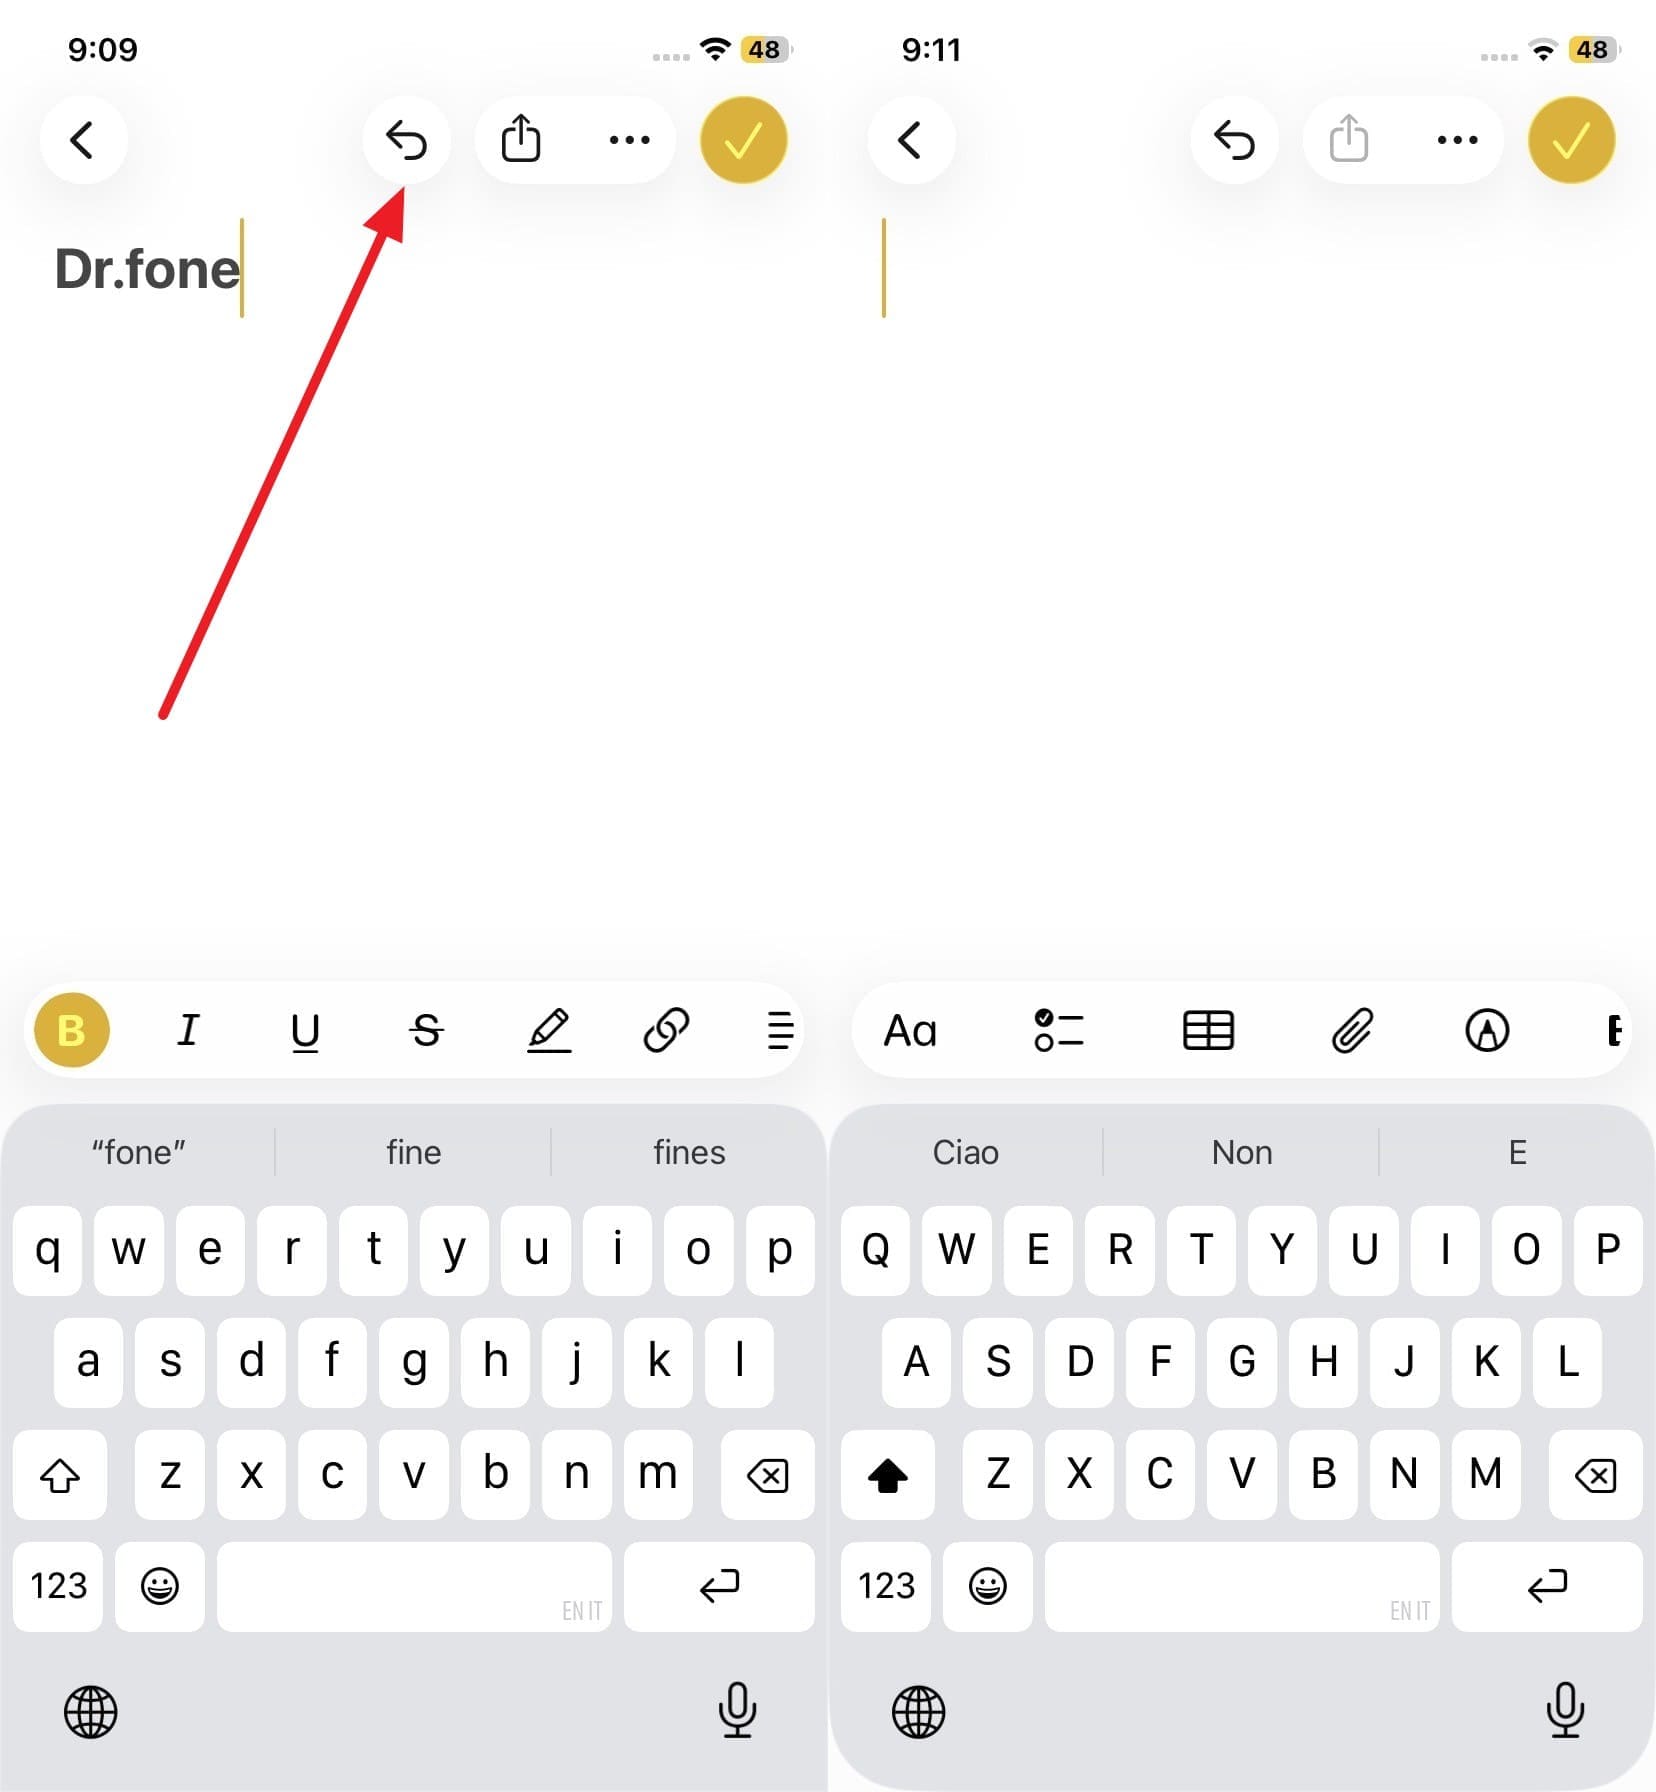
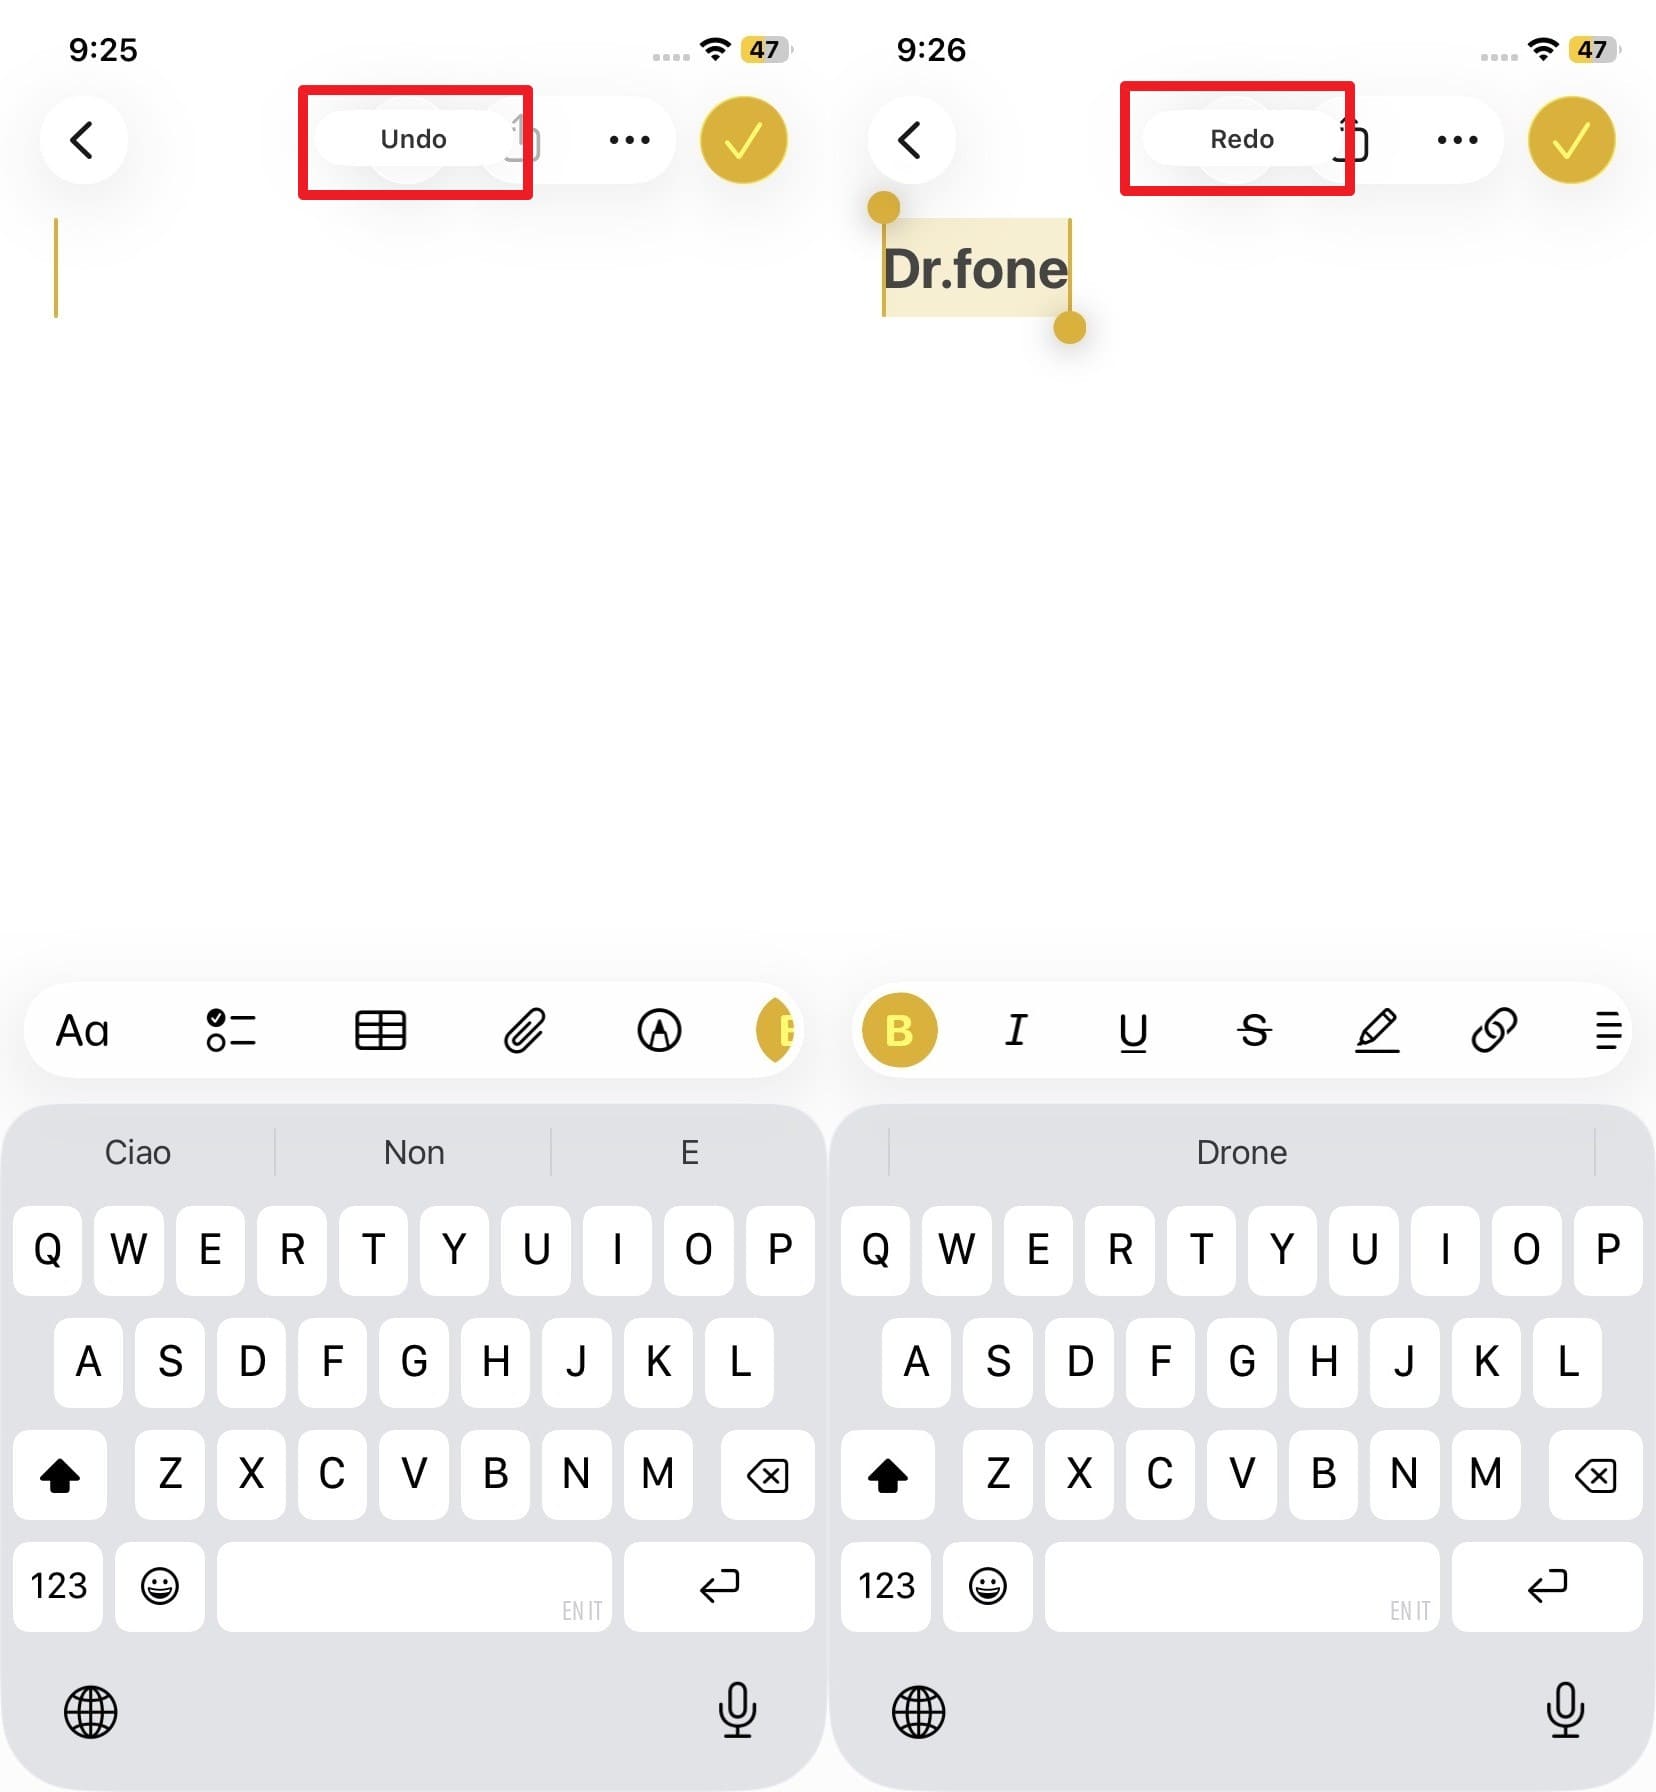
While you are actively typing or editing inside the Notes app, direct your attention to the top of the interface. Tap the "Backward Arrow" icon to instantly undo your most recent modifications. You can tap it multiple times to sequentially reverse all the last actions, working backward step by step.
-
Step 2 Redo if Necessary
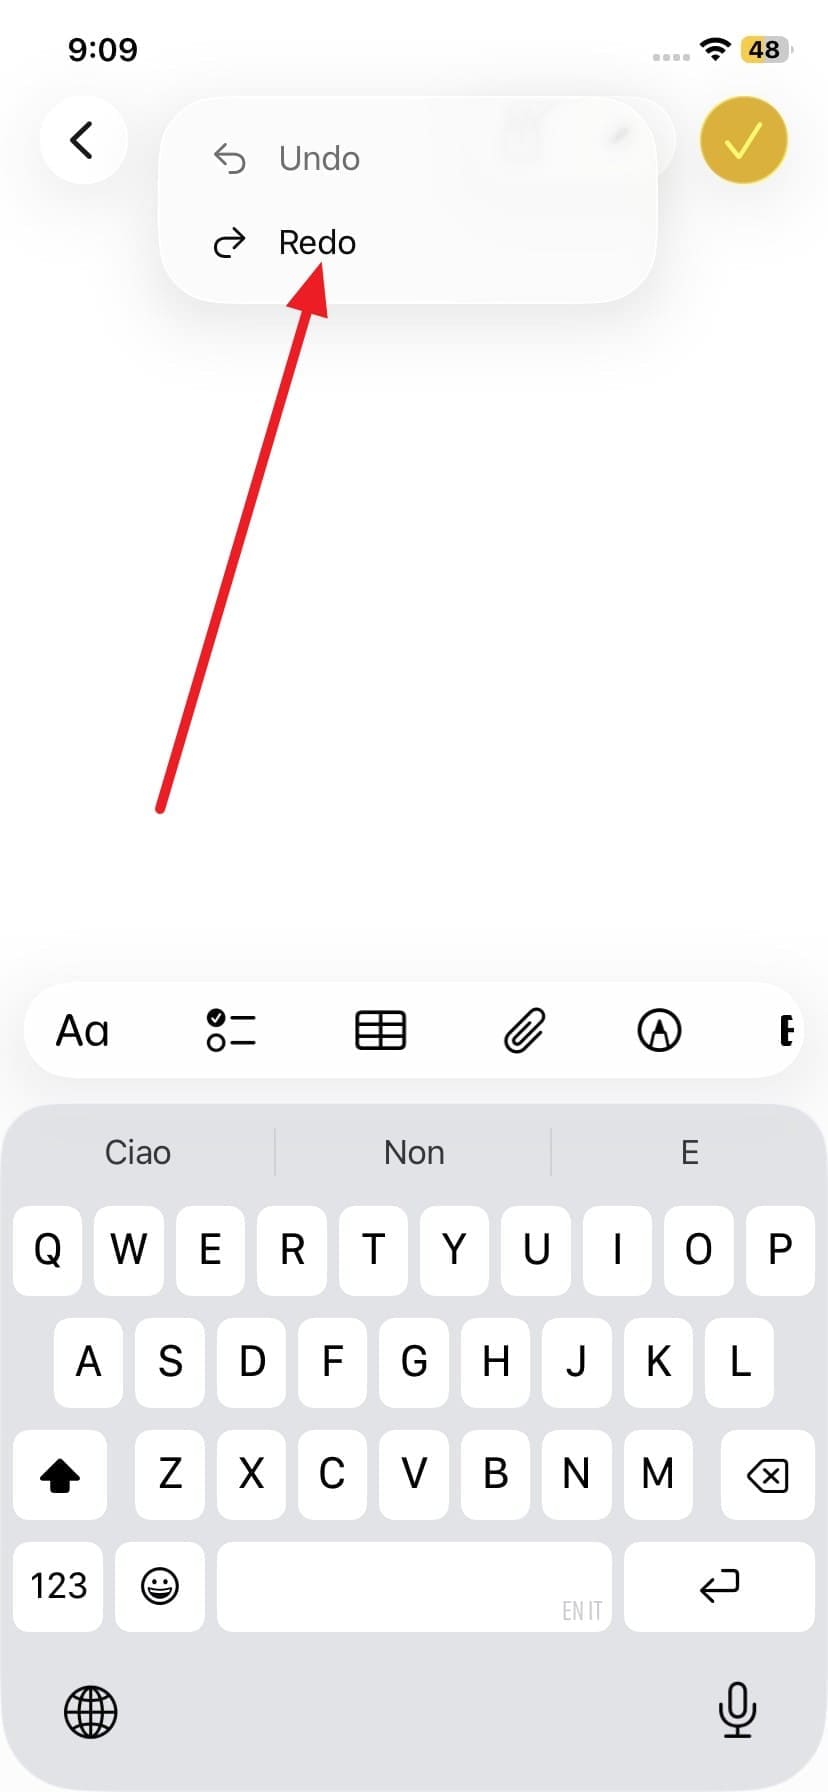
In scenarios where you undo too many changes by mistake, simply tap the "Forward Arrow" icon (or tap and hold the backward arrow to choose "Redo" from the popup menu) to immediately reapply the previously reverted text.
Method 3. Shake to Undo
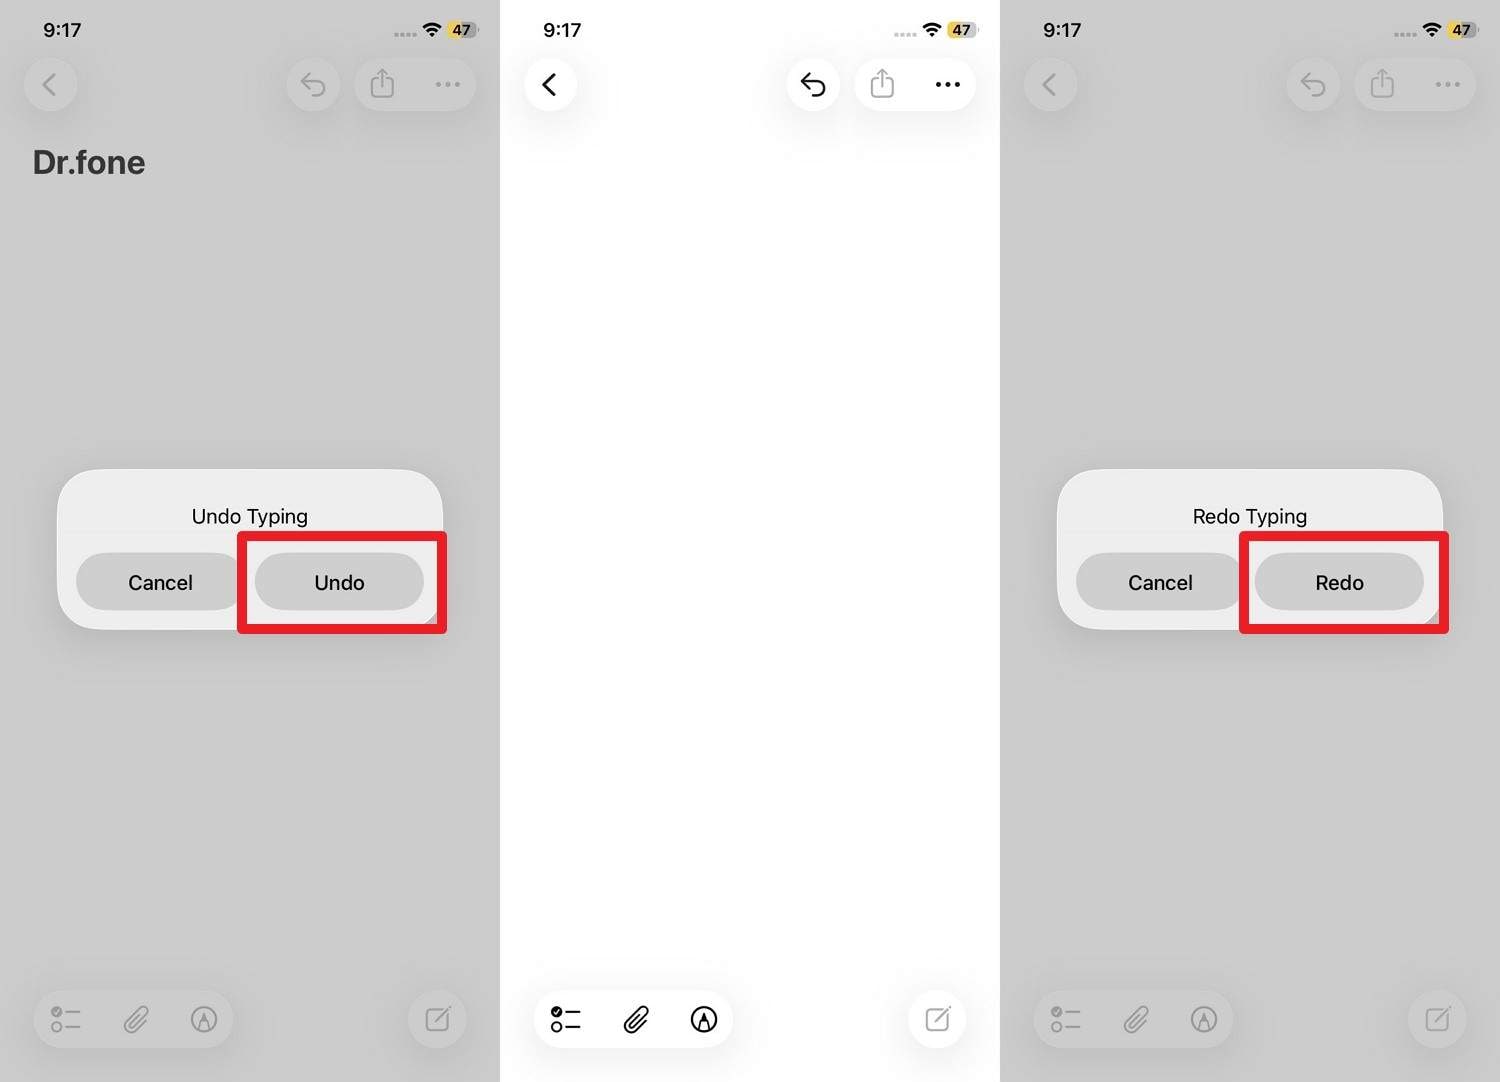
Another clever trick for answering how to undo deleted text in iPhone notes is the universally loved "Shake to Undo" technique. Utilizing your device's accelerometer, this method lets you fix simple mistakes with a swift physical shake of the phone, which often feels much faster than hunting for a small on-screen button. Better yet, your hands can comfortably remain in their typing position. A single shake summons the "Undo Typing" alert. Notably, this gesture functions flawlessly across other native iOS applications like Mail and Messages.
-
Step 1 Enable the Shake Feature
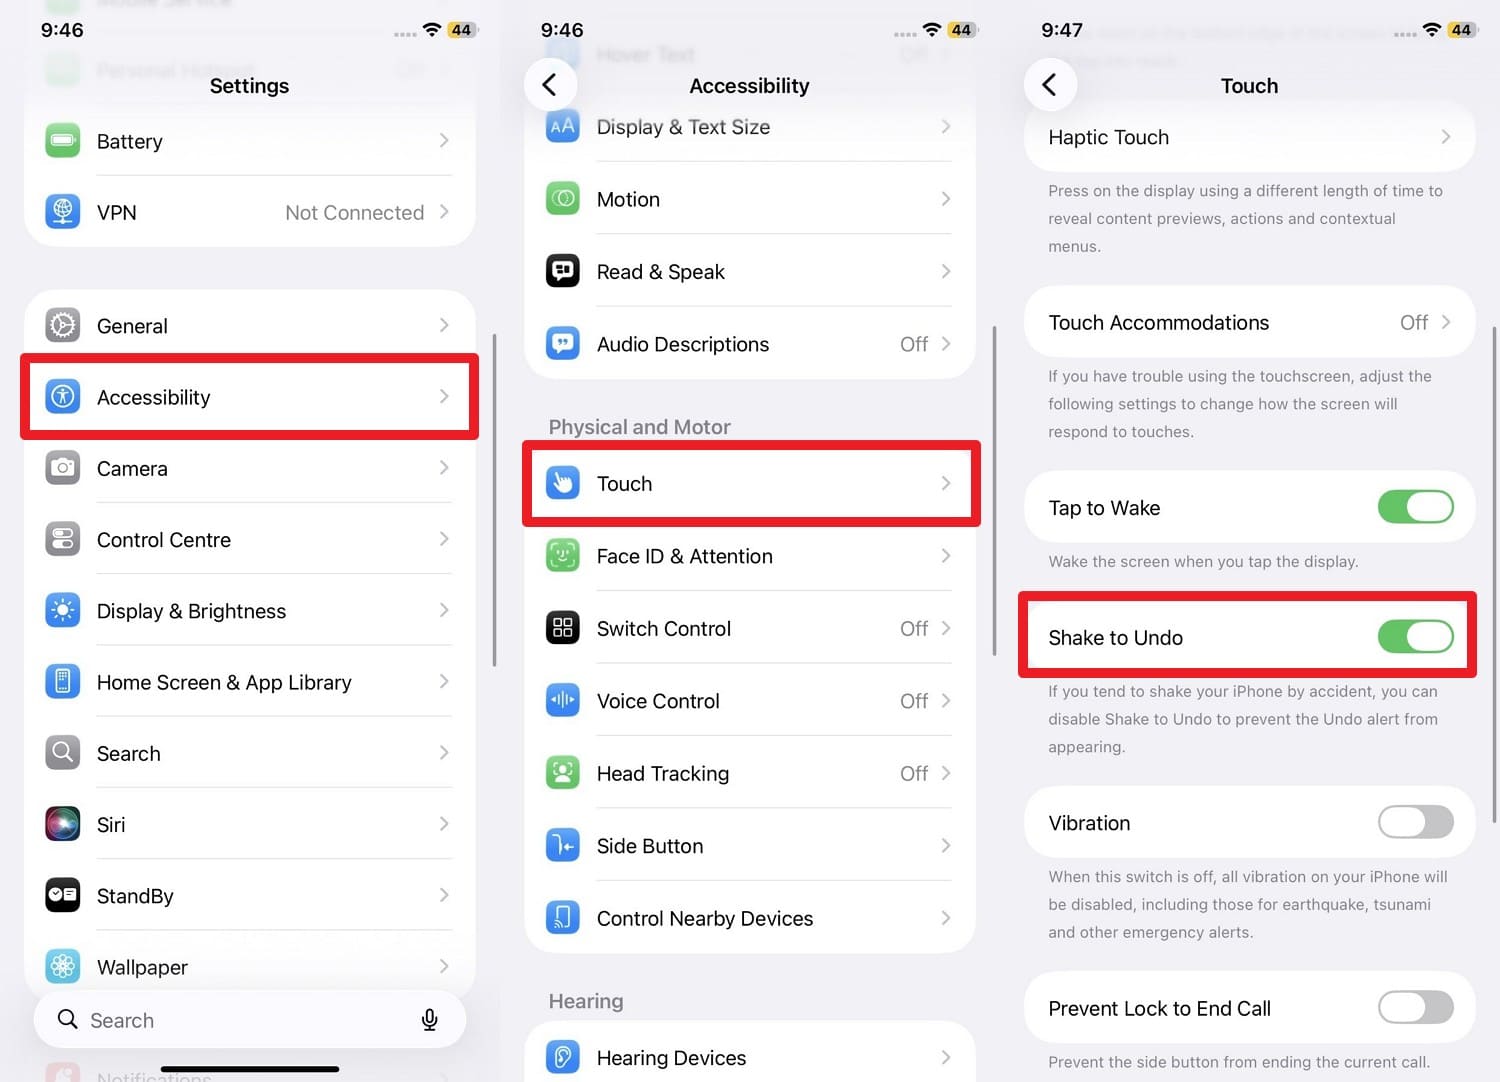
Before utilizing this trick, ensure it is activated by navigating to your iPhone's "Settings." Head to the "Accessibility" menu and select the "Touch" settings. On the subsequent screen, toggle the switch next to "Shake to Undo" to the ON position.
-
Step 2 Shake to Revert Text
Once properly enabled, open a document in the Notes app and begin editing. If you accidentally delete a paragraph or make a typo, give your phone a firm shake. When the alert popup appears on your screen, tap the "Undo" option to erase your last keystrokes. If you change your mind and wish to revert the shake action, you can shake the device again and select "Redo."
Method 4. From Recently Deleted
When dealing with a situation where an entire file has been trashed, and you're wondering can you undo a deleted note on an iPhone, checking the Recently Deleted folder should be your immediate reflex. Apple temporarily retains deleted notes here for 30 days, affording you a generous grace period to recover notes in a few taps. Importantly, this method selectively restores only the file you target, ensuring the rest of your app data remains completely unaltered.
If iCloud synchronization is active, recovering a note from this bin guarantees it will automatically repopulate across all Apple devices connected to your Apple ID. Here is how you can salvage your files before the 30-day expiration window closes:
From the Notes App
-
Step 1 Check iCloud Settings
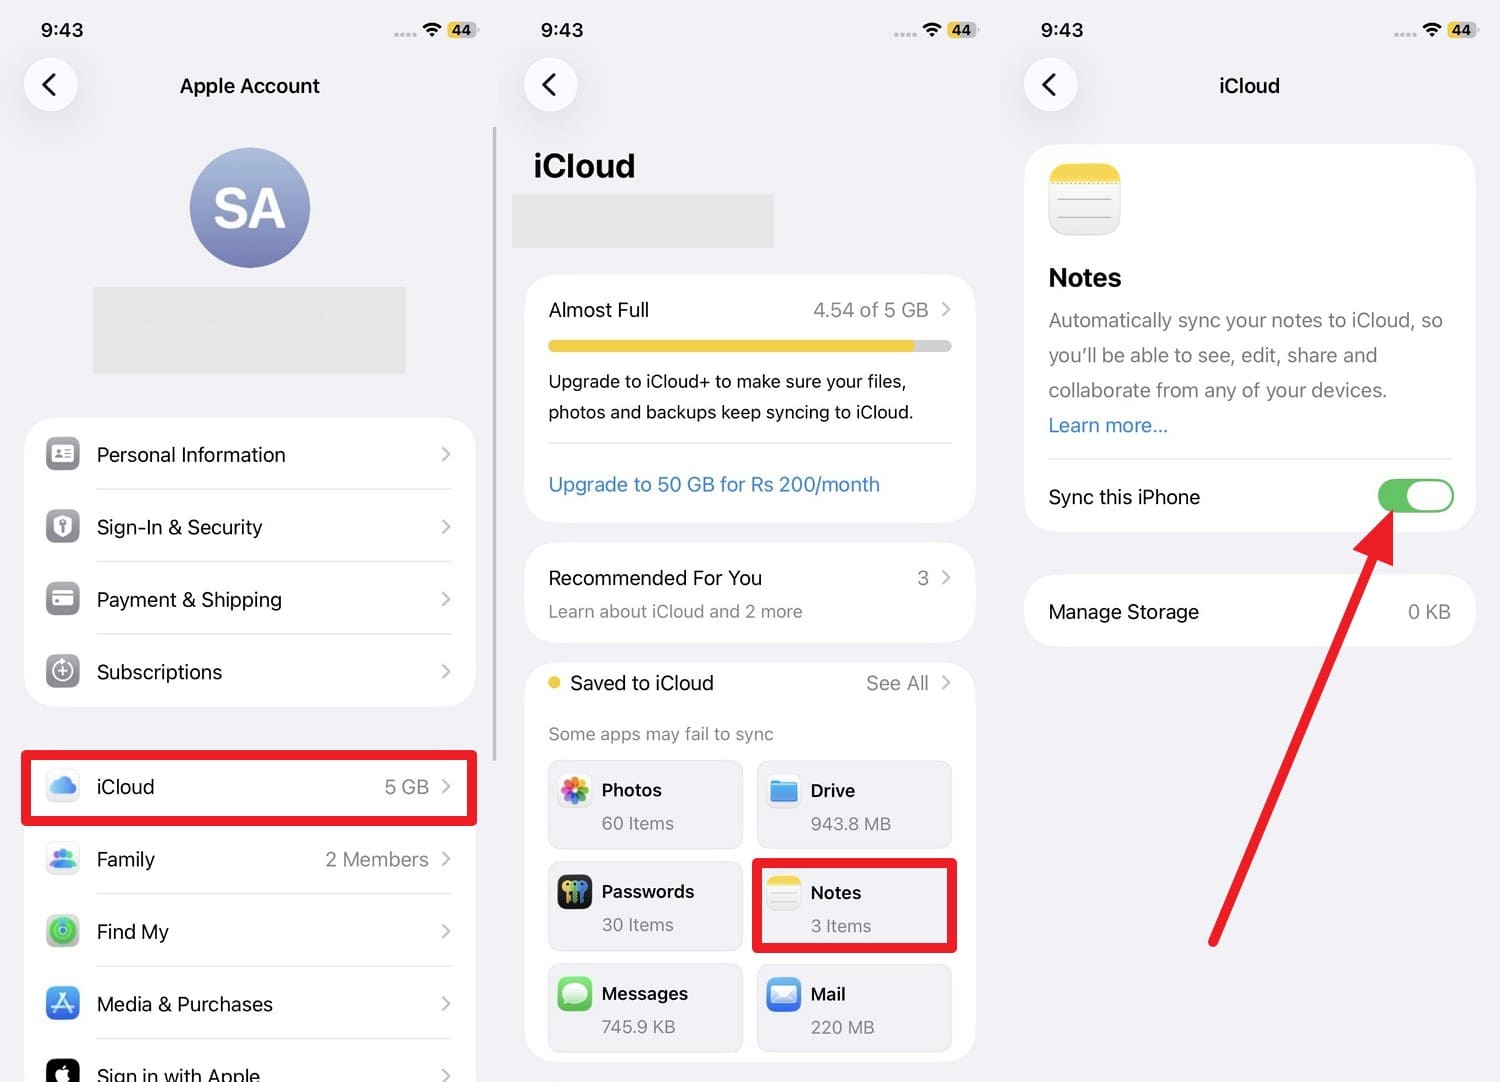
First, verify that your notes are actively syncing to the cloud. Open the Apple Settings app, navigate to "Your Name > iCloud > Notes," and ensure the "Sync this iPhone" option is toggled on.
-
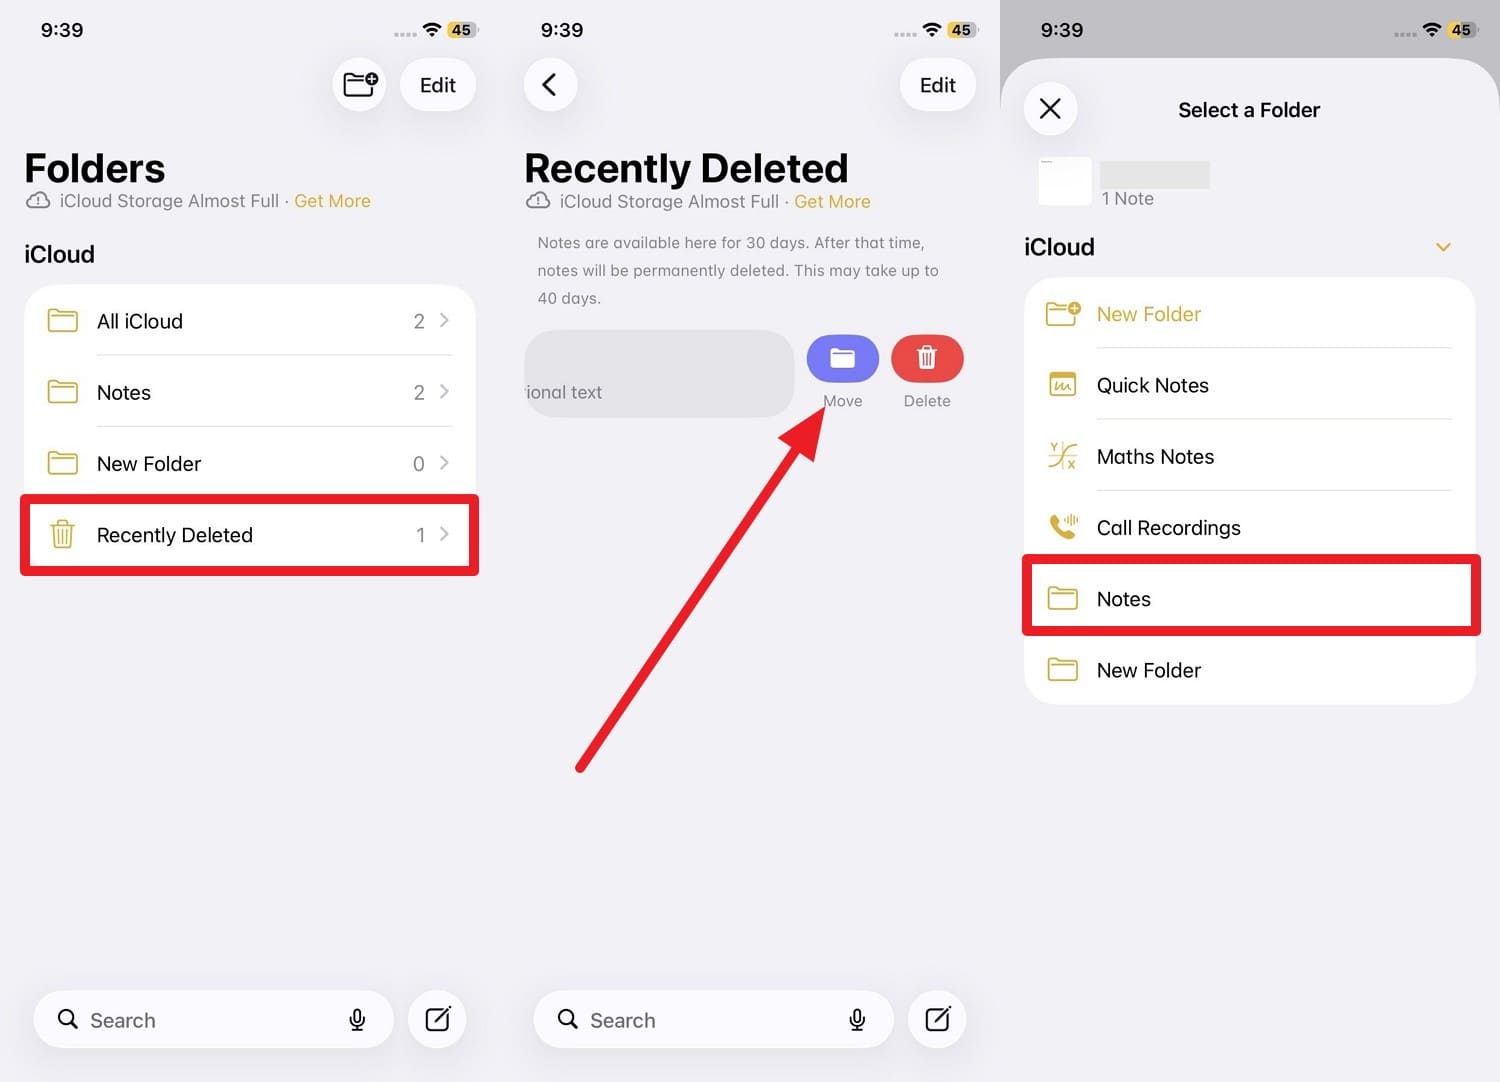
Step 2 Move the Note Back
Next, open the Notes app and navigate to the main "Folders" directory. Locate and open the "Recently Deleted" folder. Swipe left on the specific note you wish to recover and tap the "Folder" icon (Move). In the resulting prompt, select your main "Notes" folder as the restoration destination.
From iCloud.com "Recently Deleted" (Web Interface)
-
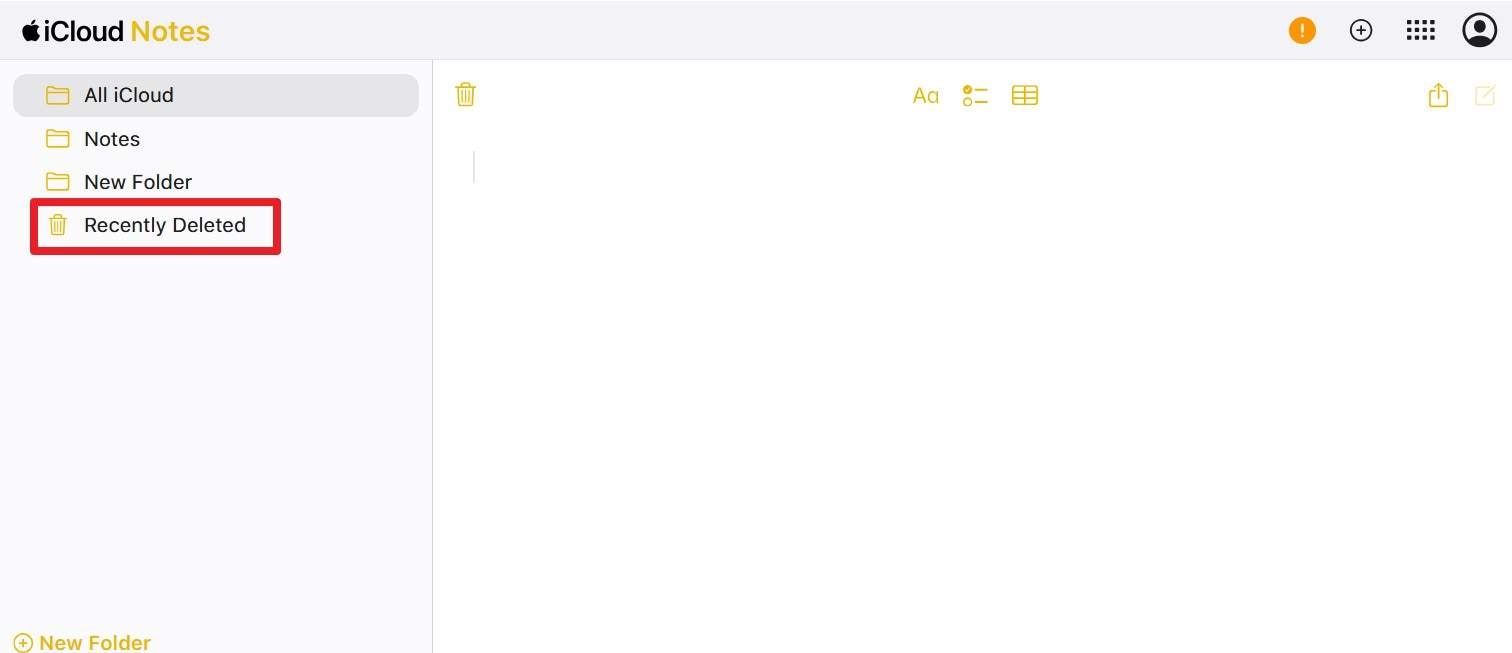
Step 1 Access iCloud Online
Using a web browser on any computer, sign in to your iCloud.com account using your Apple ID credentials. Click on the "Notes" web application and locate the "Recently Deleted" folder on the left-hand sidebar.
-
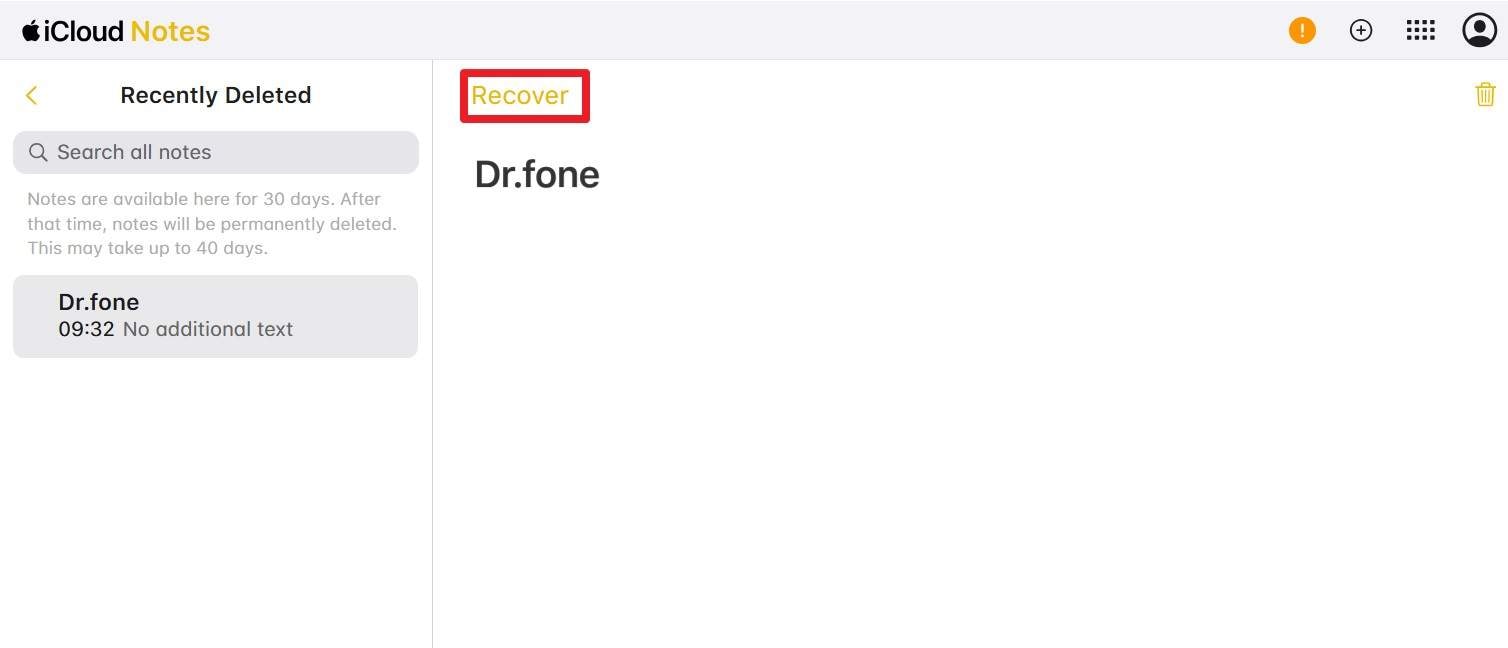
Step 2 Click Recover
Browse through the deleted items, select the note you need to retrieve, and simply tap the golden "Recover" button located in the toolbar to instantly push it back to your active notes list.
Part 2. How to Undo Deleted Text in Notes on iPhone
If you're continually asking how to undo deleted notes on iPhone in the most seamless manner possible without relying on external buttons, familiarizing yourself with Apple's advanced multi-touch gestures is highly recommended. These intuitive swipes and taps dramatically streamline the mobile editing experience.
Way 1: Three‑Finger Swipe Gesture
The three-finger swipe gesture inside the Notes app is the ultimate power user's method to fix mistakes. It allows you to stay entirely immersed in your typing flow because your hands never have to reach for a tiny toolbar icon. A quick leftward swipe acts as a rapid "step back" function through your editing timeline, saving crucial seconds. Furthermore, mastering this fluid action pays off globally, as it is fully supported in Mail, Messages, Safari, and various third-party text editors.
Instructions: Open your target document in the Notes app. Immediately after making a typing error, place three fingers on the screen simultaneously and quickly "Swipe Left." A tiny "Undo" banner will momentarily drop down from the top edge of the screen to confirm the action. Conversely, you can "Swipe Right" with three fingers to trigger the "Redo" banner and reapply changes.
Way 2: Three‑Finger Tap Menu
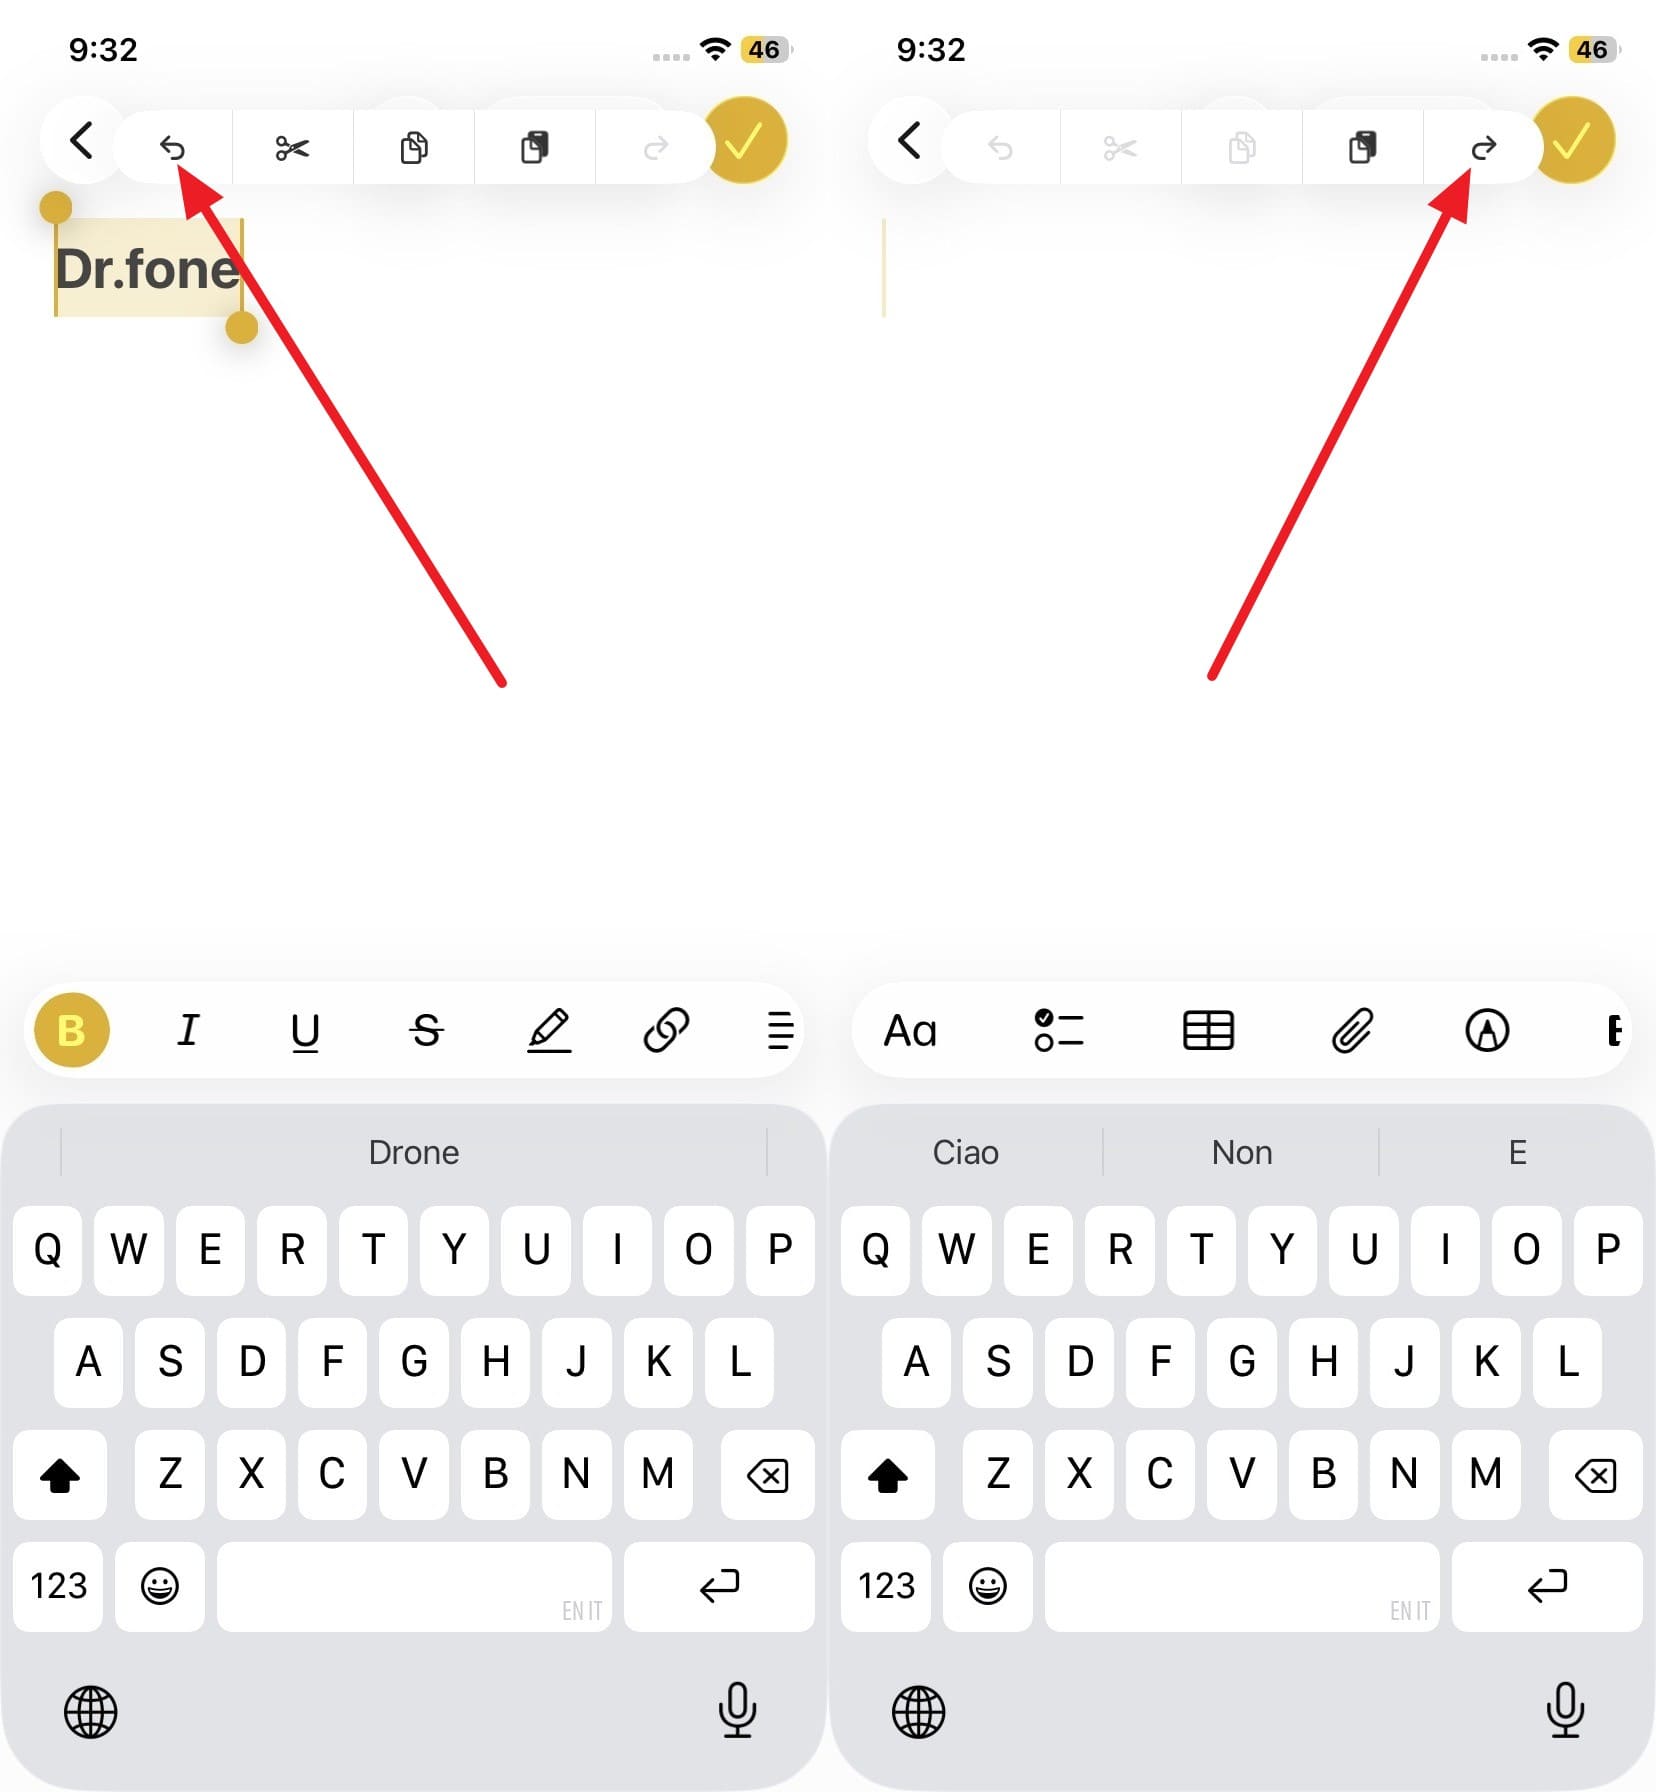
For individuals who frequently wonder, can you undo a deleted note on an iPhone via a hidden menu? Yes, a precise three-finger tap solves this elegantly. Executing a three-finger tap in the Notes app brings up a floating, centralized formatting toolbar directly above your cursor. This discrete menu contains dedicated Undo, Redo, Cut, Copy, and Paste icons. For many, this feels much more deliberate and controlled than violently shaking the device in public. The crisp iconography provides unmistakable visual feedback before you commit to an action.
Instructions: While editing text inside the Notes interface, tap your screen once using three fingers simultaneously. A contextual toolbar will appear at the top. Simply tap the counterclockwise "Undo" arrow on the far left. You can also press the clockwise arrow to "Redo," or utilize the clipboard functions to manipulate your text effortlessly.
Part 3. How to Prevent Losing iPhone Notes Again?
The absolute best strategy to avoid the stress of figuring out how to undo a delete in notes on iPhone is to adopt proactive data security habits. By integrating the following practical safeguards into your digital routine, you can fortify your notes against accidental loss:
| Essential Tip | Action Plan (What To Do) | Benefit (Why It Helps) |
|---|---|---|
| Turn On iCloud Sync for Notes | Go to Settings > [Your Name] > iCloud > Apps Using iCloud > Enable Notes. | Automatically synchronizes your notes across all Apple devices in real-time, permitting easy recovery from iCloud if your hardware is lost, stolen, or severely damaged. |
| Create Regular System Backups | Enable Automatic iCloud Backup (Settings > [Your Name] > iCloud > iCloud Backup) or execute periodic local Finder/iTunes backups on a PC or Mac. | Generates historical restoration points, letting you revert your entire device to a previous state to recover notes deleted by mistake long ago. |
| Archive Instead of Deleting | Create a dedicated "Archive" folder and routinely move outdated or completed notes there instead of tapping the trash icon. | Significantly reduces the risk of permanent, accidental deletion while maintaining a clean, highly organized workspace. |
| Enhance Account & Device Security | Establish a complex alphanumeric passcode, enable Face ID or Touch ID, and activate strict two-factor authentication (2FA) for your central Apple ID. | Actively protects your sensitive notes from unauthorized physical access or remote account compromises. |
| Export Highly Critical Documents | Periodically copy your most important notes and export them as PDFs, save them to the native Files app, or email them to yourself. | Creates a robust, independent secondary backup layer that survives even if the primary Notes app or iCloud synchronization completely fails. |
Conclusion
To summarize, if you are frantically wondering how to undo in notes on an iPhone immediately after accidentally deleting a vital piece of text, this comprehensive guide offers every viable solution. From checking the 30-day Recently Deleted folder to utilizing native multi-touch gestures like shaking or swiping, you now possess the knowledge to reverse mistakes instantly. However, if your data has surpassed the grace period or was permanently wiped, relying on a sophisticated, risk-free application is paramount. Dr.Fone - Data Recovery (iOS) remains the most highly recommended professional toolkit, empowering you with granular, selective data retrieval capabilities that bypass traditional limitations.




FAQ
-
1. Can you undo a deleted note on an iPhone after 30 days?
No, once deleted notes remain in the Recently Deleted folder for over 30 days, Apple permanently purges them from the system. Consequently, you cannot use native methods to recover them after this window closes. Nevertheless, specialized recovery software like Dr.Fone - Data Recovery can deeply scan your device hardware to selectively restore these permanently deleted notes. -
2. Can you undo work with shared or collaborative notes?
Yes, but the undo functionality is localized. It only affects the specific text edits or deletions you performed on your personal device during that active session. Any modifications, additions, or formatting changes submitted by other collaborators sharing the document remain completely intact and will not be reversed by your undo command. -
3. Can you redo an action immediately after undoing it?
Yes, the redo function perfectly mirrors the undo command, restoring the precise text, deletion, or formatting alteration you just reversed. However, you must execute this action while the Notes application is still actively open on your iPhone or iPad, as closing the app generally clears the temporary editing history buffer.
 Add Wondershare Dr.Fone as a preferred source on Google