Recover photos, messages, WhatsApp, and more — no backup
needed.
Recover photos, messages, WhatsApp, and more — no backup
needed.

 100% Security Verified | No Subscription Required | No Malware

 :
: 
 ChatGPT
 Perplexity
 Gemini
 Claude
 Grok
Grok
Growing photo libraries on multiple Apple devices is a nightmare for many users. iCloud solves this by keeping all your photos synced and accessible across all your devices. According to Persistence Market Research, Apple iCloud held 34% of the global consumer cloud storage market share in 2025. Your pictures remain safe even if your device is lost or damaged.
Still, understanding the right steps makes the whole upload process much simpler. This tutorial outlines how to upload photos to iCloud using native system settings. Users recovering deleted backup files may also consider using Dr.Fone during emergencies.
In this article
- Before Uploading Photos to iCloud: 3 Important Things to Check
- Bonus Tip. How to Recover Data from iCloud Backups

- How Do You Automatically Upload Photos to iCloud?
- How Can You Manually Upload Photos to iCloud?
- How to Check If Your Photos Have Been Uploaded to iCloud
- Why Are My Photos Not Uploading to iCloud?
Part 1. Before Uploading Photos to iCloud: 3 Important Things to Check
Before uploading, a few key checks help avoid common errors. Thus, these are 3 important details to check prior to starting the process:
What Is the Difference Between iCloud Photos and iCloud Backup?
Basically, the device snapshot is provided by "iCloud Backup," and the photos are synced between devices via "iCloud Photos." Knowing this difference helps answer how do I upload photos to iCloud, so here is a comparison table:
| Feature | iCloud Photos | iCloud Backup |
|---|---|---|
| Main Purpose | Syncs photos and videos across Apple devices | Saves complete device backups, including photos (Note: Backs up photos only when iCloud Photos is turned off.) |
| Access Method | Accessible through Photos app and iCloud.com | Restored during device setup |
| Automatic Updates | Continuously updates new photos automatically | Updates during scheduled backups |
| Storage Usage | Uses iCloud storage for media files | Uses iCloud storage for the entire device data |
| Photo Editing Sync | Syncs edits across connected devices | Does not sync live photo edits |
| Device Replacement | Keeps photos available instantly on new devices | Restores apps, settings, and device content |
| Best Use Case | Managing and syncing photo libraries | Protecting complete device information |
How Much iCloud Storage Do You Need for Photo Uploads?
iCloud storage needs depend on your photo count, along with file size. Apple accounts provide a standard baseline allotment of 5GB free. Determining your specific library size clarifies how to save photos to iCloud. Yet, HD smartphone images surpass initial free space restrictions. Moreover, Apple currently operates 2.5 billion active devices worldwide as of early 2026, according to TechRT.
Which Device and Account Settings Should You Verify Before Uploading?
Verifying these points below will ensure your pictures are uploaded to the cloud without problems:
- Account Details: Make sure that you are logged in with the right Apple ID account.
- Photos Sync: Ensure the iCloud Photos setting is fully enabled on your device.
- Software Version: Update your device to the latest available version of iOS or macOS.
- Battery Level: Keep your device charged as you upload photos to the cloud.
- Date and Time: Set your device date and time to update automatically without manual changes.
Bonus Tip. How to Recover Data from iCloud Backups
Accidental data deletion disrupts mobile storage workflows before synchronization finishes. Knowing how to store photos in iCloud secures files against local hardware failures. However, extracting items from older cloud snapshots traditionally requires wiping device settings. In such a situation, employing solutions such as Dr.Fone - Data Recovery may solve this issue without any reset. You can use this utility on any device, as it even supports iOS 26 and iPadOS 26.
Users can preview specific camera roll thumbnails prior to initiating extraction. Moreover, this data recovery software targets individual files like WhatsApp attachments and even contacts. While recovering, it prompts you to enter your verified Apple account login details. Moreover, 2FA keeps the data retrieval process entirely safe and fully protected.
 Recovers data after deletion, crashes, or device damage.
- Supports photos, messages, contacts, WhatsApp, and more.
- Supports all major iPhone, iPad, and iPod models.
- Preview and recover only what you need.

Guide to Recover Data from iCloud Backups
The following quick guide helps you retrieve your cloud backup data without hassle:
-
Step 1 Go to Dr.Fone's Data Recovery Feature
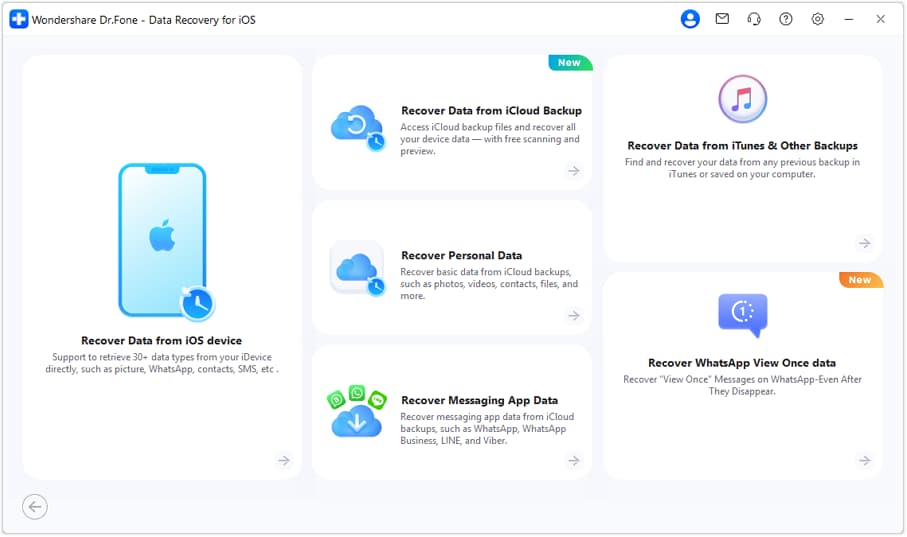
From the program's "Toolbox" section, head to the "Data Recovery" feature for "iOS." Later on, you need to opt for the "Recover Data From iCloud Backup" option.
-
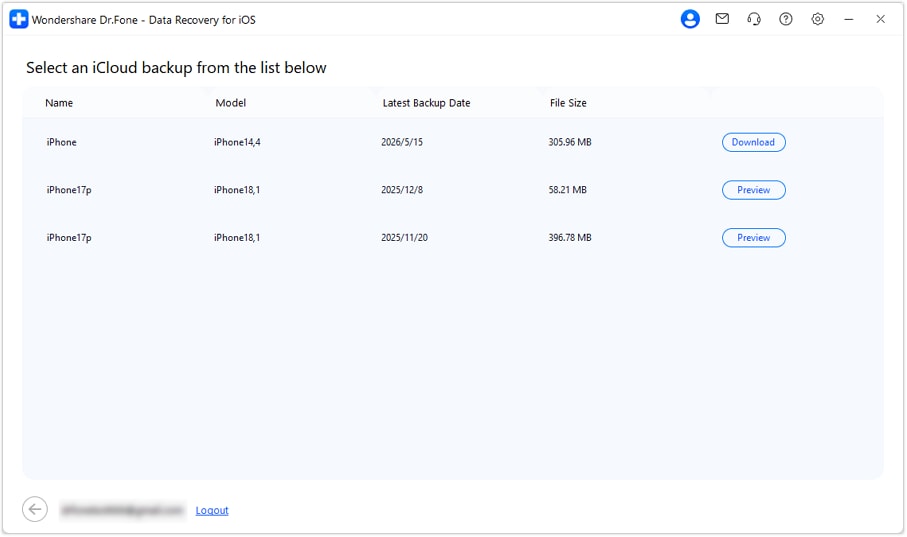
Step 2 Access and Select the iCloud Backup
Enter your "iCloud" account credentials to get 2FA. The tool will then retrieve the backup files when your account gets verified. Once your iCloud backup files appear, choose your desired one by pressing "Download."
-
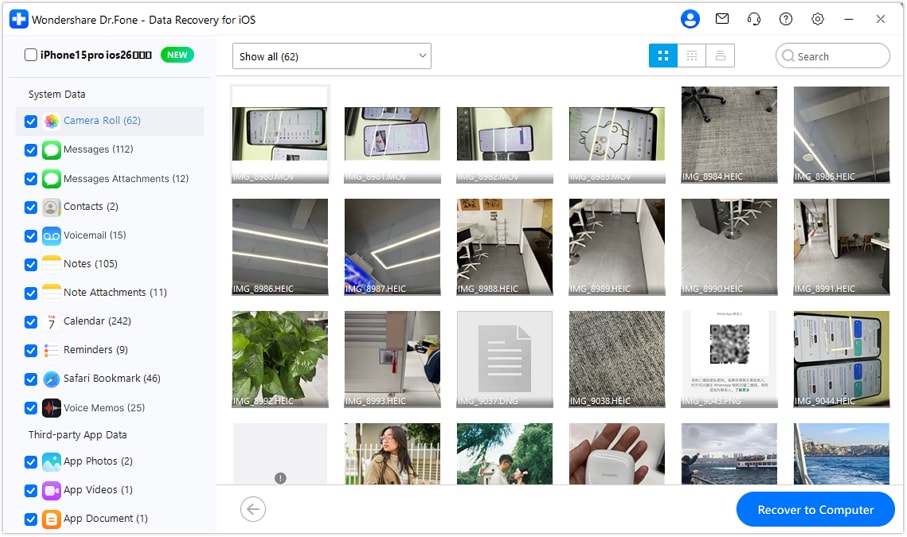
Step 3 Choose the Backup Data to Download
As the program extracts and opens the selected backup file, open the specific data to preview. Now, choose your desired data files and press "Recover to Computer" to export them.




Part 2. How Do You Automatically Upload Photos to iCloud?
The photos can be uploaded to the cloud storage using two methods. Automatic Syncing is one possibility, updating your Library as it happens. The other option is backing up your data for added protection. A CNBC report shows that 70% of Apple customers use iCloud storage. Knowing how to back up photos to iCloud helps you choose the right method. Hence, follow the steps below to set up each automatic upload method:
Enable Syncing Photos
-
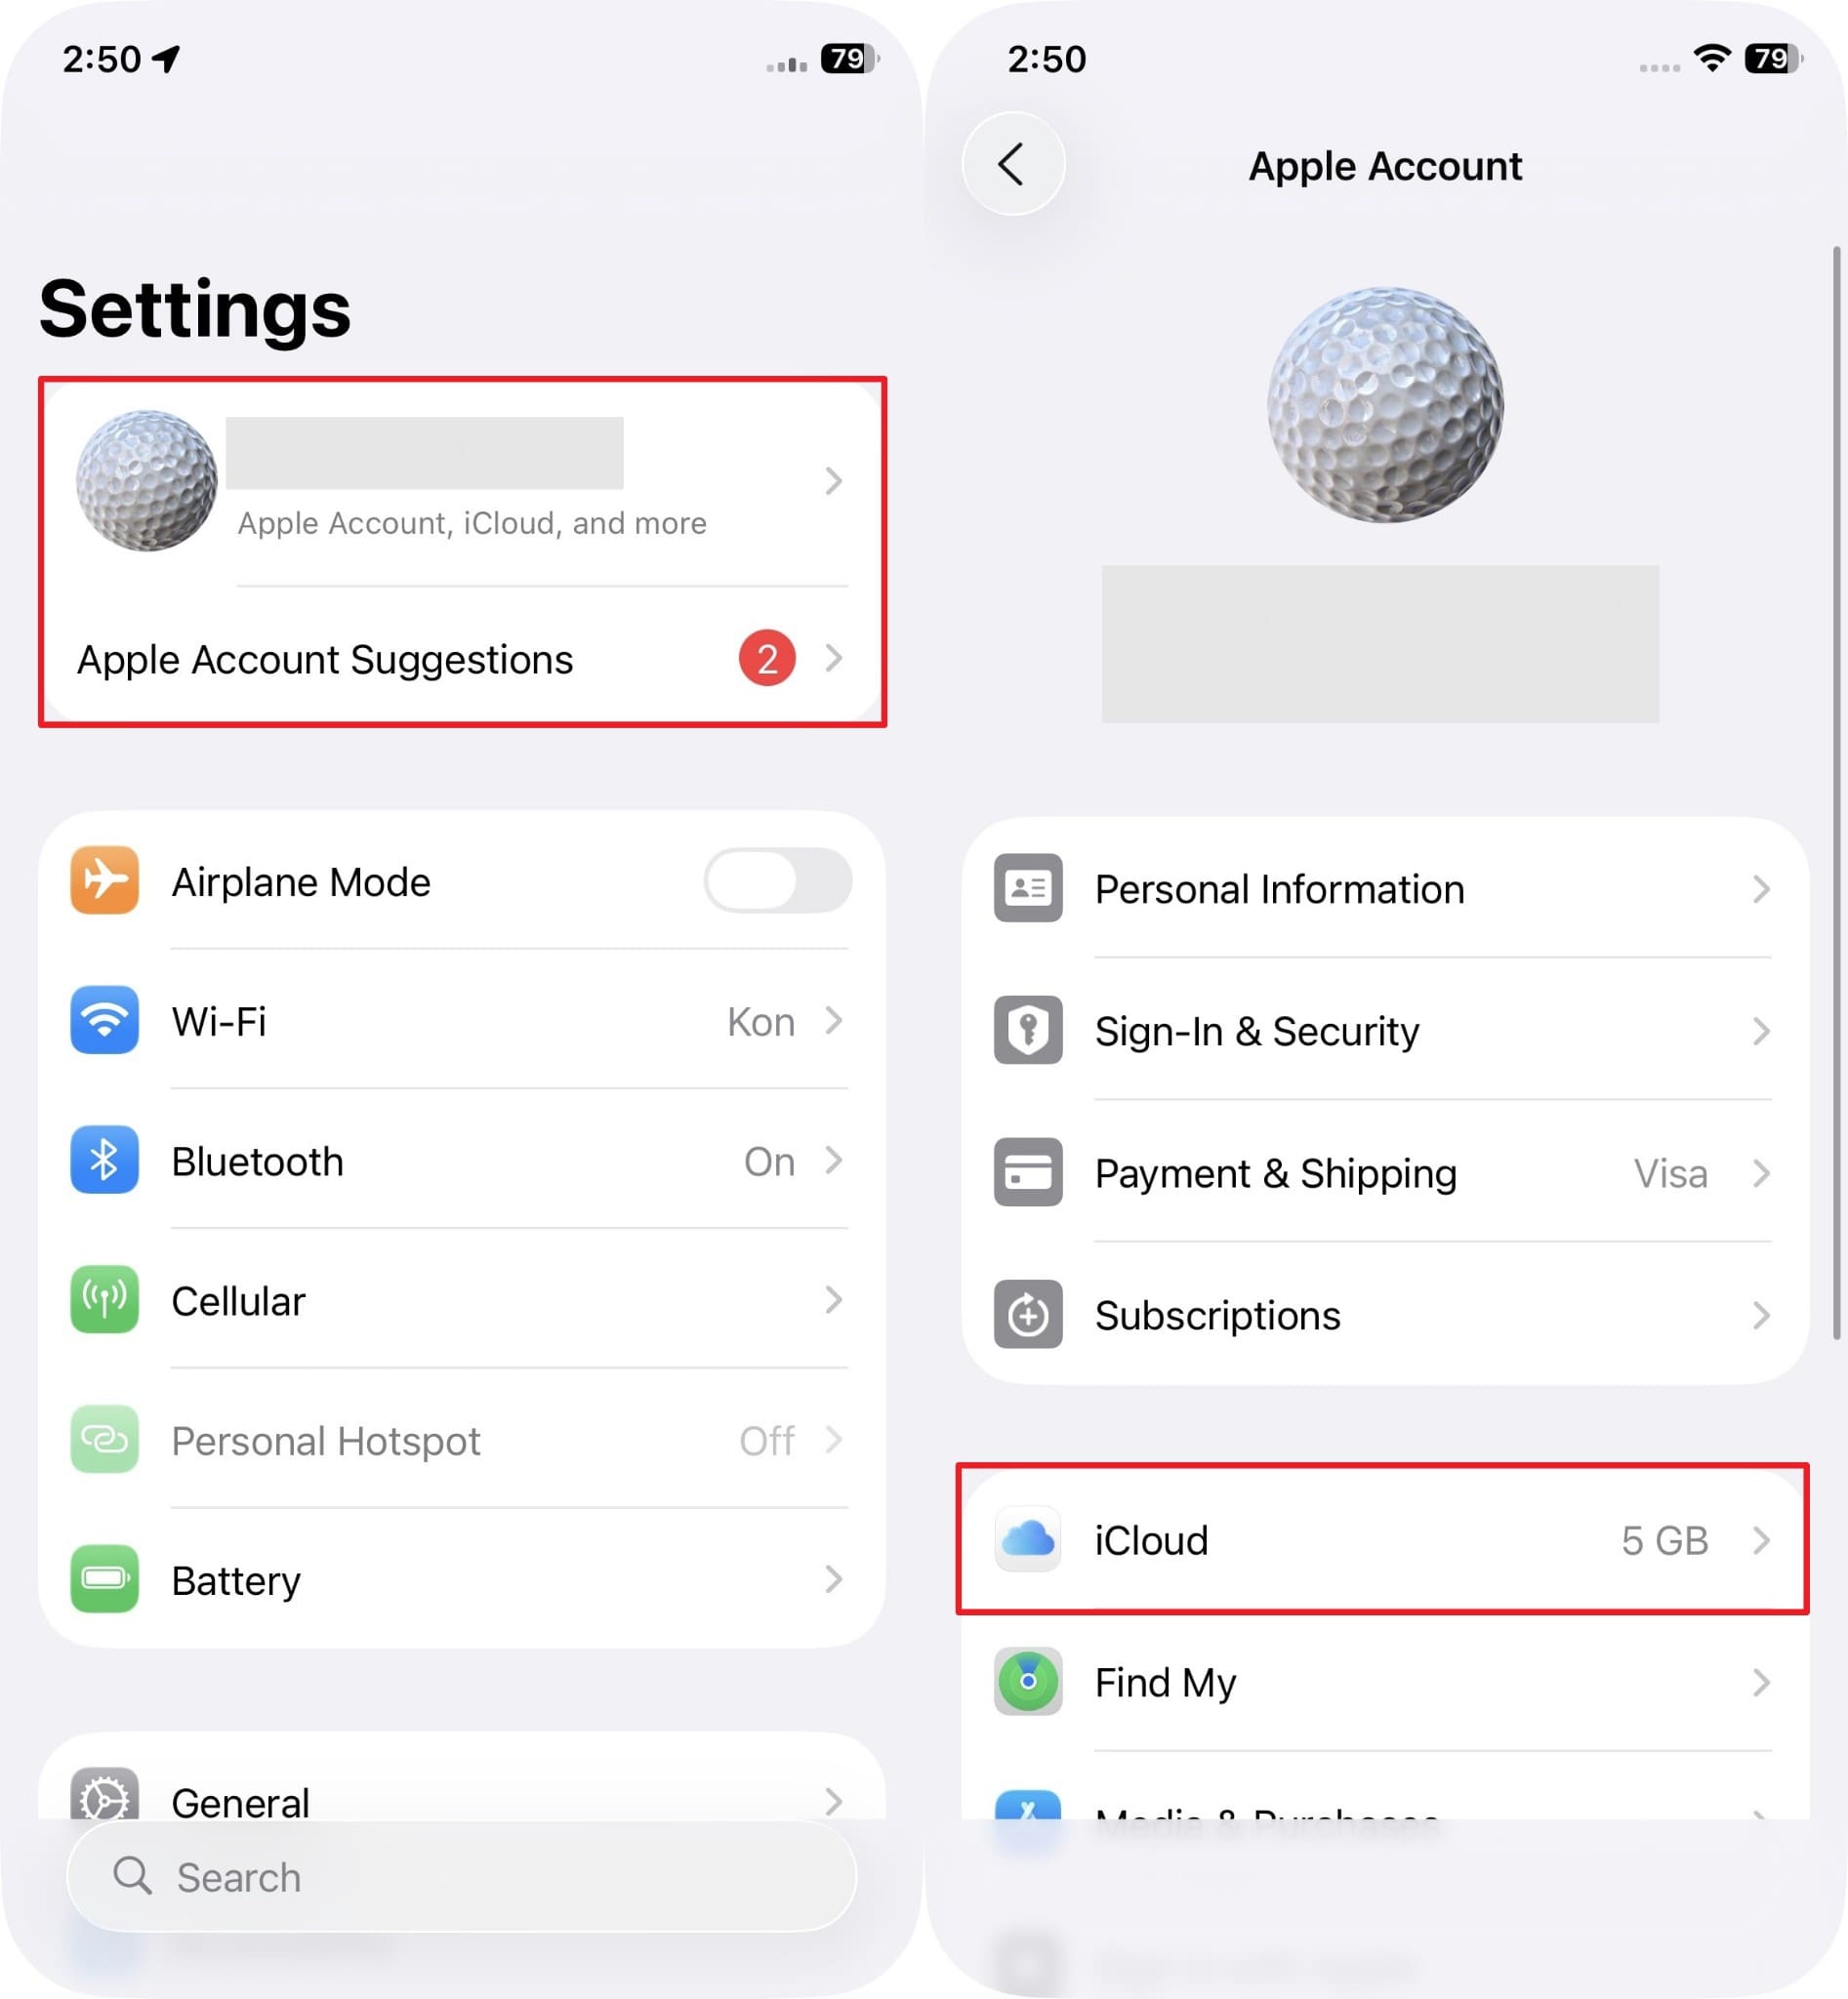
Step 1
You need to head to the "Apple ID" from settings and access "iCloud."
-
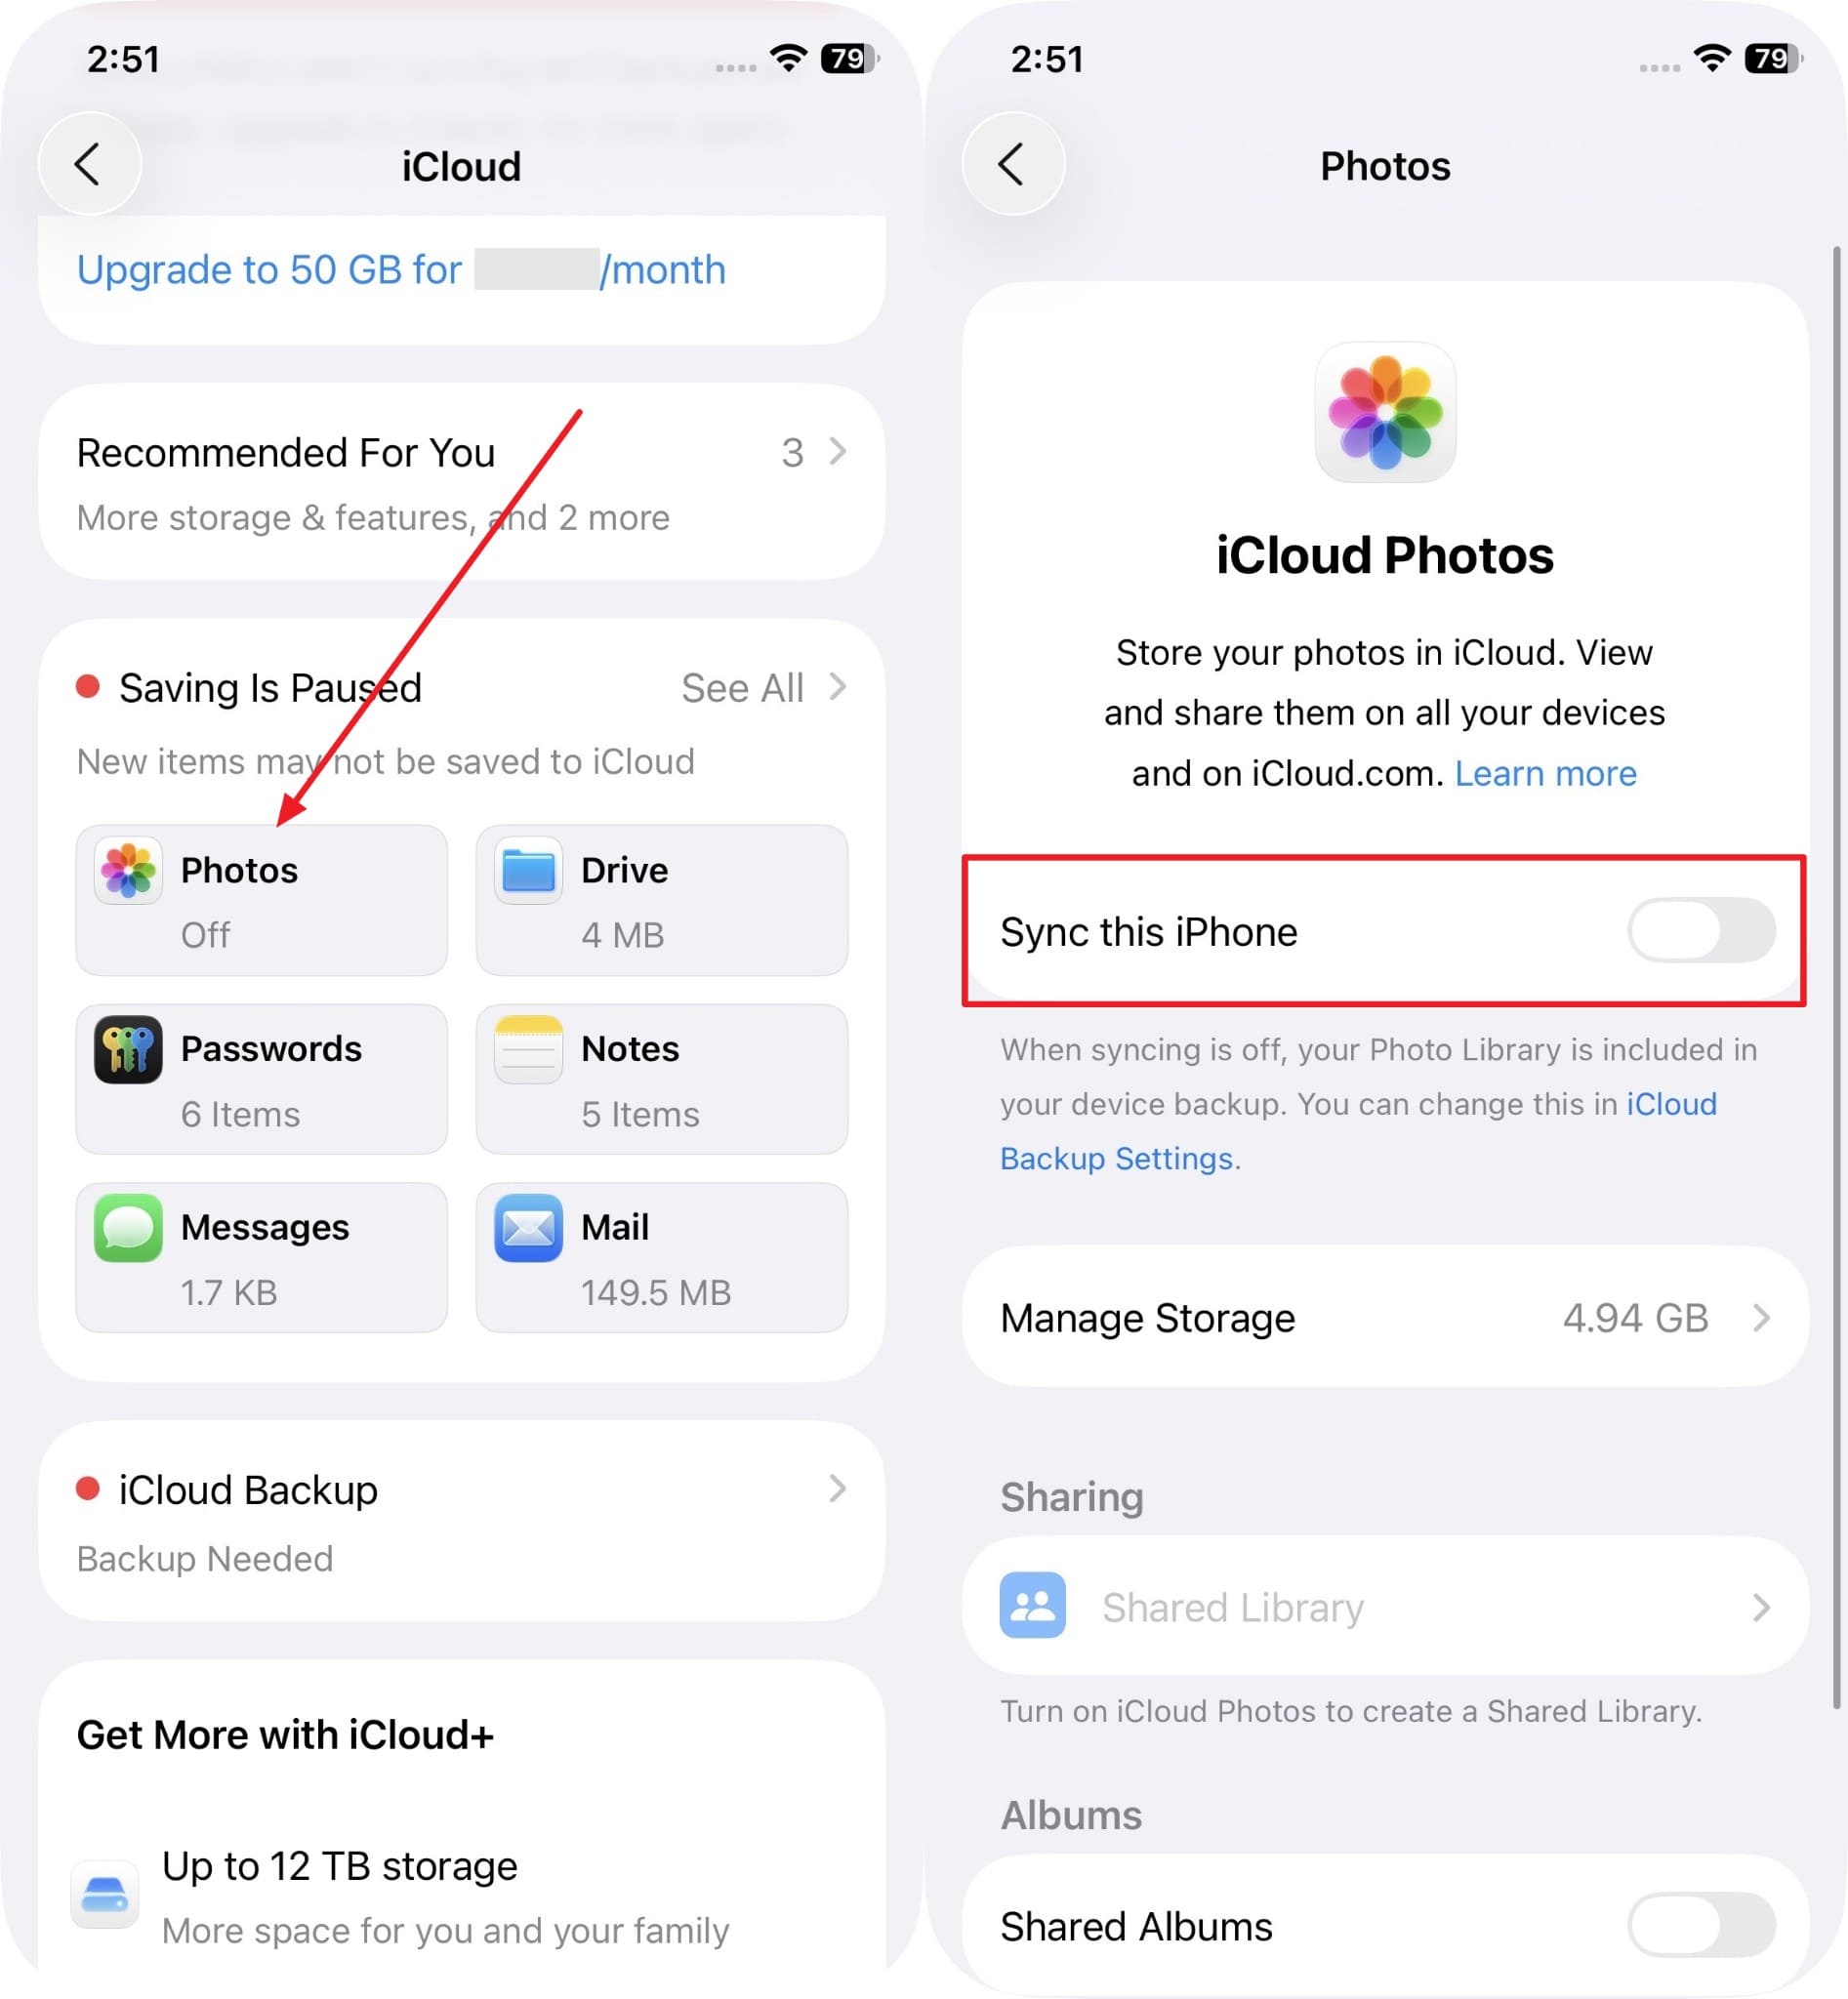
Step 2
From the upcoming display, tap "Photos" and then turn on "Sync This iPhone."
Enable iCloud Backup
-
Step 1
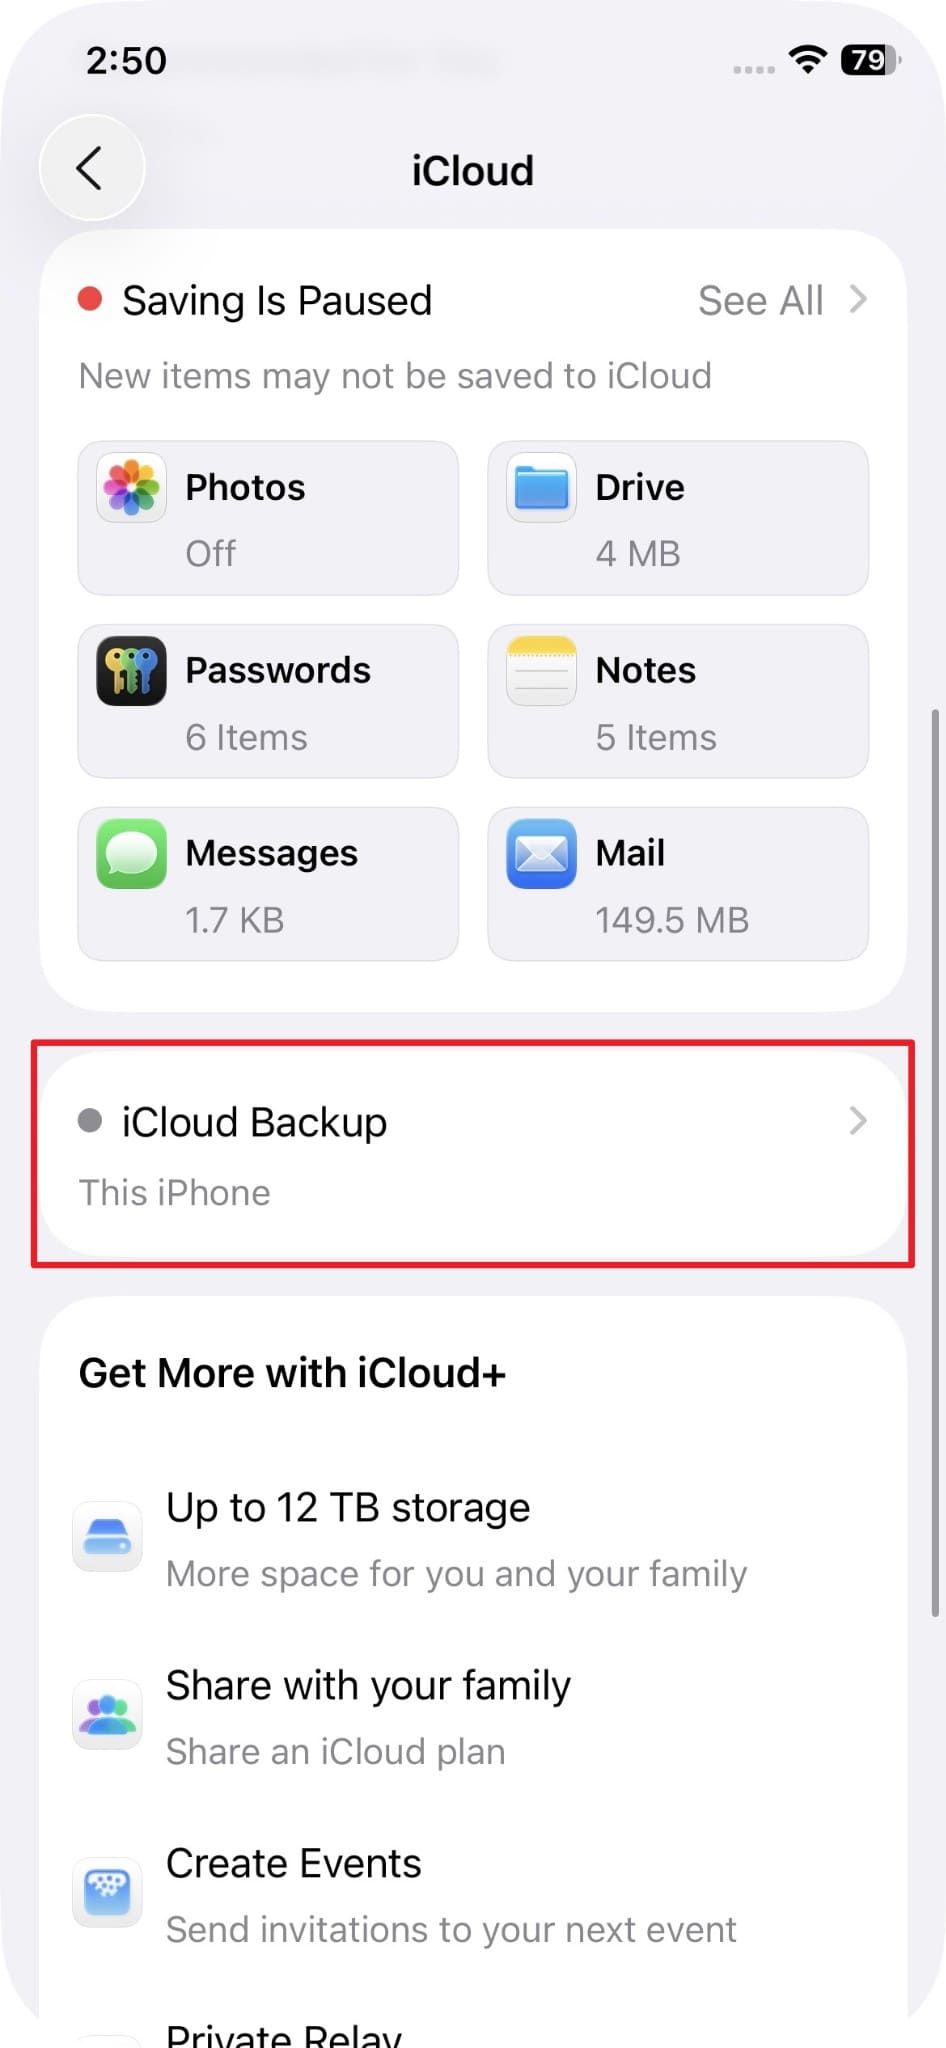
You need to access the "iCloud" section from settings and go to "iCloud Backup."
-
Step 2
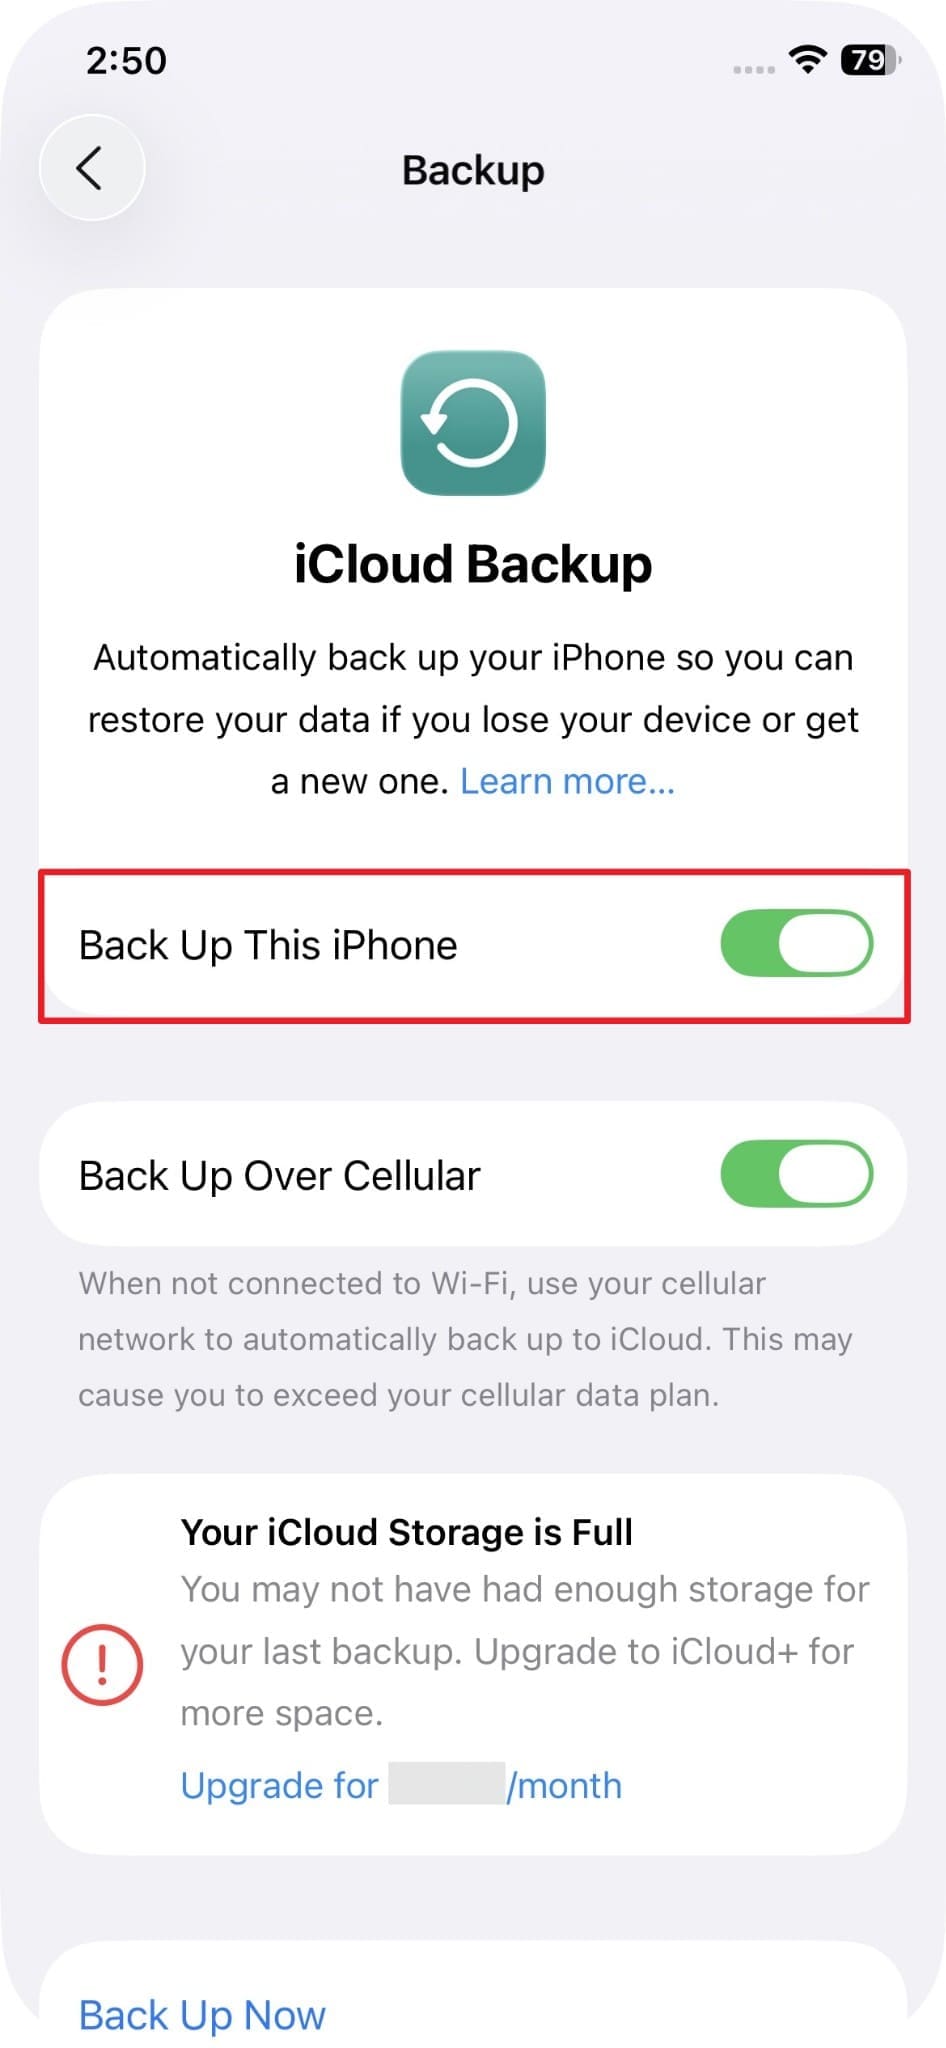
Moving forward, you need to enable the "Back Up This iPhone" toggle.
Part 3. How Can You Manually Upload Photos to iCloud?
Manual uploading gives you more control over which photos move to iCloud. It suits users who want to manage how to store photos in iCloud selectively. You can review files first and avoid syncing unwanted items. This particular method also works well when automatic syncing is unavailable or paused. Review the step-by-step instructions detailed below to begin uploading your selected items:
-
Step 1
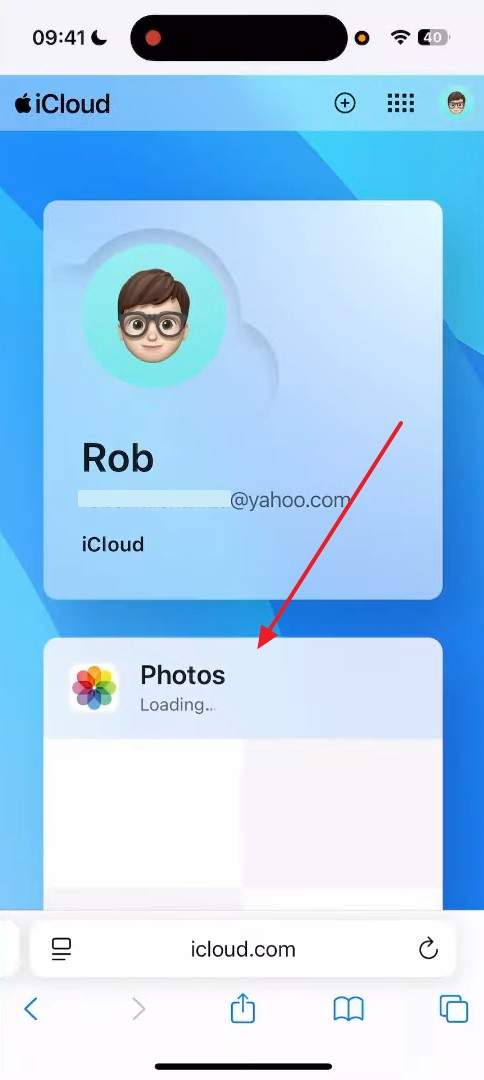
When you search for the "iCloud" website, log in with your account credentials. From the main display, navigate to the "Photos" section.
-
Step 2
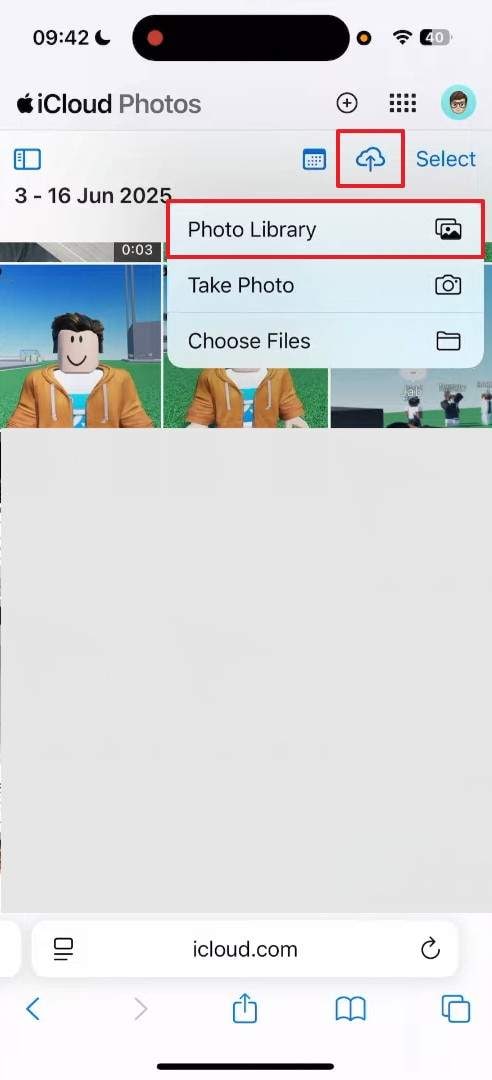
Following that, tap the "Upload" icon and opt for "Photo Library" to upload files.
Part 4. How to Check If Your Photos Have Been Uploaded to iCloud
After uploading photos, users often need confirmation of successful iCloud synchronization. Knowing how to upload pictures to iCloud also includes checking the upload status. So, adhere to these 3 easy ways to verify your photo upload status right now:
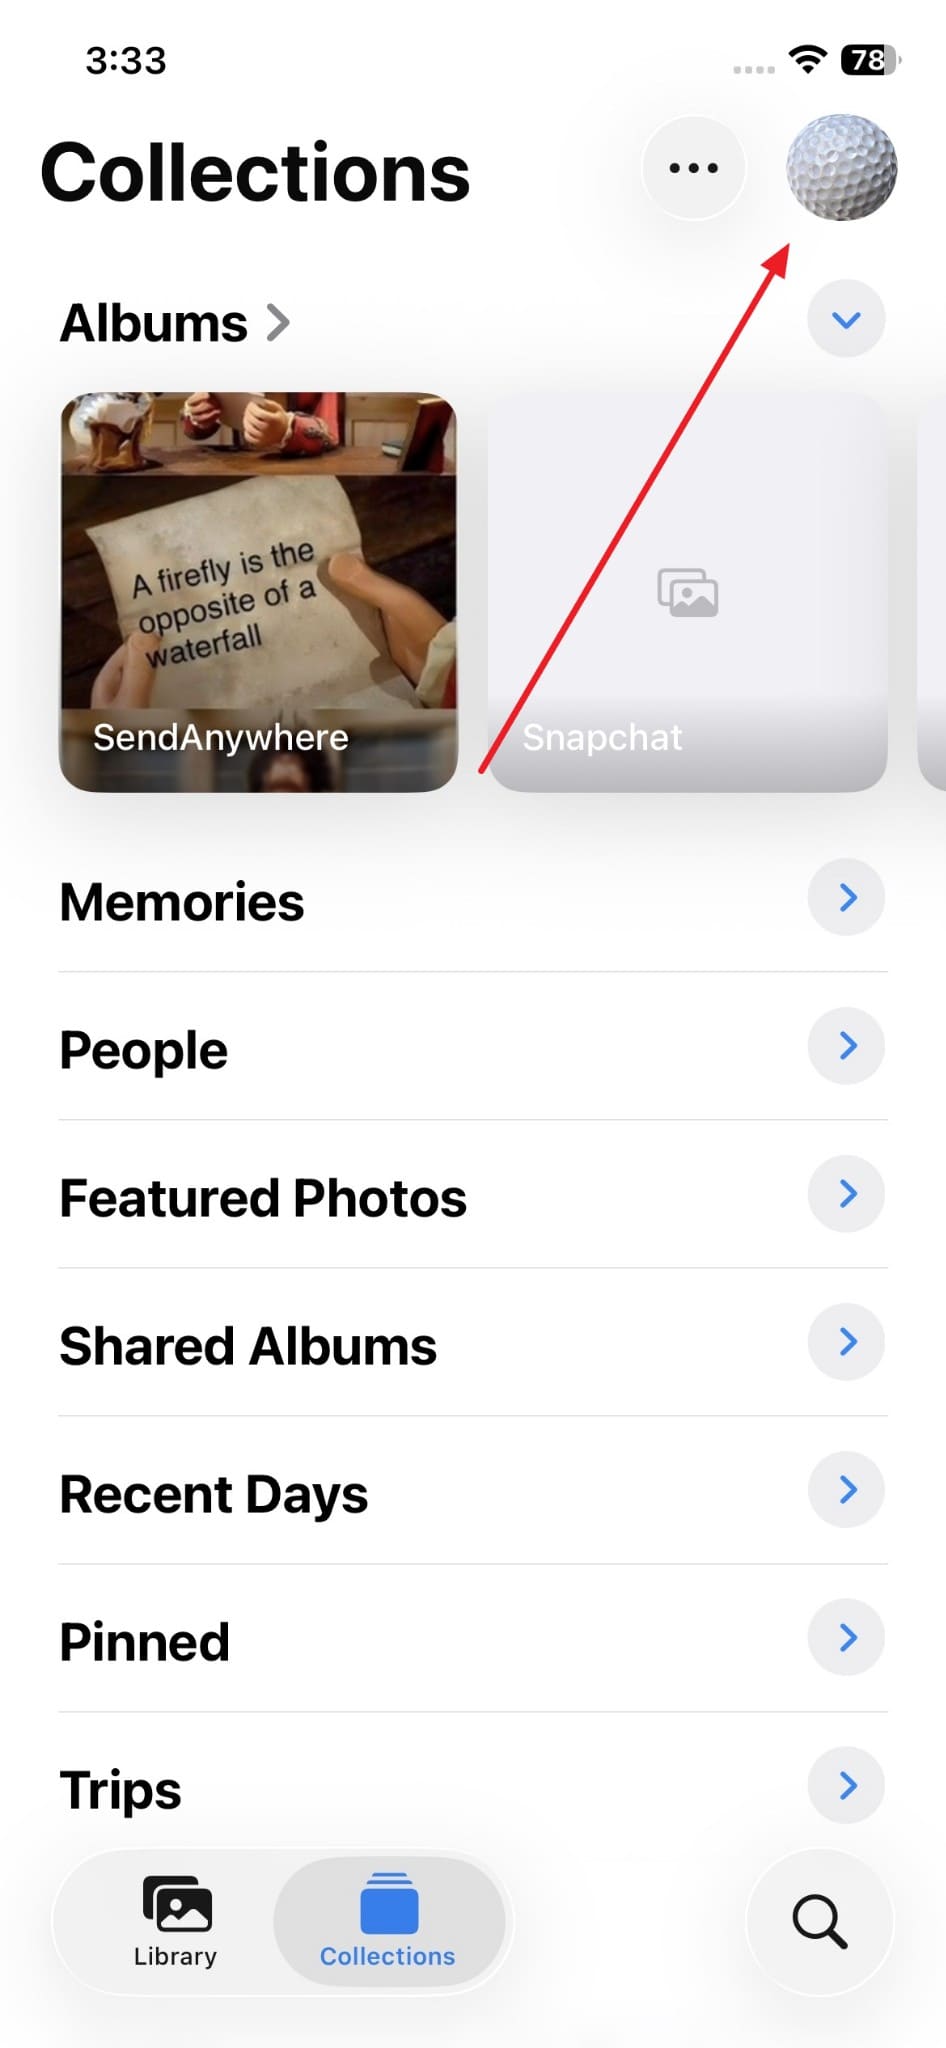
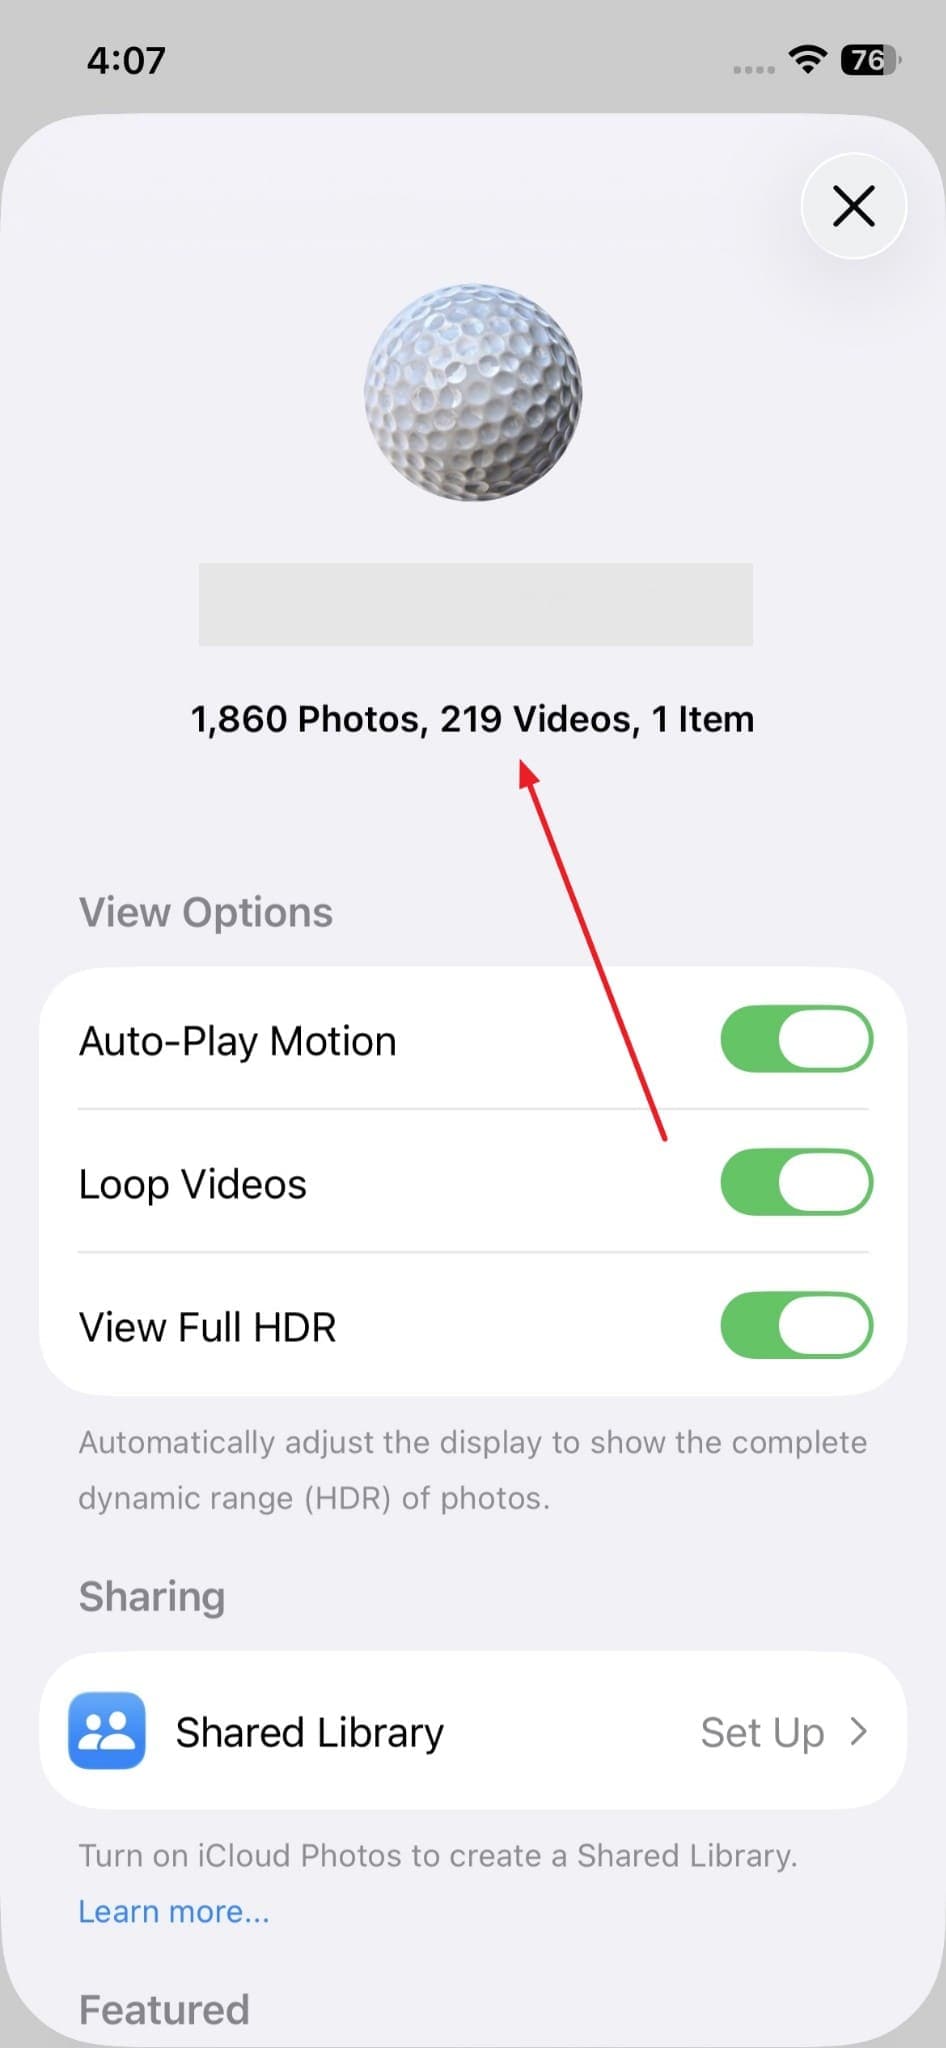
1. Check Upload Status on iPhone and iPad
Your device actually shows instant iCloud photo upload progress in Settings. Knowing how to put photos in iCloud includes knowing where to check the upload status. The Photos app displays a sync progress bar at the very bottom section. You can also see exactly how many items are still waiting to be uploaded. Thus, the steps below will guide you through checking your upload status:
-
Step 1
As you run the "Photos" app, navigate to the "Profile" section.
-
Step 2
Then, you will see a clear status of your total photos and videos.
2. Check Upload Status on Mac
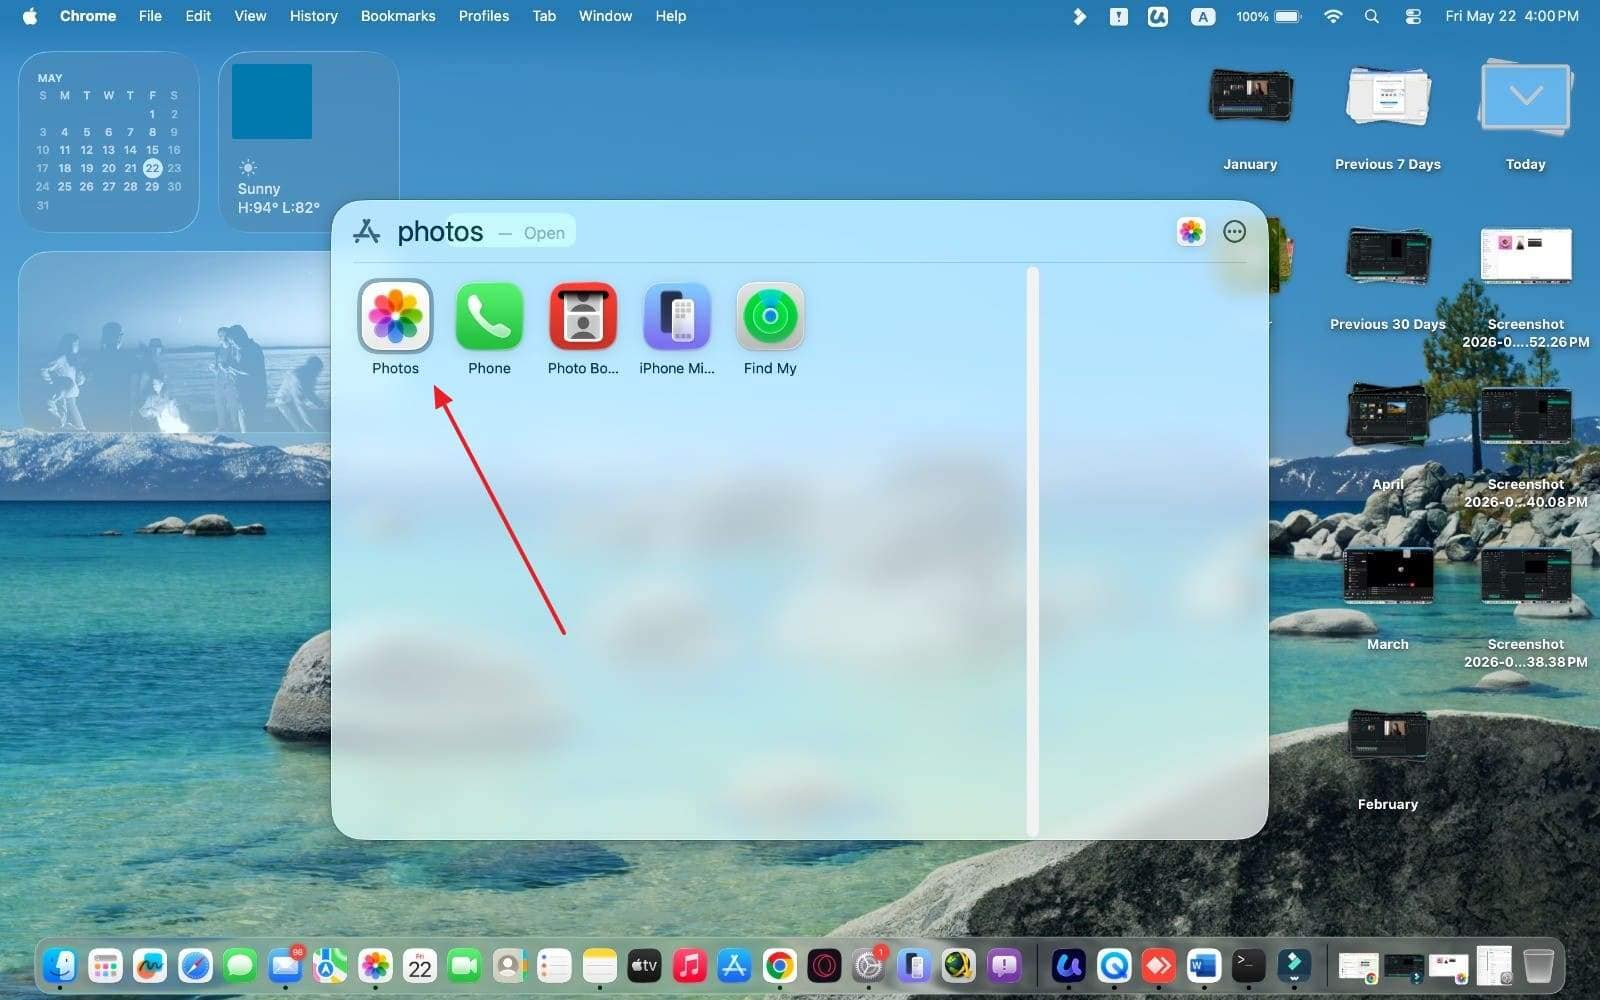
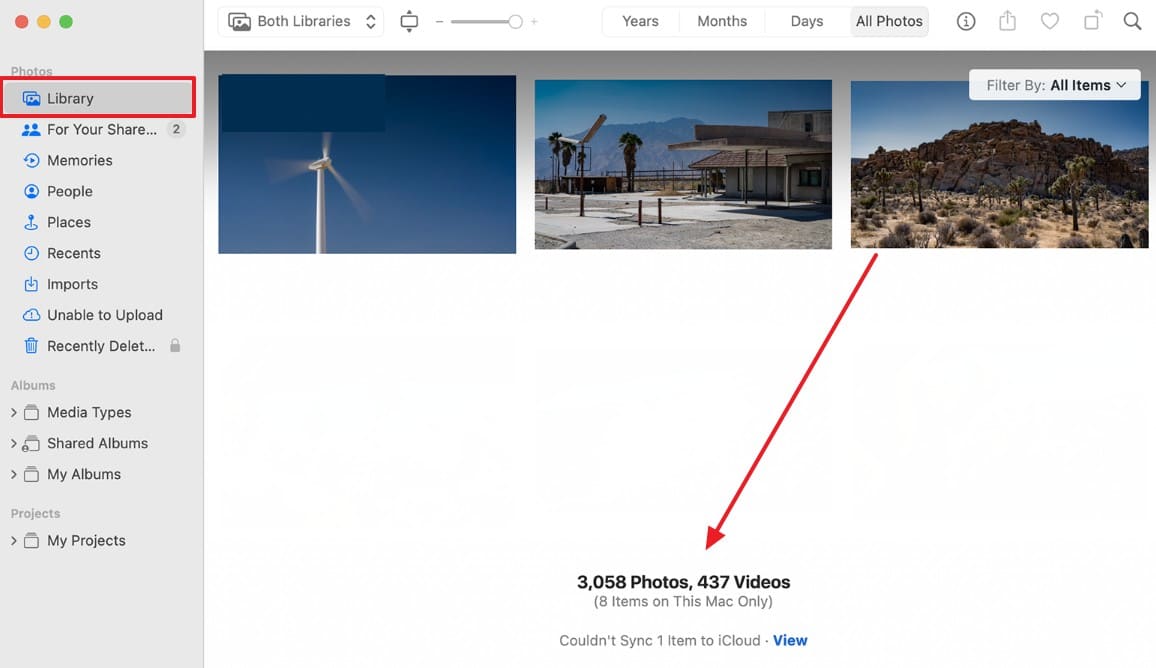
Your Mac provides a native way to monitor iCloud photo upload progress. The Photos app displays a syncing status bar at the very bottom section. You can see the remaining upload counts without opening any additional settings menu. This also helps identify delays or incomplete uploads without any tools. So, take guidance from the steps below to check your photo upload status:
-
Step 1
As you search for the "Photos" app, you need to run it for further processing.
-
Step 2
Access the "Library" tab and choose "All Photos." Then, scroll to the bottom to see the library status, like items uploading and items that couldn't sync.
3. View Your Photos on iCloud.com
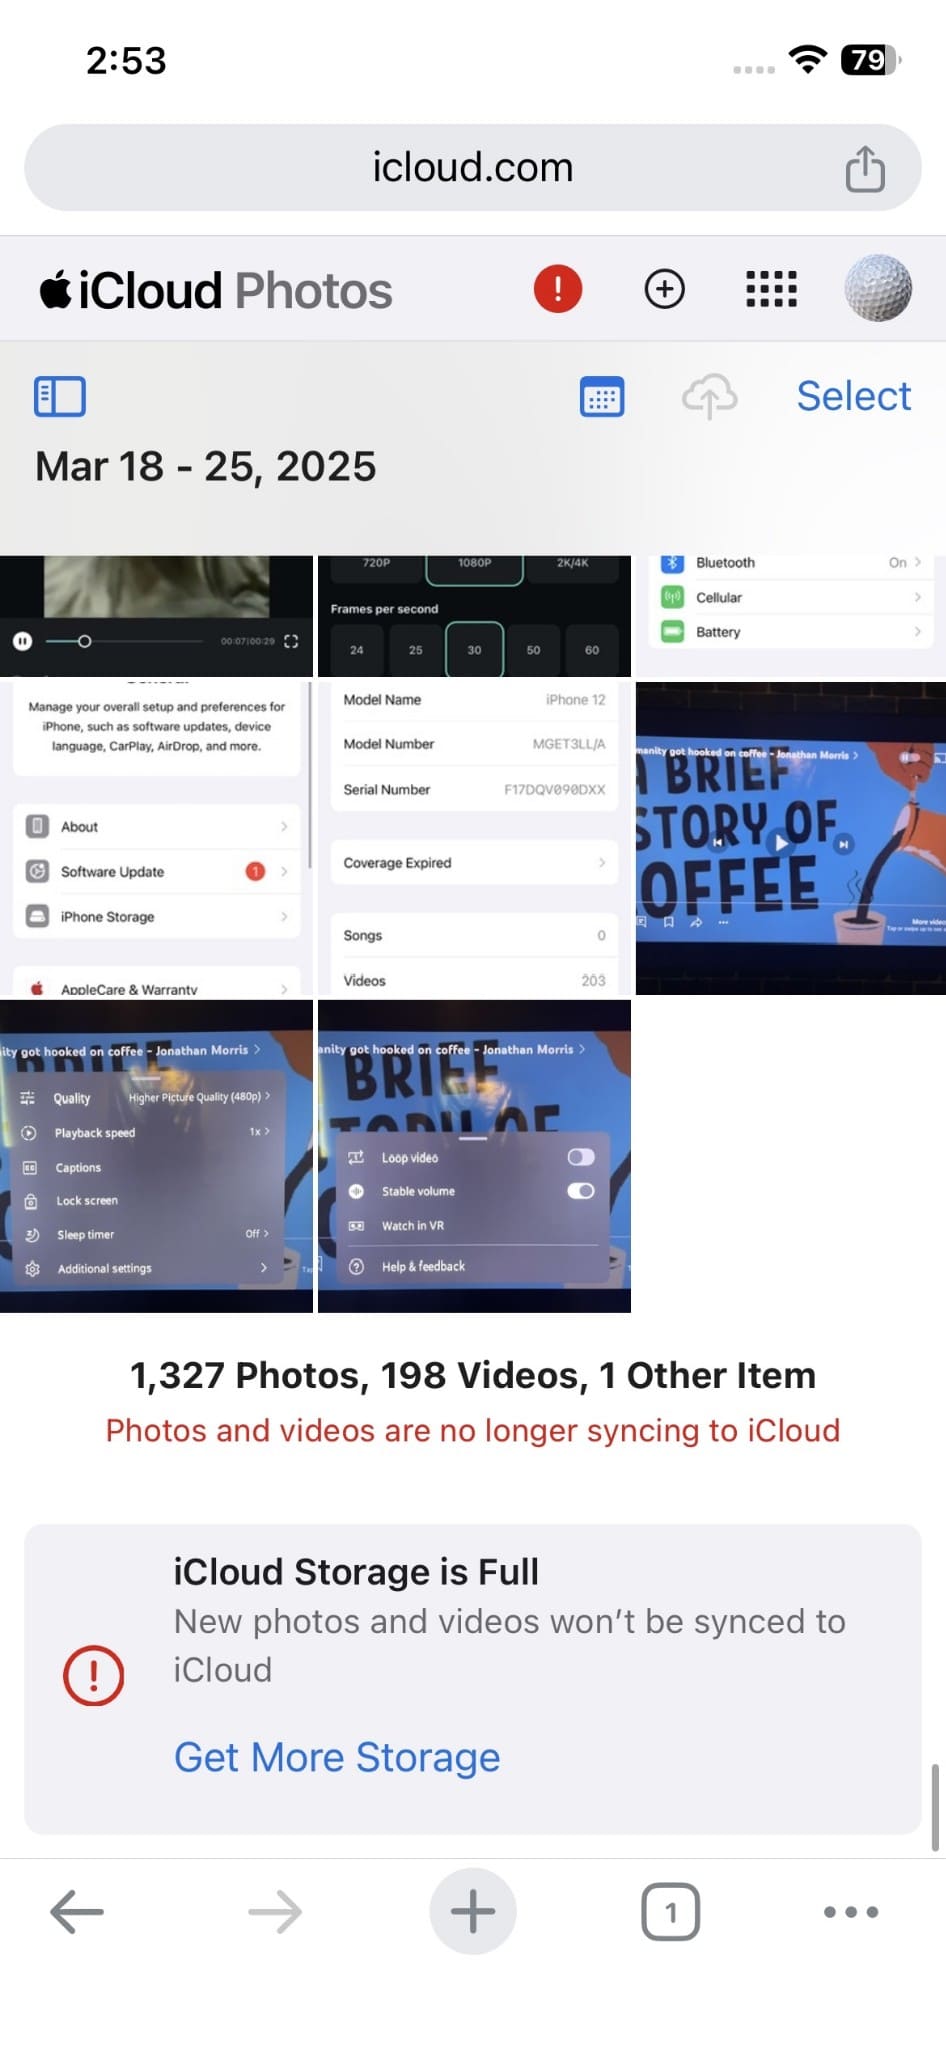
This method also offers an online way to confirm how you can save photos to iCloud. You can access your entire synced photo library from any device with internet. The website displays uploaded albums, shared collections, and recently added media files. It also shows recently deleted items that may still be within the recovery period. Hence, follow the steps below to view your uploaded photos on your browser:
-
Step 1
Upon logging in to your "iCloud" account, tap the "Photos" app from the main screen.

-
Step 2
Subsequently, you will be able to look for the images you are expecting.
Part 5. Why Are My Photos Not Uploading to iCloud?
There are several common problems that can prevent your photos from accessing cloud storage. So, below are a few key reasons explaining how do I upload photos to iCloud without hassle:
- Low Storage: Your iCloud account may have run out of available storage space. Upgrading your plan restores the upload functionality without delays.
- Weak Internet Connection: A poor or unstable network connection often interrupts active iCloud photo uploads. Switching to a stronger network resolves most syncing problems.
- iOS Version: Older iOS versions can lead to compatibility problems with iCloud syncing. When you update it to the new version, it often fixes underlying bugs affecting photo uploads.
- Disabled iCloud Photos: The syncing toggle may be turned off inside your settings. Enabling this option allows your device to resume syncing photos again.
- Low Power Mode: This mode will limit background use of the device, such as automatic uploads. Turning off this mode allows your device to resume background syncing without issues.
Conclusion
To conclude, exploring how to upload photos to iCloud ensures your local media library remains secure. Following these native platform steps optimizes wireless file transmission across devices. Experts generally recommend choosing iCloud Photos for ongoing syncing and iCloud Backup for full-device recovery. However, server errors or mistaken deletions can still compromise your data backups. When critical cloud issues occur, using tools like Dr.Fone - Data Recovery provides a possible recovery.
FAQs
-
Q1. How long does it take to upload photos to iCloud?
Upload time depends on your photo count and current internet connection speed. Larger libraries with videos can take several hours to sync fully. Therefore, keeping your device plugged in and connected helps speed the process. -
Q2. Will my photos be deleted from my phone after iCloud upload?
Uploading to the cloud storage does not automatically remove photos from your device. Yet your photos remain on your device unless you manually enable the optimize storage setting. That option will use a reduced resolution size of photos to save space. -
Q3. Can I upload photos to iCloud from a Windows PC?
Yes, you can easily upload photos to cloud storage from any Windows PC. You need to install the iCloud for Windows application or sign in via browser. Then, you can sync and manage your photo library from your computer. -
Q4. Can deleted iCloud Photos be recovered after removal?
Your recently deleted images remain recoverable inside the dedicated Recently Deleted folder section. Files usually remain available there for about 30 days before permanent cloud deletion. Besides, tools like Dr.Fone can help recover inaccessible backup photos when standard recovery methods fail.
 Add Wondershare Dr.Fone as a preferred source on Google