100% Security Verified | No Subscription Required | No Malware

 :
: 
 ChatGPT
 Perplexity
 Gemini
 Claude
 Grok
Grok

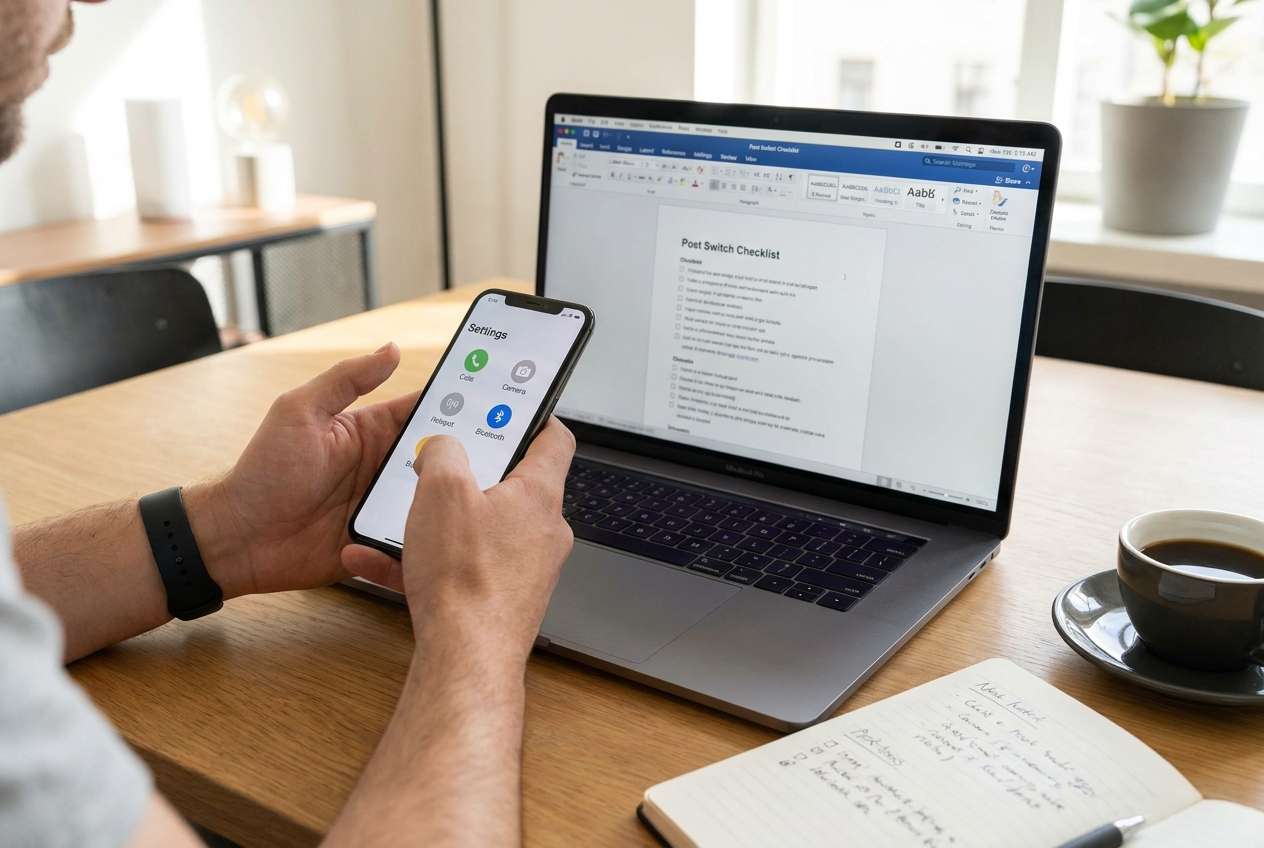
I switched phones and everything looked normal—until calls failed on LTE, my hotspot didn’t show up, and Bluetooth kept reconnecting. I wish I had a checklist in the right order before I wiped the old phone.
Forum user
Missing one small post-switch step can turn into hours of “everything looks fine” troubleshooting—especially when calls, camera permissions, hotspot provisioning, or Bluetooth pairing are involved.
AI helps you turn a vague “check everything” idea into a structured checklist with a clear order, critical pass/fail criteria, and a defined rollback point before anything irreversible.
AI can’t actually place test calls, verify carrier provisioning, or move your data between devices; execution requires real tools and on-device actions once the plan is locked.
In this article
- How to plan a post-switch checklist (calls, camera, hotspot, Bluetooth)
- Why order matters
- Define pass/fail criteria
- Set a hold point before irreversible actions
- Capture evidence to avoid re-testing
- What the AI needs to know
- Using AI prompts to build a safer workflow
- AI plan vs. real device constraints
- Execute the workflow safely with Dr.Fone
Part 1. How to Plan a Post-Switch Checklist for Calls, Camera, Hotspot, and Bluetooth Without Missing Critical Steps
You switched phones (or did a major OS update), and now you’re unsure what to verify first: calls and SMS, camera access, hotspot, or Bluetooth. Each one can fail for different reasons—SIM/eSIM state, carrier features, permissions, or old pairings—so a random test order wastes time.
After you ask AI for help, you often get a long list—but not a sequence, not what “good” looks like, and not which checks must pass before you do something risky.
The point of no return usually happens when you factory reset/trade in the old phone or delete the eSIM profile—if you do that before verification, recovery options shrink fast.
Part 2. What the AI Needs to Know
Share your setup so the checklist matches your device, carrier, and switching method.
- Old phone model + OS version (e.g., iPhone 12 iOS 17)
- New phone model + OS version (e.g., Galaxy S24 Android 15)
- Switch type (Android→Android, iPhone→iPhone, iPhone→Android, Android→iPhone)
- SIM situation (physical SIM, eSIM, dual SIM, moved SIM vs reissued eSIM)
- Carrier + plan notes (hotspot included? any family/enterprise restrictions?)
- What already fails (calls drop, camera won’t focus, hotspot missing, Bluetooth audio stutters)
- Apps involved (WhatsApp/Signal calling, camera apps, car head unit, earbuds model)
- What you can’t risk losing (messages, photos, authenticator access, work profiles)
- Your deadline and the “no downtime” window (e.g., must work by morning commute)
Part 3. Using AI Prompts to Build a Safer Post-Switch Workflow
Use the prompts below to force a clean sequence, clear pass/fail checks, and a “stop before irreversible actions” gate.
3-1. Level 1: Basic Prompt
Draft a post-switch checklist for verifying calls, camera, hotspot, and Bluetooth on my new phone.
Put the checks in the safest order and tell me what “pass” looks like for each.
Don’t include any device actions that can’t be reversed until the end.
3-2. Level 2: Advanced Prompt
Build a structured workflow with Preparation → Execution → Verification for my post-switch checklist covering calls, camera, hotspot, and Bluetooth.
Mark each step as Critical or Optional and explain why.
Include a “hold point” before any irreversible step (like factory reset/trade-in or deleting eSIM), and list the minimum verifications required to pass that hold point.
3-3. Level 3: Evidence Prompt
Here’s my context: new device (Galaxy S24, Android 15), old device (iPhone 12, iOS 17), carrier (T‑Mobile), SIM type (eSIM), Bluetooth devices (AirPods Pro 2, 2021 Honda Civic head unit), hotspot use (laptop Windows 11), camera symptom (third‑party apps can’t access camera), calling symptom (outgoing calls fail on LTE but work on Wi‑Fi calling).
Create an evidence-based checklist with:
- Before checks (what to record/screenshots, what to confirm in carrier account)
- During checks (exact test cases like “place a call to voicemail (123)”, “record 10s video in 1080p”, “hotspot connects for 2 minutes and loads 3 sites”)
- After checks (what to re-test after fixes)
Also include decision rules: if X fails, do Y next; if it still fails, stop and escalate.
3-4. Prompt Refinement
Reformat the checklist into a table with columns: Step, Critical/Optional, How to Test, Pass Criteria, If Fail → Next Action, Stop/No‑Go?.
Add a “minimum viable phone readiness” gate: list the exact checks that must pass before I rely on this phone for work/travel.
Create two variants: one for same carrier + same number, and one for number port in progress (include what to avoid while porting).
Identify the top 5 failure points specific to my setup (carrier + eSIM + car Bluetooth + hotspot) and add targeted checks for each.
Part 4. AI Plan vs. Real Device Constraints
| Planning with AI | Real-world constraint on devices/tools |
|---|---|
| Defines the safest order of checks and what to verify first | Only the device/carrier can confirm provisioning, IMS/VoLTE status, and real call routing |
| Creates pass/fail criteria (what “working” means) | You must run the actual tests (calls, recording, tethering, pairing) on the phone and connected devices |
| Identifies risk gates before irreversible actions | Factory reset, trade-in, and eSIM deletion are irreversible once done—verification must be complete first |
| Produces decision rules (“if this fails, do that next”) | Some fixes require carrier support, account changes, or waiting for network propagation |
AI improves planning, but cannot execute the checks or change your device/carrier state; you still need real device actions and a tool for safe data handling.
4-1. When to Stop Planning and Start Execution
- You have a single, ordered checklist with Critical steps clearly separated from Optional steps.
- Every critical check has a pass/fail definition and a next action if it fails.
- You’ve defined a hold point and agreed: no factory reset/trade-in, no eSIM deletion, no wiping old device until the hold point is passed.
- You know what evidence you’ll capture (screenshots, timestamps, test results) to avoid repeating tests.
Once these are true, stop editing the plan and move into execution with a controlled, reversible first move.
Part 5. Post-Switch Checklist: Execute the Workflow Safely with Dr.Fone
Execution matters now because the main risk is not “lack of ideas”—it’s losing rollback options while you’re still diagnosing. To keep the process controlled, use Dr.Fone - Phone Transfer as the practical layer for backup/transfer while you run your real device tests.
 Move data between iOS to Android and vice versa.
- Transfer contacts, SMS, photos, videos, music, and more types.
- Available with all phones with Android and iOS versions.
- Simple, click-through process.

-
Step 1 Create a rollback snapshot (before any risky changes)

Back up the old phone (and any remaining data on the new phone) so you can recover if verification fails or a reset becomes necessary.
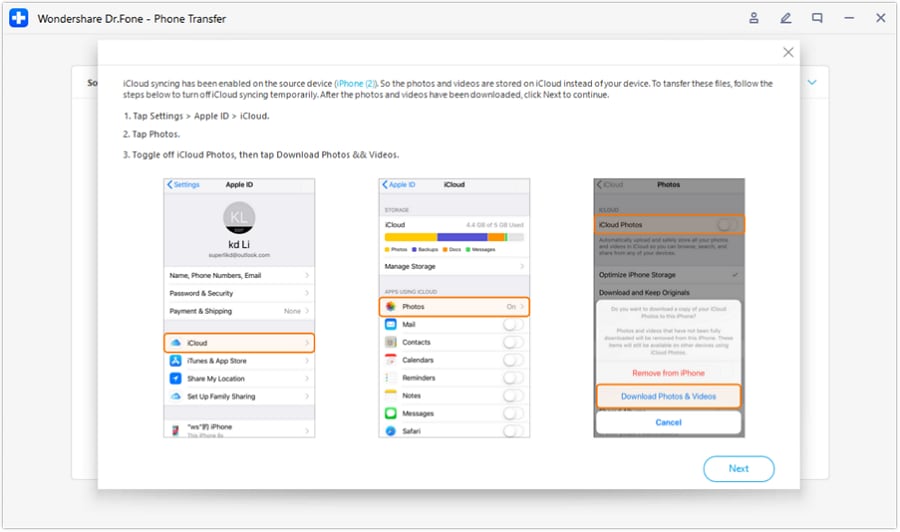
Limitation: Dr.Fone can’t validate carrier activation, hotspot entitlement, or Bluetooth stability—backup only reduces data-loss risk.
-
Step 2 Set the transfer direction and start a controlled restore/transfer

Choose the correct source/target direction (for example, iOS → Android or Android → iOS) and proceed only with the data you need for immediate usability.
-
Step 3 Select the data to move and prevent syncing conflicts during transfer

Move/restore essential data (contacts, photos, and messages where applicable), and avoid conflicts caused by active cloud sync while the transfer is running.
-
Step 4 Run critical device checks in order; only after the hold point passes, do irreversible cleanup
Execute your planned critical tests for calls, camera, hotspot, and Bluetooth exactly as written, and capture evidence (screenshots/timestamps) so you don’t repeat tests.
Only after all critical checks pass (and you’ve confirmed 2FA/authenticator access), proceed with final cleanup such as resetting the old phone for trade-in or removing the eSIM profile if that’s part of your plan.
Limitation: If you factory reset/trade in the old device or delete the eSIM too early, recovery may require carrier intervention and could permanently block access to accounts or data.


Conclusion
Use AI to design a checklist with strict ordering, pass/fail criteria, and a hold point before irreversible actions; then use Dr.Fone as the execution layer to protect your data and support controlled transfer while you run real device checks for calls, camera, hotspot, and Bluetooth.
FAQ
-
What’s the most common mistake after switching phones?
Doing irreversible cleanup (factory reset/trade-in/eSIM removal) before confirming calls/SMS, hotspot entitlement, and Bluetooth pairing stability. -
What should I verify first: data transfer or calling?
Usually calling/SMS and basic network identity first (can you place/receive calls reliably), because a partially activated number can break everything else and waste time. -
How do I make “Bluetooth works” measurable?
Define a repeatable test: pair → reconnect after reboot → play audio 5 minutes → make one call via headset/car → confirm controls/mic work. -
When should I stop troubleshooting and contact my carrier?
If voice/SMS fails across multiple locations or only works on Wi‑Fi calling, or hotspot is missing/blocked despite plan eligibility—those often indicate provisioning/account issues. -
Can AI tell me the exact fix for my phone model and carrier?
AI can propose likely causes and a safe sequence, but it can’t see your carrier account state, provisioning flags, or real-time network behavior.
 Add Wondershare Dr.Fone as a preferred source on Google