Recover photos, messages, WhatsApp, and more — no backup
needed.


 100% Security Verified | No Subscription Required | No Malware

 :

 ChatGPT
 Perplexity
 Gemini
 Claude
 Grok
The pictures for a photo book may still be on your Galaxy S22+, while the LINE messages that specified the cover, spread order and crop changes are gone. Sending the same images again will not recover which picture belonged on which page, or whether the printer had accepted the last revision.
Dr.Fone - Data Recovery (Android) provides a no-backup scan route for supported devices when you need to recover deleted LINE messages on Samsung Galaxy S22+. Previewing the available wording and the separate attachment results helps you keep useful print instructions alongside the actual images or files found. First preserve any conversation that remains, without confusing a fresh text export with recovery of the deleted portion.
In this article
Before you start
Check the specific Galaxy S22+ entry
The confirmed support record names Samsung Galaxy S22+ with Kernel 5.10.236. No Android-version restriction is listed for this model; this does not remove the kernel condition or borrow support from another Galaxy model. Keep the phone's model and software details ready for the product's compatibility checks.
Prepare a stable Windows recovery session
Use a Windows PC, a USB data cable and a destination folder that keeps private pictures out of shared workspaces. Advanced Recovery is Windows-only and saves selected discoverable results to PC, not back into LINE. Retain the current app and local storage. Do not clear cache or app data, uninstall, log out, reset, downgrade or flash the phone to pursue recovery; follow the product's displayed access instructions instead of an unverified Root guide.
Record the missing order decisions before sorting results
Note the order reference, the approximate revision day and the specific missing choice: cover image, page order, crop direction or quantity. A recovered message is useful when it actually contains the needed decision. The scan can recover only what it discovers, and a text reference to an image does not establish that its original file remains available.
Preserve retained instructions without mistaking export for undelete
Part of the printer conversation still exists, or you already have a separately saved text reference or order document.
Step 1 Locate the retained order exchange
Open the relevant chat and use its top search icon to look for an order reference or distinctive wording. The calendar icon can take the search to a likely date. If the thread was only hidden, use Home > Settings > Chats > Hidden chats > Edit > Unhide chat. Inspect actual retained messages before deciding the whole order trail is missing.
Step 2 Export the visible conversation as a reference
On the phone, open the chat's top menu > Settings > Export chat history, then choose how to send the text file. Save it to a destination you control. Check the exported text for the instructions that are still present; exporting now does not search for deleted records, and it is not a substitute for checking the image and file content separately.
Step 3 Compare any existing order document with the wording
Open only copies you already have, such as a saved proof, page list or printer confirmation. Match page numbers and stated revisions manually. Keep a proposed change separate from a message accepting it. If production is still pending and the surviving documents conflict, ask the printer to confirm the current job before sending a replacement instruction.
- A text export is a readable copy of retained history, not an importable reconstruction of the deleted conversation. Do not rely on it to contain the original photos or videos.
- An existing text file or document is a retained source. The Dr.Fone workflow below is the separate route for looking for local deleted LINE data without a backup.
Match recovered print instructions to the right material
| What you need | What to inspect | Avoid this assumption |
|---|---|---|
| Cover choice | Actual message identifying the cover and the corresponding accessible image | The first image in an attachment list must be the cover |
| Spread or page order | Written page references and any retained proof showing that arrangement | Attachment display order reproduces the intended book order |
| Crop revision | Explicit crop wording and the particular proof it refers to | A similar thumbnail proves the requested crop was applied |
| Accepted final order | An available acknowledgement of the specific revision and quantity | A draft proof or file named final proves production acceptance |
Common problems and fixes
The exported text has a reference to a picture but no usable original
Treat the text as conversation context, not an image archive. Check the independently saved picture you already possess and the available LINE Attachments scan results. Open the saved file itself before deciding it is suitable for the print job.
Several versions of the same proof are found
Compare the visible page numbers and actual change with the available messages. Preserve both the source file and the relevant wording if needed, rather than choosing solely by filename. Dr.Fone does not automatically determine the approved layout or rebuild a photo-book project.
LINE messages are available but the page sequence is incomplete
Keep the recovered instructions and the last usable proof as separate records. Mark the unresolved pages in your own checklist and request the printer's retained sequence or fresh confirmation. Do not invent missing order positions from the scan's display order.
How to use Dr.Fone - Data Recovery (Android)
Dr.Fone - Data Recovery (Android) helps you look for the missing decisions behind a set of surviving pictures. With Windows-only Advanced Recovery on a supported Galaxy S22+, you can scan for available LINE conversations without a backup, inspect LINE Attachments separately and save selected useful records to PC. This gives you a practical way to review wording and actual media together before reconstructing your own order checklist.
- Conversation preview helps identify the cover, page or crop wording that is actually present in found records.
- Separate LINE attachment results let you inspect available photos, videos and files without treating a text export as a media backup.
- Selective PC recovery keeps the relevant instructions and proof files available for manual comparison outside the phone.
 Scan Android phones and tablets directly.
- Preview and recover only what you want.
- Supports WhatsApp, photos, videos, contacts, and more.
- Works with 6000+ Android devices.
Follow the official Advanced Recovery workflow
Step 1 Start Advanced Recovery for the Galaxy S22+
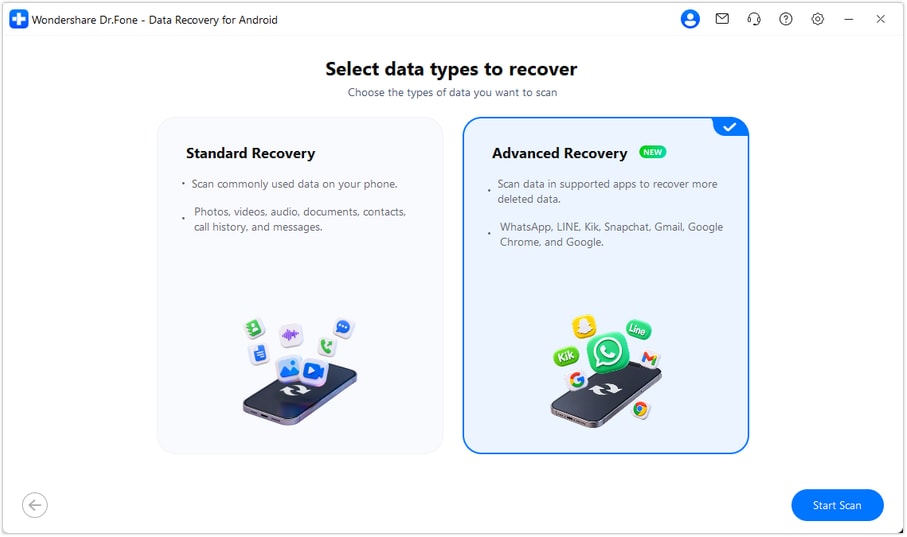
Launch Dr.Fone on Windows and navigate to Toolbox > Data Recovery. Choose Android > Recover Android Data, then Advanced Recovery > Start Scan. Connect the supported Galaxy S22+ by USB when requested and follow the device-detection prompts.
Step 2 Choose LINE and begin scanning
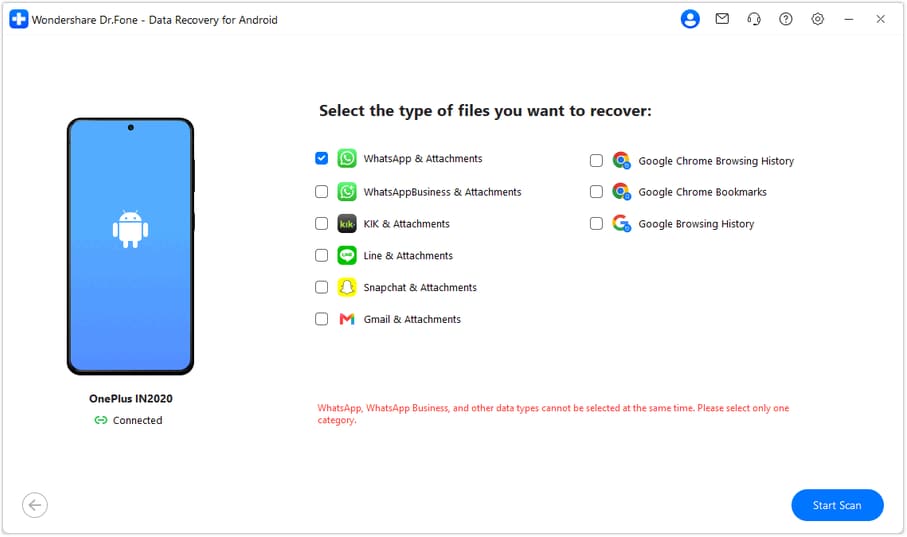
Select LINE from the available app-data categories and click Start Scan to look for the conversation records and attachments related to your missing print instructions.
Step 3 Maintain the connection during recovery scanning
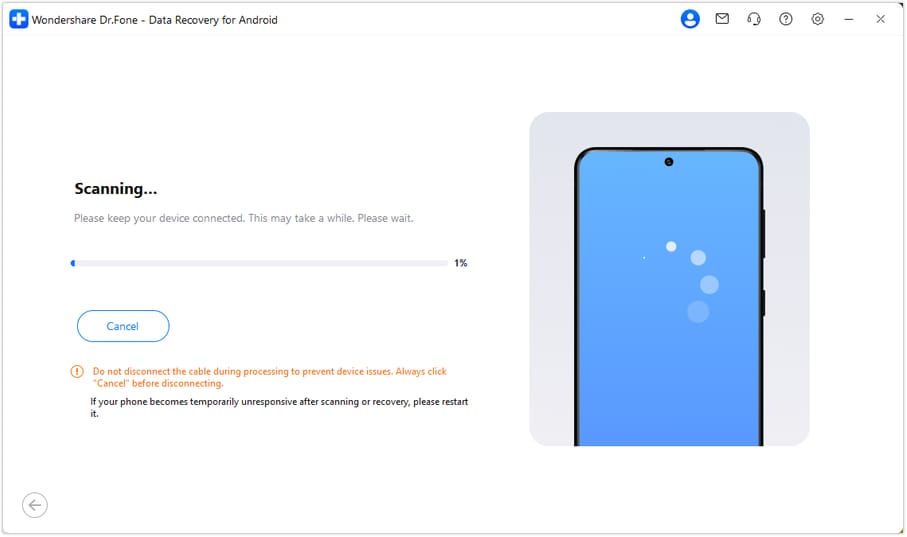
Keep the phone connected until the scan finishes. Click Cancel before disconnecting if you need to stop. If the phone is temporarily unresponsive after scanning or recovery, use the restart instruction displayed by the product.
Step 4 Preview order wording and attachment results
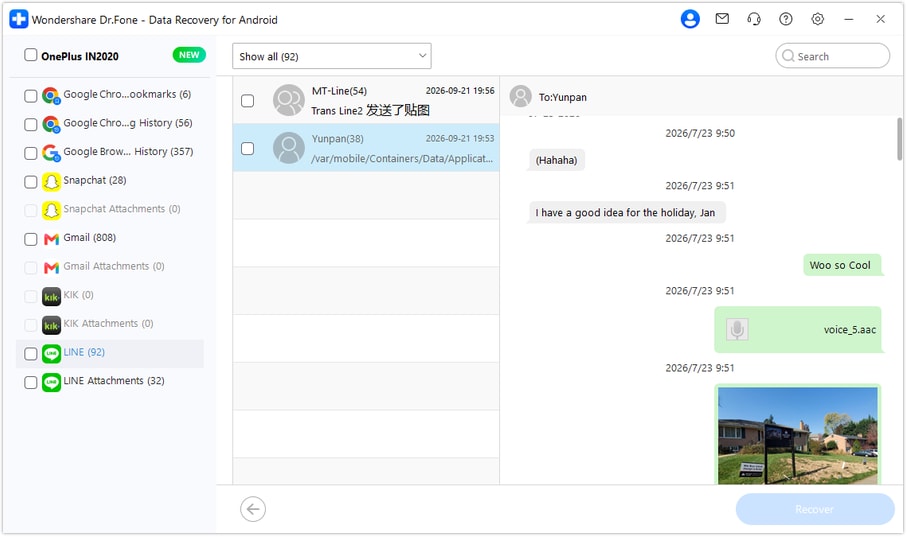
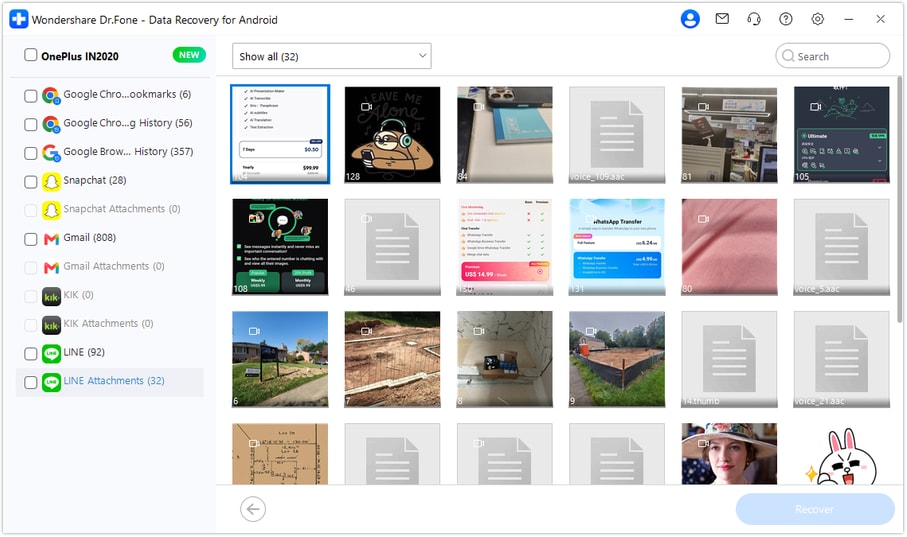
Select LINE in the results to review available conversations. Search or filter where those controls are available and inspect the order-related wording. Open LINE Attachments separately to browse available photos, videos and files, selecting the items you need for comparison.
Step 5 Save the chosen results to your computer
Click Recover and follow the prompts to choose a PC destination folder. Save the selected data and open the output to verify the retained wording and files. The results are stored on your computer, not imported into LINE or a photo-book editor.




Conclusion
The right photo is only part of a print order; the page instructions and accepted changes make it usable. Dr.Fone - Data Recovery (Android) helps supported Galaxy S22+ users preview available LINE messages, inspect attachments separately and save selected records to a PC without relying on a chat backup. Download Dr.Fone for Windows and begin the guided scan to look for the instructions and files that complete your reference set.
FAQ
1. Can I recover deleted LINE messages on Samsung Galaxy S22+ without a backup?
Dr.Fone - Data Recovery (Android) offers a device-scan route for supported Galaxy S22+ configurations. Use Advanced Recovery on Windows to inspect available LINE conversation and attachment results, then save the selected records to PC. The scan's findings determine what is recoverable.2. Will Export chat history recover the missing messages?
No. Export chat history preserves retained text for reading; it does not scan deleted records. An export created after the deletion cannot supply the missing portion merely because the conversation still appears in LINE.3. Does a text export include the original LINE photos and videos?
Do not use the text file as a substitute for the media itself. Inspect separately saved originals or available LINE Attachments results and open the actual files. A line referring to a photo is not the original photo.4. Can recovered attachments automatically rebuild my page layout?
No photo-book layout reconstruction is established by this workflow. Compare the files with available conversation wording yourself, and confirm any unresolved sequence with the printer. The attachment list is not an authoritative page order.5. Would Standard or Premium Backup fix a manually deleted order chat?
Standard Backup is relevant only when the necessary text was backed up before deletion and does not provide the same media coverage as Premium Backup. Premium Backup is not a historical rollback for a manually deleted chat. Neither turns a post-deletion backup into the no-backup recovery route described here.
 Add Wondershare Dr.Fone as a preferred source on Google