Recover photos, messages, WhatsApp, and more — no backup
needed.


 100% Security Verified | No Subscription Required | No Malware

 :

 ChatGPT
 Perplexity
 Gemini
 Claude
 Grok
A restoration project's photo may show a mark clearly but say nothing about whether it was there before the work or was part of a proposed repair. When the LINE explanation disappears, even finding the picture can be confusing if an old camera date places it months away from the discussion. Recovering deleted LINE messages on OPPO Find X9 Pro means looking for the words that explain the photograph, not deciding its meaning from a timeline position.
Dr.Fone - Data Recovery (Android) lets you look for available LINE exchanges and inspect discovered photos, videos and documents separately, then keep the useful items on your Windows PC. You can also make a brief, optional check for an already saved Google Photos copy in Recently Added. These are different sources: finding a retained image helps identify the reference, while a supported local LINE scan targets the missing discussion without a LINE backup.
In this article
Before you start
Match the exact Find X9 Pro entry
The support entry for OPPO Find X9 Pro is Android 16 with Kernel 6.12.23. Compare the connected phone's displayed model, Android and Kernel information with that exact entry. This specifically listed Android 16 configuration is distinct from Find X9 Ultra and does not establish support for every OPPO firmware. Follow the product's eligibility and access prompts for the connected device.
Preserve the device that held the LINE explanation
Keep the current LINE installation, login and local storage intact. Avoid clearing data, reinstalling, resetting, flashing or bootloader unlocking; none is a preparation step here. Prepare a Windows computer, a USB data cable and a private destination folder. Follow the recovery application's actual recognition and access instructions rather than a generic Root recipe.
Keep the image lookup optional
Use the Photos check only for an image already saved and backed up to your accessible Google Photos account. Do not enable a new backup, upload files or wait for fresh indexing on the recovery phone to make the scan possible. No separately saved picture or Google account is required for the LINE scanning route. A picture's availability and the message text's availability are independent.
Know the backup and output boundary
LINE Standard Backup is text-only and same-OS, with a suitable pre-deletion backup required for native restoration. A new Standard Backup after manual deletion or Premium Backup does not roll that deletion back. The no-backup workflow below scans remaining local data and saves selected found records to PC, not into LINE or Google Photos; expired originals absent locally are not promised.
Find a retained photo when the date sends you to the wrong place
A project image was independently saved and backed up before the loss, but its apparent photo date does not match when you added it.
Step 1 Use the existing Photos account, not a new upload
Open Google Photos with the account that already contains the saved project media. Check the account shown rather than assuming a picture missing from one account has been deleted. This check is for retained Google Photos content, not the contents of LINE's private local storage.
Step 2 Search Recently Added
At the bottom of the Android Google Photos app, tap Search and type Recently Added. Browse the matching collection for the reference image. Google documents this view as showing items in the order they were backed up, which can help when a downloaded or scanned image has a different photo timestamp.
Step 3 Separate discovery order from the project's chronology
Inspect the actual image, not just its place in the list. An old camera clock or another device's date settings can put a download under the wrong date, and Google notes that photos taken before 4 AM can be sorted into the previous day. Recently Added is a way to find an existing item, not proof of when the damage occurred or when a LINE instruction was sent. Leave timestamps and backup settings unchanged, then look for the actual explanation in LINE results.
- A backed-up photograph is a separate media copy, not a LINE chat backup. The absence of that copy is not a reason to postpone the supported device scan.
- Do not infer a before-work or after-work state from backup order. Use the actual written description when available, and keep an uncertain date uncertain.
Use the right date for the right question
| Reference you have | What it can help you do | What still needs checking |
|---|---|---|
| The photo appears in Recently Added | Locate an existing backed-up image despite an unexpected photo date | Backup order is not the date of the depicted damage or the LINE exchange |
| Only an old timestamp or a similar-looking image | Narrow candidate pictures for manual inspection | Do not label the picture before-work or after-work from appearance alone |
| A found LINE message describing the mark | Read whether the writer called it existing damage, a proposed treatment or a later observation | A proposal is not evidence that the repair was carried out |
| An available LINE attachment or work sheet | Compare the actual area, image variant and written file content | A filename or upload position does not replace the missing description |
| Useful text but no original photo | Preserve the discovered explanation to a PC | A missing full-resolution image cannot be reconstructed from text alone |
Common problems and fixes
Recently Added contains the picture, but the normal photo timeline seemed empty
Use the actual item you found and note the difference between photo date and backup order. You do not need to edit its timestamp or upload it again. Keep the LINE conversation date separate when reading scan results, especially if the picture was an older reference shared later.
There is no relevant Photos item
The image may not have been independently saved and backed up to that account. Do not turn on a new upload process just to satisfy this optional check. Proceed with the supported LINE scan and review found media as well as conversations; a missing library item does not tell you what that scan will find.
A scan result mentions the mark but not what happened next
Read any available reply or later clarification, using search and filters only where the interface offers them. Preserve the actual description, proposal and response separately rather than promoting one line into proof of completed work. If the photo is available in LINE Attachments, inspect its content independently.
How to use Dr.Fone - Data Recovery (Android)
Dr.Fone - Data Recovery (Android) gives you a way to look for the missing project explanation instead of relying on the date attached to a surviving picture. On a supported OPPO Find X9 Pro, its Windows-only Advanced Recovery mode scans selected LINE data, presents available conversations and separate attachment results, and saves your chosen records to a PC. Read the description of the mark, inspect the actual reference media and keep the useful material together for later review.
- No LINE backup required for the supported local scan: investigate the missing exchange rather than creating a new backup after the loss.
- Readable results plus independent media preview: review available wording, photos, clips and files without assuming they tell the same story.
- Focused PC output: select the relevant explanation and references instead of saving every unrelated project image.
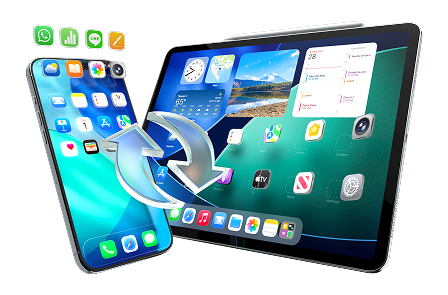
 Scan Android phones and tablets directly.
- Preview and recover only what you want.
- Supports WhatsApp, photos, videos, contacts, and more.
- Works with 6000+ Android devices.
Follow the official Advanced Recovery workflow
Step 1 Start the Windows Advanced Recovery workflow
Launch Dr.Fone, open Toolbox > Data Recovery and choose Android > Recover Android Data. Select Advanced Recovery and click Start Scan. Connect your supported Find X9 Pro by USB when prompted and follow the on-screen detection and access instructions.
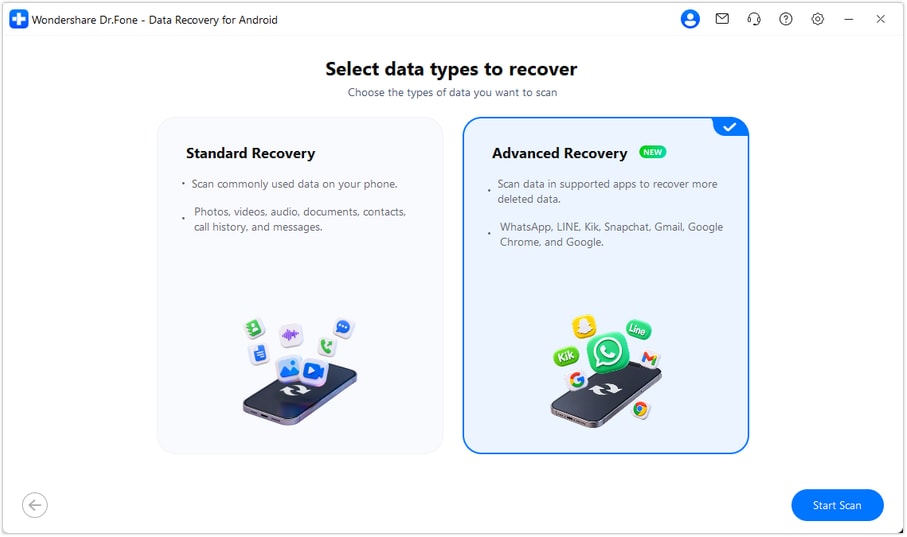
Step 2 Choose LINE data for scanning
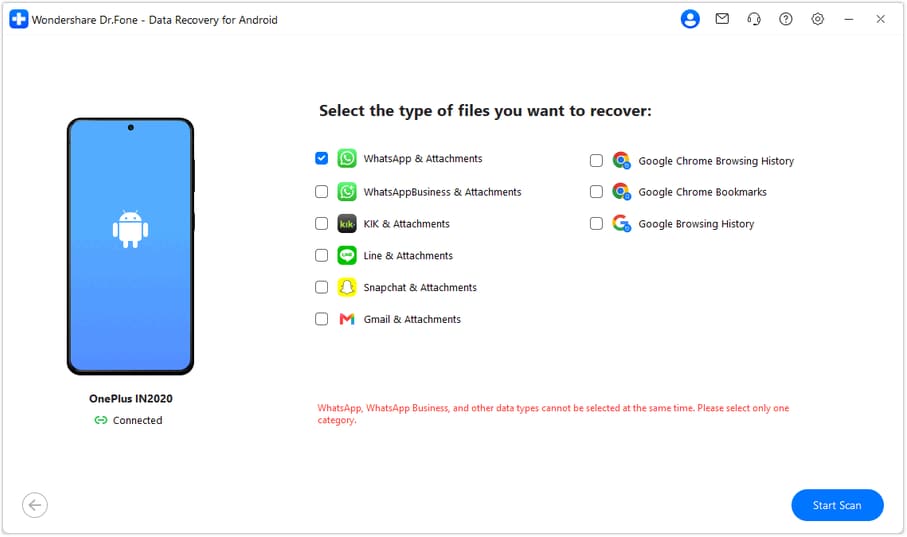
Select LINE in the supported categories and click Start Scan. The guide requires WhatsApp and WhatsApp Business to be scanned separately from the other data types if you also need those apps; do not select a WhatsApp result view for this LINE task.
Step 3 Allow the selected data scan to finish
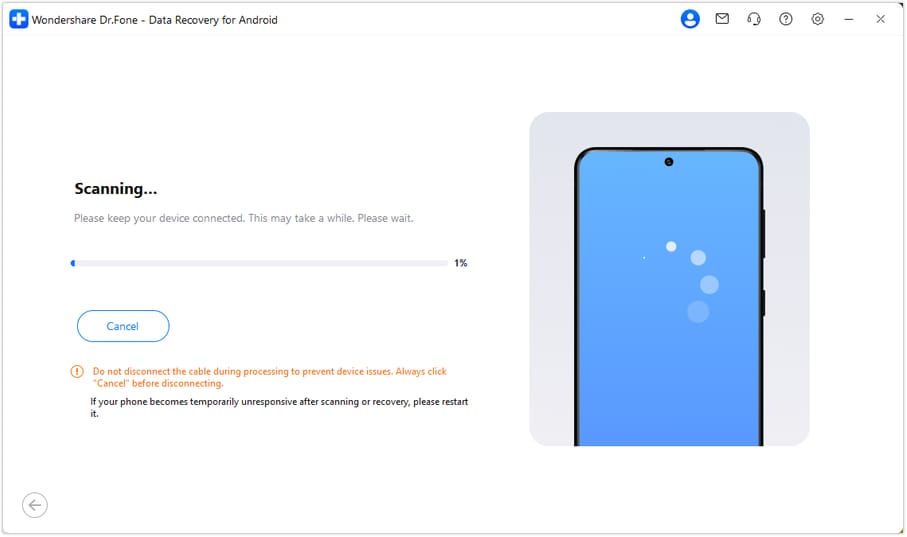
Keep the USB connection stable while Advanced Recovery scans. If you decide to stop, click Cancel before removing the cable. Follow the product's displayed restart instruction if the phone becomes temporarily unresponsive after scanning or recovery.
Step 4 Review the explanation and its visual references
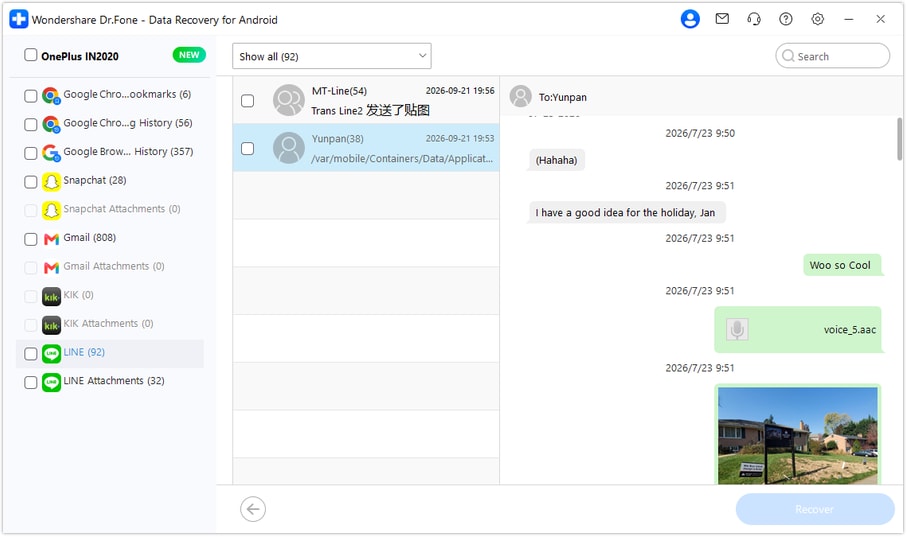
Open LINE in the results sidebar and read the available discussion about the relevant mark or work stage. Use search or filters where available. Switch to LINE Attachments to preview found photos, videos and files separately, then select the explanation and actual references that are useful.
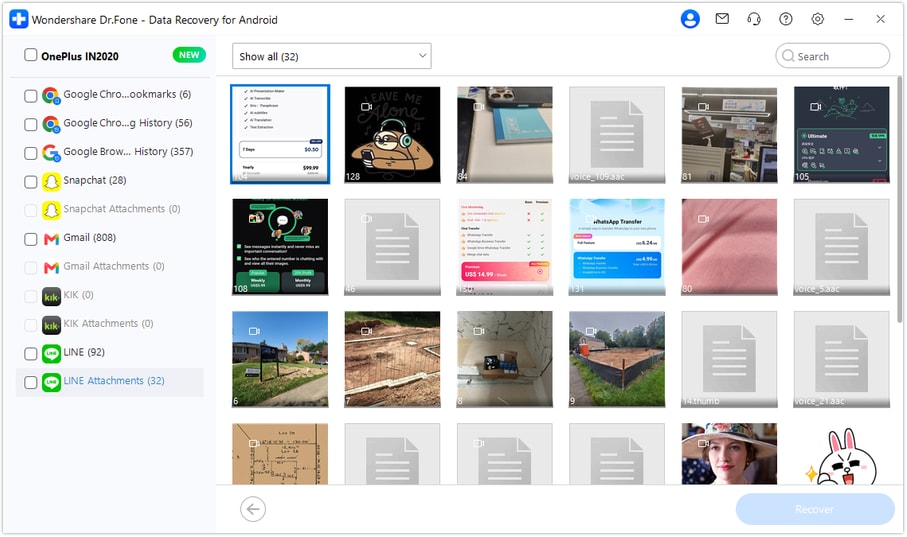
Step 5 Recover selected project records to PC
Click Recover, choose a computer folder through the on-screen prompts and save the selected results. Inspect the output on your PC. This creates a separate copy of the discoverable records; it does not restore the LINE thread or change a Photos timestamp.




Conclusion
Getting the image back is more useful when you can also read what it was meant to show. Dr.Fone - Data Recovery (Android) helps you look for available LINE descriptions, preview the actual photos and supporting files, and save selected project records to your PC. Download the Windows version, connect your supported OPPO Find X9 Pro and begin a focused LINE recovery scan.
FAQ
1. How do I recover deleted LINE messages on OPPO Find X9 Pro without a backup?
Use Dr.Fone - Data Recovery (Android) on Windows with the listed Find X9 Pro configuration: Android 16 and Kernel 6.12.23. Select Advanced Recovery, scan LINE, preview the available conversations and LINE Attachments, then save selected results to PC. Recovery depends on the data still discoverable on the connected phone.2. Why can a saved LINE photo appear under the wrong date in Google Photos?
Google explains that downloaded or scanned images can carry a different timestamp because of another device's date settings. Recently Added can help locate an existing backed-up image by backup order instead. Neither position establishes when the pictured event happened or when the image was discussed in LINE.3. Must I back up Google Photos before scanning LINE?
No. The Photos method is only an optional check for a separately saved, already backed-up image. The supported LINE device scan does not need a Google Photos account or a LINE backup. Do not start a fresh upload or change the recovery phone's data just to use that optional check.4. Will Dr.Fone return the original-resolution photo and all missing context?
Only results actually found and available for recovery can be selected. Review conversations and LINE Attachments independently: useful text may exist without the image, or vice versa. The output is saved to PC, and an unavailable or expired original is not guaranteed.
 Add Wondershare Dr.Fone as a preferred source on Google