100% Security Verified | No Subscription Required | No Malware

 :
: 
 ChatGPT
 Perplexity
 Gemini
 Claude
 Grok
Grok
Trying beta software is easier when you know where to look. This guide shows how to use android 17 beta features in a practical, phone-first way, with Android 17 beta features explained clearly so you can enroll an eligible device, install the update, and find the most relevant settings without taking unnecessary risks. Support can vary by phone model, region, and beta phase, so always back up your data first.
In this article
Before you start
Before installing any beta build, make sure your phone is supported and that you are comfortable with possible instability. Beta features often change between releases, and some options may appear only in later builds or through server-side rollouts.
A little preparation makes testing much safer and helps you avoid losing photos, messages, app data, or access to important daily tools.
Check device eligibility
Start by confirming that your phone model is part of the current Android beta program. The official Android Beta site is the best place to verify supported devices, but some brands may run their own separate beta programs.
- Beta access depends on device model and release stage.
- Regional rollout rules may delay or limit availability.
- Unsupported phones usually cannot access official beta builds.
Back up important data
Back up photos, videos, contacts, messages, and app files before you install anything. If you later leave the beta, some opt-out paths may erase local data.
- Sync contacts and calendar data to your Google account.
- Upload photos and videos to cloud storage.
- Save documents and downloads to another device or drive.
Prepare for the update
Make sure your phone has enough battery, storage, and a stable Wi-Fi connection. Sign in with the same Google account used for enrollment so the OTA update can appear normally.
- Charge the phone or keep it plugged in.
- Free up storage if system updates have failed before.
- Update core Google apps from the Play Store after installation.
Know the beta limits
Beta software is useful for testing, not guaranteed stability. You may see bugs, app crashes, overheating, or battery drain, even on eligible devices.

Method 1: Enroll and install the Android 17 beta update
This method is best if you have not installed the beta yet and want access to Android 17 beta features on a supported device.
-
Step 1 Check device eligibility
Confirm that your phone model is included in the active Android beta rollout. Eligibility can vary by brand, region, and release phase.
-
Step 2 Join the beta program
Open the official beta enrollment page for your device brand, sign in with the correct account, and opt in using the phone you want to test.
-
Step 3 Install the update
On your phone, go to Settings > System > Software update and download the beta build when it appears. Restart the device after installation to finish setup.
Enrollment is not always instant. If the update does not appear right away, give it time and check again later.
Method 2: Find and use new Android 17 beta settings
This method is for users who already updated but cannot immediately tell what changed. Many beta tools are hidden in standard settings areas rather than a single new menu.
-
Step 1 Start with key Settings areas
Open Settings and check System, Security and privacy, Notifications, Display, Battery, and Accessibility first. These are the most common places for new options to appear.
-
Step 2 Review supported system apps
Open apps such as Phone, Messages, Camera, Files, and Pixel or brand-specific tools. Some Android 17 beta new features are tied to updated apps instead of the main system menu.
-
Step 3 Enable optional tools carefully
If your build includes preview toggles or experimental options, turn on one feature at a time and test it for a day before changing more settings.
Feature names and menu locations may change between beta builds, so a setting shown in one release may move later.
Method 3: Test beta features safely on your phone
This method is best if you want to explore new tools without putting your daily setup or local files at unnecessary risk.
-
Step 1 Use a backup-first routine
Before changing feature settings, sync contacts, photos, files, and app data. This gives you a safer recovery path if the phone becomes unstable or needs a reset.
-
Step 2 Monitor performance after each change
Watch for battery drain, overheating, delayed notifications, app crashes, or lag for several hours after enabling a new option. This makes it easier to identify the cause of a problem.
-
Step 3 Roll back only if necessary
If the beta becomes unusable, review the official opt-out process for your device. Be aware that leaving a beta may wipe local data unless your device offers a supported no-wipe path.
If possible, use a secondary phone for testing instead of your main daily device.
Method comparison
Use this table to decide which path fits your situation best.
| Scenario | What you can do | Main limitation |
|---|---|---|
| Eligible phone with beta installed | Test new settings, system changes, and supported app features | You may still face bugs, battery drain, or missing features |
| Eligible phone not yet updated | Enroll in the beta and wait for the OTA update | The update may not appear immediately after enrollment |
| Unsupported phone | Read release notes and wait for stable rollout | Most Android 17 beta features will not be officially available |
Common problems and fixes
Beta builds can behave differently from stable Android, so these are the issues users most often run into when trying new features.
- My phone is not eligible for Android 17 beta: Check the official beta device list for your model and region. If your phone is unsupported, wait for a later beta phase or the final stable release.
- The beta update is not showing after enrollment: Restart the phone, connect to Wi-Fi, check for updates manually, and wait a few hours. Make sure you enrolled with the same account used on the device.
- I updated, but some features are missing: Review System, Privacy, Display, Battery, and app settings, then update Google system apps from the Play Store. Some features are limited by model, region, or build version.
- The beta caused crashes, lag, or battery drain: Turn off recently enabled features, update all apps, and restart the device. If issues continue, back up your data before considering an opt-out.
- I cannot tell whether a change is a real feature or a bug: Compare what you see with official release notes for your current build and test one change at a time.
Why this Wondershare tool may help
If beta testing leads to missing files, deleted media, or data loss after a reset, Dr.Fone - Data Recovery (Android) is the most relevant support option from Wondershare for this situation. It fits users who want Android 17 beta features explained clearly but also want a backup plan if testing goes wrong.
 Scan Android phones and tablets directly.
- Preview and recover only what you want.
- Supports WhatsApp, photos, videos, contacts, and more.
- Works with 6000+ Android devices.
How to Use Dr.Fone - Data Recovery (Android) for how to use android 17 beta features?
To know whether this tool fits your case, review the matched guide steps extracted for the feature: Recover Data from Android Device.
-
Step 1 Start Data Recovery Tool
To proceed with the Android data recovery, launch Wondershare Dr.Fone on your computer and navigate to Toolbox > Data Recovery .

-
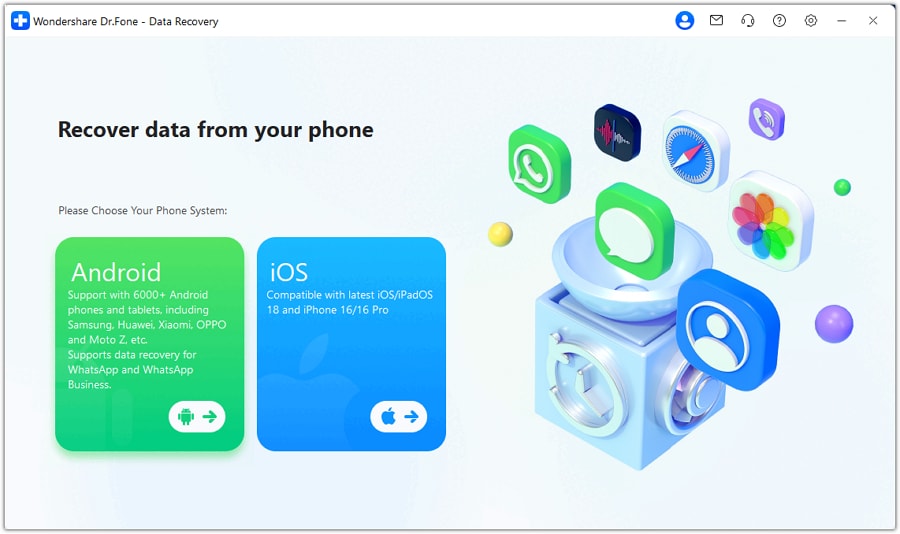
Step 2 Select Android For Recovery
As a new window pops up, select Android as your device type since you are looking to recover from Android .
-
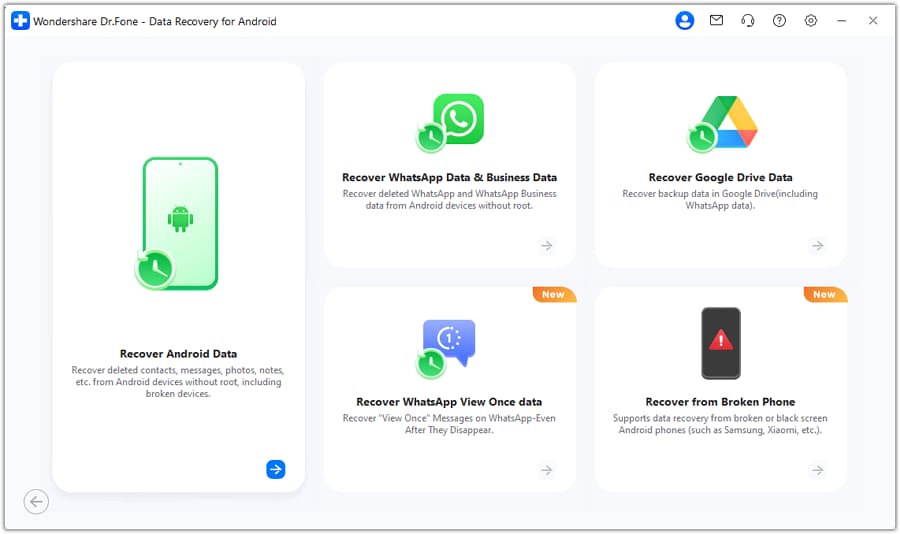
Step 3 Proceed To Select Function For Recovery
Once a new screen appears on the front, continue to select Recover Android Data from the available list.
- It can help recover data directly from Android devices after accidental deletion or failed beta-related issues.
- You can preview and restore selected items such as photos, videos, contacts, messages, and WhatsApp data.
If you try a beta build and later notice missing files, you can learn more about Dr.Fone - Data Recovery (Android) as a recovery option before assuming the data is gone for good.


Conclusion
The safest way to explore a new Android beta is to confirm compatibility, back up your phone, install the update carefully, and check the right settings areas for changes. With how to use android 17 beta features approached as a step-by-step test, you can try what is available on your device while reducing the usual beta risks.
If a feature seems missing, do not assume it failed to install. Availability often depends on device support, region, app version, and the exact beta build currently running on your phone.
FAQ
-
1. How do I use Android 17 beta features on my phone?
Enroll an eligible device in the Android beta program, install the beta update from Settings, and then review System, Privacy, Display, Battery, and supported app settings for new options. Availability depends on the device, region, and current beta build. -
2. What are the main Android 17 beta features explained simply?
In simple terms, beta features usually include early changes to privacy controls, customization, notifications, performance behavior, and supported Google apps. The exact list can change between beta releases, so what appears on one phone may differ on another. -
3. Which phones support Android 17 beta features?
Only phones included in the current beta rollout can access official Android 17 beta builds. Support depends on model, brand program participation, region, and release phase. -
4. Where can I find new Android 17 beta settings after updating?
Start with Settings sections such as System, Security and privacy, Notifications, Display, Battery, and Accessibility. Also check core apps like Phone, Messages, Camera, and Files because some features are app-based. -
5. Why are some Android 17 beta features missing on my device?
Missing features are often caused by model restrictions, regional limits, staged server-side rollouts, or differences between beta versions. Updating apps and waiting for a later build can help. -
6. Is it safe to install Android 17 beta on my main phone?
It can be safe for experienced testers, but it is not ideal for most daily-use phones. Beta software may cause crashes, battery drain, app incompatibility, or data loss when opting out, so backing up first is essential.
 Add Wondershare Dr.Fone as a preferred source on Google